> ## Documentation Index
> Fetch the complete documentation index at: https://docs.zenrows.com/llms.txt
> Use this file to discover all available pages before exploring further.
# How to Integrate ZenRows with Claude Managed Agents
> Connect ZenRows to Claude Managed Agents and let your autonomous agents execute long-running scraping tasks without getting blocked. Anthropic manages the agent loop, sandbox, and infrastructure, while ZenRows handles the scraping layer, feeding your agent with real-time web context.
## What is Claude Managed Agents?
Claude Managed Agents is Anthropic's fully managed agent harness, currently in beta. Instead of building your own agent loop, tool execution layer, and runtime infrastructure, you get a managed environment where Claude runs autonomously: reading files, executing bash commands, browsing the web, and calling external tools via MCP.
You define the agent once (model, system prompt, tools, MCP servers), create an environment (a cloud sandbox or your own infrastructure), and start sessions via API. Claude works through the task, streams events back in real time, and you can steer or interrupt mid-execution.
## Why connect ZenRows to Claude Managed Agents?
* **Get past bot protection the built-in fetch can't bypass.** Managed Agents has a native web fetch tool, but it won't get through site protections. ZenRows handles anti-bot evasion so the agent fetches the actual page every time.
* **Cleaner output for token-heavy sessions.** ZenRows returns structured Markdown instead of raw HTML. In long-running sessions with many tool calls, this keeps token usage lean and the model focused on what matters.
* **Interact with dynamic pages without writing scraping code.** Some sites only surface their data after scrolling, clicking through paginated results, selecting dropdown filters, or waiting for JavaScript to render. ZenRows' browser tools handle all of that. The agent describes the interaction in plain English, and ZenRows executes it.
## What you can build
* **Autonomous competitive intelligence reports.** Kick off a session that scrapes competitor pricing, product pages, and job boards across multiple sites, synthesizes findings, and writes a structured report to a file in the sandbox, all while you do other work.
* **Long-running data extraction pipelines.** Send the agent a list of URLs and instruct it to scrape each one, extract specific fields, and write structured output to a CSV. The session runs asynchronously and streams progress events as each page completes.
* **Research workflows with live web access.** Give the agent a research brief and let it autonomously decide which pages to visit, what to extract, and how to synthesize findings, using ZenRows to reliably fetch any source regardless of protection.
* **Scheduled monitoring via webhooks.** Combine sessions with Managed Agents' webhook support to build monitoring workflows that trigger on a schedule, scrape target pages via ZenRows, and push results to your system when done.
## Prerequisites
1. A Claude API key from the Anthropic Console.
2. Access to Claude Managed Agents (enabled by default for all API accounts).
3. A ZenRows API key from the [ZenRows dashboard](https://app.zenrows.com/builder).
## Getting started
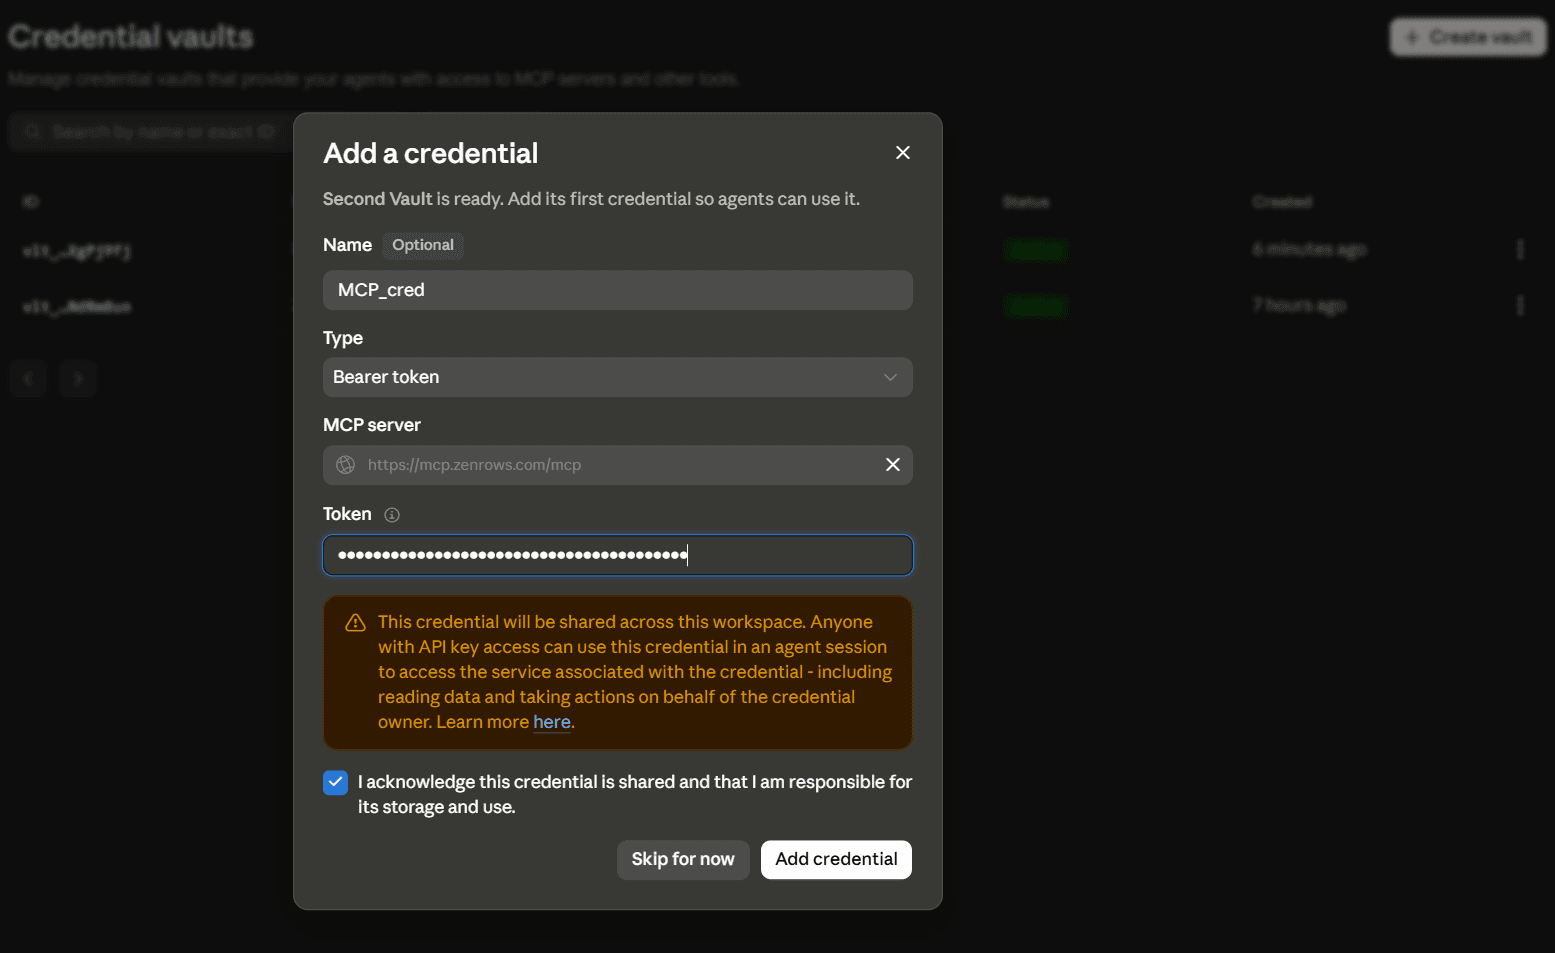
Sign in to your Anthropic Console dashboard, navigate to **Managed Agents** in the left sidebar, and click **Credential vaults**.
 Follow the on-screen instructions to create your vault:
* Name your vault.
* Set the **Type** to **Bearer token**.
* Paste the following ZenRows MCP connection URL as a Custom Server in the **MCP server** field:
```
https://mcp.zenrows.com/mcp
```
* Paste your ZenRows API key in the **Token** field.
* Acknowledge credential sharing and click **Add credential**.
Follow the on-screen instructions to create your vault:
* Name your vault.
* Set the **Type** to **Bearer token**.
* Paste the following ZenRows MCP connection URL as a Custom Server in the **MCP server** field:
```
https://mcp.zenrows.com/mcp
```
* Paste your ZenRows API key in the **Token** field.
* Acknowledge credential sharing and click **Add credential**.
 Anthropic matches credentials to MCP servers by URL at session time. As long as the URL in your vault matches the URL in the agent definition, the key is injected automatically and doesn't need to appear in the agent config.
Copy and save the **vault ID**. You'll need it when starting sessions via Anthropic's SDK or CLI.
Go to **Agents** and click **New agent**. Switch to the **JSON** tab and paste the following:
```json JSON theme={null}
{
"name": "Second research agent",
"description": "A web research agent",
"model": "claude-sonnet-4-6",
"system": "You are a research agent. You can fetch and extract content from any website on the internet, write code, run commands, and use connected tools to complete the user's task end to end.",
"mcp_servers": [
{
"name": "zenrows",
"url": "https://mcp.zenrows.com/mcp",
"type": "url"
}
],
"tools": [
{
"type": "agent_toolset_20260401"
},
{
"type": "mcp_toolset",
"mcp_server_name": "zenrows",
"default_config": {
"permission_policy": {
"type": "always_allow"
}
}
}
],
"skills": []
}
```
You can freely modify:
* `name` and `description` to match your use case
* `model` to any supported Claude model
* `system` to tailor the agent's behavior and tone
Don't change the `mcp_servers` block. The `name` and `url` fields must stay exactly as shown above so the vault credential you created in Step 1 can be matched and injected automatically. Any change to the URL will break the connection.
`always_allow` removes the approval gate so ZenRows tools execute automatically. The default is `always_ask`, which pauses the session before every tool call.
Click **Create agent** to save the agent, then copy and store the **agent ID** from the Console.
Go to **Environments** in the Console sidebar. If no environment exists yet, click **New environment**, name it, and save it. Then click **Edit** at the top-right of the environment, set **Type** to **Unrestricted**, and click **Save changes**.
Anthropic matches credentials to MCP servers by URL at session time. As long as the URL in your vault matches the URL in the agent definition, the key is injected automatically and doesn't need to appear in the agent config.
Copy and save the **vault ID**. You'll need it when starting sessions via Anthropic's SDK or CLI.
Go to **Agents** and click **New agent**. Switch to the **JSON** tab and paste the following:
```json JSON theme={null}
{
"name": "Second research agent",
"description": "A web research agent",
"model": "claude-sonnet-4-6",
"system": "You are a research agent. You can fetch and extract content from any website on the internet, write code, run commands, and use connected tools to complete the user's task end to end.",
"mcp_servers": [
{
"name": "zenrows",
"url": "https://mcp.zenrows.com/mcp",
"type": "url"
}
],
"tools": [
{
"type": "agent_toolset_20260401"
},
{
"type": "mcp_toolset",
"mcp_server_name": "zenrows",
"default_config": {
"permission_policy": {
"type": "always_allow"
}
}
}
],
"skills": []
}
```
You can freely modify:
* `name` and `description` to match your use case
* `model` to any supported Claude model
* `system` to tailor the agent's behavior and tone
Don't change the `mcp_servers` block. The `name` and `url` fields must stay exactly as shown above so the vault credential you created in Step 1 can be matched and injected automatically. Any change to the URL will break the connection.
`always_allow` removes the approval gate so ZenRows tools execute automatically. The default is `always_ask`, which pauses the session before every tool call.
Click **Create agent** to save the agent, then copy and store the **agent ID** from the Console.
Go to **Environments** in the Console sidebar. If no environment exists yet, click **New environment**, name it, and save it. Then click **Edit** at the top-right of the environment, set **Type** to **Unrestricted**, and click **Save changes**.
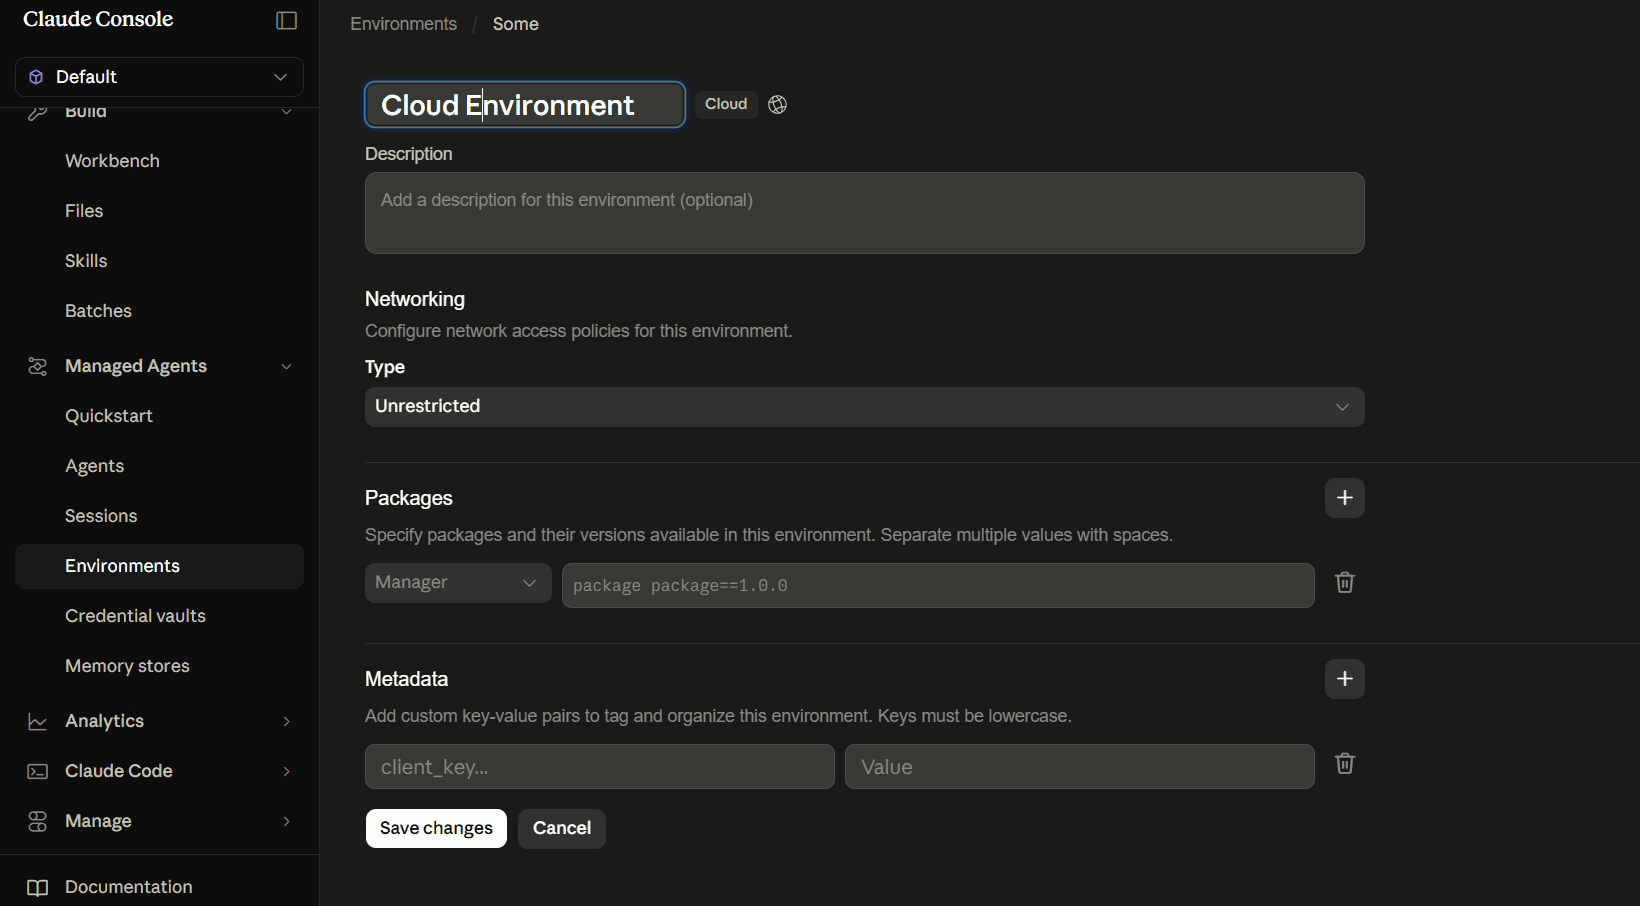 This allows the sandbox to reach the ZenRows MCP server at `mcp.zenrows.com` without any additional host configuration.
Without this setting, you'll see this error when starting a session:
```text wrap theme={null}
MCP server host(s) blocked by environment network policy: "zenrows" (mcp.zenrows.com).
Add these hosts to the environment's allowed_hosts, or set allow_mcp_servers=true.
```
Copy the **environment ID**. Environments are reusable across sessions and agents. Each session gets its own isolated sandbox, but the environment configuration is shared.
Before moving to code, confirm ZenRows is connected and working directly in the Console.
Go to **Sessions** in the left sidebar and click **New session**. Select your agent and environment, then send a prompt in the message field:
```text wrap theme={null}
Scrape https://www.scrapingcourse.com/antibot-challenge and summarize the page.
```
In the session transcript, you'll see:
* Each ZenRows tool call listed inline as it executes.
* The tool's parameters on the right panel, showing which options ZenRows used.
* The agent's final response once the session goes idle.
Since ZenRows is connected via the vault, there's no need to mention it in the prompt. The agent selects the right tool automatically.
```text Example output wrap expandable theme={null}
Here's a summary of the page at https://www.scrapingcourse.com/antibot-challenge:
🛡️ Antibot Challenge — ScrapingCourse.com
Page Title: Antibot Challenge
Purpose: This page is designed as a bot-detection challenge for learning...Truncated for brevity...
What Happens:
When you first visit, Cloudflare intercepts the request...Truncated for brevity
Once the verification passes (either automatically or via user interaction), the actual page content is revealed.
Page Content (after bypass):
The page simply displays a success message:
"You bypassed the Antibot challenge! 😄"
...Truncated for brevity...
In short, this is an educational demo page from ScrapingCourse.com that tests whether a scraping tool can bypass Cloudflare's anti-bot protection.
The ZenRows browser successfully passed the challenge and revealed the success message.
```
Once the session returns a clean summary, your integration is working. Copy your **Vault ID** from **Credential vaults**, then start sessions via the SDK or CLI.
With your agent ID, environment ID, and vault ID in hand, start a session and send a prompt programmatically. This guide uses the Python SDK. SDKs are also available for TypeScript, Go, Java, C#, PHP, and Ruby. You can also use the `ant` CLI for the same. See the Claude API official docs for CLI examples.
Install the SDK:
```bash theme={null}
pip install anthropic
```
Create a `.env` file in your project root:
```bash .env theme={null}
ANTHROPIC_API_KEY=
AGENT_ID=
ENVIRONMENT_ID=
VAULT_ID=
```
Then run the session:
```python theme={null} theme={null}
# pip install anthropic python-dotenv
import os
import anthropic
from dotenv import load_dotenv
load_dotenv()
# Initialize the Anthropic client with your API key
client = anthropic.Anthropic(api_key=os.environ["ANTHROPIC_API_KEY"])
# Create a new session for the agent, specifying the agent ID, environment ID, and vault ID
session = client.beta.sessions.create(
agent=os.environ["AGENT_ID"],
environment_id=os.environ["ENVIRONMENT_ID"],
vault_ids=[os.environ["VAULT_ID"]],
title="Website research",
betas=["managed-agents-2026-04-01"],
)
# Stream events from the session and send a user message to the agent to start the task
with client.beta.sessions.events.stream(
session.id,
betas=["managed-agents-2026-04-01"],
) as stream:
client.beta.sessions.events.send(
session.id,
events=[
{
"type": "user.message",
"content": [
{
"type": "text",
"text": "Scrape https://www.scrapingcourse.com/ecommerce/, get the top 3 best deals based on price and ratings, and return a summary of the findings.",
}
],
}
],
betas=["managed-agents-2026-04-01"],
)
# Process the events from the stream, printing messages from the agent and tool usage
for event in stream:
match event.type:
case "agent.message":
for block in event.content:
print(block.text, end="")
case "agent.tool_use":
print(f"\n[Tool: {event.name}]")
case "session.status_idle":
print("\n\nAgent finished.")
break
```
While your session is running, you can monitor it live in the Console. Go to **Sessions** in the left sidebar, and you'll see the active session with its transcript, tool calls, and status updating in real time.
## Troubleshooting
### httpx.ReadError: An existing connection was forcibly closed
The streaming connection dropped mid-response due to network instability. The session itself completed successfully on Anthropic's side. Try on a more stable connection, or disable any VPN, firewall, or antivirus that may be cutting long-lived HTTP connections.
### MCP server host(s) blocked by environment network policy
Your environment's networking policy is blocking outbound access to `mcp.zenrows.com`. Go to **Environments** in the Console, open your environment, click **Edit**, and set the networking Type to **Unrestricted**. Save the environment and restart your session.
### mcp\_authentication\_failed\_error in session events
The vault credential URL doesn't match the `url` declared in `mcp_servers`. Both must be exactly `https://mcp.zenrows.com/mcp`. Check for trailing slashes or typos in either field.
### mcp\_connection\_failed\_error in session events
The ZenRows MCP server was unreachable. The session continues without ZenRows tools. Check your network settings and confirm the endpoint is reachable. The connection is retried automatically on the next session interaction.
### Session starts but agent doesn't call ZenRows tools
Confirm that the `mcp_toolset` entry references `mcp_server_name: zenrows` and that `zenrows` matches the `name` in your `mcp_servers` array exactly. A mismatch means the toolset is declared but not linked to any server.
### Agent pauses before every ZenRows tool call
The MCP toolset defaults to `always_ask`, which pauses the session and waits for your approval before each tool call. Set `always_allow` on the toolset to let ZenRows tools execute automatically:
```json JSON theme={null}
{
"type": "mcp_toolset",
"mcp_server_name": "zenrows",
"default_config": {
"permission_policy": {
"type": "always_allow"
}
}
}
```
### Tools.1.permission\_policy: Extra inputs are not permitted
The `permission_policy` field must be nested inside `default_config`, not placed directly on the toolset object. See the correct structure above.
### Missing beta header error
All Managed Agents requests require `managed-agents-2026-04-01` in the beta header. The Python and TypeScript SDKs accept this via the `betas` parameter on each call. If you're using raw HTTP, add `anthropic-beta: managed-agents-2026-04-01` to every request header.
## Further reading
* Claude Managed Agents overview
* MCP connector
* Authenticate with vaults
* Session event stream
* [ZenRows MCP documentation](/integrations/mcp/mcp-overview)
## FAQ (Frequently asked questions)
Yes. Environments are created independently of agents and referenced by ID at session creation. Multiple sessions from different agents can all reference the same environment configuration. Each session still gets its own isolated sandbox (sessions do not share filesystem state), but the environment definition (networking, pre-installed packages, sandbox type) is shared.
It's currently in beta. All requests require the `managed-agents-2026-04-01` beta header. See the overview for current access details.
Agent definitions are reusable and workspace-scoped. Putting credentials there would expose them to anyone with API access to the workspace. Vaults keep secrets separate: the agent definition stays clean, and each session injects the right credential at runtime.
Yes. Vault credentials apply to every thread in a multiagent session. Any agent whose definition declares the ZenRows MCP server will authenticate with the vault credentials provided at session creation. See Multiagent sessions.
Yes. Use the `default_config` and `configs` pattern on the `mcp_toolset` entry. Set `default_config.enabled` to `false` and explicitly enable only the tools you want:
```json JSON theme={null}
{
"type": "mcp_toolset",
"mcp_server_name": "zenrows",
"default_config": {"enabled": false},
"configs": [
{"name": "zenrows_scrape", "enabled": true}
]
}
```
Connecting ZenRows via MCP is free. However, there are two separate costs from running an agent that calls the ZenRows MCP. Anthropic bills for the session itself based on token usage across all model calls. ZenRows bills separately against your subscription for each tool call: `scrape` calls use Universal Scraper API credits and `browser_*` calls use Scraping Browser credits. Monitor ZenRows usage on your [ZenRows Analytics page](https://app.zenrows.com/analytics).
Yes. Claude Managed Agents supports self-hosted sandboxes to meet compliance or data residency requirements. The ZenRows MCP setup is identical: ZenRows connects via the remote HTTP server regardless of where the sandbox runs. See Self-hosted sandboxes.
This allows the sandbox to reach the ZenRows MCP server at `mcp.zenrows.com` without any additional host configuration.
Without this setting, you'll see this error when starting a session:
```text wrap theme={null}
MCP server host(s) blocked by environment network policy: "zenrows" (mcp.zenrows.com).
Add these hosts to the environment's allowed_hosts, or set allow_mcp_servers=true.
```
Copy the **environment ID**. Environments are reusable across sessions and agents. Each session gets its own isolated sandbox, but the environment configuration is shared.
Before moving to code, confirm ZenRows is connected and working directly in the Console.
Go to **Sessions** in the left sidebar and click **New session**. Select your agent and environment, then send a prompt in the message field:
```text wrap theme={null}
Scrape https://www.scrapingcourse.com/antibot-challenge and summarize the page.
```
In the session transcript, you'll see:
* Each ZenRows tool call listed inline as it executes.
* The tool's parameters on the right panel, showing which options ZenRows used.
* The agent's final response once the session goes idle.
Since ZenRows is connected via the vault, there's no need to mention it in the prompt. The agent selects the right tool automatically.
```text Example output wrap expandable theme={null}
Here's a summary of the page at https://www.scrapingcourse.com/antibot-challenge:
🛡️ Antibot Challenge — ScrapingCourse.com
Page Title: Antibot Challenge
Purpose: This page is designed as a bot-detection challenge for learning...Truncated for brevity...
What Happens:
When you first visit, Cloudflare intercepts the request...Truncated for brevity
Once the verification passes (either automatically or via user interaction), the actual page content is revealed.
Page Content (after bypass):
The page simply displays a success message:
"You bypassed the Antibot challenge! 😄"
...Truncated for brevity...
In short, this is an educational demo page from ScrapingCourse.com that tests whether a scraping tool can bypass Cloudflare's anti-bot protection.
The ZenRows browser successfully passed the challenge and revealed the success message.
```
Once the session returns a clean summary, your integration is working. Copy your **Vault ID** from **Credential vaults**, then start sessions via the SDK or CLI.
With your agent ID, environment ID, and vault ID in hand, start a session and send a prompt programmatically. This guide uses the Python SDK. SDKs are also available for TypeScript, Go, Java, C#, PHP, and Ruby. You can also use the `ant` CLI for the same. See the Claude API official docs for CLI examples.
Install the SDK:
```bash theme={null}
pip install anthropic
```
Create a `.env` file in your project root:
```bash .env theme={null}
ANTHROPIC_API_KEY=
AGENT_ID=
ENVIRONMENT_ID=
VAULT_ID=
```
Then run the session:
```python theme={null} theme={null}
# pip install anthropic python-dotenv
import os
import anthropic
from dotenv import load_dotenv
load_dotenv()
# Initialize the Anthropic client with your API key
client = anthropic.Anthropic(api_key=os.environ["ANTHROPIC_API_KEY"])
# Create a new session for the agent, specifying the agent ID, environment ID, and vault ID
session = client.beta.sessions.create(
agent=os.environ["AGENT_ID"],
environment_id=os.environ["ENVIRONMENT_ID"],
vault_ids=[os.environ["VAULT_ID"]],
title="Website research",
betas=["managed-agents-2026-04-01"],
)
# Stream events from the session and send a user message to the agent to start the task
with client.beta.sessions.events.stream(
session.id,
betas=["managed-agents-2026-04-01"],
) as stream:
client.beta.sessions.events.send(
session.id,
events=[
{
"type": "user.message",
"content": [
{
"type": "text",
"text": "Scrape https://www.scrapingcourse.com/ecommerce/, get the top 3 best deals based on price and ratings, and return a summary of the findings.",
}
],
}
],
betas=["managed-agents-2026-04-01"],
)
# Process the events from the stream, printing messages from the agent and tool usage
for event in stream:
match event.type:
case "agent.message":
for block in event.content:
print(block.text, end="")
case "agent.tool_use":
print(f"\n[Tool: {event.name}]")
case "session.status_idle":
print("\n\nAgent finished.")
break
```
While your session is running, you can monitor it live in the Console. Go to **Sessions** in the left sidebar, and you'll see the active session with its transcript, tool calls, and status updating in real time.
## Troubleshooting
### httpx.ReadError: An existing connection was forcibly closed
The streaming connection dropped mid-response due to network instability. The session itself completed successfully on Anthropic's side. Try on a more stable connection, or disable any VPN, firewall, or antivirus that may be cutting long-lived HTTP connections.
### MCP server host(s) blocked by environment network policy
Your environment's networking policy is blocking outbound access to `mcp.zenrows.com`. Go to **Environments** in the Console, open your environment, click **Edit**, and set the networking Type to **Unrestricted**. Save the environment and restart your session.
### mcp\_authentication\_failed\_error in session events
The vault credential URL doesn't match the `url` declared in `mcp_servers`. Both must be exactly `https://mcp.zenrows.com/mcp`. Check for trailing slashes or typos in either field.
### mcp\_connection\_failed\_error in session events
The ZenRows MCP server was unreachable. The session continues without ZenRows tools. Check your network settings and confirm the endpoint is reachable. The connection is retried automatically on the next session interaction.
### Session starts but agent doesn't call ZenRows tools
Confirm that the `mcp_toolset` entry references `mcp_server_name: zenrows` and that `zenrows` matches the `name` in your `mcp_servers` array exactly. A mismatch means the toolset is declared but not linked to any server.
### Agent pauses before every ZenRows tool call
The MCP toolset defaults to `always_ask`, which pauses the session and waits for your approval before each tool call. Set `always_allow` on the toolset to let ZenRows tools execute automatically:
```json JSON theme={null}
{
"type": "mcp_toolset",
"mcp_server_name": "zenrows",
"default_config": {
"permission_policy": {
"type": "always_allow"
}
}
}
```
### Tools.1.permission\_policy: Extra inputs are not permitted
The `permission_policy` field must be nested inside `default_config`, not placed directly on the toolset object. See the correct structure above.
### Missing beta header error
All Managed Agents requests require `managed-agents-2026-04-01` in the beta header. The Python and TypeScript SDKs accept this via the `betas` parameter on each call. If you're using raw HTTP, add `anthropic-beta: managed-agents-2026-04-01` to every request header.
## Further reading
* Claude Managed Agents overview
* MCP connector
* Authenticate with vaults
* Session event stream
* [ZenRows MCP documentation](/integrations/mcp/mcp-overview)
## FAQ (Frequently asked questions)
Yes. Environments are created independently of agents and referenced by ID at session creation. Multiple sessions from different agents can all reference the same environment configuration. Each session still gets its own isolated sandbox (sessions do not share filesystem state), but the environment definition (networking, pre-installed packages, sandbox type) is shared.
It's currently in beta. All requests require the `managed-agents-2026-04-01` beta header. See the overview for current access details.
Agent definitions are reusable and workspace-scoped. Putting credentials there would expose them to anyone with API access to the workspace. Vaults keep secrets separate: the agent definition stays clean, and each session injects the right credential at runtime.
Yes. Vault credentials apply to every thread in a multiagent session. Any agent whose definition declares the ZenRows MCP server will authenticate with the vault credentials provided at session creation. See Multiagent sessions.
Yes. Use the `default_config` and `configs` pattern on the `mcp_toolset` entry. Set `default_config.enabled` to `false` and explicitly enable only the tools you want:
```json JSON theme={null}
{
"type": "mcp_toolset",
"mcp_server_name": "zenrows",
"default_config": {"enabled": false},
"configs": [
{"name": "zenrows_scrape", "enabled": true}
]
}
```
Connecting ZenRows via MCP is free. However, there are two separate costs from running an agent that calls the ZenRows MCP. Anthropic bills for the session itself based on token usage across all model calls. ZenRows bills separately against your subscription for each tool call: `scrape` calls use Universal Scraper API credits and `browser_*` calls use Scraping Browser credits. Monitor ZenRows usage on your [ZenRows Analytics page](https://app.zenrows.com/analytics).
Yes. Claude Managed Agents supports self-hosted sandboxes to meet compliance or data residency requirements. The ZenRows MCP setup is identical: ZenRows connects via the remote HTTP server regardless of where the sandbox runs. See Self-hosted sandboxes.