> ## Documentation Index
> Fetch the complete documentation index at: https://docs.zenrows.com/llms.txt
> Use this file to discover all available pages before exploring further.
# How to Integrate MuleSoft with ZenRows
> Connect ZenRows web scraping capabilities to MuleSoft Anypoint Platform workflows for enterprise-grade automated data extraction pipelines.
Connect ZenRows' web scraping capabilities to your MuleSoft workflows through the Anypoint platform. This integration enables automated data extraction from websites directly within your existing automation processes.
## What Is MuleSoft?
MuleSoft is a no-code/low-code automation platform that connects and exchanges data between various applications and systems. One of its core components is the MuleSoft Anypoint platform, which enables users to integrate systems via an API-focused approach.
## Use Cases
Here are some use cases of MuleSoft-ZenRows integration.
* **Competitor monitoring**: Schedule automated scraping of competitor websites to track pricing, product changes, or content updates.
* **Sentiment analysis**: Gather product reviews data from various sources with ZenRows and analyze their sentiment using LLM integration.
* **Demand forecasting**: Use cron jobs to scrape demand signals from retail and ecommerce sites with ZenRows. Calculate trends and historical moves with JavaScript via Anypoint's Scripting module. Store time-series data in a database and forecast anticipated demand using LLM.
* **Best deal recommendation**: Collect product data from various platforms with ZenRows and use an LLM to analyze key points, such as price, demand history, reviews, and ratings, to recommend the best deal for your customers.
## Initial Integration Steps via Anypoint Platform
The best way to integrate MuleSoft with ZenRows is via Anypoint. This guide assumes that you already have an Anypoint account with the Anypoint Studio downloaded and installed.
We'll create a scraping workflow that extracts data from an Amazon product page and stores it in a JSON file.
### Step 1: Create and deploy a ZenRows API Spec
1. Log in to MuleSoft via the Anypoint platform.
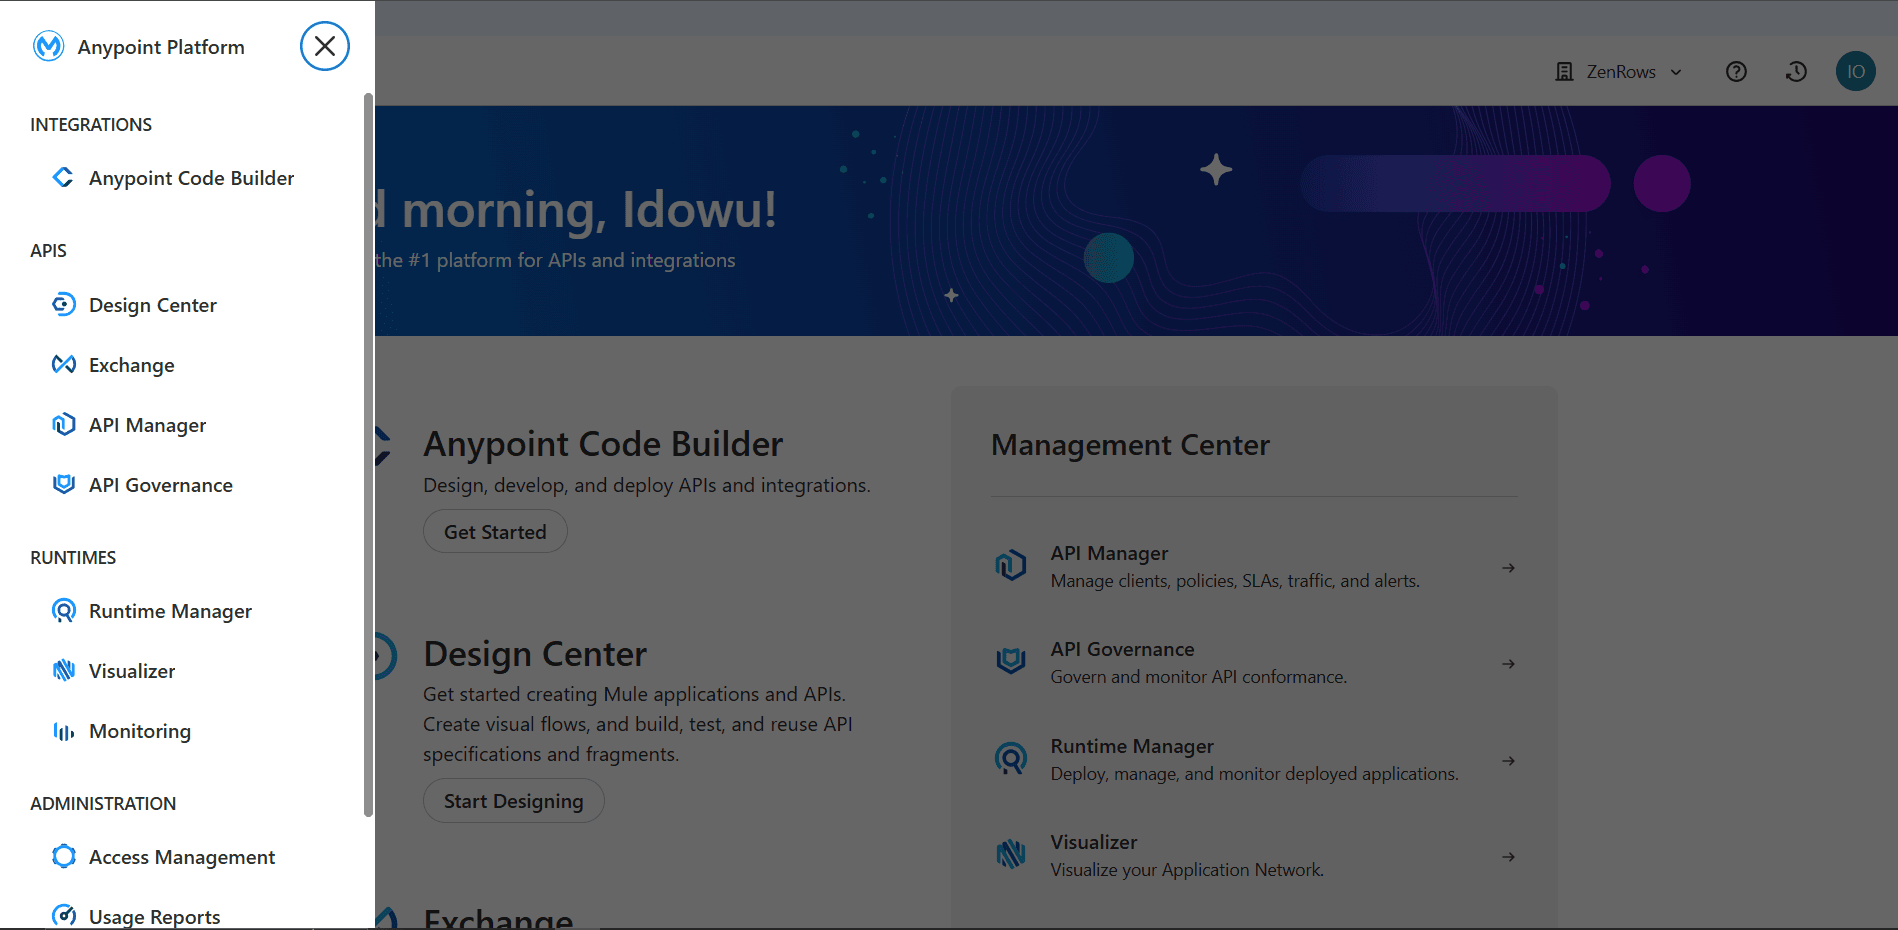
2. Click the icon at the top left and go to **Design Center**.
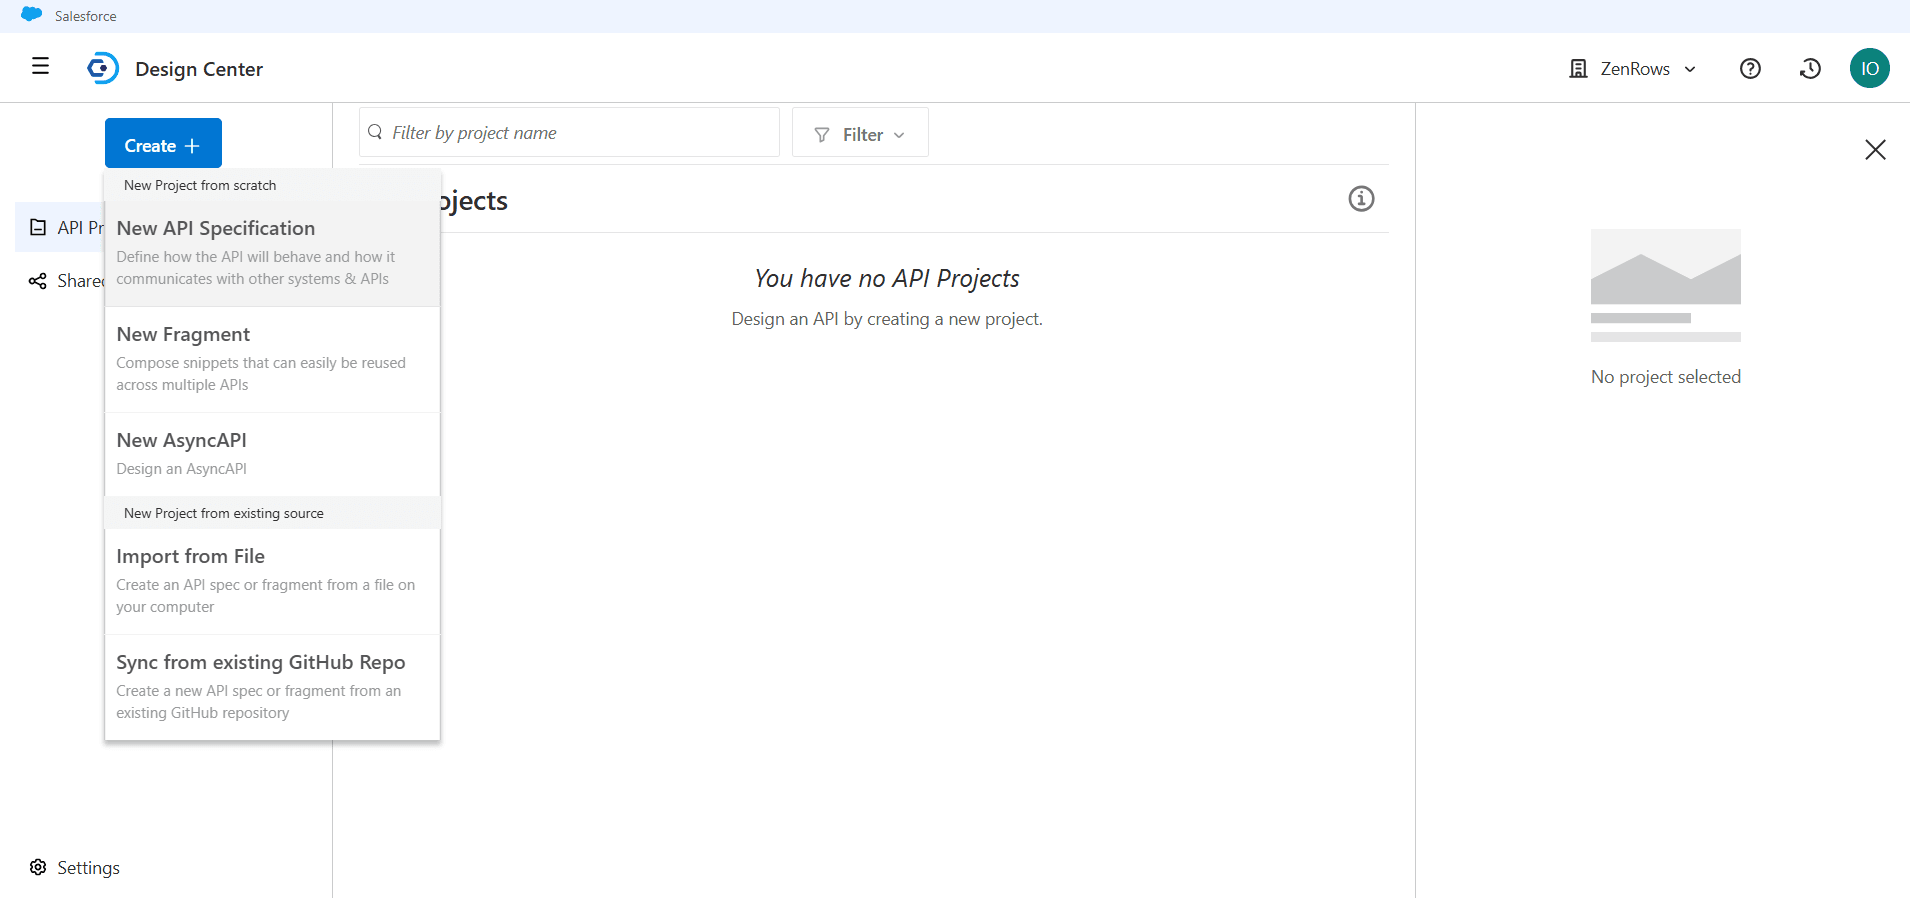
 3. Click `Create +` at the top-left and select **New API Specification**.
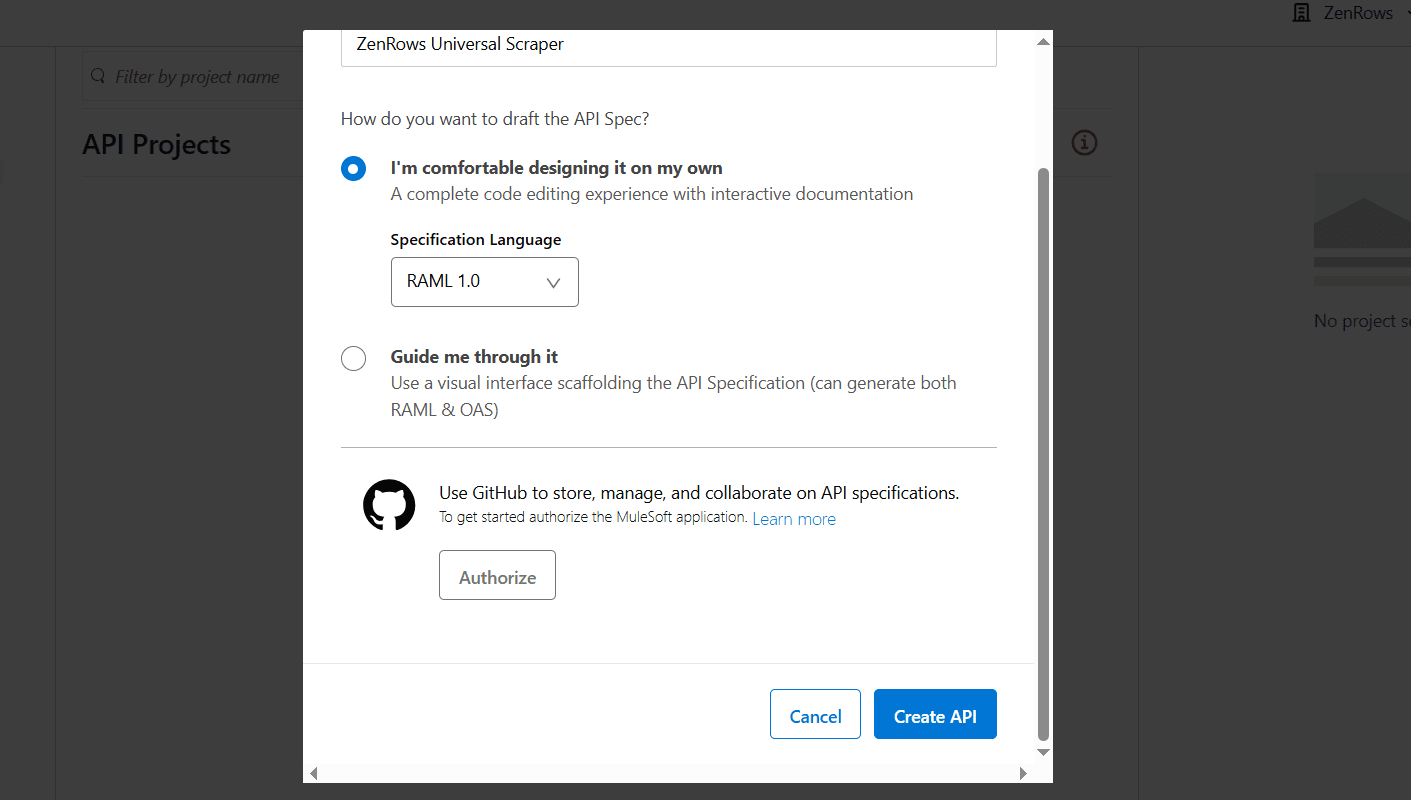
 4. Give your project a name (e.g., ZenRows Universal Scraper). Then click `Create API`.
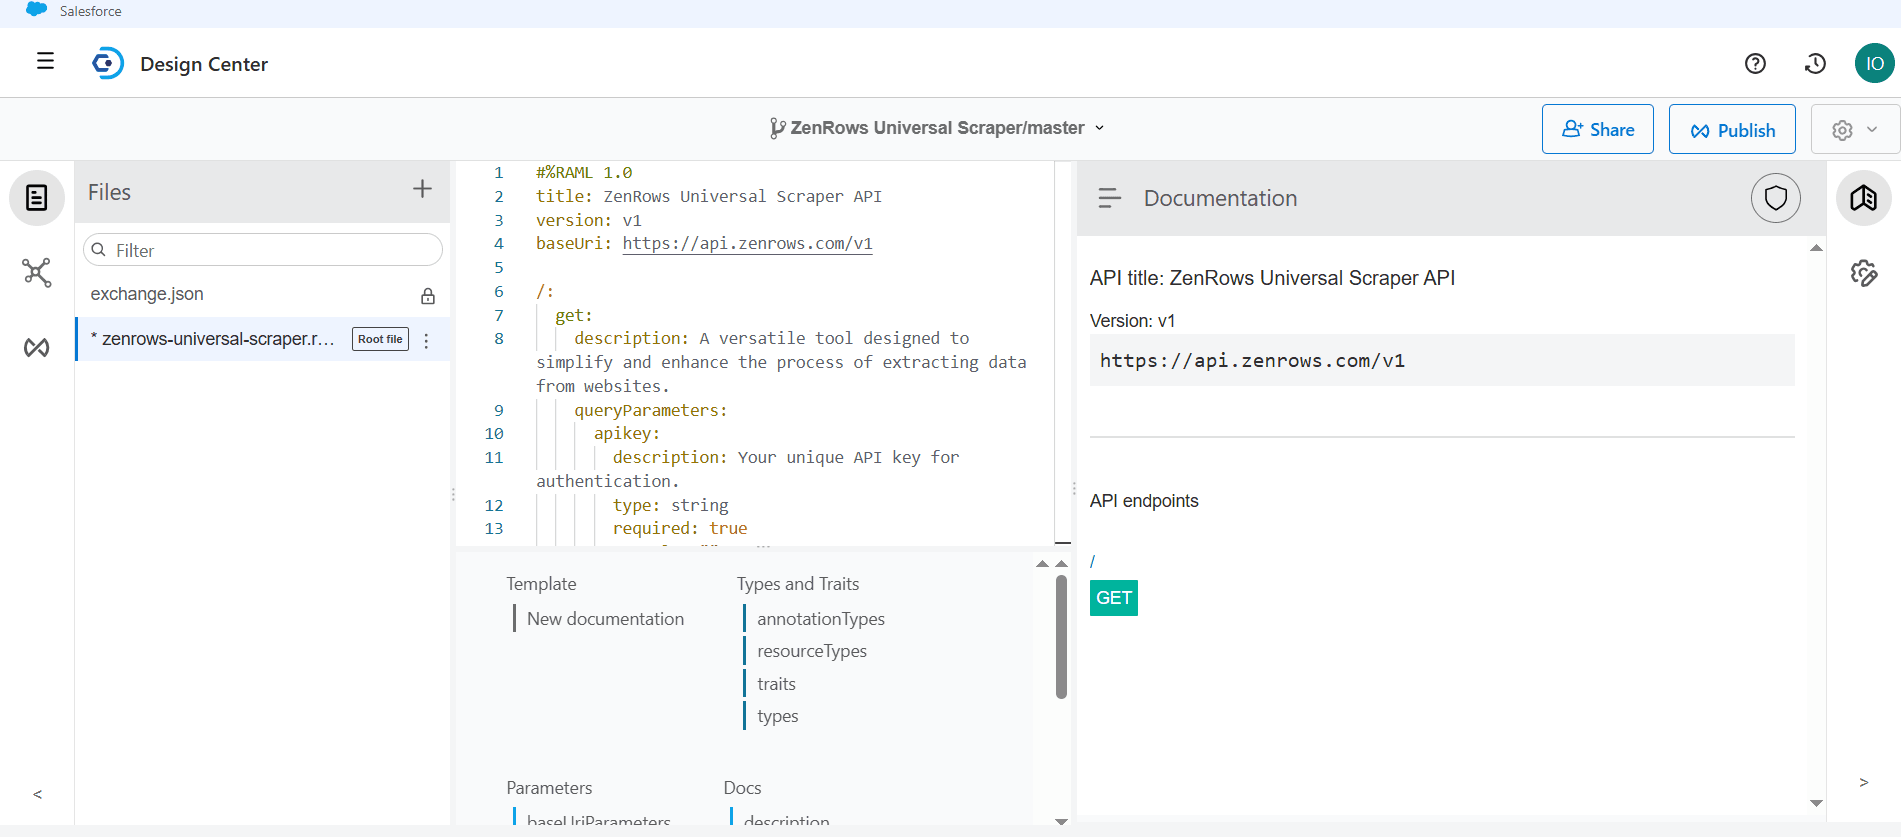
 5. The Design Center creates a new `zenrows-universal-scraper.raml` file. Remove the existing content in the **RAML** code box and paste the following ZenRows RAML configuration inside the code box. This configuration defines the required [specs and parameters](/universal-scraper-api/api-reference#parameter-overview) to use the ZenRows Universal Scraper API:
```yml RAML theme={null}
#%RAML 1.0
title: ZenRows Universal Scraper API
version: v1
baseUri: https://api.zenrows.com/v1
/:
get:
description: A versatile tool designed to simplify and enhance the process of extracting data from websites.
queryParameters:
apikey:
description: Your unique API key for authentication.
type: string
required: true
example: ""
url:
description: The URL of the page you want to scrape.
type: string
required: true
example: ""
js_render:
description: Enable JavaScript rendering with a headless browser.
type: boolean
required: false
default: false
example: true
premium_proxy:
description: Use residential IPs to bypass anti-bot protection.
type: boolean
required: false
default: false
example: true
proxy_country:
description: Set the country of the IP used for the request (requires Premium Proxies).
type: string
required: false
example: ""
autoparse:
description: Automatically parse the content of supported websites and return the data as a JSON object.
type: boolean
required: false
default: false
example: false
response_type:
description: Convert HTML to other formats (Markdown, Plaintext, PDF).
type: string
required: false
example: markdown
wait:
description: Wait a fixed number of milliseconds after page load.
type: integer
required: false
example: 0
wait_for:
description: Wait for a specific CSS Selector to appear in the DOM before returning content.
type: string
required: false
example: ""
css_extractor:
description: Extract specific elements using CSS selectors.
type: string
required: false
example: ""
json_response:
description: Capture network requests in JSON format, including XHR or Fetch data.
type: boolean
required: false
default: false
example: true
js_instructions:
description: Execute custom JavaScript on the page to interact with elements, scroll, click buttons, or manipulate content.
type: string
required: false
example: ""
original_status:
description: Return the original HTTP status code from the target page.
type: boolean
required: false
default: false
example: true
outputs:
description: Specify which data types to extract from the scraped HTML.
type: string
required: false
example: "tables,hashtags,emails"
block_resources:
description: Block specific resources (images, fonts, etc.)
type: string
required: false
example: "image,media,font"
screenshot:
description: Capture an above-the-fold screenshot of the page.
type: boolean
required: false
default: false
example: false
screenshot_selector:
description: Capture a screenshot of a specific element using CSS Selector.
type: string
required: false
example: ""
screenshot_fullpage:
description: Capture a full-page screenshot.
type: boolean
required: false
default: false
example: true
screenshot_format:
description: Choose the screenshot format.
type: string
required: false
example: "png"
screenshot_quality:
description: For JPEG format, set quality from 1 to 100.
type: integer
required: false
example: 70
responses:
200:
body:
application/json:
example: |
{
"success": true,
"data": ""
}
```
6. Click `Get`. Then, click `Publish` at the top right.
5. The Design Center creates a new `zenrows-universal-scraper.raml` file. Remove the existing content in the **RAML** code box and paste the following ZenRows RAML configuration inside the code box. This configuration defines the required [specs and parameters](/universal-scraper-api/api-reference#parameter-overview) to use the ZenRows Universal Scraper API:
```yml RAML theme={null}
#%RAML 1.0
title: ZenRows Universal Scraper API
version: v1
baseUri: https://api.zenrows.com/v1
/:
get:
description: A versatile tool designed to simplify and enhance the process of extracting data from websites.
queryParameters:
apikey:
description: Your unique API key for authentication.
type: string
required: true
example: ""
url:
description: The URL of the page you want to scrape.
type: string
required: true
example: ""
js_render:
description: Enable JavaScript rendering with a headless browser.
type: boolean
required: false
default: false
example: true
premium_proxy:
description: Use residential IPs to bypass anti-bot protection.
type: boolean
required: false
default: false
example: true
proxy_country:
description: Set the country of the IP used for the request (requires Premium Proxies).
type: string
required: false
example: ""
autoparse:
description: Automatically parse the content of supported websites and return the data as a JSON object.
type: boolean
required: false
default: false
example: false
response_type:
description: Convert HTML to other formats (Markdown, Plaintext, PDF).
type: string
required: false
example: markdown
wait:
description: Wait a fixed number of milliseconds after page load.
type: integer
required: false
example: 0
wait_for:
description: Wait for a specific CSS Selector to appear in the DOM before returning content.
type: string
required: false
example: ""
css_extractor:
description: Extract specific elements using CSS selectors.
type: string
required: false
example: ""
json_response:
description: Capture network requests in JSON format, including XHR or Fetch data.
type: boolean
required: false
default: false
example: true
js_instructions:
description: Execute custom JavaScript on the page to interact with elements, scroll, click buttons, or manipulate content.
type: string
required: false
example: ""
original_status:
description: Return the original HTTP status code from the target page.
type: boolean
required: false
default: false
example: true
outputs:
description: Specify which data types to extract from the scraped HTML.
type: string
required: false
example: "tables,hashtags,emails"
block_resources:
description: Block specific resources (images, fonts, etc.)
type: string
required: false
example: "image,media,font"
screenshot:
description: Capture an above-the-fold screenshot of the page.
type: boolean
required: false
default: false
example: false
screenshot_selector:
description: Capture a screenshot of a specific element using CSS Selector.
type: string
required: false
example: ""
screenshot_fullpage:
description: Capture a full-page screenshot.
type: boolean
required: false
default: false
example: true
screenshot_format:
description: Choose the screenshot format.
type: string
required: false
example: "png"
screenshot_quality:
description: For JPEG format, set quality from 1 to 100.
type: integer
required: false
example: 70
responses:
200:
body:
application/json:
example: |
{
"success": true,
"data": ""
}
```
6. Click `Get`. Then, click `Publish` at the top right.
 7. Keep the **Asset Version** and **API Version** as `1.0.0` and `v1`, respectively. Under **LifeCycle State**, select **Stable**.
8. Click `Publish to Exchange`.
9. Close the confirmation modal.
7. Keep the **Asset Version** and **API Version** as `1.0.0` and `v1`, respectively. Under **LifeCycle State**, select **Stable**.
8. Click `Publish to Exchange`.
9. Close the confirmation modal.
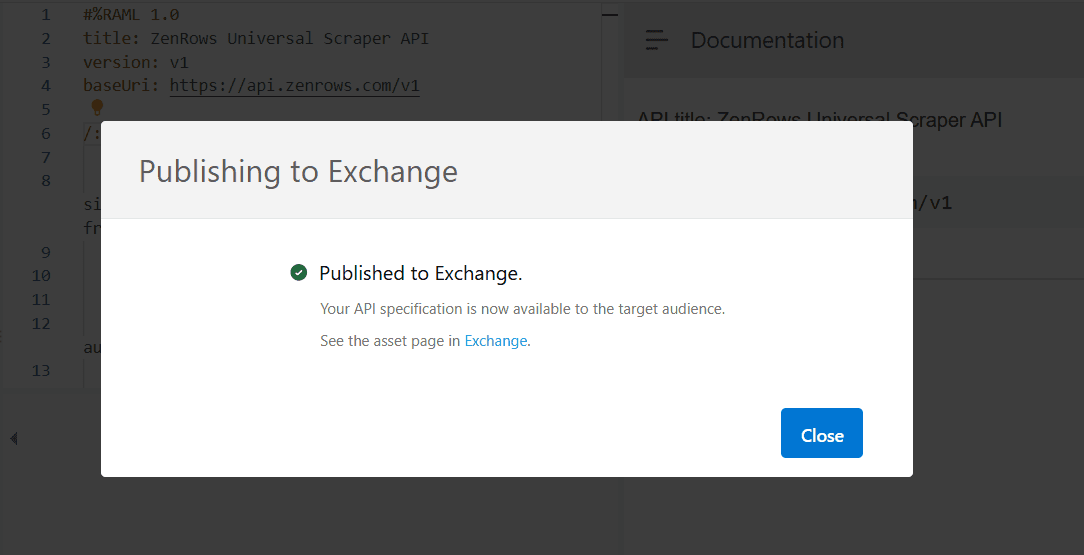 10. Click the menu icon at the top left and go to **Exchange** to view your published API spec in the Anypoint Exchange marketplace.
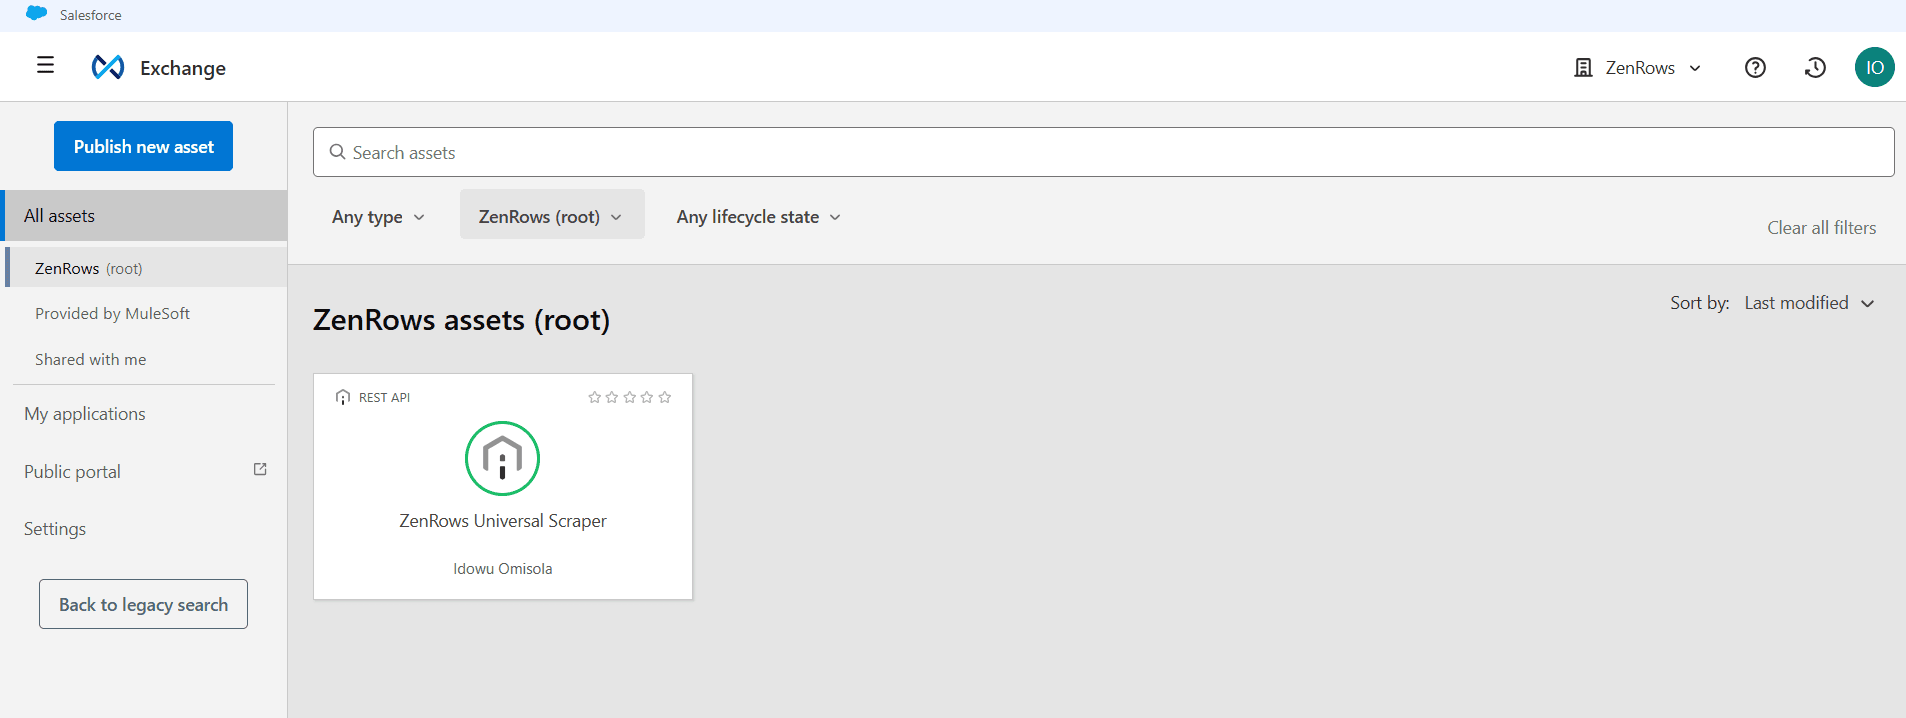 ### Step 2: Import the ZenRows API Spec into Anypoint Studio
1. Launch the Anypoint Studio on your machine.
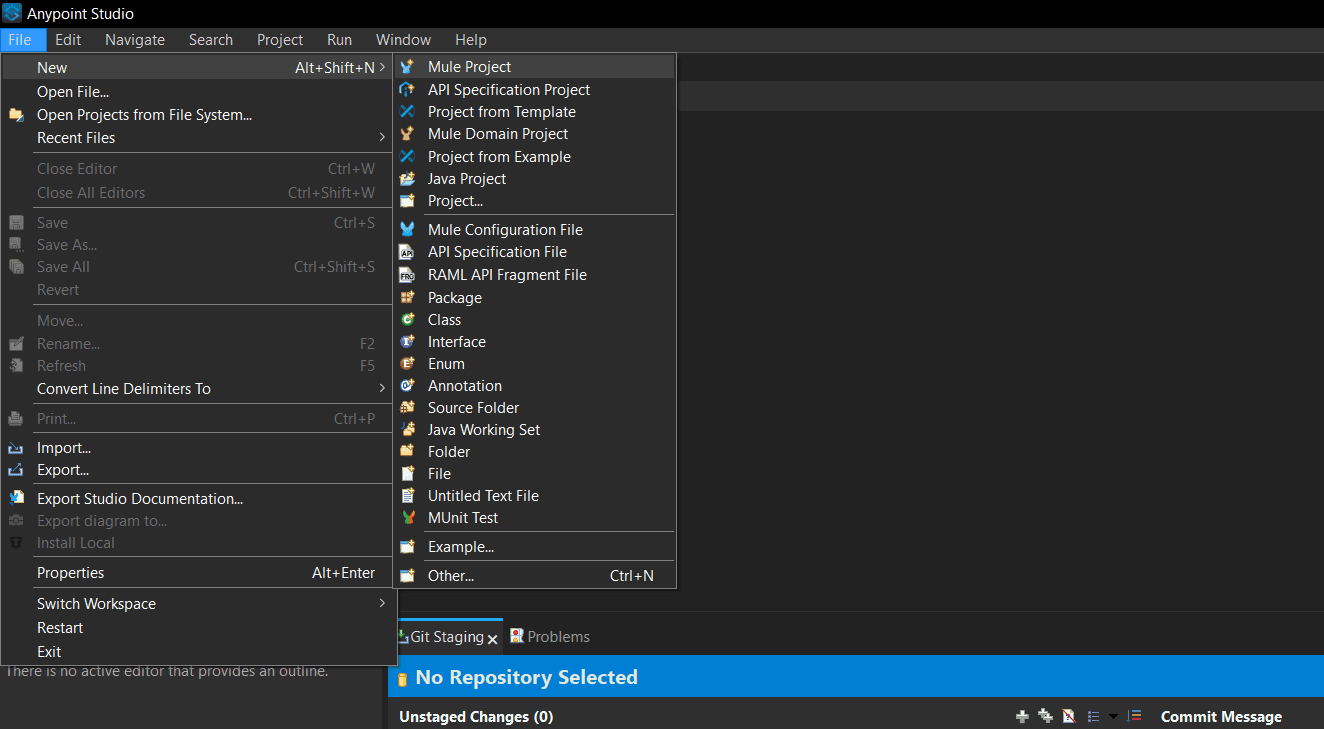
2. Click `File` at the top left and go to **New**. Then, select **Mule Project**.
### Step 2: Import the ZenRows API Spec into Anypoint Studio
1. Launch the Anypoint Studio on your machine.
2. Click `File` at the top left and go to **New**. Then, select **Mule Project**.
 3. Give your project a name (e.g., Scraper) and click `Finish`.
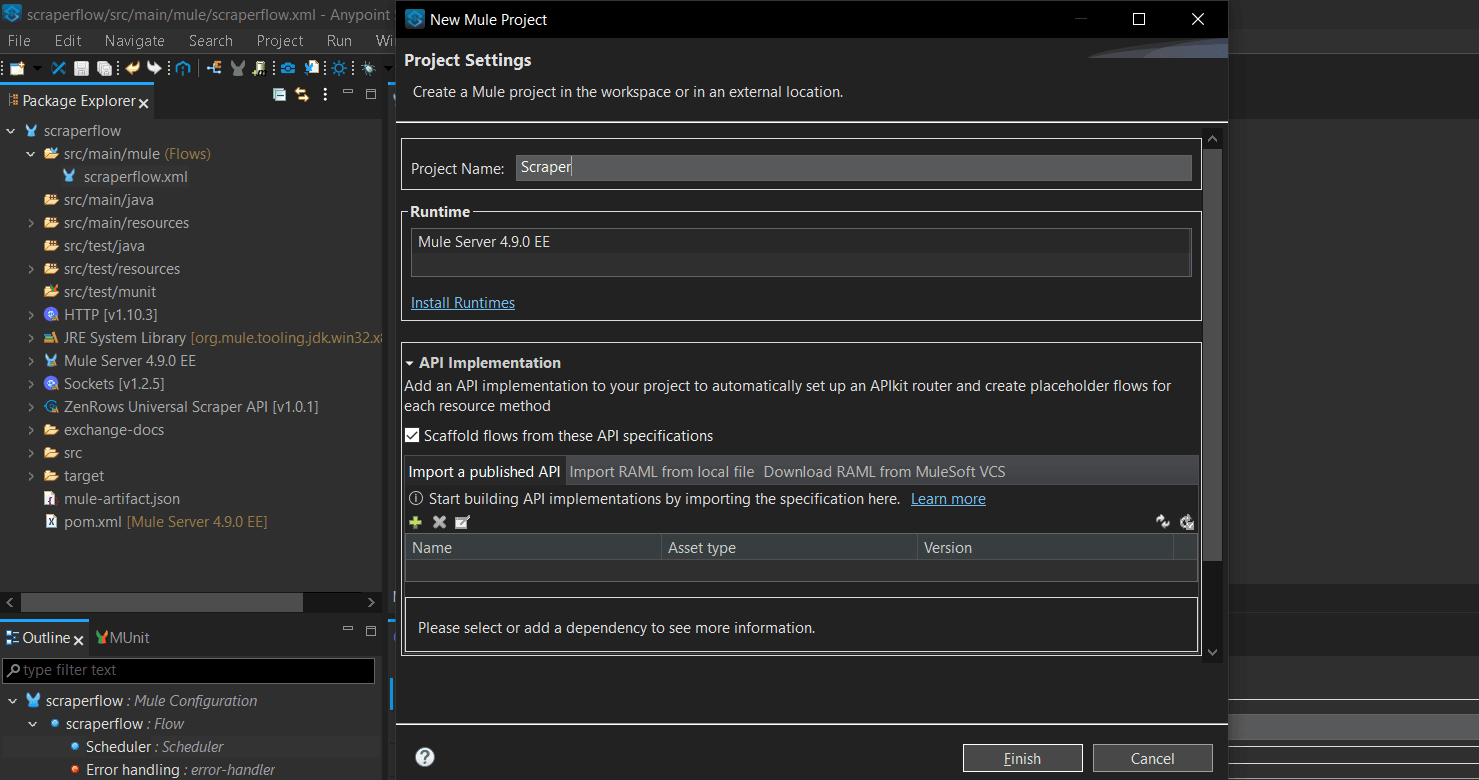 4. Double-click the `` (`scraperflow.xml`) file on the left sidebar to load the flow canvas.
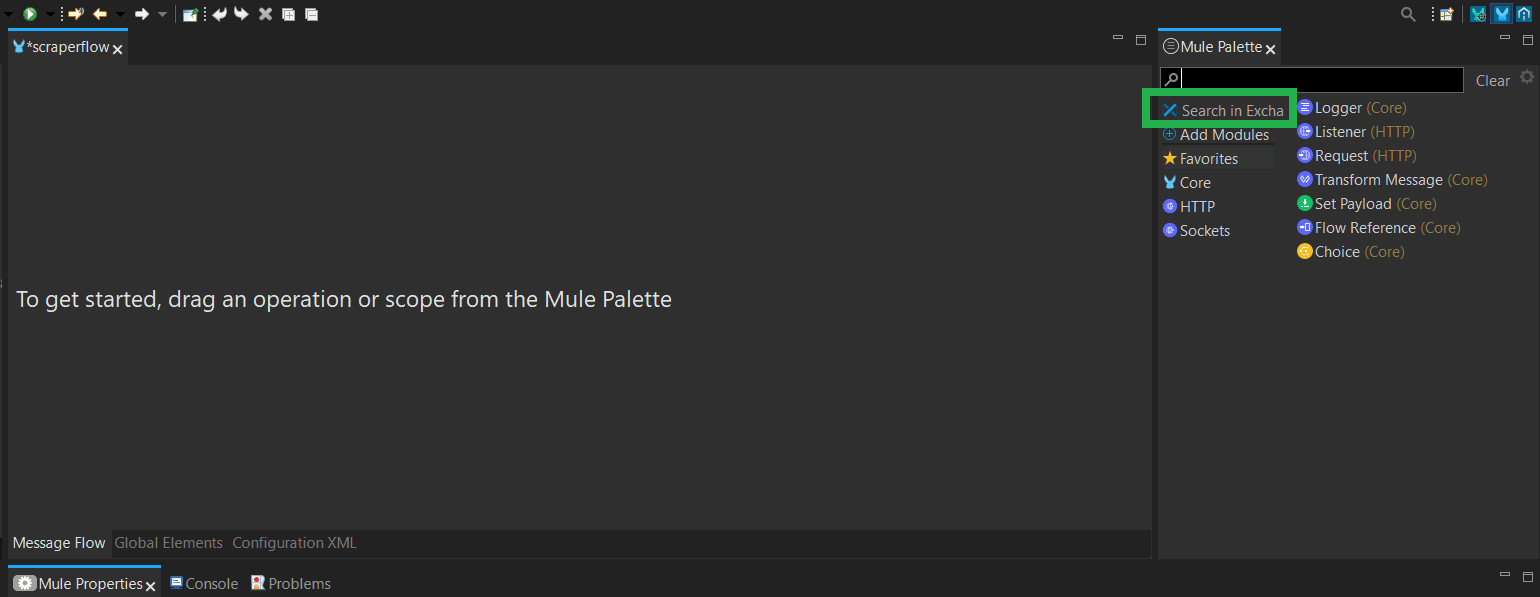
5. From the Mule Palette on the right side of the canvas, click `Search in Exchange`.
4. Double-click the `` (`scraperflow.xml`) file on the left sidebar to load the flow canvas.
5. From the Mule Palette on the right side of the canvas, click `Search in Exchange`.
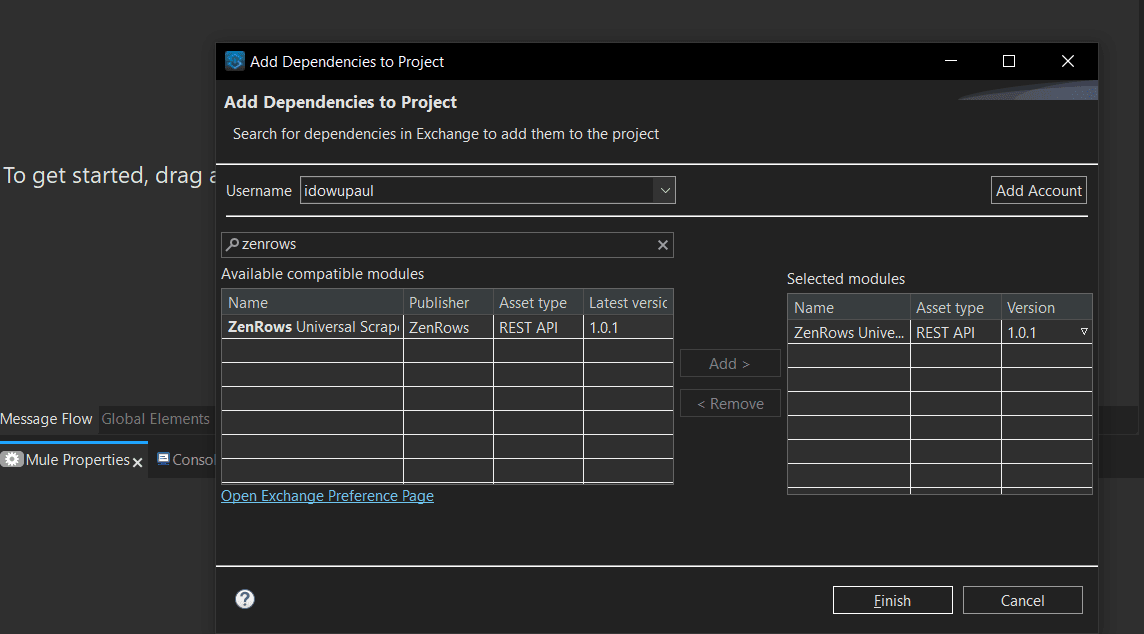
 6. Click `Add Account` and authenticate Anypoint Studio with your Anypoint account if you haven't done so already.
7. Search for ZenRows in the search bar and select the **ZenRows Universal Scraper API** spec from the result table.
8. Click `Add` to load the API spec into the Anypoint Studio Mule Palette.
9. Click `Finish`.
6. Click `Add Account` and authenticate Anypoint Studio with your Anypoint account if you haven't done so already.
7. Search for ZenRows in the search bar and select the **ZenRows Universal Scraper API** spec from the result table.
8. Click `Add` to load the API spec into the Anypoint Studio Mule Palette.
9. Click `Finish`.
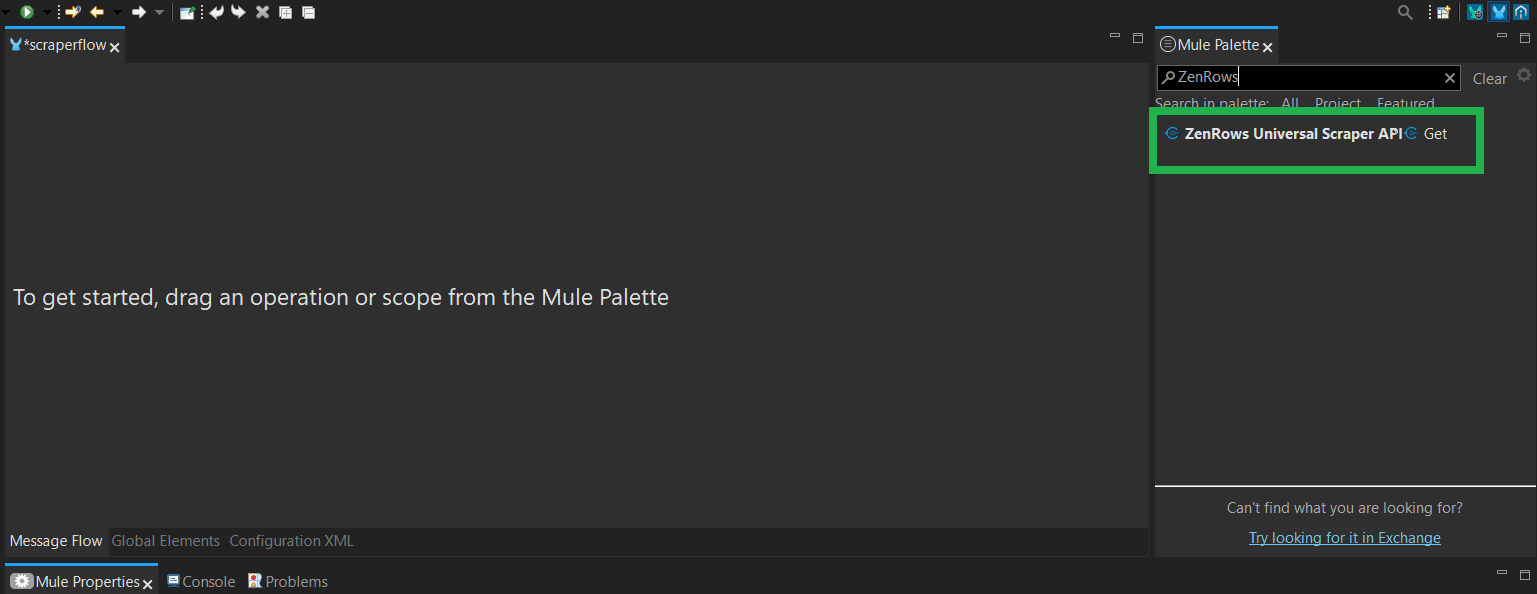
 10. To test the import, search for ZenRows via the Mule Palette search bar. The ZenRows Universal Scraper spec now appears in the Mule Palette.
 ### Step 3: Create the scraping workflow in Anypoint Studio
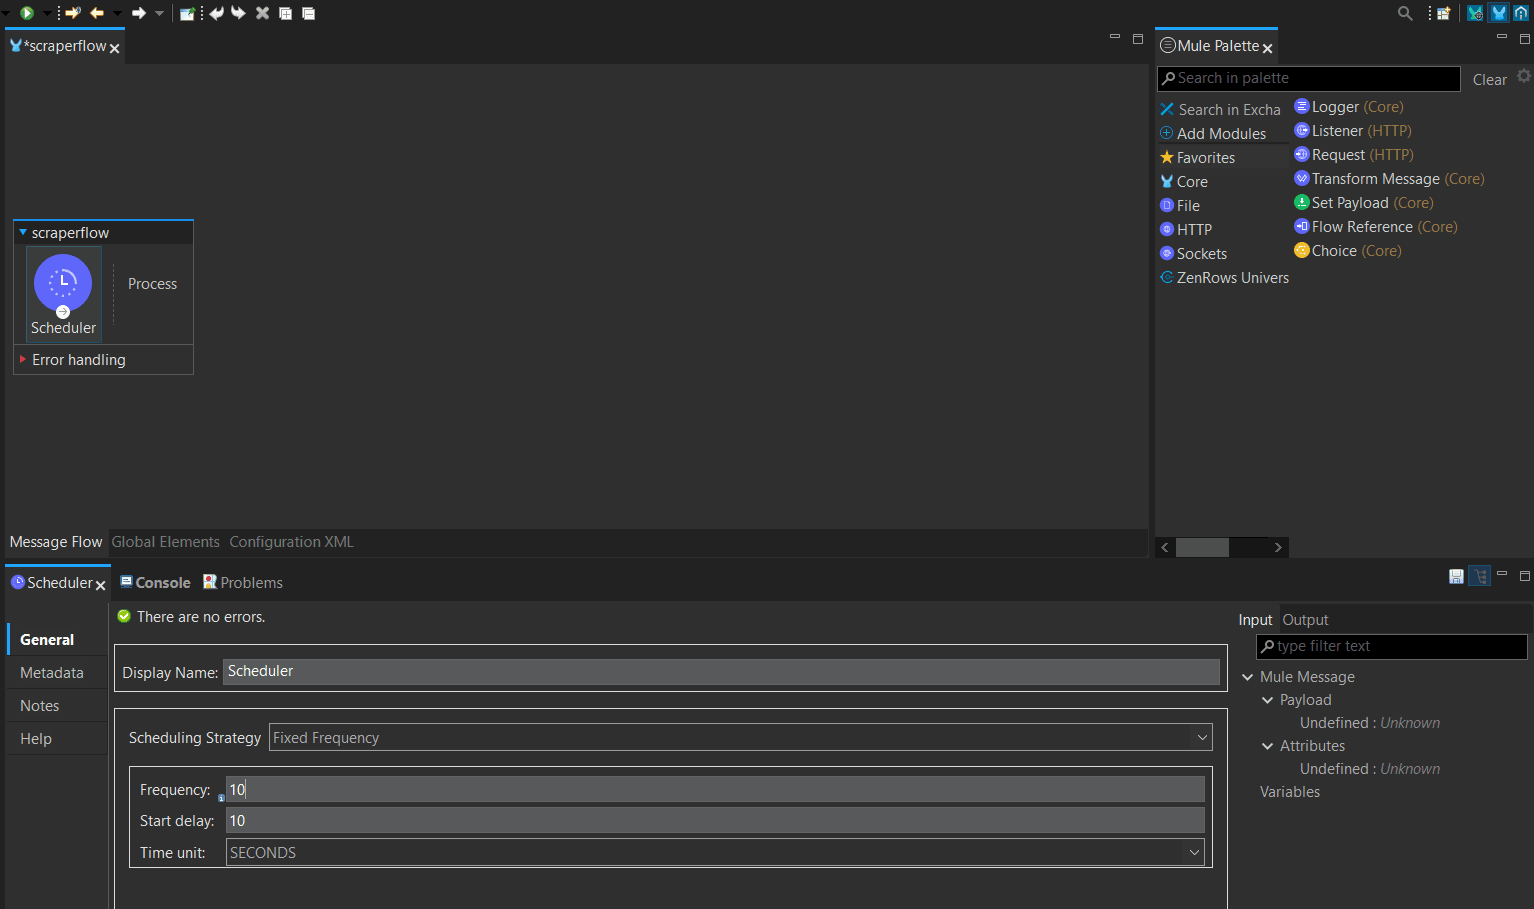
1. From the Mule Palette, search for **Scheduler** and drag it into the canvas. Rename your scheduler as you desire.
2. From the **Scheduling Strategy** dropdown, choose between **Frequency** or **Cron**. We've chosen **Frequency** in this case and scheduled the flow to run the request within 10 seconds using a 10-second delay.
### Step 3: Create the scraping workflow in Anypoint Studio
1. From the Mule Palette, search for **Scheduler** and drag it into the canvas. Rename your scheduler as you desire.
2. From the **Scheduling Strategy** dropdown, choose between **Frequency** or **Cron**. We've chosen **Frequency** in this case and scheduled the flow to run the request within 10 seconds using a 10-second delay.
 3. Search for **Logger** and drag it into the Process tab inside the Scraperflow. We'll use this to log the beginning of automation.
4. In the **Message** box, type a trigger alert message (e.g., Schedule triggered!).
3. Search for **Logger** and drag it into the Process tab inside the Scraperflow. We'll use this to log the beginning of automation.
4. In the **Message** box, type a trigger alert message (e.g., Schedule triggered!).
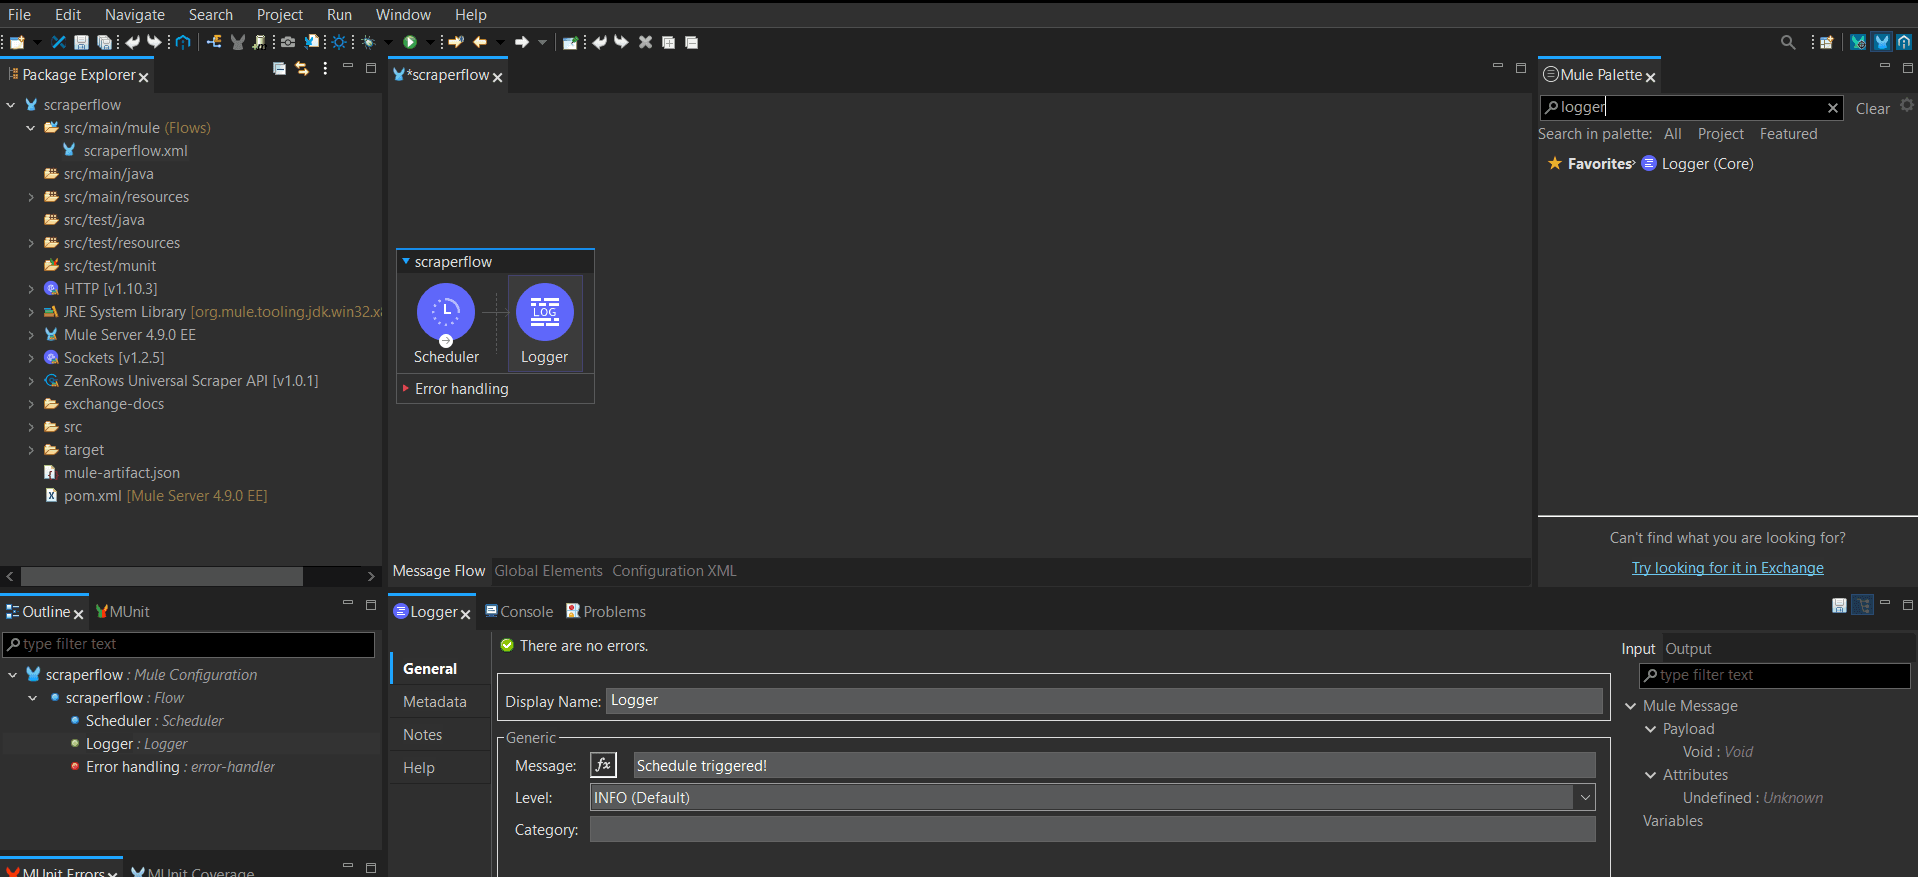 5. Search for **ZenRows** in the Mule Palette. Then, drag the ZenRows Universal Scraper API spec into the workflow.
6. Click the **Connector Configuration** dropdown and select **Create a new configuration**.
7. Rename the ZenRows flow as you desire (e.g., Product Scraper Flow).
8. Click the `+` icon next to **Connector Configuration** and click okay to set it as ZenRows.
5. Search for **ZenRows** in the Mule Palette. Then, drag the ZenRows Universal Scraper API spec into the workflow.
6. Click the **Connector Configuration** dropdown and select **Create a new configuration**.
7. Rename the ZenRows flow as you desire (e.g., Product Scraper Flow).
8. Click the `+` icon next to **Connector Configuration** and click okay to set it as ZenRows.
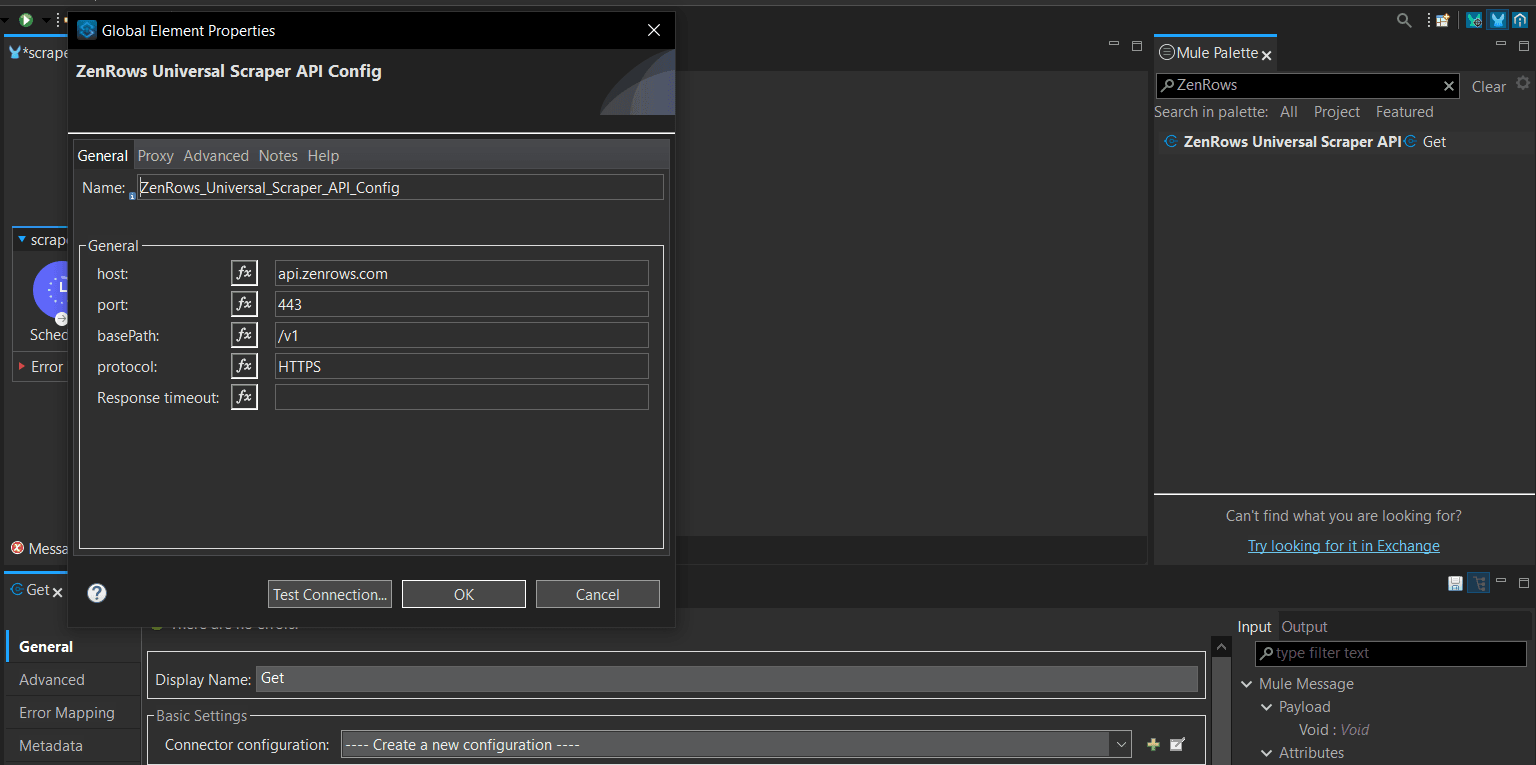 9. Set the necessary parameters. We've used the following in this guide:
* ZenRows API key.
* Target URL
* Js\_render = true
* Premium\_proxy = true
* Proxy\_country = us
* css\_extractor:
```json JSON theme={null}
{
"name": "span#productTitle",
"price": "span.aok-offscreen",
"ratings": "span.reviewCountTextLinkedHistogram span.a-size-base.a-color-base",
"reviewSummary": "#product-summary p span",
"reviewCount": "#acrCustomerReviewText"
}
```
10. Press `Ctrl+S` on your keyboard to save the current flow.
9. Set the necessary parameters. We've used the following in this guide:
* ZenRows API key.
* Target URL
* Js\_render = true
* Premium\_proxy = true
* Proxy\_country = us
* css\_extractor:
```json JSON theme={null}
{
"name": "span#productTitle",
"price": "span.aok-offscreen",
"ratings": "span.reviewCountTextLinkedHistogram span.a-size-base.a-color-base",
"reviewSummary": "#product-summary p span",
"reviewCount": "#acrCustomerReviewText"
}
```
10. Press `Ctrl+S` on your keyboard to save the current flow.
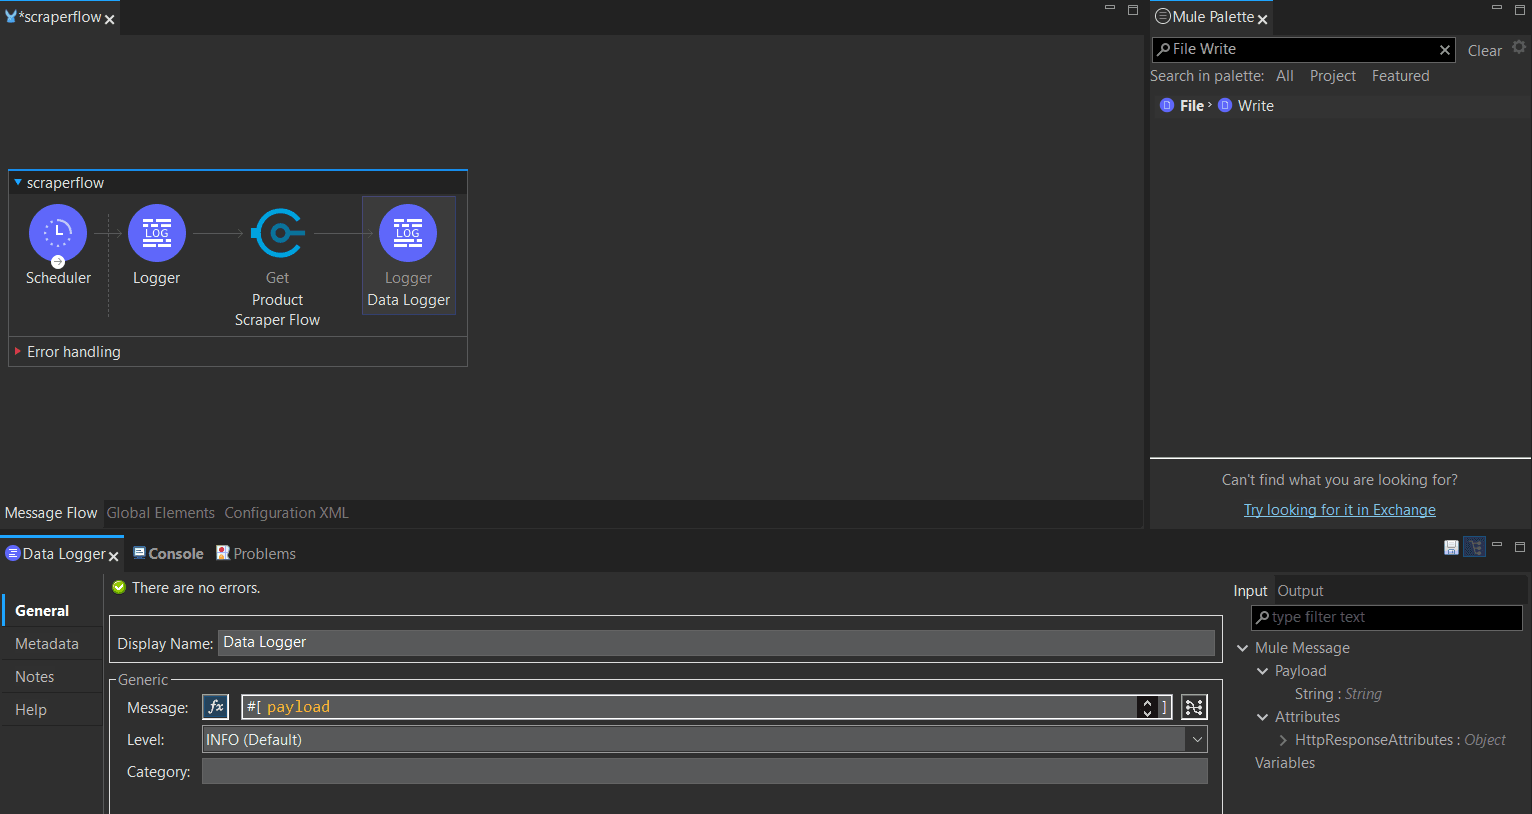
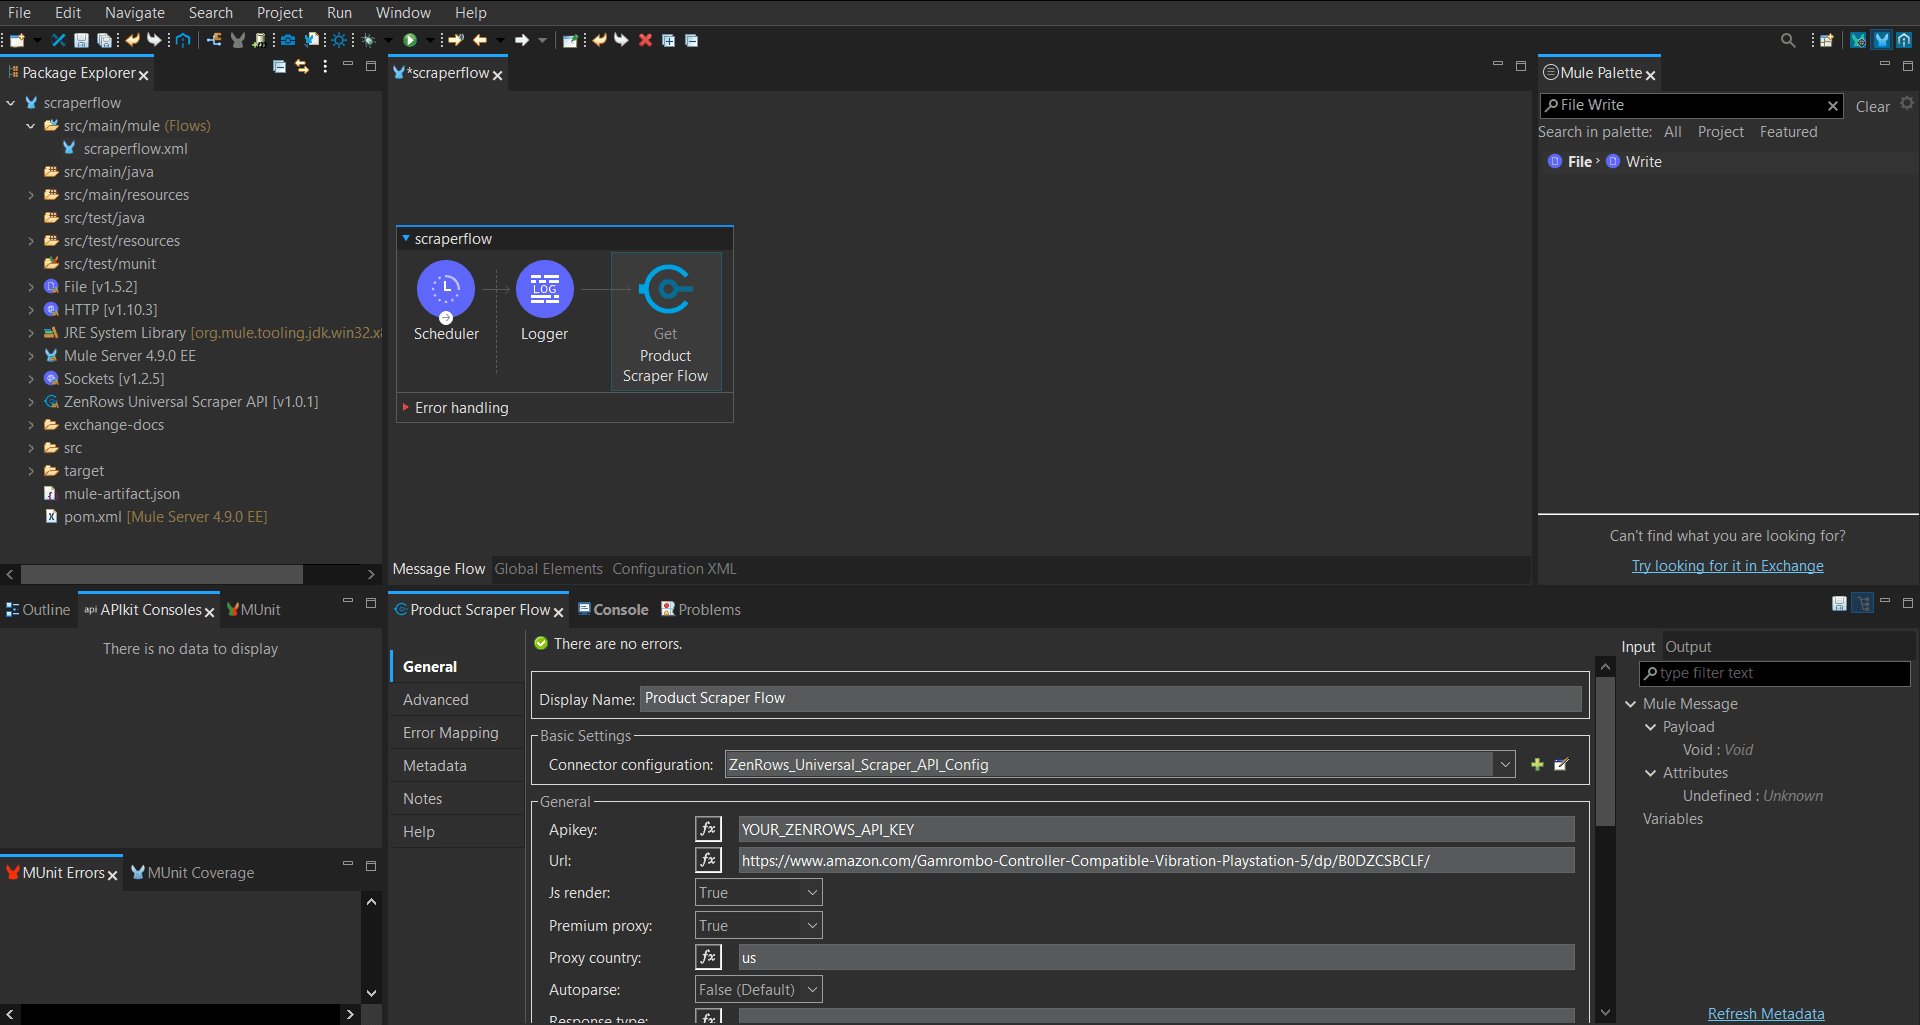 11. Again, search and drag a **Logger** flow into the workflow to output the scraping result.
12. Rename the new logger (e.g., Data Logger)
13. In the Logger's **Message**, click `fx` and type `#[payload`.
11. Again, search and drag a **Logger** flow into the workflow to output the scraping result.
12. Rename the new logger (e.g., Data Logger)
13. In the Logger's **Message**, click `fx` and type `#[payload`.
 ### Step 4: Save the data
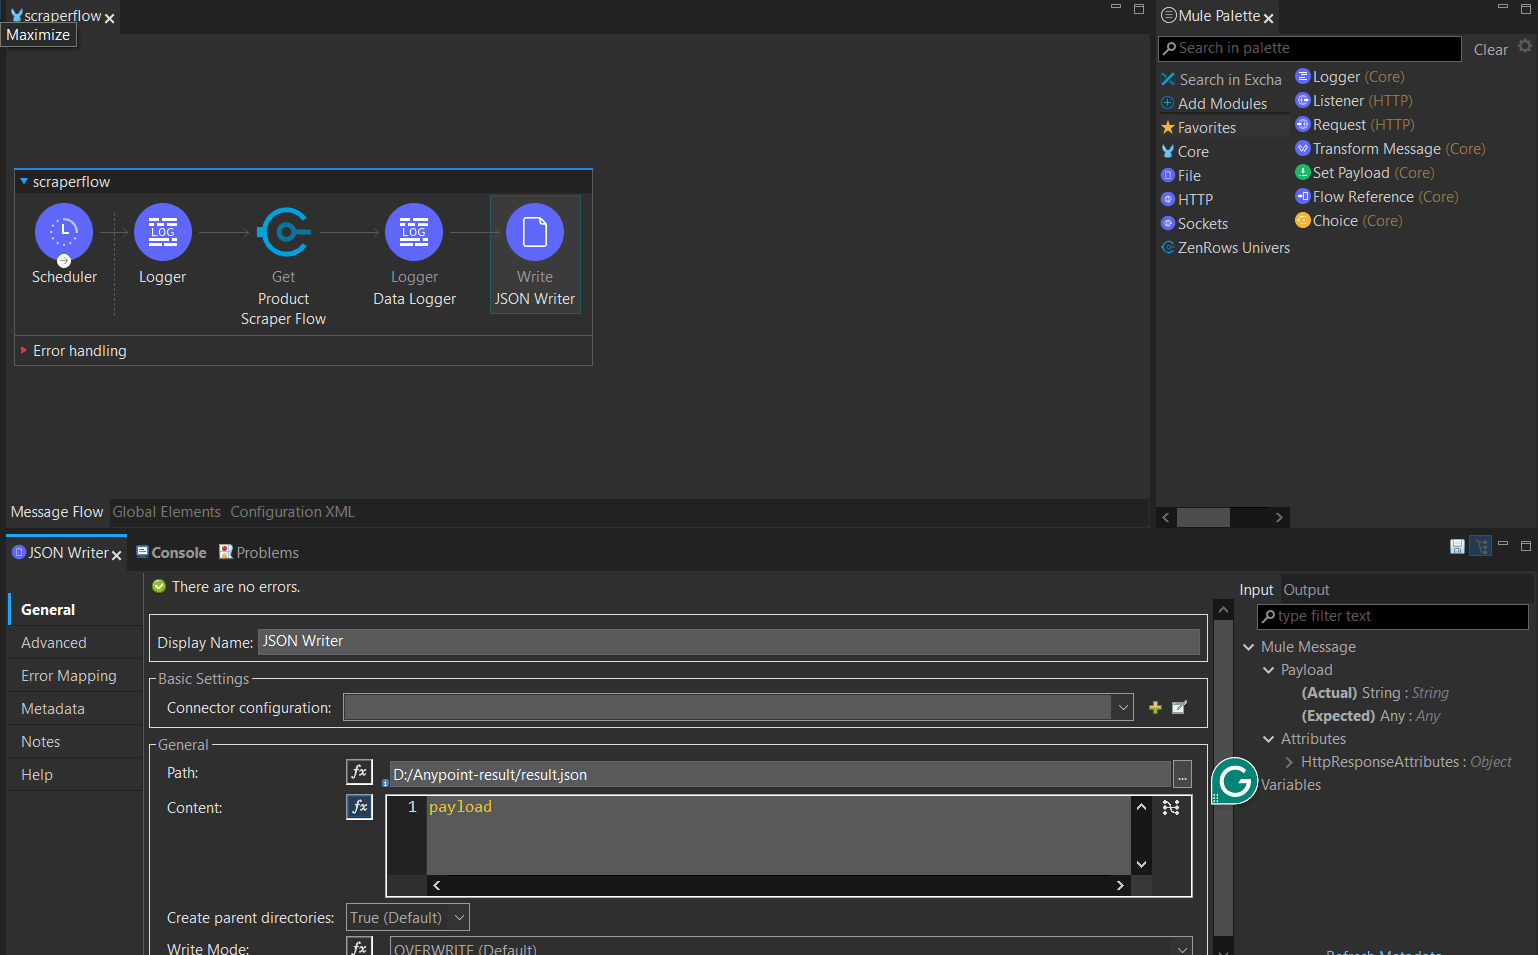
1. Search for **File Write** in the Mule Palette and drag it into your workflow.
2. Rename the Writer (e.g., JSON Writer).
3. Paste the destination folder path in the **Path** field (e.g., `D:/Anypoint-result/result.json`). Keep the **Content** field as **payload** and the **Write Mode** as **OVERWRITE**.
4. Press Ctrl+S to save the changes.
### Step 4: Save the data
1. Search for **File Write** in the Mule Palette and drag it into your workflow.
2. Rename the Writer (e.g., JSON Writer).
3. Paste the destination folder path in the **Path** field (e.g., `D:/Anypoint-result/result.json`). Keep the **Content** field as **payload** and the **Write Mode** as **OVERWRITE**.
4. Press Ctrl+S to save the changes.
 ### Step 5: Run the flow
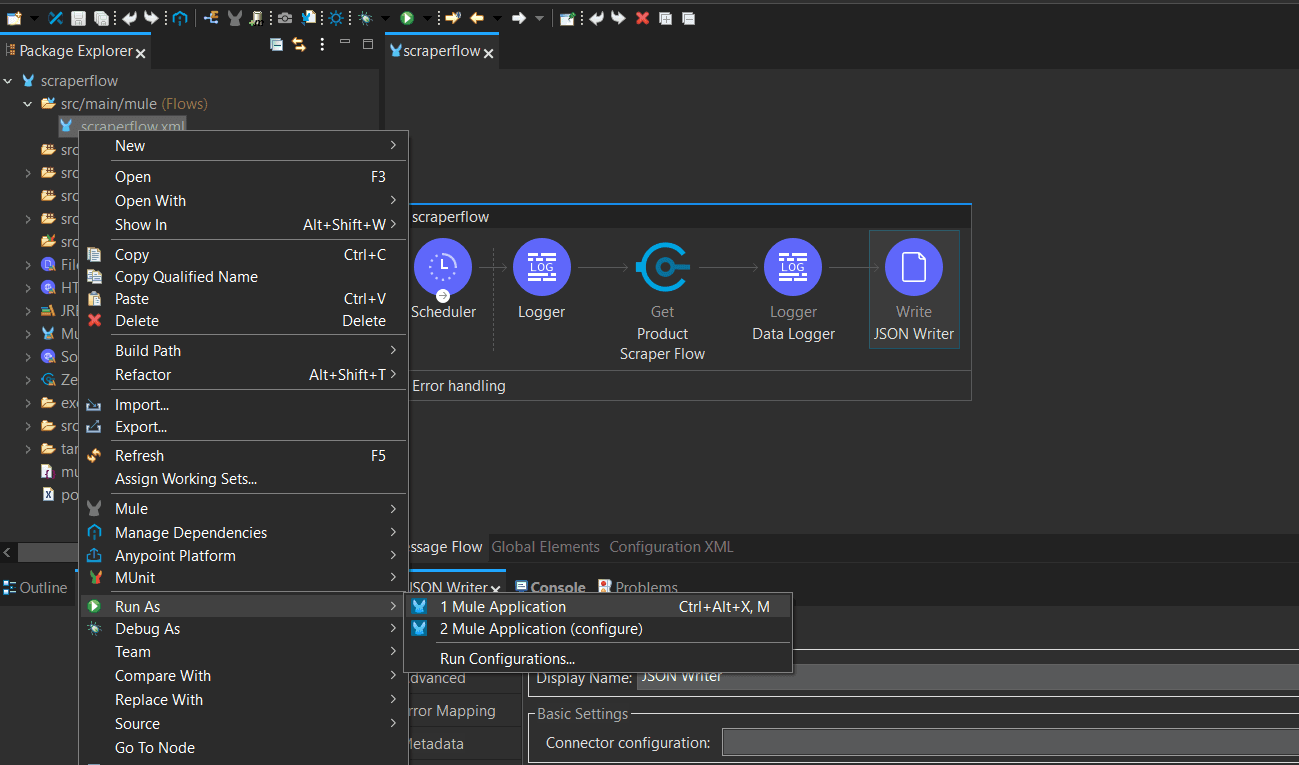
To run the flow, right-click `scraperflow.xml`, click `Run As` > `Mule Application`.
### Step 5: Run the flow
To run the flow, right-click `scraperflow.xml`, click `Run As` > `Mule Application`.
 Check your JSON storage directory and open the created JSON file to see the scraped data.
Here's a sample JSON result:
```json result.json theme={null}
{
"name": "Gamrombo LED Wireless Controller for PS5, Compatible with PS5 Pro/Slim/PC, Dual Vibration, Marco/Turbo Function, 3.5mm Audio Jack, 6-Axis Motion Contro Gamepad with Speaker",
"price": [
"$49.99 with 17 percent savings",
"List Price: $59.99"
],
"ratings": [
"4.5",
"4.5"
],
"reviewCount": [
"423 ratings",
"423 ratings"
],
"reviewSummary": [
"Customers find the controller's ergonomics responsive and comfortable during long gaming sessions, with buttons that provide crisp feedback and moderate rebound strength. Moreover, the device functions well on both PC and PS5 systems, and customers appreciate its build quality with wear-resistant materials. Additionally, they like its style, particularly the colors and lights, and consider it surprisingly good for its price. The response time receives positive feedback, with customers noting very low wireless delay and fast charging capabilities.",
"",
"AI Generated from the text of customer reviews",
""
]
}
```
Congratulations! 🎉You just integrated ZenRows into your MuleSoft Anypoint automation workflow.
## Troubleshooting
### Error 429 (Too Many Requests)
* **Solution**: Increase the Scheduler's frequency and delay to space out the requests and prevent multiple requests from running within a short time frame.
### Build failed during Anypoint Studio compilation
* **Solution 1**: Check for errors in each flow and fix them individually.
* **Solution 2**: Ensure you enter the correct ZenRows parameters. The `js_render` and `premium_proxy` parameters should be set to `true` to increase the success rate.
* **Solution 3**: Verify that your API key is entered correctly.
### Incomplete or empty data
* **Solution 1**: Ensure that you enter the correct CSS selectors.
* **Solution 2**: Validate that the CSS extractor array is formatted correctly.
* **Solution 3**: If using autoparse, ensure that ZenRows supports the target page. Check the [ZenRows Data Collector Marketplace](https://www.zenrows.com/scraper) to view the supported websites.
### File write access denied:
* **Solution 1**: If storing data locally, give the current Anypoint Studio workplace access to the storage location.
* **Solution 2**: Ensure that you append the file name to the file path specified in the Anypoint Studio Writer flow. For example, `D:/Anypoint-result` is wrong. The correct file path format should be `D:/Anypoint-result/result.json`.
## Frequently Asked Questions (FAQ)
ZenRows doesn't charge you extra for making scraping requests via Anypoint. However, while Anypoint comes with a 30-day free trial, it requires an upfront financial commitment, which limits your ability to use the scraping workflow.
Yes, you can save data locally to a CSV file using Anypoint's File Write module. MuleSoft's Anypoint also supports remote database connection using the JDBC (Java Database Connectivity) driver.
No, but integrating ZenRows with MuleSoft is straightforward. You only need to paste the RAML file containing the required ZenRows Universal Scraper API specifications into the Anypoint Platform and publish it to the Exchange. You can then interact with ZenRows visually in your workflow via the published API specification.
Although Anypoint doesn't have built-in support for LLM tools, you can load your desired model using Anypoint's HTTP request flow. This involves authorizing the LLM via the Bearer Authorization header and returning its response using a Logger flow or directly writing it into a file.
Check your JSON storage directory and open the created JSON file to see the scraped data.
Here's a sample JSON result:
```json result.json theme={null}
{
"name": "Gamrombo LED Wireless Controller for PS5, Compatible with PS5 Pro/Slim/PC, Dual Vibration, Marco/Turbo Function, 3.5mm Audio Jack, 6-Axis Motion Contro Gamepad with Speaker",
"price": [
"$49.99 with 17 percent savings",
"List Price: $59.99"
],
"ratings": [
"4.5",
"4.5"
],
"reviewCount": [
"423 ratings",
"423 ratings"
],
"reviewSummary": [
"Customers find the controller's ergonomics responsive and comfortable during long gaming sessions, with buttons that provide crisp feedback and moderate rebound strength. Moreover, the device functions well on both PC and PS5 systems, and customers appreciate its build quality with wear-resistant materials. Additionally, they like its style, particularly the colors and lights, and consider it surprisingly good for its price. The response time receives positive feedback, with customers noting very low wireless delay and fast charging capabilities.",
"",
"AI Generated from the text of customer reviews",
""
]
}
```
Congratulations! 🎉You just integrated ZenRows into your MuleSoft Anypoint automation workflow.
## Troubleshooting
### Error 429 (Too Many Requests)
* **Solution**: Increase the Scheduler's frequency and delay to space out the requests and prevent multiple requests from running within a short time frame.
### Build failed during Anypoint Studio compilation
* **Solution 1**: Check for errors in each flow and fix them individually.
* **Solution 2**: Ensure you enter the correct ZenRows parameters. The `js_render` and `premium_proxy` parameters should be set to `true` to increase the success rate.
* **Solution 3**: Verify that your API key is entered correctly.
### Incomplete or empty data
* **Solution 1**: Ensure that you enter the correct CSS selectors.
* **Solution 2**: Validate that the CSS extractor array is formatted correctly.
* **Solution 3**: If using autoparse, ensure that ZenRows supports the target page. Check the [ZenRows Data Collector Marketplace](https://www.zenrows.com/scraper) to view the supported websites.
### File write access denied:
* **Solution 1**: If storing data locally, give the current Anypoint Studio workplace access to the storage location.
* **Solution 2**: Ensure that you append the file name to the file path specified in the Anypoint Studio Writer flow. For example, `D:/Anypoint-result` is wrong. The correct file path format should be `D:/Anypoint-result/result.json`.
## Frequently Asked Questions (FAQ)
ZenRows doesn't charge you extra for making scraping requests via Anypoint. However, while Anypoint comes with a 30-day free trial, it requires an upfront financial commitment, which limits your ability to use the scraping workflow.
Yes, you can save data locally to a CSV file using Anypoint's File Write module. MuleSoft's Anypoint also supports remote database connection using the JDBC (Java Database Connectivity) driver.
No, but integrating ZenRows with MuleSoft is straightforward. You only need to paste the RAML file containing the required ZenRows Universal Scraper API specifications into the Anypoint Platform and publish it to the Exchange. You can then interact with ZenRows visually in your workflow via the published API specification.
Although Anypoint doesn't have built-in support for LLM tools, you can load your desired model using Anypoint's HTTP request flow. This involves authorizing the LLM via the Bearer Authorization header and returning its response using a Logger flow or directly writing it into a file.