# API Error Codes
Source: https://docs.zenrows.com/api-error-codes
Understanding the ZenRows® Universal Scraper API error codes is crucial for troubleshooting and optimizing your interactions with ZenRows. Below are common errors you may encounter, along with explanations and recommended actions.
Each error code corresponds to specific conditions encountered during the Universal Scraper API usage, from authentication problems to request handling and server responses.
## 400 Bad Request
### REQS001 Requests To This Domain Are Forbidden
**Problem:** Requests to this URL are forbidden.
**Solution:**
1. Check our [target sites' access restrictions and user behavior guidelines](/forbidden-sites) to see if the domain is explicitly blocked
2. Try using a different domain that provides similar data
3. If you need to scrape this specific domain for a legitimate business purpose, contact our support team to discuss potential options
### REQS002 Request Requirements Unsatisfied
**Problem:** The requested URL domain needs JavaScript rendering and/or Premium Proxies due to its high-level security defenses.
**Solution:**
1. Read the error message to understand the specific requirements for the domain
2. Add `js_render=true` and/or `premium_proxy=true` parameters to your request, depending on the domain's requirements
### REQS004 Invalid Params Provided
**Problem:** Some parameters or even the URL are invalid or not properly encoded.
**Solution:**
1. Read the error message to understand the specific issue
2. Ensure your URL is properly URL-encoded (check our [guide on encoding URLs](/universal-scraper-api/faq#how-to-encode-urls)) or the http you use is doing it for you
3. Validate that all parameter values match the expected types (boolean, string, etc.)
4. Remove any invalid or unsupported parameters from your request
5. Check that you are not sending query parameters for the target page as parameters for the API call
### RESP004 CSS Extractor Parameter Is Not Valid
**Problem:** The `css_extractor` parameter sent in your request is not valid.
**Solution:**
1. Check your CSS selector syntax for errors (like missing brackets or quotes)
2. Simplify complex selectors that might be causing issues
3. Test your CSS selector on the actual page using browser developer tools first (`document.querySelector('.your-selector')`)
4. If extracting multiple elements, ensure your JSON structure follows the correct format:
```js theme={null}
css_extractor={
"title": "h1.product-title",
"price": "span.product-price"
}
```
### REQS006 Invalid CAPTCHA Solver Key
**Problem:** The configured CAPTCHA solver integration API key is invalid.
**Solution:**
1. Verify your CAPTCHA solver API key in your [account integrations](https://app.zenrows.com/account/integrations) page
2. Check that your CAPTCHA solver account has sufficient funds
3. Confirm the CAPTCHA solver service is operational through their status page
4. Try re-generating a new API key from your CAPTCHA solver service
### RESP008 Non-Retryable Error not related to ZenRows
**Problem:** The target returned an error on the site's config or certificate, not an error ZenRows can solve or bypass.
**Solution:**
1. Check if the target website is accessible from your browser
2. If you're using geolocation, try a different country as the site might only be available in specific regions
3. Wait a few minutes and retry as the issue might be temporary
4. For SSL certificate issues, try accessing the HTTP version of the site if available
## 401 Unauthorized
### AUTH001 API Key Missing
**Problem:** No `apikey` information was sent in your request.
**Solution:**
1. Add the `apikey` parameter to your request
2. Check your code to ensure the apikey is being included in every request
3. For API clients like Axios or Requests, set up default parameters to include your API key automatically
4. Verify the API endpoint structure - the key should be sent as a query parameter to the API endpoint
### AUTH002 Invalid API Key
**Problem:** The `apikey` sent does not match the expected format.
**Solution:**
1. Copy your API key directly from the [ZenRows Builder](https://app.zenrows.com/builder)
2. Ensure no extra spaces or characters were accidentally included
3. Check for any string formatting or concatenation issues in your code
4. If using environment variables, verify they're loading correctly
### AUTH003 API Key Not Found
**Problem:** The `apikey` sent in your request is not valid.
**Solution:**
1. Verify you're using the correct API key from your [ZenRows Builder](https://app.zenrows.com/builder)
2. Check if your API key has been revoked or regenerated recently
3. Ensure your account is active and working, you can perform a request from the Builder itself
4. For team accounts, confirm with your administrator that the key is still valid
## 402 Payment Required
### AUTH004 Usage Exceeded
**Problem:** This `apikey` has no more usage remaining.
**Solution:**
1. Top up your account in the [ZenRows Billing page](https://app.zenrows.com/billing)
2. Upgrade your plan in the [ZenRows Plans page](https://app.zenrows.com/plans)
3. Check your current usage to see if you're approaching limits before they're reached
4. For temporary needs or puntual issues, contact our support team
### AUTH005 API Key Is No Longer Valid
**Problem:** This `apikey` has reached its validity period.
**Solution:**
1. Check your subscription in the [ZenRows Billing page](https://app.zenrows.com/billing)
2. Check if your account is active and working, you can perform a request from the [Builder](https://app.zenrows.com/builder) itself
3. Contact support if you believe there is an issue with your account
### AUTH010 Feature Is Not Included In Plan
**Problem:** The requested feature is not included in your subscription plan.
**Solution:**
1. Review the [features included in each plan](https://www.zenrows.com/pricing)
2. Upgrade to a plan that includes the feature you need
3. Modify your code to avoid using premium features if you don't upgrade
4. Contact our support team if you believe there is an issue with your account
### AUTH011 No Subscription Found
**Problem:** This account does not have an active subscription.
**Solution:**
1. Purchase a subscription plan from the [ZenRows plans page](https://app.zenrows.com/plans)
2. Check for any failed payment attempts in your account history
3. Verify your payment method details are correct
4. Contact our support team if you believe there is an issue with your account
### AUTH012 Subscription Does Not Allow To Use The Product
**Problem:** This account subscription does not allow to use this service.
**Solution:**
1. Check which ZenRows products your subscription includes
2. Upgrade to a plan that includes the product you're trying to use
3. Ensure you're using the correct API endpoint for your subscription
4. Contact our support team if you believe there is an issue with your account
## 403 Forbidden
### AUTH009 User Is Not Verified
**Problem:** This `apikey` belongs to a user that has not verified the email account.
**Solution:**
1. Check your email inbox (including spam folder) for a verification email
2. Request a new verification email
3. Ensure your email address is entered correctly in your profile
4. Contact support if you continue to have verification issues
### BLK0001 IP Address Blocked
**Problem:** Your IP address has been blocked for exceeding the maximum error rate allowed.
**Solution:**
1. Wait a few minutes before retrying requests
2. Implement error handling in your code to prevent excessive failed requests
3. Use exponential backoff when retrying failed requests
4. If using the service in a high-traffic environment, consider implementing a queue system to manage request rates
Visit our [troubleshooting guide](/universal-scraper-api/troubleshooting/ip-address-blocked) for step-by-step instructions, common causes, and best practices to quickly restore access.
## 404 Not Found
### RESP002 Page Not Found
**Problem:** The requested URL page returned a 404 HTTP Status Code.
**Solution:**
1. Verify the URL exists by opening it in a browser
2. Check for typos or encoding issues in the URL
3. If the page was recently available, it might have been moved or deleted
4. For dynamic sites, try adding `js_render=true` as some 404 pages are generated via JavaScript
5. Note that these requests are billed
### RESP007 Site Not Found
**Problem:** The requested target domain could not be resolved, or there is no DNS record associated with it.
**Solution:**
1. Verify the domain exists by checking in your browser
2. Check for typos in the domain name
3. If using an IP address, ensure it's correctly formatted
4. If the domain is new or rarely accessed, DNS propagation might still be in progress
5. Try using premium proxies and geolocation since the domain might be available only in certain countries
6. Note that these requests are billed
## 405 Method Not Allowed
### REQS005 Method Not Allowed
**Problem:** The HTTP verb used to access this page is not allowed.
**Solution:**
1. Change your request method to one of the allowed methods: GET, POST, or PUT
2. For complex requests, consider breaking them down into multiple simpler requests
3. Check if the endpoint you're trying to access has specific method requirements
## 407 Proxy Authentication Required
### AUTH007 Invalid Proxy-Authorization Header
**Problem:** The Proxy-Authorization header sent does not match the expected format.
**Solution:**
1. Ensure the Proxy-Authorization header is a base64 encoded string of `:`
2. Check your base64 encoding function for errors or incorrect character handling
3. Try API calls instead of proxy mode to ensure that the API key and account are working properly
## 413 Content Too Large
### RESP005 Response Size Exceeded The Limit
**Problem:** The response data size is bigger than the maximum allowed download size.
**Solution:**
1. Request specific parts of the page using CSS selectors instead of the entire page
2. Split large pages into multiple smaller requests by targeting specific sections
3. Use pagination parameters if available on the target site
4. If using JSON Response, the full response will be considered for the size limit - try revoming it and see if it works
Looking for ways to handle large responses? Check out our [troubleshooting guide](/universal-scraper-api/troubleshooting/response-too-large) for practical strategies, examples, and tips to work within response size limits.
## 422 Unprocessable Entity
### RESP001 Could Not Get Content
**Problem:** The service couldn't get the content.
**Solution:**
1. Add `js_render=true` as the site might require JavaScript to load content
2. Enable `premium_proxy=true` if the site has anti-bot measures
3. Try adding geolocation to the request set to a country where the site is available
4. Increase wait time with `wait=5000` or higher if content loads slowly
5. Check the error's body for more specific details about the failure
6. Try using custom headers with a referer to mimic a real browser:
```js theme={null}
params={
// ...
"custom_headers": true,
}
headers={
"Referer": "https://www.google.com"
}
```
## 424 Failed Dependency
### RESP006 Failed To Solve CAPTCHA
**Problem:** The CAPTCHA solver provider was unable to solve the CAPTCHA detected in the page.
**Solution:**
1. Check your CAPTCHA solver service account for sufficient balance
2. Try adding premium proxies to the request
3. Implement retry logic with increasing wait times between attempts
## 429 Too Many Requests
### AUTH006 Concurrency Exceeded
**Problem:** The concurrency limit was reached.
**Solution:**
1. Implement a queue system in your code to limit concurrency requests
2. Monitor the `Concurrency-Remaining` header to adjust your request rate dynamically
3. Increase wait times between batches of requests
4. For high-volume scraping needs, upgrade to a plan with higher concurrency limits
5. Learn more about [how ZenRows concurrency works](/universal-scraper-api/features/concurrency) and implement the provided code examples
6. Note that canceled requests on the client side will not release concurrency until the processing is done in the server side - we recommend not setting a timeout below 3 minutes
### AUTH008 Rate Limit Exceeded
**Problem:** The rate limit was reached.
**Solution:**
1. Implement exponential backoff between requests
2. Distribute requests evenly over time rather than sending them in bursts
3. Set up a queue system with configurable delay between requests
4. For time-sensitive projects, consider upgrading to a plan with higher rate limits
5. Monitor usage patterns to identify and optimize peak request periods
## 500 Internal Server Error
### CTX0001 Context Cancelled
**Problem:** The request was canceled from the client's side.
**Solution:**
1. Check your client's timeout settings - we recommend not setting a timeout below 3 minutes
2. If you're canceling requests manually, review your cancellation logic
3. Ensure your network connection is stable during the entire request
### ERR0001 Unknown Error
**Problem:** An internal error occurred.
**Solution:**
1. Retry the request after a short delay (10-30 seconds)
2. Check the [ZenRows status page](https://status.zenrows.com/) for any ongoing issues
3. Implement error logging to capture the full error response for troubleshooting
4. If the error persists, contact support with details of your request
### ERR0000 Unknown Error
**Problem:** An unexpected internal error occurred.
**Solution:**
1. Retry the request after a short delay (10-30 seconds)
2. Check the [ZenRows status page](https://status.zenrows.com/) for any ongoing issues
3. Implement error logging to capture the full error response for troubleshooting
4. If the error persists, contact support with details of your request
## 502 Bad Gateway
### RESP003 Could Not Parse Content
**Problem:** The request failed because the URL could not be automatically parsed.
**Solution:**
1. Remove the `autoparse` parameter and process the raw HTML response
2. Contact support with details of your request if the issue persists
## 504 Gateway Timeout
### CTX0002 Operation Timeout Exceeded
**Problem:** The request exceeded the maximum allowed time and was aborted.
**Solution:**
1. Check if the target website is slow or unresponsive in a browser
2. Reduce the complexity of your request if using JS Instructions
3. Try adding premium proxies to the request or geolocation to a country where the site is available
4. Break complex scraping tasks into smaller, more focused requests
5. If the issue persists, contact support with details of your request and use case
# Product updates and announcements
Source: https://docs.zenrows.com/changelog
Hey everyone! We're excited to share a significant update to help you stay on top of your account activity:
🔔 **Usage Notifications & Alerts Now Available for All Plans**
All plans now include access to usage notifications and alerts to keep you informed about your account activity and resource consumption.
✅ **Default Notifications Enabled for Active Customers**
To make things even easier, we've enabled the following default notifications for all active customers:
* Invoice Paid: Get notified when your invoices are successfully processed.
* Weekly Usage Summary: A snapshot of your account usage delivered straight to your inbox.
* Universal Consumption Threshold: Alerts when you approach key usage limits.
🎛️ **Customize Your Notifications**
You can personalize your notification preferences anytime by visiting your [notification settings](https://app.zenrows.com/account/notifications).
This update ensures you have the tools you need to manage your account effortlessly. Let us know if you have any feedback—we're always here to improve your experience!
Hey everyone! We've made a round of upgrades across our APIs based on customer feedback:
🏡 **Idealista API**
* Added location fields (neighborhood → region) to reduce API calls
* Picture tags now included for better media organization
* Unpublished listings now return data instead of a 404
* New fields: construction year & listing reference
🛒 **Walmart Reviews API**
* Fixed sorting via URL
* Now supports syndicated reviews
🏠 **Zillow Property API**
* Contact info now included in responses
Stop wasting time parsing HTML! ZenRows Scraper APIs deliver clean, structured JSON instantly—no setup, no maintenance, no headaches.
🔑 **Why ZenRows Scraper APIs?**
✅ Structured JSON Responses – Get ready-to-use data, no HTML parsing needed.
✅ Effortless Scraping – No CAPTCHAs, no blockers—just seamless data access to popular sites like Amazon, Walmart, Google, Zillow and more
✅ Zero Setup & Maintenance – Works out of the box, no tuning required.
🎯 **Get Data, Not Problems**
Forget the hassle of scrapers breaking. With ZenRows Scraper APIs, you get reliable, structured data—so you can focus on insights, not maintenance.
🚀 Try the new Scraper API beta today!
# Explore ZenRows Academy
Source: https://docs.zenrows.com/first-steps/academy-tab
# Frequently Asked Questions
Source: https://docs.zenrows.com/first-steps/faq
No, monthly plans are reset each month and usage doesn't roll over.
ZenRows does not offer a browser extension, and our products are designed to work via API requests, proxies, and automated browsers, not through browser extensions.
## Why Doesn't ZenRows Offer a Browser Extension?
Browser extensions have significant limitations when it comes to web scraping:
1. **Restricted Execution** – Extensions run in a browser's sandboxed environment, limiting their ability to bypass antibot protections.
2. **Scalability Issues** – A browser extension would require manual interaction, making it impractical for large-scale or automated scraping.
3. **Limited Customization** – Unlike our API and Scraping Browser, extensions lack the flexibility to integrate advanced scraping techniques, such as headless browsing, fingerprint evasion, and CAPTCHA handling.
## How to Scrape Without a Browser Extension
Instead of using an extension, we recommend using one of our API-based solutions, which are optimized for web scraping at scale:
### Universal Scraper API
* Designed for flexible, automated scraping with built-in antibot bypassing.
* Supports JavaScript rendering, Premium Proxies, and CAPTCHA handling.
* Ideal for scraping protected or dynamic pages.
### Scraper APIs
* Ready-to-use APIs that return structured data from specific websites.
* Handles antibot measures and complex scraping challenges automatically.
### Scraping Browser
* A headless browsing solution that allows full control over web automation.
* Ideal for cases where manual browser behavior replication is needed.
### Residential Proxies
* Provides rotating IPs to increase anonymity.
* Best for handling IP-based blocks but requires custom browser automation for full scraping functionality.
If you're looking for automated and scalable web scraping, our API solutions are the best fit. Let us know if you need help choosing the right approach! 🚀
If you need to capture dynamic content loaded via AJAX requests, ZenRows offers different approaches depending on the product you're using. Some products provide built-in JSON responses, while others require custom configurations to extract network requests.
More and more websites load content dynamically, meaning data is fetched via XHR, AJAX, or Fetch requests instead of being included in the initial HTML. Besides waiting for the content to load, you might want to capture these network requests—similar to how they appear in the Network tab in DevTools.
## How Each ZenRows Product Handles XHR / AJAX / Fetch Requests
### Universal Scraper API
* The JSON Response feature (`json_response=true`) captures AJAX requests automatically.
* Returns a structured JSON object containing two fields:
* HTML – The final rendered page source.
* XHR – An array of network requests (XHR, AJAX, Fetch), including URL, body, headers, and more.
* This feature is exclusive to the Universal Scraper API and is ideal for analyzing background requests.
Learn more: [JSON Response](/universal-scraper-api/features/json-response)
### Scraper APIs
* Default response format is JSON, but it does not include network requests by default.
* Instead of capturing XHR calls, it extracts and structures the final page content into a JSON format.
* This means you'll get structured data rather than raw network request details.
### Scraping Browser
* Does not capture network requests automatically.
* You'll need to configure custom JavaScript code to intercept and extract XHR/AJAX calls manually on Puppeteer or Playwright.
For a step-by-step guide on capturing network requests in Playwright, check out our comprehensive [Playwright guide](https://www.zenrows.com/blog/playwright-scraping#request-and-response-interception).
### Residential Proxies
* Acts as a proxy layer without modifying responses.
* To capture XHR/AJAX requests, you must configure custom request logging in your own setup (e.g., Puppeteer, Playwright, or Selenium).
By choosing the right ZenRows product and configuration, you can effectively capture network requests and analyze the data that websites load dynamically. Let us know if you need guidance on a specific use case! 🚀
ZenRows is designed to bypass most modern antibot solutions out-of-the-box. We continuously test and optimize our systems to ensure a smooth scraping experience. However, antibot defenses vary by website, and different ZenRows products serve different purposes.
Below is an overview of how each product handles antibot measures and what to expect when using them.
## Universal Scraper API
The Universal Scraper API, when combined with Premium Proxies and JS Render, effectively handles most antibot measures. This setup mimics real user behavior, helping bypass bot detection mechanisms.
However, not all pages are protected equally. Many websites enforce stricter protections on internal APIs or login-restricted content. If you're targeting such endpoints, additional configurations might be needed.
If you're experiencing blocks despite using Premium Proxies and JS Render, refer to this guide: [Using Premium + JS Render and still blocked](/universal-scraper-api/faq#using-premium-js-render-and-still-blocked)
## Scraper APIs
Our Scraper APIs are designed for ease of use. Simply send a request to our API, and we handle all antibot measures in the background, delivering the structured content you need. This is the best option for users who want a hassle-free experience without worrying about configuration.
## Residential Proxies
Residential Proxies prioritize anonymity rather than antibot bypassing. They provide IP rotation and geographic targeting but do not include built-in antibot or CAPTCHA-solving capabilities. For heavily protected websites, additional techniques may be required.
## Scraping Browser
The Scraping Browser is highly effective against antibot and anticaptcha solutions, using the same advanced algorithms as the Universal Scraper API. However, if a website enforces a CAPTCHA challenge, we do not automatically bypass it. Solving CAPTCHAs currently requires implementing custom handling, such as integrating third-party CAPTCHA-solving services.
By choosing the right combination of ZenRows tools, you can optimize your web scraping strategy to handle even the most complex antibot defenses. If you need further assistance, feel free to reach out to our support team.
ZenRows supports a variety of **no-code platforms** to help you scrape data from websites without writing a single line of code. These integrations let you connect your scraping workflows with thousands of apps like **Google Sheets**, **Airtable**, **Notion**, **Amazon S3**, and more.
These no-code integrations are ideal for marketers, analysts, product managers, and anyone looking to automate data collection without needing technical skills.
## When to Use No-Code Integrations
Use ZenRows' no-code options when you:
* Want to scrape data into a spreadsheet without writing code
* Need to automate recurring data collection tasks
* Prefer visual workflow builders over API requests
* Are integrating web data into tools like CRMs, email platforms, or dashboards
**Best Practice:** Start with pre-built ZenRows templates in platforms like Zapier or Make to set up your workflow in minutes.
## Next Steps
Visit our [Integrations Page](/integrations/overview) to explore tutorials and real-world examples that walk you through setting up your first workflow.
Suppose you must scrape data from a website and automatically process it using a third-party tool. We offer various ways to integrate ZenRows with external software and tools. Currently, you can [integrate a captcha solver](/universal-scraper-api/features/other#captcha-solver) or [a no-code tool like Zapier/Make/Clay](/first-steps/faq#does-zenrows-have-no-code-options).
Additionally, you can build your integrations using the ZenRows output, whether HTML or JSON. A good use case for this is the autoparse feature, which returns structured data from a page.
Yes! Our custom plans are available for high-volume cases. We cannot customize public plans, as they are standardized for all our clients.
Optimizing your requests can significantly improve performance and reduce response times. Below are general best practices, followed by specific recommendations for each ZenRows product.
## Factors Affecting Request Speed
1. **Concurrency**: Sending multiple requests simultaneously can increase throughput
2. **Resource Usage**: Features like JavaScript rendering or waiting for specific conditions can impact speed
3. **Response Size (optional)**: Pages with dynamic content will naturally take longer to load. Consider targeting only the necessary data or using output filters to minimize payload.
4. **Success Rate**: The rate of successful requests. If the success rate is low, you may need to increase the number of requests or the concurrency.
While Residential Proxies have no concurrency restrictions, other products have plan-specific limits. Monitor your performance when adjusting these settings.
### Monitoring Concurrency Usage
Each response includes headers that help you manage and optimize your concurrency:
```
Concurrency-Limit: 200
Concurrency-Remaining: 199
```
These headers help you:
* Monitor how many concurrent requests your plan allows
* Track how many slots are currently available
* Adjust request volume dynamically to avoid hitting limits that may delay or throttle requests
The Concurrency-Remaining header reflects the real-time state of your concurrency usage and is the primary value our system uses to enforce limits. If it reaches zero and more requests are sent, you may receive a `429 Too Many Requests` error and your IP can be temporarily blocked for 5 minutes.
If you receive a `BLK0001` error (IP Address Blocked), it means your IP has exceeded the allowed error rate. The block will last for 5 minutes and will impact your ability to send new requests during that time, affecting your overall scraping speed. For more details, see our [API Error Codes documentation](/api-error-codes#BLK0001).
Use these headers to adjust your request flow in real-time, scaling up when possible and backing off before hitting limits.
## Product-Specific Recommendations
### Universal Scraper API
1. **Optimize JavaScript Rendering**:
* Disable `js_render=true` for static content to improve speed
* Only enable when necessary for dynamic content or accessing protected content
* Consider the impact on response times
2. **Minimize Wait Times**:
* Use `wait` and `wait_for` only when required
* Set the minimum necessary wait duration
* Longer waits mean slower requests
3. **Use Premium Proxies**:
* Enable `premium_proxy=true` for faster, more consistent responses
* Particularly useful for sites with anti-bot measures
* Can reduce retries and improve overall speed
### Scraper APIs
1. **Concurrency Management**:
* Start with moderate concurrency and monitor response times
* Increase gradually while maintaining acceptable speed
* Implement backoff strategies when requests slow down
2. **Parameter Optimization**:
* Remove unnecessary parameters that might slow down requests
* Only use parameters essential for your use case
* Monitor the impact of each parameter on response times
### Residential Proxies
1. **Request Rate Optimization**:
* Monitor response times at different request rates
* Adjust based on target site performance
* Implement backoff when responses slow down
### Scraping Browser
1. **Resource Management**:
* Disable unnecessary JavaScript execution
* Block non-essential resources (images, media, etc.)
* Optimize browser settings for faster loading
2. **CAPTCHA Handling**:
* Implement manual CAPTCHA solving to avoid automated delays
* Consider the impact on overall request speed
## Speed Optimization Best Practices
1. **Start with Baseline**: Begin with standard settings and measure response times
2. **Monitor Performance**: Use response headers and timing metrics to track speed
3. **Gradual Optimization**: Make incremental changes and measure their impact
4. **Smart Retries**: Use exponential backoff for failed requests to maintain speed
5. **Target-Specific Tuning**: Adjust settings based on the specific website's performance
While these optimizations can improve request speed, some features (like JavaScript rendering) might be necessary for your specific use case. If you need help optimizing for speed while maintaining functionality, our support team is here to assist.
API usage counts are managed based on your subscription plan:
## Monthly Plans
* Usage is tracked and reset each month.
Any remaining usage does not roll over to the next month.
## 3-Month and 6-Month Plans
* Usage is tracked and reset every 3 or 6 months, depending on your subscription.
Any remaining usage does not roll over at the end of each period.
## Yearly Plans
* Usage is tracked and reset annually.
Any remaining usage does not roll over to the next year.
ZenRows is designed to bypass most modern antibot solutions out-of-the-box. We continuously test our service to ensure optimal performance.
Handling CAPTCHAs depends on the type of CAPTCHA and the ZenRows product you're using.
## Handling CAPTCHAs on Forms
CAPTCHAs on forms are not solved automatically. If you need to submit forms that trigger a CAPTCHA, we offer an integration with a CAPTCHA solver that might work for your use case. Learn more about it here: [Using JavaScript Instructions to Solve CAPTCHAs](/universal-scraper-api/features/js-instructions#captcha-solving)
## CAPTCHA Handling by Product
Each ZenRows product has its own approach to handling CAPTCHAs, depending on the level of antibot protection in place. While some products automatically bypass CAPTCHAs in most cases, others may require additional configurations or external solvers. Below, we outline how each product deals with CAPTCHAs and what you can do to improve your success rate.
### Universal Scraper API
* Uses Premium Proxies and JS Render to bypass most antibot measures.
* If a CAPTCHA appears, you can use JavaScript Instructions to interact with the page and solve it manually or through an external CAPTCHA-solving service.
### Scraper APIs
* Fully managed solution—our API automatically handles the antibot protections, including CAPTCHA challenges.
### Residential Proxies
* Residential Proxies provide anonymity but do not bypass CAPTCHAs automatically.
* If CAPTCHA protection is strict, you'll need custom handling or an external solver.
### Scraping Browser
* Uses the same bypassing techniques as the Universal Scraper API.
* Can handle most antibot solutions, but does not solve CAPTCHAs by default.
* If a CAPTCHA is encountered, it requires custom handling, such as integrating a CAPTCHA solver.
By choosing the right ZenRows product and implementing the appropriate CAPTCHA-handling techniques, you can minimize interruptions and improve your scraping success rate. If you need assistance with a specific case, feel free to contact our support team.
Concurrency refers to the number of ongoing requests that happen at any given time. By different means, computers and languages can call the API in parallel and wait for results while others are still running. You can use concurrency with any ZenRows plan; check out [pricing](https://www.zenrows.com/pricing) for more details.
For more details, check our [how-to guide on concurrency](/universal-scraper-api/features/concurrency#using-concurrency) to see details about implementation in Python and JavaScript.
## Important Behavior to Understand
### Canceled Requests Still Count Against Your Concurrency
One crucial thing to understand is that **canceling requests on the client side does NOT immediately free up concurrency slots**. When you cancel a request:
1. Your client stops waiting for a response
2. But the ZenRows server continues processing the request
3. The concurrency slot remains occupied until the server-side processing completes
4. Only then is the concurrency slot released
This can lead to unexpected `429` errors if you're canceling requests and immediately trying to make new ones, as your concurrency limit might still be reached.
### Security System for Failing Requests
ZenRows implements a security system that may temporarily ban your API key if you send too many failing requests in a short period. Types of failing requests that can trigger this include:
* `429 Too Many Requests` errors due to exceeding concurrency limits
* Invalid API key errors
* `400 Bad Request` errors due to invalid parameters
* Other repeated API errors
If your API key gets temporarily banned, you'll receive an error from the API. If the requests continue, the IP address might get banned for a few minutes and the requests will not even connect with the server.
## Monitoring Your Concurrency Usage
You can monitor your concurrency usage through response headers:
```
Concurrency-Limit: 200
Concurrency-Remaining: 199
X-Request-Cost: 0.001
X-Request-Id: 67fa4e35647515d8ad61bb3ee041e1bb
Zr-Final-Url: https://httpbin.io/anything
```
These headers provide valuable information about your request:
* **Concurrency-Limit**: Your maximum concurrent request limit based on your plan
* **Concurrency-Remaining**: Number of additional concurrent requests you can make
* **X-Request-Cost**: The cost of this request (varies based on enabled features)
* **X-Request-Id**: Unique identifier for this request - essential when reporting issues to support
* **Zr-Final-Url**: The final URL after any redirects that occurred during the request
## Related questions
### How many concurrent requests are included in my plan?
The concurrency limit varies by subscription plan:
* **Trial plan:** 5 concurrent requests
* **Developer plan:** 20 concurrent requests
* **Startup plan:** 50 concurrent requests
* **Business plan:** 100 concurrent requests
* **Business 500:** 150 concurrent requests
* **Business 1K:** 200 concurrent requests
* **Business 2K:** 300 concurrent requests
* **Business 3K:** 400 concurrent requests
Enterprise plans can include custom concurrency limits to fit your needs. Contact us for tailor-made Enterprise solutions.
### If get a "429 Too Many Requests" error, do I lose that request or is it queued?
You'll receive an error, and that request won't be queued or retried automatically. You'll need to manage retries on your end, ensuring you don't exceed your concurrency limit.
### Can I increase my concurrency limit?
Absolutely! We offer [various plans](https://www.zenrows.com/pricing) with different concurrency limits to suit your needs. If you find yourself frequently hitting the concurrency limit, consider upgrading.
### How can I monitor my concurrency usage?
When using the Universal Scraper API, each response includes these helpful headers:
* `Concurrency-Limit`: Shows your maximum concurrent request limit
* `Concurrency-Remaining`: Shows how many free concurrency slots you have available
### I've been blocked by repeatedly exceeding my concurrency limit. Why?
Whenever you exceed your plan concurrency limit, you'll start receiving "429 Too Many Requests" errors.
If you keep sending more and more requests exceeding your plan concurrency limit in a short period of time, the service may temporarily block your IP address to prevent API misuse.
The IP address ban will last only a few minutes, but repeatedly being blocked might end in a long-lasting block.
Check the [concurrency optimization section](/universal-scraper-api/features/concurrency#using-concurrency-headers-for-optimization) for more information on how to limit concurrent requests to prevent being blocked.
### Troubleshooting with Support
When contacting ZenRows support for any issues with your requests, always include:
1. The **X-Request-Id** from the response headers
2. The exact error message you received
3. The timestamp of when the error occurred
4. Details about the parameters you used in the request
This information, especially the Request ID, allows our support team to quickly locate your specific request in our logs and provide more effective assistance.
Many websites tailor their content based on the visitor's location. For example, Amazon displays different products and prices on its UK (`.co.uk`) and French (`.fr`) sites. If you're scraping data from these sites, using a regional IP ensures that you receive the correct localized content. Also some websites restrict access to their content based on geographic location.
To avoid discrepancies caused by regional variations, such as different products being displayed on a retailer's website, you can send a specific country code with your request. This ensures that your request is localized to the desired country, allowing you to obtain consistent and replicable results.
ZenRows supports proxies from numerous countries around the world. You can use any country's ISO code to configure your proxies.
Here is the comprehensive list of premium proxy countries supported by ZenRows:
```json theme={null}
af => Afghanistan
al => Albania
dz => Algeria
ad => Andorra
ao => Angola
ai => Anguilla
ag => Antigua and Barbuda
ar => Argentina
am => Armenia
au => Australia
at => Austria
az => Azerbaijan
bs => Bahamas
bh => Bahrain
bd => Bangladesh
bb => Barbados
by => Belarus
be => Belgium
bz => Belize
bj => Benin
bm => Bermuda
bt => Bhutan
bo => Bolivia, Plurinational State of
ba => Bosnia and Herzegovina
bw => Botswana
br => Brazil
bn => Brunei Darussalam
bg => Bulgaria
bf => Burkina Faso
bi => Burundi
cv => Cabo Verde
kh => Cambodia
cm => Cameroon
ca => Canada
ky => Cayman Islands
cf => Central African Republic
td => Chad
cl => Chile
cn => China
co => Colombia
km => Comoros
cg => Congo
cd => Congo, The Democratic Republic o
cr => Costa Rica
ci => Cote D'ivoire
hr => Croatia
cu => Cuba
cy => Cyprus
cz => Czech Republic
dk => Denmark
dj => Djibouti
do => Dominican Republic
ec => Ecuador
eg => Egypt
sv => El Salvador
gq => Equatorial Guinea
er => Eritrea
ee => Estonia
et => Ethiopia
fo => Faroe Islands
fj => Fiji
fi => Finland
fr => France
gf => French Guiana
pf => French Polynesia
ga => Gabon
gm => Gambia
ge => Georgia
de => Germany
gh => Ghana
gi => Gibraltar
gr => Greece
gl => Greenland
gp => Guadeloupe
gu => Guam
gt => Guatemala
gn => Guinea
gw => Guinea-Bissau
gy => Guyana
ht => Haiti
hn => Honduras
hk => Hong Kong
hu => Hungary
is => Iceland
in => India
id => Indonesia
ir => Iran, Islamic Republic of
iq => Iraq
ie => Ireland
im => Isle of Man
il => Israel
it => Italy
jm => Jamaica
jp => Japan
jo => Jordan
kz => Kazakhstan
ke => Kenya
kr => Korea, Republic of
kw => Kuwait
kg => Kyrgyzstan
la => Lao People's Democratic Republic
lv => Latvia
lb => Lebanon
ls => Lesotho
lr => Liberia
ly => Libya
lt => Lithuania
lu => Luxembourg
mo => Macao
mk => Macedonia, The Former Yugoslav Republic of
mg => Madagascar
mw => Malawi
my => Malaysia
mv => Maldives
ml => Mali
mt => Malta
mq => Martinique
mr => Mauritania
mu => Mauritius
mx => Mexico
md => Moldova, Republic of
mn => Mongolia
me => Montenegro
ma => Morocco
mz => Mozambique
mm => Myanmar
na => Namibia
np => Nepal
nl => Netherlands
nc => New Caledonia
nz => New Zealand
ni => Nicaragua
ne => Niger
ng => Nigeria
no => Norway
om => Oman
pk => Pakistan
ps => Palestine, State of
pa => Panama
pg => Papua New Guinea
py => Paraguay
pe => Peru
ph => Philippines
pl => Poland
pt => Portugal
pr => Puerto Rico
qa => Qatar
re => Reunion
ro => Romania
ru => Russia
rw => Rwanda
lc => Saint Lucia
mf => Saint Martin (French Part)
ws => Samoa
sa => Saudi Arabia
sn => Senegal
rs => Serbia
sc => Seychelles
sl => Sierra Leone
sg => Singapore
sx => Sint Maarten (Dutch Part)
sk => Slovakia
si => Slovenia
sb => Solomon Islands
so => Somalia
za => South Africa
ss => South Sudan
es => Spain
lk => Sri Lanka
sd => Sudan
sr => Suriname
sz => Swaziland
se => Sweden
ch => Switzerland
sy => Syrian Arab Republic
tw => Taiwan, Province of China
tj => Tajikistan
tz => Tanzania, United Republic of
th => Thailand
tl => Timor-Leste
tg => Togo
to => Tonga
tt => Trinidad and Tobago
tn => Tunisia
tr => Turkey
tm => Turkmenistan
ug => Uganda
ua => Ukraine
ae => United Arab Emirates
gb => United Kingdom
us => United States
uy => Uruguay
uz => Uzbekistan
vu => Vanuatu
ve => Venezuela, Bolivarian Republic of
vn => Viet Nam
ye => Yemen
zm => Zambia
zw => Zimbabwe
```
## How to use it with each product:
### Universal Scraper API
Incorporate the selected ISO code into your scraping script to route your requests through the chosen proxy.
```python scraper.py theme={null}
# pip install requests
import requests
# Example for setting a proxy for Canada
params = {
'premium_proxy': 'true',
'proxy_country': 'ca',
}
response = requests.get('https://api.zenrows.com/v1/', params=params)
print(response.text)
```
### Scraper APIs
If the API offers a country option you can add it similarly to the Universal Scraper API.
```python theme={null}
# pip install requests
import requests
query_id_url = "example"
api_endpoint = f"https://.api.zenrows.com/v1/targets///{query_id_url}"
params = {
"apikey": "YOUR_ZENROWS_API_KEY",
"country": "us" # Optional: Target specific country
}
response = requests.get(api_endpoint, params=params)
print(response.text)
```
### Residential Proxies
ZenRows supports IPs from a wide variety of countries, allowing you to access geo-restricted data with ease. You can specify a country by using `country` followed by the country code in your proxy URL.
Example for Spain:
```bash theme={null}
http://:_country-es@superproxy.zenrows.com:1337
```
### Scraping Browser
You basically have two ways to set a country geolocation on the Scraping Browser, depending if you're using the SDK or not.
Without using the SDK, select a specific country by adding the `proxy_country` parameter to the WebSocket URL:
```bash theme={null}
wss://browser.zenrows.com?apikey=YOUR_ZENROWS_API_KEY&proxy_country=es
```
In SDK mode, specify the country when generating the connection URL:
```bash theme={null}
const connectionURL = scrapingBrowser.getConnectURL({
proxy: {
location: ProxyCountry.ES
},
});
```
By using the right proxy, you can ensure more reliable and geographically relevant data scraping while maintaining compliance with website policies.
For further assistance or more detailed configuration, refer to the ZenRows documentation or contact their support team. Happy scraping!
Not at all. We only charge for successful requests :)
`404 Not Found` and `410 Gone` errors are charged
You can extract data from as many websites as you want. Throw us 1M requests or 50M; we can perfectly handle it!
Not at all. Our platform and infrastructure are cloud-based, making our language-agnostic API easy and seamless to use.
# Quick Setup and First Request
Source: https://docs.zenrows.com/first-steps/getting-started-guide
Start scraping any website in under 5 minutes. ZenRows handles anti-bot measures, JavaScript rendering, and proxy management automatically, so you can focus on collecting data instead of managing infrastructure.
## Quick Setup
Visit the [Registration Page](https://app.zenrows.com/register) and sign up using Google, GitHub, or your email address. Account creation is free and provides immediate access to your dashboard.
Select options that match your use case during the setup process. This helps ZenRows recommend the most suitable features for your scraping needs
Get your API key from the dashboard and start your first request immediately. This key authenticates all your requests and tracks usage against your plan limits. Keep this key secure and never share it publicly.
## Your First Request
Test your ZenRows setup with this simple request:
```python Python theme={null}
## pip install requests
import requests
url = 'https://httpbin.io/anything'
apikey = 'YOUR_ZENROWS_API_KEY'
params = {
'url': url,
'apikey': apikey,
}
response = requests.get('https://api.zenrows.com/v1/', params=params)
print(response.text)
```
```javascript Node.js theme={null}
// npm install axios
const axios = require('axios');
const url = 'https://httpbin.io/anything';
const apikey = 'YOUR_ZENROWS_API_KEY';
axios({
url: 'https://api.zenrows.com/v1/',
method: 'GET',
params: {
'url': url,
'apikey': apikey,
},
})
.then(response => console.log(response.data))
.catch(error => console.log(error));
```
```java Java theme={null}
import org.apache.hc.client5.http.fluent.Request;
public class APIRequest {
public static void main(final String... args) throws Exception {
String apiUrl = "https://api.zenrows.com/v1/?apikey=YOUR_ZENROWS_API_KEY&url=https%3A%2F%2Fhttpbin.io%2Fanything";
String response = Request.get(apiUrl)
.execute().returnContent().asString();
System.out.println(response);
}
}
```
```php PHP theme={null}
```
```go Go theme={null}
package main
import (
"io"
"log"
"net/http"
)
func main() {
client := &http.Client{}
req, err := http.NewRequest("GET", "https://api.zenrows.com/v1/?apikey=YOUR_ZENROWS_API_KEY&url=https%3A%2F%2Fhttpbin.io%2Fanything", nil)
resp, err := client.Do(req)
if err != nil {
log.Fatalln(err)
}
defer resp.Body.Close()
body, err := io.ReadAll(resp.Body)
if err != nil {
log.Fatalln(err)
}
log.Println(string(body))
}
```
```ruby Ruby theme={null}
# gem install faraday
require 'faraday'
url = URI.parse('https://api.zenrows.com/v1/?apikey=YOUR_ZENROWS_API_KEY&url=https%3A%2F%2Fhttpbin.io%2Fanything')
conn = Faraday.new()
conn.options.timeout = 180
res = conn.get(url, nil, nil)
print(res.body)
```
```bash cURL theme={null}
curl "https://api.zenrows.com/v1/?apikey=YOUR_ZENROWS_API_KEY&url=https%3A%2F%2Fhttpbin.io%2Fanything"
```
Replace `YOUR_ZENROWS_API_KEY` with your actual API key from the dashboard. A successful response confirms your setup is working correctly.
## Next Steps
### Choose your ZenRows solution
Select the approach that best fits your scraping requirements and technical expertise:
} href="https://docs.zenrows.com/universal-scraper-api/api-reference">
**Best for**: General web scraping with automatic optimization
} href="/scraping-browser/introduction">
**Best for**: Complex automation requiring complete browser control
} href="/residential-proxies/introduction">
**Best for**: High-quality proxies with existing infrastructure
} href="/scraper-apis/introduction">
**Best for**: Structured data from specific popular websites
} href="/integrations/overview">
**Best for**: No-code solutions and workflow automation
Check our [Product Documentation](/first-steps/our-products#best-product-for-your-use-case) to compare features and find the best fit for your use case, or review our [Pricing Guide](/first-steps/pricing#choosing-the-right-plan-for-your-needs) to select the right plan.
### Learn web scraping fundamentals
Build your knowledge with comprehensive guides and best practices:
* [Web Scraping Best Practices](https://www.zenrows.com/blog/web-scraping-best-practices) - Essential techniques for reliable data collection, rate limiting strategies, and ethical scraping guidelines.
* [Complete Python Web Scraping Tutorial](https://www.zenrows.com/blog/web-scraping-python) - Step-by-step implementation guide covering BeautifulSoup, requests, and data processing.
* [Web Scraping Use Cases Guide](https://www.zenrows.com/blog/7-use-cases-for-website-scraping) - Real-world applications including price monitoring, lead generation, market research, and competitive analysis.
* [Handling JavaScript-Heavy Websites](https://www.zenrows.com/blog/scraping-javascript-rendered-web-pages) - Advanced techniques for single-page applications and dynamic content.
* [E-commerce Data Collection](https://www.zenrows.com/blog/job-board-scraping) - Strategies for product information, pricing, and inventory tracking.
### Scale your operations
As your scraping needs grow, explore advanced features and optimization strategies:
* **Concurrent requests**: Optimize performance by running multiple requests simultaneously
* **Data storage**: Choose appropriate databases and storage solutions for your collected data
* **Automation**: Set up scheduled scraping jobs for regular data collection
* **Data processing**: Implement pipelines for cleaning, validating, and analyzing scraped data
* **Monitoring**: Track success rates, identify patterns, and optimize your scraping strategy
### Get help when you need it
Access support resources and community knowledge:
* **FAQs** - Find answers to common questions about API limits, billing, and technical issues
* **Troubleshooting Guides** - Resolve specific problems with blocked requests, parsing errors, and configuration issues
* **Support** - Contact our team for personalized assistance with complex scraping challenges
* **Community** - Join our Discord server to connect with other developers and share scraping strategies
* **Documentation** - Explore detailed guides for advanced features and specific use cases
## Why Choose ZenRows?
ZenRows solves the most challenging aspects of web scraping through automated solutions:
**Anti-bot bypass & proxy rotation**: Detects and bypasses Cloudflare, reCAPTCHA, Akamai, Datadome, and other blocking mechanisms. Automatically switches between residential IPs across 190+ countries while rotating browser fingerprints to maintain access.
**JavaScript rendering**: Uses real browser engines to handle dynamic content, infinite scroll, and lazy-loaded elements that traditional HTTP requests cannot capture.
**Adaptive infrastructure**: Includes automatic retry mechanisms when requests fail, real-time analytics for monitoring performance, and maintains 99.9% uptime.
**Auto-parsing features**: Adapts automatically to structural changes on supported websites, reducing maintenance overhead.
You can start scraping immediately without technical expertise in proxy management or anti-detection techniques.
## Common Scraping Challenges
If you're new to web scraping, understanding these common challenges helps explain why ZenRows provides value and how it solves problems you might encounter with traditional scraping approaches:
### Anti-Bot Measures
Websites deploy various blocking mechanisms to prevent scraping, such as:
* Web application firewalls (e.g., **Cloudflare**, **Datadome**, **Akamai**).
* CAPTCHA services that require solving puzzles to verify human activity.
* Rate limiting restricts the number of requests from a single IP address within a given time.
Overcoming these measures often requires advanced techniques like CAPTCHA-solving services, IP rotation, and adapting to specific firewall rules.
### JavaScript Rendering
Many modern websites dynamically render content using JavaScript, which prevents data from loading immediately when the page is opened. For example:
* Dynamic content that appears only after JavaScript execution completes.
* Infinite scrolling websites only display initial content, loading more as users scroll.
* "Load more" buttons that reveal additional content through user interaction.
Traditional HTTP requests cannot capture this dynamically generated content.
### HTML Structural Changes
Websites frequently update page designs, layouts, and HTML structures to introduce new features or improve user experience. These changes often include:
* Modifications to **CSS selectors** or **HTML attribute names**.
* Adjustments to the overall structure of the page.
Such updates can render previously working scrapers ineffective, requiring constant monitoring and updates to your scraping logic.
### Legal Considerations
Scraping activities must comply with legal and ethical guidelines:
* Website **terms of service** that prohibit scraping certain types of data, especially sensitive or restricted information.
* **Data behind login walls** or private details is often protected by law and requires explicit authorization to access.
* Adhering to rules specified in a site's `robots.txt` file, which defines areas where bots are not allowed.
## Frequently Asked Questions (FAQ)
No technical expertise in proxy management or anti-detection techniques is required. ZenRows handles all the complex infrastructure automatically. If you can make HTTP requests, you can use ZenRows.
Yes, every new account includes a free trial period to test our services. You can make requests immediately after signing up to evaluate ZenRows with your target websites.
Enable JavaScript rendering (`js_render=true`) when scraping websites that load content dynamically, have infinite scroll, use "Load More" buttons, or are single-page applications (SPAs) built with React, Vue, or Angular.
Your API key is unique to your account and should be kept secure. Never share it publicly or commit it to version control. Use environment variables in your code and regenerate your key if you suspect it's been compromised.
Each ZenRows product has its own endpoint and documentation. You can use multiple products with the same API key. Simply change the endpoint URL and parameters based on which product you want to use for each request.
ZenRows works with any programming language that can make HTTP requests. We provide code examples for Python, JavaScript/Node.js, Java, PHP, Go, Ruby, and cURL. The API is language-agnostic and follows standard REST principles.
Log into your ZenRows dashboard to view real-time usage statistics, remaining credits, success rates, and request history. You can also set up usage alerts to notify you when approaching your plan limits.
# Managing Your Notifications and Usage Alerts
Source: https://docs.zenrows.com/first-steps/manage-notifications
Stay in control of your account and data usage with our customizable notification system. Notifications help you track your subscription, monitor API usage, and avoid service disruptions without needing to log in daily. This guide outlines the types of notifications available, their default statuses, and how to manage them. [Manage your notifications](https://app.zenrows.com/account/notifications).
You can add multiple email recipients in the notification settings by separating them with commas. If no email is specified, notifications will be sent to the account's primary email address by default.
## Billing
### Invoice Paid
**Default: `Enabled`**
Receive a confirmation email with a receipt each time a payment is successfully processed. This is ideal for keeping your accounting records up to date and sharing invoices with your finance team.
## Alerts
### Subscription Utilization Threshold
**Default: `Enabled`**
Set a custom percentage threshold (e.g., 80%) to receive a warning when your usage approaches the plan's limit. This is useful for proactively managing high-volume workflows and preventing unexpected overages. Click **Manage** to configure your preferred threshold level.
### Subscription Limit Reached
**Default: `Enabled`**
Get notified the moment your monthly quota is fully consumed. This allows you to take immediate action—such as upgrading your plan, purchasing extra credits (Top-Ups), or optimizing your requests to maintain uninterrupted service.
## Activity
### Daily Usage Summary
**Default: `Disabled`**
Receive a quick daily snapshot of your API activity, showing the number of requests made and data consumed by product. This is ideal for users who want to keep a close eye on consumption or need to report usage daily.
### Weekly Usage Summary
**Default: `Enabled`**
Receive a consolidated report summarizing your usage for the past 7 days. This is great for identifying trends, evaluating API needs, and planning for scale. Recommended for teams and managers who track consumption over time.
### Universal Scraper API Daily Consumption Threshold
**Default: `Enabled`**
Stay informed when your daily Universal Scraper API usage exceeds a preset threshold. This is useful for preventing excessive daily usage or monitoring anomalies. Thresholds can be customized by clicking **Manage** in your notification settings.
## Managing Your Notification Settings
You can manage all notifications from the [Notifications Settings page](https://app.zenrows.com/account/notifications). To unsubscribe or pause alerts:
1. Visit your [notification settings](https://app.zenrows.com/account/notifications).
2. Locate the notification type you want to adjust.
3. Use the toggle switch to enable or disable it.
4. If applicable, click **Manage** to configure thresholds or add recipients.
These settings apply instantly, giving you real-time control over how and when you're informed.
We recommend keeping critical alerts such as **Subscription Utilization Limit Reached** and **Invoice Paid** enabled at all times to avoid missed billing or service interruptions.
# ZenRows' list of products
Source: https://docs.zenrows.com/first-steps/our-products
## Universal Scraper API
ZenRows' Universal Scraper API is a powerful tool for easily extracting data from websites. It handles everything from dynamic content and JavaScript rendering to IP rotation and fingerprint management, offering a hassle-free solution for web scraping. It's extensive customization options, residential proxy support, and Cloudflare bypass capabilities make it perfect for handling complex scraping tasks efficiently.
**Key Benefits:**
* Handles dynamic content and JavaScript rendering
* Extensive customization options
* Anti-bot bypass capabilities
## Scraping Browser
The Scraping Browser integrates seamlessly with Puppeteer and Playwright, making it the ideal solution for users already working with those tools. It leverages ZenRows' residential proxy network and browser simulation to scrape dynamic websites, handle user interactions, and avoid IP blocks — **all with just one line of code**.
**Key Benefits:**
* Seamless integration with Puppeteer and Playwright
* Leverages residential proxy network
* Handles user interactions and avoids IP blocks
## Residential Proxies
ZenRows' Residential Proxies provide access to a global network of over 55 million IPs across 190+ countries, ensuring reliable and anonymous connections. With features like IP auto-rotation and geo-targeting, they are perfect for scraping geo-restricted content and maintaining high performance while staying undetected.
**Key Benefits:**
* Access to a global network of residential IPs
* IP auto-rotation and geo-targeting
* Reliable and anonymous connections
## Scraper APIs
Scraper APIs designed by ZenRows are built to extract structured data from industries like eCommerce, Search Engine Results Pages (SERPs), and Real Estate, with more to come. Each API is optimized for its target industry, handling JavaScript-heavy pages, pagination, complex navigation, and anti-bot protections. Whether you're tracking prices, monitoring search rankings, or analyzing property listings, ZenRows ensures seamless data collection with minimal effort.
**Key Benefits:**
* Industry-specific optimizations
* Handles complex navigation and anti-bot protections
* Seamless data collection with minimal effort
## Best Product for Your Use Case
### Compare Based on Technical Needs
Understanding your technical requirements helps narrow down the right product quickly:
* **Facing anti-bot restrictions?** The **Universal Scraper API** handles all bypass mechanisms automatically for sites with defenses like Cloudflare, DataDome, or similar anti-bot protection. It's your best choice for heavily protected sites.
* **Need complex browser interactions?** Choose the **Scraping Browser** if your project requires extensive actions like clicking buttons, scrolling, or form filling. It integrates with your existing Puppeteer or Playwright code, adding proxy management and scalability.
Consider using custom code to bypass forced CAPTCHAS if the page forces a challenge, or switch to the Universal Scraper API. However, remember that the Universal Scraper API has limitations when executing complex [JavaScript instructions](/universal-scraper-api/features/js-instructions).
* **Want plug-and-play solutions?** Our **Scraper APIs** provide industry-specific data extraction with minimal configuration. Perfect for eCommerce, SERPs, or Real Estate data collection.
* **Just need reliable IPs?** **Residential Proxies** give you access to over 55 million IPs worldwide with geo-targeting capabilities if you have your scraping setup, but need undetectable proxies.
### Match the Product to Your Workflow
Understanding when to choose each product will help you make the right decision for your specific use case.
#### Universal Scraper API
Best for general-purpose scraping. It handles everything, including JavaScript rendering, anti-bot bypass, proxy rotation, fingerprinting and more, making it perfect when you need a comprehensive scraping solution without building the infrastructure yourself.
#### Scraper APIs
Ideal for vertical-specific needs with structured output. Whether you're extracting data from eCommerce platforms, monitoring search engine results, or analyzing real estate listings, these APIs provide structured results with minimal setup.
#### Scraping Browser
Ideal if you already use Playwright or Puppeteer and need to add proxy management and anti-bot bypass capabilities. It provides fine-grained control over browser interactions such as clicking buttons, filling forms, scrolling and more. The key advantage is maintaining your existing scraping code while leveraging ZenRows' infrastructure for scalability.
#### Residential Proxies
Choose this when you have custom scraping logic but need reliable, geo-targeted IPs.
### Evaluate Cost and Scale
When selecting the right product, evaluating cost and scalability is critical to ensure your solution meets your budget and growth requirements.
Understand your usage patterns by estimating your monthly data needs and consider how many requests or pages you need to scrape and the complexity of those requests. For instance, scraping heavily protected sites or performing complex browser interactions may require more resources, impacting costs.
You can find detailed information about pricing for each product in our [Pricing Documentation](/first-steps/pricing)
## Frequently Asked Questions (FAQ)
**Universal Scraper API**: A complete web scraping solution that handles dynamic content, proxies, anti-bot measures, and JavaScript rendering automatically.\
**Scraping Browser**: Ideal for developers using Puppeteer or Playwright, it adds proxy integration, browser simulation, and anti-bot bypass with minimal setup.\
**Residential Proxies**: A standalone proxy service offering over 55 million real IPs with geo-targeting and rotation for custom-built scraping solutions.\
**Scraper APIs**: Industry-specific APIs optimized for structured data extraction from verticals like eCommerce, SERPs, and Real Estate, requiring minimal configuration and no coding.
You can interact with the page using [JavaScript instructions](/universal-scraper-api/features/js-instructions) in the **Universal Scraper API**. These instructions are designed for simple interactions, such as clicking buttons, filling forms, and basic navigation. However, they have limitations and are not suited for complex or heavy interactions.
For more advanced interactions, such as deep website manipulation, handling dynamic user flows, executing intricate browser actions, or multi-step navigations, the **Scraping Browser** is the best choice. It integrates seamlessly with Puppeteer or Playwright, giving you full control over the browser environment. This allows for precise interactions, such as simulating user behavior, handling JavaScript-heavy pages, and navigating complex workflows.
Yes, ZenRows offers no-code options for web scraping. You can integrate ZenRows with various platforms to connect thousands of apps.
[Click here](/integrations/clay) for more information on our No-Code documentation pieces under the Integration tag.
Yes, each new request automatically uses a different IP to ensure anonymity and avoid detection.
However, if you need to maintain the same IP for a specific period, this is also possible. Please refer to each product's documentation for detailed information on how to configure it.
Yes, our products support geo-targeting, allowing you to choose IPs from specific countries or regions. This is especially useful for accessing localized content.
Currently, city- or state-level geolocation is not available.
Absolutely. Residential Proxies are designed to integrate seamlessly with any custom scraping setup, regardless of the tools or frameworks you use.
No, Residential Proxies are only available to paying accounts.
No, our fingerprints are not returned.
No, we do not return either the page's IP or our own IP.
No, you cannot access the page headers directly. However, you can access the response headers.
No, CAPTCHA tokens are not returned after bypassing.
No, we provide the tools for scraping, but you need to develop your own solutions. Our easiest product to integrate is **Scraper APIs**, which require less coding — just run them to get the page contents.
We also offer a [No-Code options](/first-steps/faq#does-zenrows-have-no-code-options) for those who prefer to avoid coding.
# ZenRows Pricing
Source: https://docs.zenrows.com/first-steps/pricing
ZenRows® offers transparent, flexible pricing designed for different technical levels and scraping volumes. Every plan includes access to all ZenRows products — the **Universal Scraper API**, **Scraping Browser**, **Residential Proxies**, and **Scraper APIs (Beta)**.
## How Pricing Works
### Shared Balance system
Each plan gives you a **shared balance** that you can spend across all ZenRows products. This means you have the flexibility to use any combination of our tools without worrying about separate limits for each product.
### Pay Only for Success
You're charged **only for successful requests**. Failed or retried requests don't consume your balance. HTTP 404 and 410 responses count as successful because the request completed correctly and returned valid data.
### What Affects Your Costs
Your costs depend on four main factors:
* **Page complexity** — Basic public pages cost less than protected pages behind anti-bot systems (i.e., Cloudflare, DataDome, Akamai, etc.)
* **JavaScript rendering** — Enabling browser-based rendering increases costs because it requires more computational resources
* **Premium proxies** — These residential IP addresses improve success rates on protected or geo-targeted sites but cost more
* **Browser usage** — When using the **Scraping Browser**, you pay based on data transferred (GB) and active session time
### Cost Multipliers for Universal Scraper API
Different features multiply your base cost depending on the infrastructure required:
| Feature | Cost multiplier vs Basic |
| ------------------------------ | ------------------------ |
| JavaScript Rendering | ×5 |
| Premium Proxies | ×10 |
| JS Rendering + Premium Proxies | ×25 |
**Example costs per 1,000 requests (CPM):**
* Basic pages: \$0.28
* With JavaScript: \$1.40
* With Premium Proxies: \$2.80
* With both features: \$7.00
These multipliers reflect the additional infrastructure needed for browser rendering and residential IP addresses.
## Basic vs Protected Pages
Understanding the difference between these page types helps you estimate costs accurately:
* **Basic pages** — Standard public websites like news articles, product listings, and blogs. These usually work without proxies or JavaScript rendering.
* **Protected pages** — Sites using anti-bot protection (i.e., Cloudflare, DataDome, Akamai, etc). These need JavaScript rendering and Premium Proxies for reliable data extraction.
If you're unsure about your page mix, use our **[Pricing Calculator](https://www.zenrows.com/pricing-calculator)** to estimate how different page types affect your total cost.
## Cost Calculation Examples
### Universal Scraper API
* **Available requests** = (Plan Balance ÷ Cost per 1,000 requests) × 1,000
* **Total cost** = (Number of requests ÷ 1,000) × Cost per 1,000 requests
### Scraping Browser
* **Total cost** = (GB used × price per GB) + (Session hours × \$0.09)
* Sessions are billed in 30-second increments
### Residential Proxies
* **Total cost** = GB used × price per GB
> **Remember:** You pay only for successful requests across all products.
## Choose Your Plan in 60 Seconds
1. **Estimate your monthly volume** — Count how many Basic and Protected pages you'll scrape
2. **Add browser usage** — If you'll use the Scraping Browser, estimate GB and session hours needed
3. **Get a recommendation** — The calculator suggests a plan with buffer room for growth
→ **[Open the Pricing Calculator](https://www.zenrows.com/pricing-calculator)**
## Plan Comparison
**A free trial period to test your use case.**
**Price:** Free
**Universal Scraper API**
* 1,000 basic results
* 200 results using only the JS Rendering feature
* 100 results using only the Premium Proxy feature
* 40 protected results
**Scraper APIs `BETA`**
* 1,000 results
**Scraping Browser** or **Residential Proxies**
* 100 MB
**Concurrency:** 5 parallel requests
**Maximum Download Size:** 10 MB
**Features:**
* Everything from the Business Plan
**Ideal for personal or small projects.**
**Price:** \$69.99/month
**Universal Scraper API**
* 250K basic results (\$0.28 CPM)
* 50K results using only the JS Rendering feature (\$1.40 CPM)
* 25K results using only the Premium Proxy feature (\$2.80 CPM)
* 10K protected results (\$7 CPM)
**Scraper APIs `BETA`**
* 66.7K results (\$1.05 CPM)
**Scraping Browser** or **Residential Proxies**
* 12.73 GB (\$5.5/GB)
**Concurrency:** 20 parallel requests
**Maximum Download Size:** 5 MB
**Features:**
* AI support and documentation
* Standard analytics
* Alerts & notifications
**Great for early-stage startups needing more volume.**
**Price:** \$129.99/month
**Universal Scraper API**
* 1M basic results (\$0.13 CPM)
* 200K results using only the JS Rendering feature (\$0.65 CPM)
* 100K results using only the Premium Proxy feature (\$1.30 CPM)
* 40K protected results (\$3.25 CPM)
**Scraper APIs `BETA`**
* 130K results (\$1.00 CPM)
**Scraping Browser** or **Residential Proxies**
* 24.76 GB (\$5.25/GB)
**Concurrency:** 50 parallel requests
**Maximum Download Size:** 10 MB
**Features:**
* Everything from the Developer Plan
* Human chat support
**Suitable for scaling operations.**
**Price:** \$299.99/month
**Universal Scraper API**
* 3M basic results (\$0.10 CPM)
* 600K results using only the JS Rendering feature (\$0.50 CPM)
* 300K results using only the Premium Proxy feature (\$1.00 CPM)
* 120K protected results (\$2.50 CPM)
**Scraper APIs `BETA`**
* 315.8K results (\$0.95 CPM)
**Scraping Browser** or **Residential Proxies**
* 60 GB (\$5/GB)
**Concurrency:** 100 parallel requests
**Maximum Download Size:** 10 MB
**Features:**
* Everything from the Startup Plan
* Advanced analytics
**Built for high-traffic applications.**
**Price:** \$499.99/month
**Universal Scraper API**
* 6.2M basic results (\$0.08 CPM)
* 1.2M results using only the JS Rendering feature (\$0.40 CPM)
* 620K results using only the Premium Proxy feature (\$0.80 CPM)
* 240K protected results (\$2.08 CPM)
**Scraper APIs `BETA`**
* 555.5K results (\$0.90 CPM)
**Scraping Browser** or **Residential Proxies**
* 111.11 GB (\$4.5/GB)
**Concurrency:** 150 parallel requests
**Maximum Download Size:** 20 MB
**Features:**
* Everything from the Business Plan
* Priority support
**High-performance plan for large teams.**
**Price:** \$999.99/month
**Universal Scraper API**
* 12.5M basic results (\$0.08 CPM)
* 2.5M results using only the JS Rendering feature (\$0.40 CPM)
* 1.2M results using only the Premium Proxy feature (\$0.80 CPM)
* 480K protected results (\$2.08 CPM)
**Scraper APIs `BETA`**
* 1.2M results (\$0.83 CPM)
**Scraping Browser** or **Residential Proxies**
* 285.71 GB (\$3.5/GB)
**Concurrency:** 200 parallel requests
**Maximum Download Size:** 20 MB
**Features:**
* Everything from the Business 500 Plan
* Dedicated Account Manager
**Built for data-intensive operations.**
**Price:** \$1,999.99/month
**Universal Scraper API**
* 25M basic results (\$0.08 CPM)
* 5M results using only the JS Rendering feature (\$0.40 CPM)
* 2.5M results using only the Premium Proxy feature (\$0.80 CPM)
* 1M protected results (\$2.00 CPM)
**Scraper APIs `BETA`**
* 2.5M results (\$0.80 CPM)
**Scraping Browser** or **Residential Proxies**
* 634.92 GB (\$3.15/GB)
**Concurrency:** 300 parallel requests
**Maximum Download Size:** 50 MB
**Features:**
* Everything from the Business 1k Plan
**Enterprise-grade scale and reliability.**
**Price:** \$2,999.99/month
**Universal Scraper API**
* 37.5M basic results (\$0.08 CPM)
* 7.5M results using only the JS Rendering feature (\$0.40 CPM)
* 3.75M results using only the Premium Proxy feature (\$0.80 CPM)
* 1.5M protected results (\$2.00 CPM)
**Scraper APIs `BETA`**
* 4M results (\$0.75 CPM)
**Scraping Browser** or **Residential Proxies**
* 1.07 TB (\$2.73/GB)
**Concurrency:** 400 parallel requests
**Maximum Download Size:** 100 MB
**Features:**
* Everything from the Business 2k Plan
* SLA Guarantee
* Onboarding & technical support
**Custom solutions for large-scale businesses.**
**Price:** Custom (above \$2,999/month)
**Universal Scraper API**
* Custom results
**Scraper APIs `BETA`**
* Custom results
**Scraping Browser** or **Residential Proxies**
* Custom GB
**Concurrency:** Custom parallel requests
**Maximum Download Size:** Custom MB
**Features:**
* Everything from the Business 3k Plan
* Dedicated Key Account Manager
**Basic results** = Public websites without anti-bot protection\
**Protected results** = Sites behind firewalls, or heavy JavaScript\
**Concurrent requests** = How many pages you can scrape simultaneously. Higher concurrency enables faster data extraction.
Use the **[Pricing Calculator](https://www.zenrows.com/pricing-calculator)** to test different scenarios and find your ideal plan.
## Product-Specific Pricing Details
### Universal Scraper API
* **Billing method:** Cost per 1,000 successful requests (CPM)
* **Cost multipliers:** Apply when you enable JavaScript rendering or Premium Proxies
* **Best for:** Mixed scraping where some pages need protection bypass
### Scraping Browser
* **Billing method:** Data usage (per GB) + session time (\$0.09 per hour)
* **Best for:** Interactive sessions or long-running browser automation
### Residential Proxies
* **Billing method:** Data usage only (per GB)
* **Best for:** Geo-targeted scraping or proxy-only workflows
### Scraper APIs `Beta`
* **Billing method:** Cost per 1,000 successful requests with volume discounts
* **Best for:** Structured data from predictable endpoints
Enterprise plans offer additional CPM and GB pricing discounts. [Contact our sales team](https://www.zenrows.com/contact-sales) if your usage exceeds our highest standard plan.
## Managing Your Subscription
Access all subscription changes from your Plans or Billing pages.
### Top-Ups
You'll receive usage alerts at 80% and 95% of your limit, if enabled from your [Notifications settings](https://app.zenrows.com/account/notifications). Top-Ups let you extend usage without changing plans:
* **Cost:** 15% of your plan price for 15% more usage
* **Limit:** Up to 4 Top-Ups per billing cycle
Set automatic Top-Ups to trigger at your chosen threshold (like 95%). To avoid surprises, enable invoice notifications in your [Notification Settings](https://app.zenrows.com/account/notifications).
### Upgrading Your Plan
* **When it applies:** Immediately after purchase
* **Important:** Unused balance from your previous plan doesn't carry over or be credited toward the new plan
### Downgrading Your Plan
* **When it applies:** At the end of your current billing cycle
* **During transition:** You keep your current limits until renewal
### Cancelling Your Subscription
1. Go to Billing
2. Click **Cancel Subscription**
3. Select your reason for cancelling (your feedback helps us improve!)
4. Confirm to complete the cancellation
1. You keep access until your billing cycle ends
2. You can use your remaining quota during this time
3. No additional charges will occur
For complete terms and conditions, visit our Terms & Conditions page.
## Frequently Asked Questions (FAQ)
ZenRows uses a subscription model. Each plan gives a monthly balance (e.g., Business = \$299) to spend across all products.\
Every successful request deducts cost according to its CPM or GB rate. You only pay for successful requests — failed or retried ones aren’t billed (404 and 410 count as successful).
No, the cost of requests is included in your plan, and your plan's balance applies to all products. For example, if you're on the Business plan, you pay **\$299 per month** and receive **\$299 worth of usage** to spend across all ZenRows products.
1. Each product has a specific cost per request.
2. The costs for all products are deducted from your shared balance.
For instance:
If you spend \$150 with the Universal Scraper API and \$149 with the Scraping Browser, your total usage will be \$299.
Keep in mind that your plan's balance is shared across all products, not allocated separately to each product.
We accept credit cards (Visa, MasterCard, American Express, etc.), Apple Pay, Google Pay and PayPal. Wire transfer is accepted for Enterprise customers. We don't accept crypto or debit cards at the moment.
We offer flexible subscription options with discounts for longer commitments. Choose from 3-month, 6-month, or yearly plans, each with discounted pricing. The best value comes with our yearly plan, which includes a 10% discount. Enjoy the full range of ZenRows features at the best rates available.
Currently, ZenRows does not offer Pay-As-You-Go plans. However, we are actively working on expanding our offerings and plan to introduce a Pay-As-You-Go option soon.
Currently, we only offer custom plans for users requiring higher volumes than those included in our Business 3k plan (\$2,999/month). We do not offer the option to purchase additional concurrency separately or to subscribe to a plan for just one product at a lower price.
When you subscribe to any of our plans, you gain access to all products, with usage limits determined by your selected plan. If you have high-volume needs beyond our standard offerings, feel free to reach out to discuss a tailored solution.
There is no need to cancel your free trial. It will expire automatically at the end of the trial period.
No further action is required on your part.
No, pausing or delaying your subscription is not currently available. You can either keep your subscription active or cancel it at any time. If you choose to cancel, you will continue to have access to all services until the end of your current billing cycle. Please note that any unused days or features do not roll over if you renew or reactivate your subscription later.
You can view and download your subscription invoices on your [Billing page](https://app.zenrows.com/billing).
Advanced Analytics, available on Business and higher plans, provides detailed insights and monitoring tools to help you optimize data extraction and manage costs. Key features include:
* **Timeline View of Scraping Activity:** Visualize requests, costs, and success/failure rates over time.
* **Granular Usage Insights with Date Filtering:** Filter and analyze your usage data by custom date ranges using an interactive datepicker.
* **Domain and Subdomain Analytics:** Track usage and performance by domain and subdomain.
* **Detailed Usage & Performance Metrics:** Monitor spending, request volume, success/failure rates, HTTP status codes, and more.
* **Concurrency Insights:** Monitor concurrent request limits and resource usage.
Advanced Analytics helps you quickly identify trends, optimize your scraping strategy, and maintain complete visibility over your usage and costs.
This advanced filtering is only available with Advanced Analytics. Other plans can access the analytics page but do not have advanced filtering.
Currently, it's not possible to update information on past invoices. To ensure your future invoices have the correct details, please keep your profile information up to date in your [Account Settings](https://app.zenrows.com/account/settings) and update your payment methods on the [Billing page](https://app.zenrows.com/billing). Any changes you make will be reflected in your next invoices.
Rest assured, you won't be charged when your free trial ends. We don't ask for any credit card details during sign-up, so there's no way for us to bill you unexpectedly.
During your trial, you'll have a \$1 usage limit to explore and experience our service freely. Once your trial ends or you reach the limit, your access will pause—no surprise charges, ever. If you'd like to continue using our service, you're welcome to subscribe at any time. And if you have any questions, our support team is always here to help!
Yes. Upgrades apply immediately, but any unused balance from your previous plan doesn't carry over. Downgrades take effect at the start of your next billing cycle, and there are no penalties for changing plans.
Yes, for usage beyond our Business 3K plan (\$2,999/month), we offer Enterprise plans with custom concurrency limits, SLA guarantees, dedicated support, and volume discounts. We don't currently offer plans for single products or additional concurrency purchases for standard plans.
**All plans:** Documentation and AI-powered support\
**Startup and above:** Human chat support\
**Business and above:** Priority human support\
**Enterprise:** Dedicated account manager, SLA guarantees, onboarding assistance, and private Slack channel
# Unblocking Your Scraper with Residential Proxies
Source: https://docs.zenrows.com/first-steps/res-proxy-first-req
# Power Up Your Headless Browser Scraper
Source: https://docs.zenrows.com/first-steps/sc-browser-first-req
# Launch Your First Universal Web Scraper
Source: https://docs.zenrows.com/first-steps/uni-sc-api-first-req
# Welcome to ZenRows®
Source: https://docs.zenrows.com/first-steps/welcome
ZenRows® offers tools to help you gather and manage web data easily. Whether you need to extract data from websites, use a browser for dynamic content, or access geo-targeted content with residential proxies, we have the right solutions for you.
## Products
ZenRows provides a variety of tools to meet your data extraction needs. Whether you need industry-specific data, a universal scraping solution, or strong proxy support, ZenRows has you covered.
}
href="/universal-scraper-api/api-reference"
>
Increase your scraping success rate with advanced AI tools that handle CAPTCHA, browsers, fingerprinting, and more.
}
href="/scraping-browser/introduction"
>
Run your Puppeteer and Playwright scripts on cloud-hosted browsers with rotating residential IPs and 99.9% uptime for scalable web data extraction.
}
href="/residential-proxies/introduction"
>
Access geo-restricted content with our auto-rotating residential proxies, offering over 55 million IPs and 99.9% uptime.
}
href="/scraper-apis/introduction"
>
Get real-time product and property data with fast, reliable APIs for eCommerce, Real Estate, and search engine results pages (SERP).
### 👉 Common Use-Cases
ZenRows is built to handle real-world scraping scenarios. Whether you need to load dynamic single-page applications, keep sessions alive across multiple requests, submit forms, or capture geo-localized data, we've got you covered.
See our new [Common Use-Cases & Recipes guide](/universal-scraper-api/common-use-cases) for quick examples.
### 💡 Need Help? You Can Ask Our AI-Powered Search!
You can use the **search bar at the top of the page** to instantly get answers to your questions, find documentation, and explore ZenRows' features. Simply type what you're looking for, and our AI will guide you!
# Forbidden Sites and Activities
Source: https://docs.zenrows.com/forbidden-sites
ZenRows target sites' access restrictions and user behavior guidelines
Are your ZenRows requests failing? You might be trying to scrape restricted websites or engaging in prohibited activities. Read on to understand the guidelines.
ZenRows prevents access to certain websites, including but not limited to:
* Financial institutions
* Governmental websites
* Payment processors
* Visa applications
Additionally, certain behaviors on permissible sites can result in account suspension. Be aware of these to use our service without disruptions.
### Understanding Access Restrictions
We provide flexible products, but it's essential to understand the limitations set primarily for legal or ethical reasons.
#### Restricted Websites Categories
1. **Banks**: Websites of banking institutions.
2. **Credit Card Processors/Payment Gateways**: This encompasses VISA, MasterCard, PayPal, Stripe, and similar payment platforms.
3. **Visas, eVisas, and Permits Websites**: Platforms related to visa application or issuance.
4. **Governmental Websites**: Mostly, those with `.gov` domain extensions.
We may also block other sites based on legal or ethical concerns. If you believe a site is blocked in error, or there's a legitimate reason for accessing content from a restricted site, please [contact us](mailto:success@zenrows.com). We welcome feedback and will review your appeal.
#### Encountering Restrictions - What to Expect
If you target a restricted site, ZenRows API will return the following error:
* **HTTP Status Code**: `400 Bad Request`
* **Response Body**:
```json theme={null}
{
"code": "REQS001",
"detail": "Requests to this URL are forbidden. Contact support if this may be a problem, or try again with a different target URL.",
"instance": "/v1",
"status": 400,
"title": "Requests to this domain are forbidden (REQS001)",
"type": "https://docs.zenrows.com/api-error-codes#REQS001"
}
```
### User Behavior Guidelines
Certain behaviors can lead to account suspension due to ethical, legal, or operational reasons:
1. **Brute Forcing Login Forms**: Prohibited due to security concerns.
2. **Heavy Traffic Burden**: Overloading sites disrupts their operation. Respect the `robots.txt` file and avoid aggressive scraping.
3. **Scraping Copyrighted Content**: Without permissions, this is legally contentious.
4. **Extracting Private Personal Information**: Against GDPR and other privacy laws.
5. **Misrepresentation**: Tactics like spoofing user-agents or using proxies unethically are discouraged.
#### Recommendations and Best Practices
1. **Handle Errors Gracefully**: Build error-handling into your systems to manage potential restrictions seamlessly. If you get an HTTP 400 status code, do not retry your request to prevent being permanently blocked.
2. **Reach Out**: Our support team is always ready to help, clarify, and listen.
We aim for a balance between powerful web scraping and ethical web behavior. By respecting these guidelines, we can create a sustainable and beneficial web scraping ecosystem. For any queries or clarifications, our support team is here to assist.
## Frequently Asked Questions (FAQ)
This error typically indicates that you've attempted to access a restricted website or IP address.
Please review our access restrictions and guidelines to understand the limitations.
If you target a restricted site, ZenRows API will return the following error:
* **HTTP Status Code**: `400 Bad Request`
* **Response Body**:
```json theme={null}
{
"code": "REQS001",
"detail": "Requests to this URL are forbidden. Contact support if this may be a problem, or try again with a different target URL.",
"instance": "/v1",
"status": 400,
"title": "Requests to this domain are forbidden (REQS001)",
"type": "https://docs.zenrows.com/api-error-codes#REQS001"
}
```
Apart from accessing restricted sites, specific behaviors, like brute forcing login forms, extracting private personal information against GDPR norms, or heavy traffic burden on websites, can lead to account suspension.
Always refer to our [Terms and Conditions](https://www.zenrows.com/terms-and-conditions) to avoid any inadvertent disruptions.
No, scraping content directly from server IP addresses is not allowed. Only URLs with Fully Qualified Domain Names (FQDNs) can be scraped.
# How to Integrate 2Captcha with ZenRows
Source: https://docs.zenrows.com/integrations/2captcha
Integrating 2Captcha with ZenRows gives you an extra layer of protection to handle interactive CAPTCHAs that appear on web pages. This guide shows you how to set up 2Captcha with both the ZenRows Universal Scraper API and the ZenRows Scraping Browser.
## What Is 2Captcha
2Captcha is a CAPTCHA-solving service that employs humans to solve various types of CAPTCHA challenges. Here's how 2Captcha works:
1. The scraper submits the CAPTCHA challenge as a unique key (e.g., sitekey for reCAPTCHA) via 2Captcha's API.
2. A human solver receives and solves the CAPTCHA challenge manually.
3. The human worker returns the CAPTCHA solution as a hashed token.
4. The scraper supplies the solution token to the site and solves the challenge.
The service is particularly useful for solving in-page CAPTCHAs, ensuring complete CAPTCHA evasion. These include CAPTCHAs attached to form fields or those that appear when you interact with page elements.
You'll learn to integrate 2Captcha with ZenRows in the next sections of this guide. To demonstrate the solution, we'll use the reCAPTCHA demo page as the target website.
## Integrating 2Captcha With the Universal Scraper API
The Universal Scraper API automatically bypasses website protections, but you should combine it with 2Captcha for interactive or form-based CAPTCHAs. This approach requires minimal code changes and helps handle unexpected blocks.
### Step 1: Set up 2Captcha on ZenRows
1. Log in to your 2Captcha dashboard and copy your API key.
2. Go to the [Integrations Page](https://app.zenrows.com/account/integrations) in your ZenRows account and click on `Integrations`.
3. Click `Manage` on the 2Captcha card.
4. Enter your 2Captcha API key and click `Save`.
### Step 2: Integrate 2Captcha in your scraping request
After adding the 2Captcha ZenRows integration, you need to specify its usage in your Universal Scraper API request via the [`js_instructions`](/universal-scraper-api/features/js-instructions) parameter. ZenRows handles all communication between your script and 2Captcha.
The `js_instructions` parameter accepts a `solve_captcha` option that specifies which CAPTCHA type you want to solve.
ZenRows's Universal Scraper API supports these CAPTCHA types for 2Captcha integration:
* `recaptcha`: Google reCAPTCHA series, including invisible CAPTCHAs that don't require user interaction.
* `cloudflare_turnstile`: Cloudflare Turnstile CAPTCHAs are typically found on forms and interactive elements.
Here are the supported CAPTCHA types with their configuration options:
```javascript theme={null}
[
// Solve reCAPTCHA
{"solve_captcha": {"type": "recaptcha"}},
// Solve Cloudflare Turnstile
{"solve_captcha": {"type": "cloudflare_turnstile"}},
// Solve Invisible reCAPTCHA with inactive option
{"solve_captcha": {"type": "recaptcha", "options": {"solve_inactive": true}}}
]
```
For more information on the available instructions, check the [JavaScript Instructions Documentation](/universal-scraper-api/features/js-rendering#solve-captchas) page.
Now, let's implement the `js_instructions` in your ZenRows request. In this example, the script waits for 3 seconds, solves the reCAPTCHA challenge using 2Captcha, waits 3 seconds for processing, clicks the submit button, and then waits for the success message to be present:
```python Python theme={null}
# pip3 install requests
import requests
url = "https://2captcha.com/demo/recaptcha-v2"
def scraper(url):
apikey = "YOUR_ZENROWS_API_KEY"
params = {
"url": url,
"apikey": apikey,
"js_render": "true",
"premium_proxy": "true",
"json_response": "true",
"js_instructions": """[
{"wait": 3000},
{"solve_captcha":{"type":"recaptcha"}},
{"wait": 3000},
{"click": "button[type='submit']"},
{"wait_for": "._successMessage_1ndnh_1"}
]""",
"css_extractor": """{"success":"p._successMessage_1ndnh_1"}""",
}
response = requests.get("https://api.zenrows.com/v1/", params=params)
return response.json()
```
The CSS selectors provided in this example (`._successMessage_1ndnh_1`, `button[type='submit']`) are specific to the page used in this guide. Selectors may vary across websites. For guidance on customizing selectors, refer to the [CSS Extractor documentation](/universal-scraper-api/features/output#css-selectors). If you're having trouble, the [Advanced CSS Selectors Troubleshooting Guide](/universal-scraper-api/troubleshooting/advanced-css-selectors) can help resolve common issues.
### Step 3: Confirm you solved the CAPTCHA
You can confirm that the CAPTCHA was successfully solved by checking the response from both the `js_instructions` and `css_extractor`:
```python theme={null}
# confirm if CAPTCHA is bypassed
html_content = scraper(url)
css_extractror_info = html_content.get("css_extractor")
js_instructions_info = html_content.get("js_instructions_report")
print(
"CSS extractor info:",
css_extractror_info,
"\n",
"JS instructions info:",
js_instructions_info,
)
```
### Complete Example
Here's the full working code:
```python Python theme={null}
# pip3 install requests
import requests
url = "https://2captcha.com/demo/recaptcha-v2"
def scraper(url):
apikey = "YOUR_ZENROWS_API_KEY"
params = {
"url": url,
"apikey": apikey,
"js_render": "true",
"premium_proxy": "true",
"json_response": "true",
"js_instructions": """[
{"wait": 3000},
{"solve_captcha":{"type":"recaptcha"}},
{"wait": 3000},
{"click": "button[type='submit']"},
{"wait_for": "._successMessage_1ndnh_1"}
]""",
"css_extractor": """{"success":"p._successMessage_1ndnh_1"}""",
}
response = requests.get("https://api.zenrows.com/v1/", params=params)
return response.json()
### confirm if CAPTCHA is bypassed
html_content = scraper(url)
css_extractror_info = html_content.get("css_extractor")
js_instructions_info = html_content.get("js_instructions_report")
print(
"CSS extractor info:",
css_extractror_info,
"\n",
"JS instructions info:",
js_instructions_info,
)
```
When successful, you'll see a response like this, confirming the CAPTCHA was solved:
```python Response theme={null}
CSS extractor info: {"data": {"success": "Captcha is passed successfully!"}}
JS instructions info: {
"instructions": [
# ...
{
"duration": 1456,
"instruction": "solve_captcha",
"params": {"options": None, "type": "recaptcha"},
"result": [
{
# ...
"response_element": True,
"solved": True,
# ...
}
],
"success": True,
},
# ...
],
# ...
}
```
This response is equivalent to manually clicking the "Check" button on the reCAPTCHA demo page to verify the CAPTCHA was solved.
The [`json_response`](/universal-scraper-api/features/js-rendering#debug-js-instructions) parameter is used here for debugging purposes. For production use, you can parse the `response.text` with a parser like BeautifulSoup since the request returns the HTML content that was previously locked behind the CAPTCHA.
## Integrating 2Captcha With the ZenRows Scraping Browser
The ZenRows Scraping Browser doesn't include direct 2Captcha integration, but you can achieve this using the 2Captcha SDK. Here's how to set it up using Playwright with the Scraping Browser in Python.
### Step 1: Install the 2Captcha SDK
First, install the 2Captcha SDK:
```bash theme={null}
pip3 install 2captcha-python
```
### Step 2: Connect to 2Captcha
Import the necessary libraries and create a connection to 2Captcha using your API key:
```python Python theme={null}
# pip3 install 2captcha-python playwright
from playwright.async_api import async_playwright
from twocaptcha import TwoCaptcha
# connect to 2Captcha API
two_captcha_api_key = "2Captcha_API_KEY"
solver = TwoCaptcha(two_captcha_api_key)
```
The solver object handles all communication with the 2Captcha service.
### Step 3: Connect to the Scraping Browser and obtain the CAPTCHA Token
Connect to the Scraping Browser, navigate to your target page, and extract the reCAPTCHA sitekey (a unique identifier for the CAPTCHA):
```python Python theme={null}
# ...
# scraping browser connection URL
connection_url = (
"wss://browser.zenrows.com?apikey=YOUR_ZENROWS_API_KEY"
)
async with async_playwright() as p:
# connect to the browser over CDP (Chrome DevTools Protocol)
browser = await p.chromium.connect_over_cdp(connection_url)
# create a new page
page = await browser.new_page()
# navigate to the target URL
await page.goto(url)
# wait for the reCAPTCHA sitekey to load and extract it
await page.wait_for_selector("#g-recaptcha")
site_key = await page.evaluate(
"document.querySelector('#g-recaptcha').getAttribute('data-sitekey')"
)
# solve CAPTCHA
captcha_response = solver.recaptcha(sitekey=site_key, url=url)
# extract the reCAPTCHA token from the response
captcha_token = captcha_response["code"]
```
This code extracts the sitekey from the reCAPTCHA element and sends it to 2Captcha for solving.
### Step 4: Solve the CAPTCHA
When a user solves a CAPTCHA, the solution token gets placed in a hidden input field. You need to simulate this process by injecting the token into the appropriate field:
```python Python theme={null}
# ...
async def scraper(url):
async with async_playwright() as p:
# ...
# enter the CAPTCHA token to pass the block
await page.evaluate(
"""
(captchaToken) => {
const responseField = document.getElementById("g-recaptcha-response");
responseField.style.display = 'block';
responseField.value = captchaToken;
responseField.dispatchEvent(new Event('change', { bubbles: true }));
}
""",
captcha_token,
)
```
This JavaScript code finds the hidden response field, makes it visible, sets the token value, and triggers a change event to notify the page that the CAPTCHA was solved.
### Step 5: Confirm you solved the CAPTCHA
After applying the CAPTCHA solution, you can proceed with your scraping tasks. Let's verify the solution worked by clicking the submit button and checking the response:
```python Python theme={null}
# ...
import time
# ...
async def scraper(url):
async with async_playwright() as p:
# ...
# confirm if the CAPTCHA is passed
await page.get_by_role("button", name="Check").click()
time.sleep(10)
try:
success_text = await page.text_content("p._successMessage_1ndnh_1")
if success_text:
print(success_text)
else:
error_text = await page.text_content("div._alertBody_bl73y_16")
print(error_text)
except Exception as e:
print(e)
# close the browser
await browser.close()
```
The CSS selectors provided in this example (`._successMessage_1ndnh_1`, `._alertBody_bl73y_16`) are specific to the page used in this guide. Selectors may vary across websites. For guidance on customizing selectors, refer to the [CSS Extractor documentation](/universal-scraper-api/features/output#css-selectors). If you're having trouble, the [Advanced CSS Selectors Troubleshooting Guide](/universal-scraper-api/troubleshooting/advanced-css-selectors) can help resolve common issues.
Run the code using `asyncio`:
```python Python theme={null}
# ...
import asyncio
# ...
url = "https://2captcha.com/demo/recaptcha-v2"
# run the scraper
asyncio.run(scraper(url))
```
### Complete Example
Here's the full working code:
```python Python theme={null}
# pip3 install 2captcha-python playwright
from playwright.async_api import async_playwright
from twocaptcha import TwoCaptcha
import time
import asyncio
# connect to 2Captcha API
two_captcha_api_key = "2Captcha_API_KEY"
solver = TwoCaptcha(two_captcha_api_key)
# scraping browser connection URL
connection_url = "wss://browser.zenrows.com?apikey=YOUR_ZENROWS_API_KEY"
async def scraper(url):
async with async_playwright() as p:
# connect to the browser over CDP (Chrome DevTools Protocol)
browser = await p.chromium.connect_over_cdp(connection_url)
# create a new page
page = await browser.new_page()
# navigate to the target URL
await page.goto(url)
# wait for the reCAPTCHA sitekey to load and extract it
await page.wait_for_selector("#g-recaptcha")
site_key = await page.evaluate(
"document.querySelector('#g-recaptcha').getAttribute('data-sitekey')"
)
# solve CAPTCHA
captcha_response = solver.recaptcha(sitekey=site_key, url=url)
# extract the reCAPTCHA token from the response
captcha_token = captcha_response["code"]
# enter the CAPTCHA token to pass the block
await page.evaluate(
"""
(captchaToken) => {
const responseField = document.getElementById("g-recaptcha-response");
responseField.style.display = 'block';
responseField.value = captchaToken;
responseField.dispatchEvent(new Event('change', { bubbles: true }));
}
""",
captcha_token, # Pass the CAPTCHA token as an argument to the JavaScript function
)
# confirm if the CAPTCHA is passed
await page.get_by_role("button", name="Check").click()
time.sleep(10)
try:
success_text = await page.text_content("p._successMessage_1ndnh_1")
if success_text:
print(success_text)
else:
error_text = await page.text_content("div._alertBody_bl73y_16")
print(error_text)
except Exception as e:
print(e)
# close the browser
await browser.close()
url = "https://2captcha.com/demo/recaptcha-v2"
# run the scraper
asyncio.run(scraper(url))
```
The above code extracts the following success message from the page:
```bash theme={null}
Captcha is passed successfully!
```
Congratulations! 🎉 You've just integrated 2Captcha with the ZenRows Universal Scraper API and the ZenRows Scraping Browser.
## Conclusion
By integrating 2Captcha with ZenRows, you can reliably handle even the toughest CAPTCHAs and keep your scraping workflows running smoothly. Whether you use the Universal Scraper API or the Scraping Browser, this setup helps you automate CAPTCHA solving and reduce manual effort.
## Frequently Asked Questions (FAQ)
At a success rate of 99.93%, ZenRows bypasses the CAPTCHAs and other anti-bot measures commonly encountered during web scraping. However, interactive or in-page CAPTCHAs, such as those tied to form fields, may occasionally appear after bypassing the primary CAPTCHA. While this is rare, integrating 2Captcha provides an additional layer of stealth, ensuring even higher reliability and enhancing the already impressive 99.93% success rate.
ZenRows, when integrated with 2Captcha, natively supports solving reCAPTCHA and Cloudflare Turnstile, two of the most common CAPTCHA types.
No, ZenRows does not return CAPTCHA tokens.
# How to Integrate Clay with ZenRows
Source: https://docs.zenrows.com/integrations/clay
ZenRows provides powerful web scraping capabilities that integrate seamlessly with Clay, allowing you to extract data from websites without writing code. The integration enables the automated collection of structured data from any website directly into Clay's spreadsheet interface.
## What is Clay?
Clay is a powerful no-code data platform that functions as an intelligent spreadsheet with built-in automation capabilities. It enables users to collect, transform, and analyze data from various sources without requiring programming knowledge, making complex data operations accessible to everyone.
With its extensive integration ecosystem, Clay allows users to connect to hundreds of data sources, including web scraping tools like ZenRows, CRM systems, and marketing platforms.
## Watch the Video Tutorial
Learn how to set up the Clay ↔ ZenRows integration step-by-step by watching this video tutorial:
## ZenRows Configuration Options
ZenRows offers numerous configuration options to customize your web scraping experience. Here's a detailed breakdown of each option available in the Clay integration:
### Basic Configuration
* **Scrape URL:** The target webpage URL you want to scrape. In Clay, this is typically linked to a column containing URLs.
* **Autoparse:** When enabled, ZenRows automatically parses the HTML structure of the page, converting it into structured data.
* **Wait Time (ms):** Defines the delay in milliseconds after the initial page load before capturing the content. Essential for pages that load content dynamically.
### Advanced Configuration
* **Render JavaScript:** When enabled, ZenRows uses a headless browser to render JavaScript on the page, which is essential for modern websites where content is loaded dynamically.
* **Premium Proxy:** Enables the use of high-quality, residential IP addresses to avoid detection.
* **Proxy Country:** Specifies a two-letter country code (e.g., "US", "UK", "DE") to route requests through servers in that location. Enables access to region-specific content that may be unavailable from your location.
* **Auto-update:** Updates data automatically when your table changes.
* **Only run if:** Set conditions for when the scraper should run.
## Getting Started: Real-World Example
We'll use ZenRows to scrape property information from Zillow and organize it in Clay.
### Step 1: Create a New Workbook in Clay
1. Log in to your Clay account at [https://www.clay.com](https://www.clay.com).
2. Click **+ New Workbook** in the top right corner.
3. Name your workbook (e.g., "Real Estate Analysis") and click **+ New blank table** button.
### Step 2: Set Up Your Table Structure
1. Inside your new workbook, you'll see a blank table.
2. Create the following columns by clicking on the **+ Add column** icon to the right of the default column:
* Property URL
* City
* State
* Zipcode
* Price
* Description
3. Add these example Zillow property URLs in the "Property URL" column:
* `https://www.zillow.com/homedetails/110-Rosewell-Mdw-Syracuse-NY-13214/31725398_zpid/`
* `https://www.zillow.com/homedetails/27-Central-St-Greenlawn-NY-11740/59566735_zpid/`
* `https://www.zillow.com/homedetails/6-Dean-St-Farmingdale-NY-11735/32614340_zpid/`
* `https://www.zillow.com/homedetails/4848-Mount-Vernon-Blvd-Hamburg-NY-14075/30342319_zpid/`
* `https://www.zillow.com/homedetails/251-Post-Ave-Rochester-NY-14619/30882345_zpid/`
### Step 3: Add the ZenRows Integration
1. Click on the **+ Add Column** and select **Add Enrichment**.
2. In the search bar, type "ZenRows".
3. Under Integrations, select **Run ZenRows Scrape**.
### Step 4: Configure the ZenRows Scraper
1. **Account Selection:**
* By default, "Clay-managed ZenRows account" will be selected.
* Alternatively, click **Add account** to use your own ZenRows API key.
2. **Configure Settings:**
* **Scrape URL:** Select the "Property URL" column from your table.
* **Autoparse:** Toggle ON to automatically parse the webpage content.
* **Wait Time (ms):** Set to 5000 (5 seconds) to ensure the page loads fully.
* **Render JavaScript:** Toggle ON as Zillow relies heavily on JavaScript.
* **Premium Proxy:** Toggle ON for improved success rates on Zillow.
3. **Run Settings:**
* **Auto-update:** Toggle ON to automatically update data when your table changes
4. Click **Save and run 5 rows in this view** button.
### Step 5: Map the Scraped Data to Your Columns
After ZenRows scrapes the data, you need to map the relevant information to your specific columns:
1. **For the City column:**
* Click on the header of your "City" column.
* Select **Edit column**.
* Ensure "Text" is selected as the Data type.
* Click in the value field and type `/` to insert column.
* From the dropdown that appears, select **Run ZenRows Scrape**.
* Select "city" from the properties list (or click "Insert all properties" to see all available data).
* Click **Save settings**.
2. **Repeat for other columns:**
* **State:** Map to "state" property
* **Zipcode:** Map to "zipcode" property
* **Price:** Map to "price" property
* **Description:** Map to "description" property
Once mapped, your columns will automatically populate with the corresponding data from Zillow.
## Integration Benefits & Applications
This ZenRows-Clay integration enables professionals across industries, including real estate, e-commerce, recruitment, marketing, etc., to automate data collection processes that would otherwise require significant manual effort or technical expertise.
By eliminating development requirements and handling complex challenges like JavaScript rendering and anti-bot protections automatically, this integration allows you to focus on data analysis rather than acquisition.
## Frequently Asked Questions (FAQs)
Yes, you can use your own ZenRows API key with Clay. When configuring the integration, select "Add account" instead of using the Clay-managed ZenRows account. This gives you more control over your scraping operations and allows you to use your existing subscription limits and settings.
If you're not receiving data, first ensure JavaScript rendering is enabled, as most modern websites require it. Next, increase the Wait Time to 5000-8000ms to allow dynamic content to load fully.
For websites with strong anti-bot measures, enable both Premium Proxy and Anti-Bot options. Finally, verify that the site's structure hasn't changed by testing the scrape on a single URL before scaling up.
Data update frequency depends on your configuration and account type. With Auto-update enabled, Clay will refresh the data whenever the source table changes. If you're using Clay's managed ZenRows account, be mindful of the shared usage limits.
For high-frequency scraping needs, consider using your own ZenRows API key, which allows you to operate within your personal subscription limits. For websites that change frequently, you can set up scheduled updates in Clay to keep your data current without manual intervention.
# How to Integrate Flowise with ZenRows
Source: https://docs.zenrows.com/integrations/flowise
Integrate ZenRows with Flowise to add reliable web scraping capabilities to your AI workflows. This guide shows you how to build data collection pipelines that combine ZenRows' scraping technology with Flowise's visual workflow builder.
## What is Flowise?
Flowise is an open-source, low-code platform for visually building, managing, and interacting with AI agents and large language model (LLM) workflows in a chat-based environment. Its drag-and-drop interface allows users to compose AI agents into interconnected, LLM-powered workflows **with little to no programming knowledge**.
## Use Cases
You can leverage Flowise-ZenRows integration to drive several business opportunities. Here are some of them:
* **Product research**: Discover the best marketing position for new products with insights from scraped data.
* **Demand forecasting**: Scrape products' data to predict the demand ahead of competitors. Make data-driven decisions on re-stocks and pricing.
* **Real-estate intelligence**: Collect real-estate data and analyze it to gain data-driven investment insights.
* **Competitor's research**: Gather competitor's data for information gain and predict their next moves.
* **Product optimization**: Collect customers' reviews, ratings, and other metrics from social platforms, review sites, and brand pages and fine-tune products to meet consumers' expectations.
* **Lead generation**: Collect quality lead contacts from various sources and automate captures, outreaches, and follow-ups.
* **Product recommendation**: Scrape and analyze relevant product data points to recommend the best deals to potential buyers.
## Basic Integration: Amazon Product Scraper
Let's start by building a simple Amazon product scraper workflow that fetches data using ZenRows and returns it as a response via the Flowise chat box. We'll use the Flowise Agentflows for this tutorial.
The Flowise platform is accessible locally or remotely via the official Flowise website. If you use Flowise remotely via the website, no installation steps are required. However, the local setup requires installing Flowise globally to run a local server.
In this guide, **we'll use the local setup**, starting with the installation and server startup steps.
### Step 1: Install Flowise and set up a server
This tutorial assumes you've set up Node.js on your machine. Otherwise, download and install it from the official website.
1. Install the `flowise` package globally:
```bash theme={null}
npm install -g flowise
```
2. Run the `flowise` server. The command below starts a server that defaults to `http://localhost:300`:
```bash theme={null}
npx flowise start
```
3. Visit this URL to launch the Flowise interface.
4. Complete the initial registration steps, and you'll get to the platform's dashboard, as shown below:
### Step 2: Add ZenRows API Key to Flowise environment variables
Adding your ZenRows API key to the Flowise environment variable makes it accessible across the platforms.
1. From the dashboard, go to **Variables**.
2. Click `+ Add Variable` at the top-right.
3. Fill in the **Variable Name** field with the name of your API key. Then, paste your ZenRows API key in the **Value** field.
4. Click `Add`.
### Step 3: Initiate a new Agentflow
1. Go to **Agentflows** and click `+ Add New` at the top right to open the Flowise canvas.
2. Once in the Flowise Canvas, click the save icon at the top right.
3. Enter a name for your new workflow and click `Save`.
### Step 4: Create a scraper flow with ZenRows
We'll integrate the ZenRows API using an HTTP agent node, which enables you to send an API request via Flowise.
1. Click the `+` icon at the top left and search for **"HTTP"** using the search bar.
2. Drag and drop the **HTTP** node into your Canvas, placing it directly in front of the **Start** agent.
3. Link the agents by dragging a line from the **Start** node to connect with the **HTTP** agent node.
4. Double-click the **HTTP** agent node.
5. Click the edit icon at the top of the modal to change the agent's name. Then, press **Enter** on your keyboard.
6. Click `+ Add Query Params` to set the target URL parameter. We'll retrieve this URL dynamically from the chat box:
* Type `url` in the **Key** field.
* Type double braces (`{{`) in the **Value** field. This loads dynamic input options.
* Select **question** from the options to load the URL from the chat box.
7. Similarly, for the ZenRows API key, click `+ Add Query Params` and type `apikey` in the **Key** field. Type `{{` inside the **Value** and select `$vars.ZENROWS_API_KEY`.
8. Click `+ Add Query Params` repeatedly to add each of the following [ZenRows parameters](/universal-scraper-api/api-reference#parameter-overview) in order:
* `js_render` = `true`
* `premium_proxy` = `true`
* `wait` = `2500`
* `css_extractor` =
* `original_status` = `true`
9. Add your [CSS selectors](/universal-scraper-api/troubleshooting/advanced-css-selectors) as an array in the `css_extractor` value: We'll use the following `css_extractor` for this tutorial:
```json theme={null}
{
"name":"span#productTitle",
"price":"span.a-price.aok-align-center.reinventPricePriceToPayMargin.priceToPay",
"ratings":"#acrPopover",
"description":"ul.a-unordered-list.a-vertical.a-spacing-mini",
"review summary":"#product-summary p span",
"review count":"#acrCustomerReviewLink"
}
```
10. Under **Response Type**, select **Text**.
11. Click on the `Flowise Canvas`. Then, click the `Validate Nodes` icon at the top right and select `Validate Nodes` to confirm that your setup is correct.
12. Finally, click the `save` icon at the top right to save your changes.
### Step 5: Run the flow
1. Click the chat icon at the top right.
2. Type an Amazon product page URL in the box and press Enter to send your request.
3. Click the `Process Flow banner` in the chat box.
4. Click the expansion icon next to Scraper Agent.
5. You'll see the following response page, showing the scraped data:
However, we want the LLM to return the data as the sole response in the chat. Let's set this up using OpenAI.
### Step 6: Integrate an LLM flow
1. Click the `+` icon at the top left. Search **LLM**. Then, drag and drop it in the canvas next to the Scraper Agent.
2. Link the **Scraper Agent** to the **LLM** node.
3. Double-click the **LLM** agent and rename it.
4. Under **Model**, search and select `ChatOpenAI`.
5. Click `ChatOpenAI` Parameters:
* Click on `Connect Credentials`, then on `Create New` and set up your OpenAI API key and click `Add`.
* Select your desired model, temperature (preferably, 0.1 or 0.2 for increased accuracy), and other parameters.
6. Click `+ Add Messages`:
* Under **Role**, select `Assistant`.
* Type `{{` inside the Content field and select `httpAgentflow_0`.
7. Toggle on `Enable Memory`.
8. Type the following prompt in the **Input Message** field. We've instructed the LLM to only show `{{ httpAgentflow_0 }}` as the output and not attempt to visit any URL provided in the chat:
```text theme={null}
You are a web scraping assistant. Only display the response provided by the Scraper Agent in the chat box. Do not attempt to access or retrieve information from external URLs yourself; rely solely on the Scraper Agent for all web data. Your output must be {{ httpAgentflow_0 }}.
```
9. Set the **Return Response As** field to **Assistant Message**. This allows the chat model to return the Scraper Agent's output in its response.
10. Click anywhere in the canvas. Then click the save icon at the top right.
11. To run the flow, click the chat icon and send the URL of an Amazon product page in the chat. The model now streams the scraped data as a response in the chat box:
Nice! You just created your first scraping flow by integrating ZenRows with Flowise.
## Advanced Integration: Demand Analysis System
Besides the HTTP option, you can also integrate ZenRows with Flowise using custom functions. We'll see a real-life use case using the following agents:
* Create an agent that scrapes an Amazon listing page based on a search term using ZenRows.
* Build an agent node to handle data cleaning.
* Create an agent to analyze the data using LLM.
### Step 1: Create a custom web scraper function with ZenRows
1. Go to **Agentflows** and click `+ Add New` to start a new flow.
2. Click the save icon and name your flow.
3. Click `+` at the top left of the Flowise canvas.
4. Search for `Custom Function` and drag its card to the canvas.
5. Link the **Start** node with the **Custom Function** agent.
6. Double-click the Custom Function agent and rename it.
7. Initiate the ZenRows scraping logic inside the **JavaScript Function** field. Import `axios`, configure the target URL to accept a search term, and load your ZenRows API key from the Flowise environment variables.
```javascript Node.js theme={null}
const axios = require("axios");
// declare the search term variable
const searchTerm = $searchTerm;
// load your API key from the environment variables
const apikey = $vars.ZENROWS_API_KEY;
const url = `https://www.amazon.com/s?k=${encodeURIComponent(searchTerm)}`;
```
8. To create the `searchTerm` variable, click `+ Add Input Variables`.
9. Type `searchTerm` inside the **Variable Name** field.
10. We want the scraping logic to accept this search term dynamically from the user's question in the chat box. Type `{{` in the **Variable Value** and select `question`.
11. Extend the scraping logic by adding the required ZenRows parameters. Scrape the data using the `css_extractor` and return the response data. See the complete code below:
```javascript Node.js theme={null}
const axios = require("axios");
// declare the search term variable
const searchTerm = $searchTerm;
// load your API key from the environment variables
const apikey = $vars.ZENROWS_API_KEY;
const url = `https://www.amazon.com/s?k=${encodeURIComponent(searchTerm)}`;
try {
const response = await axios({
url: "https://api.zenrows.com/v1/",
method: "GET",
params: {
url: url,
apikey: apikey,
js_render: "true",
wait: "2500",
premium_proxy: "true",
css_extractor: JSON.stringify({
name: "div.s-title-instructions-style",
url: "div.s-title-instructions-style a @href",
listingPrice: "span.a-price",
demandHistory:
"div.a-section.a-section.a-spacing-none.a-spacing-top-micro span.a-size-base.a-color-secondary",
reviewCount: "span.a-size-base.s-underline-text",
}),
},
});
return response.data;
} catch (error) {
console.error("Error fetching data:", error.message);
throw error;
}
```
12. Click the save icon at the top right to save your changes.
### Step 2: Create a data cleaning agent
1. Click the `+` icon.
2. Search for **Custom Function** and drag and drop it onto the canvas.
3. Link this new custom function agent with the **Scraper** agent.
4. Double-click the `Custom Function 1` agent node and rename it (e.g., Data Cleaner).
5. We need to load the Scraper agent's output into the Data Cleaner agent node. Create this variable by clicking `+ Add Input Variables`. Then, type **scrapedData** in the **Variable Name** field. Then, enter `{{` in the **Variable Value** field and select `customFunctionAgentflow_0`.
6. Enter the following data cleaning code in the JavaScript Function field. This code first converts the scraped data into an object, merges it, and fixes anomalies, such as data inconsistencies.
```javascript Node.js theme={null}
// convert the scraped data to an object
let data;
try {
data = JSON.parse($scrapedData);
} catch (e) {
return [];
}
// ensure all arrays exist
const demand = Array.isArray(data.demandHistory) ? data.demandHistory : [];
const name = Array.isArray(data.name) ? data.name : [];
const listingPrice = Array.isArray(data.listingPrice) ? data.listingPrice : [];
const reviewCount = Array.isArray(data.reviewCount) ? data.reviewCount : [];
const url = Array.isArray(data.url) ? data.url : [];
const baseUrl = "https://www.amazon.com";
// check if the demand entry is a real monthly demand
const isValidDemand = (d) =>
typeof d === "string" && d.includes("bought in past month");
// merge and clean the data
const products = [];
let demandIdx = 0;
for (let i = 0; i < name.length; i++) {
// filter out sponsored/ad names
if (
typeof name[i] !== "string" ||
name[i].toLowerCase().startsWith("sponsored") ||
name[i].toLowerCase().includes("ad feedback")
) {
continue;
}
// find the next valid demand entry
let demandValue = "Unavailable";
while (demandIdx < demand.length) {
if (isValidDemand(demand[demandIdx])) {
demandValue = demand[demandIdx];
demandIdx++;
break;
}
demandIdx++;
}
// clean doubled price issues
let price = listingPrice[i] || "Unavailable";
if (typeof price === "string") {
const match = price.match(/\$\d+(\.\d{2})?/);
if (match) {
price = match[0];
}
}
// ensure URL is absolute
let productUrl = url[i] || "Unavailable";
if (
typeof productUrl === "string" &&
productUrl !== "Unavailable" &&
!productUrl.startsWith("http")
) {
productUrl = baseUrl + productUrl;
}
products.push({
name: name[i] || "Unavailable",
demand: demandValue,
price: price,
reviews: reviewCount[i] || "Unavailable",
url: productUrl,
});
}
return products;
```
7. Click anywhere on the canvas and click the save icon.
### Step 3: Create a Data Analyst Agent LLM
1. Click the `+` icon.
2. Search for **LLM** and drag and drop it into the canvas.
3. Link the LLM agent with the Data Cleaner agent. The LLM will act on the cleaned data returned from the Data Cleaner agent.
4. Double-click the LLM agent and give it a descriptive name.
5. From the **Model** dropdown, search and select `ChatOpenAI` or your preferred model.
6. Set up your credentials, select your model, and choose a temperature.
7. Click `+ Add Messages` under the **Messages** section.
8. Create a prompt that instructs the Analyst agent to get the most in-demand products from the cleaned data and establish a correlation between price and demand. We'll use the following prompt, where `customFunctionAgentflow_1` is the cleaned data from the Data Cleaner agent node.
```text theme={null}
Analyze the products in {{ customFunctionAgentflow_1 }}. Select the 4 most in-demand products based on the demand history (highest demand first). Also, tell if there is a correlation between price and demand across these products. For each product, format the product's URL as an HTML anchor tag with the text: Check product out.
```
9. Under Role, select `Assistant`. Then, enter the prompt into the **Content** field.
10. Under **Return Response As**, select `Assistant Message`.
11. Finally, validate and save your workflow by clicking the validation and save icons at the top right, respectively.
### Step 4: Run the demand analysis workflow
Click the message icon to initiate a chat. Then, prompt the Analyst agent with a product search term (e.g., headphones, mouse, or teddy bears).
Here's a sample response for "mouse" product listings:
Congratulations! 🎉 You just built a product research workflow with ZenRows and Flowise integration.
## Troubleshooting
### Error 401 or ZenRows authentication error
* **Solution 1**: Ensure you've entered the correct ZenRows API key in the Flowise environment variables.
* **Solution 2**: Ensure you load the ZenRows API key into your scraping workflow.
### Error 400
* **Solution 1**: Make sure the supplied ZenRows parameters are correct and don't contain unsupported strings.
* **Solution 2**: Use the correct CSS selectors and format the `css_extractor` array correctly.
### LLM agent fails
* **Solution 1**: Check your network connectivity and try your prompt again.
* **Solution 2**: Ensure you still have enough API credit for your chosen LLM.
* **Solution 3**: Make sure you've supplied the correct API key of your LLM agent.
### Custom function fails
* **Solution 1**: Execute the code in an external text editor, such as VS Code, and simulate the expected output for debugging.
* **Solution 2**: Make sure all variables in your code are listed as **Input Variables**.
### `localhost unavailable` or the Flowise interface doesn't load
* **Solution**: Stop and restart the running server. Then, reload the Flowise interface.
## Conclusion
You've learned to connect ZenRows with Flowise for a streamlined data flow across several agents, including data collection, cleaning, and analysis. While Flowise enables you to build agentic workflows for data automation and other purposes, ZenRows ensures the integrity of your data pipeline with a consistent data supply.
## Frequently Asked Questions (FAQ)
ZenRows doesn't charge you extra for integrating with Flowise. Flowise is also an open-source tool with no initial cost implications. Although Flowise charges for advanced features like cloud hosting, the free plan provides most of what you need, including building Agentflows, Chatflows, Assistants, and more.
Yes, ZenRows integrates with other AI-powered low-code and no-code workflow tools, including Pipedream, Make, Clay, Zapier, and more. Check our [integration options](/integrations/overview) for more details.
Although Flowise supports Google Sheets as a tool, connecting to it involves some technical steps. Currently, Flowise has limitations in terms of Google Sheets write operations compared to tools like Zapier, which offer easier and more seamless integration.
Yes, integrating ZenRows with Flowise enables your scraper agent to bypass anti-bots easily.
# How to Integrate LangChain with ZenRows
Source: https://docs.zenrows.com/integrations/langchain
Extract web data with AI agents using ZenRows' enterprise-grade scraping infrastructure. The `langchain-zenrows` integration enables large language models (LLMs) to access real-time web data using ZenRows' robust scraping infrastructure. This guide covers how to scrape data with LLMs using the `langchain-zenrows` module.
## What is LangChain?
LangChain is a framework that connects large language models to external data sources and applications. It provides a composable architecture that enables you to create AI workflows by chaining LLM operations, from simple prompt-response patterns to autonomous agents.
One key advantage of LangChain is that it allows for easy swapping, coupling, and decoupling of LLMs.
### Key Benefits of Integrating LangChain With ZenRows
The `langchain-zenrows` integration brings the following benefits:
* **Integrate ZenRows with LLMs**: Easily integrate scraping capabilities into your desired LLM.
* **Build an agentic data pipeline**: Assign different data pipeline roles to each LLM agent based on its capabilities.
* **Real-time web access without getting blocked**: Fetch live web content without antibot or JavaScript rendering limitations.
* **Multiple output formats**: Fetch website data in various formats, including HTML, Markdown, Plaintext, PDF, or Screenshots.
* **Specific data point extraction**: Extract specific data from web pages, such as emails, tables, phone numbers, images, and more.
* **Support for custom parsing**: Fetch specific information from web elements using ZenRows' advanced CSS selector feature.
## Use Cases
Here are some use cases of the `langchain-zenrows` integration:
* **Real-time monitoring**: Develop an AI application that scrapes and monitors website content changes in real-time.
* **Market research and demand forecasting**: Scrape demand signals, such as reviews, social comments, engagement metrics, price trends, and more. Then, pass the data to an LLM model for forecasting.
* **Finding the best deals**: Spot the best deals for a specific product from several e-commerce websites using ZenRows.
* **Review summarization**: Summarize scraped reviews using a selected model.
* **Sentiment analysis**: Scrape and analyze sentiment in social comments or product reviews.
* **Product research and comparison**: Compare products across multiple retail websites and e-commerce platforms to identify the best options.
* **Consistent data pipeline update**: Keep your data pipeline up to date with fresh data by integrating `langchain-zenrows` into your pipeline operations.
## Getting Started: Basic Usage
Let's start with a simple example that uses the `langchain-zenrows` package to scrape the Antibot Challenge page and return its content in Markdown format.
Install the `langchain-zenrows` package using `pip`:
```bash theme={null}
pip3 install langchain-zenrows
```
Import the `ZenRowsUniversalScraper` class from the `langchain_zenrows` module, instantiate the universal scraper with your ZenRows API key, and specify ZenRows parameters with the `response_type` set to `markdown`:
```python Python theme={null}
from langchain_zenrows import ZenRowsUniversalScraper
# Set your ZenRows API key
os.environ["ZENROWS_API_KEY"] = "YOUR_ZENROWS_API_KEY"
# Instantiate the universal scraper
scraper = ZenRowsUniversalScraper()
url = "https://www.scrapingcourse.com/antibot-challenge"
# Set ZenRows parameters
params = {
"url": url,
"js_render": "true",
"premium_proxy": "true",
"response_type": "markdown",
}
# Get content in markdown format
result = scraper.invoke(params)
print(result)
```
The integration bypasses the target site's antibot measure and returns its content as Markdown:
```html Output theme={null}
[ Scraping Course](http://www.scrapingcourse.com/)
# Antibot Challenge

## You bypassed the Antibot challenge! :D
```
You've successfully integrated ZenRows with LangChain and bypassed an antibot challenge. Let's build an AI research assistant with this integration.
## Advanced Usage: Building an AI Research Assistant
Let's take things a step further by building an AI-powered pricing research assistant for Etsy. Using the `langchain-zenrows` integration together with OpenAI's `gpt-4o-mini` model, our assistant will automatically visit Etsy's accessories category and extract key product details such as names, prices, and URLs.
Here's the prompt we'll use to guide the assistant:
### Example Prompt
```text Prompt theme={null}
Go to the accessories category of https://www.etsy.com/ and return the names, prices, and URLs of the top 4 products in JSON format using the autoparse feature.
```
### Step 1: Install the packages
```bash theme={null}
pip install langgraph langchain-openai langchain-zenrows
```
### Step 2: Add ZenRows as a scraping tool for the AI model
Import the necessary modules and define your ZenRows and OpenAI API keys. Instantiate OpenAI's chat model and `langchain-zenrows` integration with the relevant API keys. Configure the LLM agent to use ZenRows as a scraping tool:
```python Python theme={null}
# pip install langgraph langchain-openai langchain-zenrows
from langchain_zenrows import ZenRowsUniversalScraper
from langchain_openai import ChatOpenAI
from langgraph.prebuilt import create_react_agent
import os
os.environ["ZENROWS_API_KEY"] = "YOUR_ZENROWS_API_KEY"
os.environ["OPENAI_API_KEY"] = "YOUR_OPENAI_API_KEY"
def scraper():
# initialize the model
llm = ChatOpenAI(model="gpt-4o-mini")
# initialize the universal scraper
zenrows_tool = ZenRowsUniversalScraper()
# create an agent that uses ZenRows as a tool
agent = create_react_agent(llm, [zenrows_tool])
```
### Step 3: Prompt the AI Agent
Invoke the AI agent with the research prompt and execute the scraper. As stated in the prompt, the agent uses ZenRows' [`markdown`](/universal-scraper-api/features/output#markdown-response) response to scrape the target page in Markdown format. It then analyzes the result and returns the 4 cheapest products:
```python Python theme={null}
# ...
def scraper():
# ...
try:
# create a prompt
result = agent.invoke(
{
"messages": "Go to the Accessories category page of https://www.etsy.com/. Scrape the page in markdown format and return the 4 cheapest products in JSON format."
}
)
# extract the response
for message in result["messages"]:
print(f"{message.content}")
except NameError:
print(
"⚠️ Agent not available."
)
except Exception as e:
print(f"❌ Error running agent: {e}")
scraper()
```
The agent uses ZenRows to visit and scrape the product information. Once scraped, the agent returns the items in the desired format.
### Complete Code Example
Combine the snippets from the two steps, and you'll get the following code:
```python Python theme={null}
# pip install langgraph langchain-openai langchain-zenrows
from langchain_zenrows import ZenRowsUniversalScraper
from langchain_openai import ChatOpenAI
from langgraph.prebuilt import create_react_agent
import os
os.environ["ZENROWS_API_KEY"] = "YOUR_ZENROWS_API_KEY"
os.environ["OPENAI_API_KEY"] = "YOUR_OPENAI_API_KEY"
def scraper():
# initialize the model
llm = ChatOpenAI(model="gpt-4o-mini")
# initialize the universal scraper
zenrows_tool = ZenRowsUniversalScraper()
# create an agent that uses ZenRows as a tool
agent = create_react_agent(llm, [zenrows_tool])
try:
# create a prompt
result = agent.invoke(
{
"messages": "Go to the Accessories category page of https://www.etsy.com/. Scrape the page in markdown format and return the 4 cheapest products in JSON format."
}
)
# extract the response
for message in result["messages"]:
print(f"{message.content}")
except NameError:
print(
"⚠️ Agent not available."
)
except Exception as e:
print(f"❌ Error running agent: {e}")
scraper()
```
The above code returns the names, prices, and URLs of the 4 cheapest products in JSON format as expected.
### Example Output
```json Output theme={null}
[
{
"title": "Lovely Cat Keychain Gift For Pet Mom",
"price": "$4.68",
"url": "https://www.etsy.com/listing/1812260433/lovel...",
},
{
"title": "Personalized slim leather keychain, key fob, custom keychain, leather initial keychain, quick shipping anniversary gift",
"price": "$4.79",
"url": "https://www.etsy.com/listing/876501930/personalized...",
},
{
"title": "Custom OWALA Name Tag Back to School for daughter Owala Cup accessory for son waterbottle Tumbler Name Plate for sports tumbler athlete tag",
"price": "$4.50",
"url": "https://www.etsy.com/listing/1796331543/custom-...",
},
{
"title": "Set of Blue and White Striped Hair Bows - 3-Inch Handmade Clips for Girls & Toddlers",
"price": "$6.00",
"url": "https://www.etsy.com/listing/4328846122/set...",
},
]
```
Congratulations! 🎉 You've now integrated ZenRows as a web scraping tool for an AI agent using the `langchain-zenrows` module.
## API Reference
| Parameter | Type | Description |
| ---------------------- | --------- | --------------------------------------------------------------------------------------------------------------------------------------------------------------------------------------- |
| `zenrows_api_key` | `string` | Your ZenRows API key. If not provided, the setup looks for the `ZENROWS_API_KEY` environment variable. |
| `url` | `string` | **Required.** The URL to scrape. |
| `js_render` | `boolean` | Enable JavaScript rendering with a headless browser. Essential for modern web apps, SPAs, and sites with dynamic content (default: False). |
| `js_instructions` | `string` | Execute custom JavaScript on the page to interact with elements, scroll, click buttons, or manipulate content. |
| `premium_proxy` | `boolean` | Use residential IPs to bypass antibot protection. Essential for accessing protected sites (default: False). |
| `proxy_country` | `string` | Set the country of the IP used for the request. Use for accessing geo-restricted content. Two-letter country code. |
| `session_id` | `integer` | Maintain the same IP for multiple requests for up to 10 minutes. Essential for multi-step processes. |
| `custom_headers` | `boolean` | Include custom headers in your request to mimic browser behavior. |
| `wait_for` | `string` | Wait for a specific CSS Selector to appear in the DOM before returning content. |
| `wait` | `integer` | Wait a fixed amount of milliseconds after page load. |
| `block_resources` | `string` | Block specific resources (images, fonts, etc.) from loading to speed up scraping. |
| `response_type` | `string` | Convert HTML to other formats. Options: "markdown", "plaintext", "pdf". |
| `css_extractor` | `string` | Extract specific elements using CSS selectors (JSON format). |
| `autoparse` | `boolean` | Automatically extract structured data from HTML (default: False). |
| `screenshot` | `string` | Capture an above-the-fold screenshot of the page (default: "false"). |
| `screenshot_fullpage` | `string` | Capture a full-page screenshot (default: "false"). |
| `screenshot_selector` | `string` | Capture a screenshot of a specific element using CSS Selector. |
| `screenshot_format` | `string` | Choose between "png" (default) and "jpeg" formats for screenshots. |
| `screenshot_quality` | `integer` | For JPEG format, set the quality from 1 to 100. Lower values reduce file size but decrease quality. |
| `original_status` | `boolean` | Return the original HTTP status code from the target page (default: False). |
| `allowed_status_codes` | `string` | Returns the content even if the target page fails with the specified status codes. Useful for debugging or when you need content from error pages. |
| `json_response` | `boolean` | Capture network requests in JSON format, including XHR or Fetch data. Ideal for intercepting API calls made by the web page (default: False). |
| `outputs` | `string` | Specify which data types to extract from the scraped HTML. Accepted values: emails, phone numbers, headings, images, audios, videos, links, menus, hashtags, metadata, tables, favicon. |
For complete parameter documentation and details, see the official [ZenRows API Reference](/universal-scraper-api/api-reference#parameter-overview).
## Troubleshooting
### Token limit exceeded
* **Solution 1**: If you hit the LLM token limit, it means the output size has exceeded what the model can process in a single request. You can parse specific data and then feed it to the LLM model.
* **Solution 2**: If the issue is related to usage-based token quotas or the model version's capabilities, consider upgrading your plan or switching to a higher model with higher bandwidth. For instance, moving from gpt-3.5 to gpt-4o-mini increases the token limit significantly.
### API key error
* **Solution 1**: Ensure you've added your ZenRows and the LLM's API keys to your environment variables.
* **Solution 2**: Cross-check the API keys and ensure you've entered the correct keys.
### Empty or incomplete data/tool response
* **Solution 1**: Activate JS rendering to handle dynamic content and increase the success rate.
* **Solution 2**: Increase the wait time using the ZenRows `wait` or `wait_for` parameter. The `wait` parameter introduces a general delay to allow the entire page to load, whereas `wait_for` targets a specific element, pausing execution until that element appears before scraping continues.
* **Solution 3**: If you've used the `css_extractor` parameter to target specific elements, ensure you've entered the correct selectors.
## Helpful Resources
* LangChain-ZenRows PyPI package
* LangChain-ZenRows GitHub repository
* Check our examples for more use cases
## Frequently Asked Questions (FAQ)
`langchain-zenrows` is compatible with all LLMs supported by LangChain. Check LangChain's official chat models documentation for more information.
Yes, you can extract data from specific elements by explicitly specifying their selectors in your prompt.
Yes, you can include custom JavaScript via ZenRows' `js_instructions` parameter. Check our [JavaScript instructions guide](/universal-scraper-api/features/js-instructions) for more.
Yes, ZenRows' antibot bypass features are activated automatically when using ZenRows as the agent's tool.
Yes. The JS rendering parameter is activated on demand while scraping a JavaScript-rendered site. This enables you to scrape dynamic pages with ease.
To extract data from specific elements, use ZenRows' `css_extractor` parameter to specify the selectors of the elements containing the data you want to scrape.
Yes, you can prompt the LLM to take a half, full, or a specific element screenshot, and it will return your desired result using ZenRows' screenshot parameter.
ZenRows offers enterprise-grade reliability, featuring built-in antibot bypass, premium proxies, JavaScript rendering, and more. Unlike basic scrapers, it can handle protected sites, geo-restricted content, and modern SPAs without getting blocked.
# How to Integrate Lindy with ZenRows
Source: https://docs.zenrows.com/integrations/lindy
Automate web scraping workflows by connecting ZenRows with Lindy's AI assistant platform. This integration extracts and processes web data through intelligent automation, eliminating manual data collection tasks.
## What Is Lindy?
Lindy creates AI assistants that automate repetitive business tasks. When you integrate Lindy with ZenRows, you can scrape websites automatically and use the extracted data to trigger intelligent workflows like generating reports, updating spreadsheets, or managing sales pipelines.
## Use Cases
Here are some ways you can use ZenRows and Lindy together:
* **Competitive Analysis:** Extract competitor data and generate automated reports.
* **Lead Generation:** Scrape business directories and qualify prospects for your sales team.
* **Brand Monitoring:** Track online mentions and respond automatically.
* **Content Curation:** Collect and categorize articles for your team.
* **Market Research:** Gather and analyze property listings or market data.
## Real-World End-to-End Integration Example
This example shows how to build an automated system that monitors e-commerce products and stores the data in Google Sheets.
### Step 1: Create a new Lindy assistant
1. Log in to Lindy and open your workspace dashboard.
2. Click `+ New Lindy`, select **Start from scratch**, and name your assistant (e.g., Product Data Extractor).
### Step 2: Configure ZenRows integration with Lindy
1. Go to [ZenRows' Universal Scraper API Request Builder](https://app.zenrows.com/builder).
2. Input `https://www.scrapingcourse.com/ecommerce` as your target URL for scraping.
3. Enable **JS Rendering** to handle dynamic page content.
4. Configure **Output type** to **Specific Data** and navigate to the **Parsers** section.
5. Set up the CSS selector configuration: `{ "name": ".product-name" }`.
6. Navigate to the cURL tab and copy the generated HTTP request URL. It'll look like this:
```bash theme={null}
https://api.zenrows.com/v1/?apikey=&url=https%3A%2F%2Fwww.scrapingcourse.com%2Fecommerce%2F&js_render=true&css_extractor=%257B%2522name%2522%253A%2522.product-name%2522%257D
```
The CSS selectors provided in this example (`.product-name`) are specific to the page used in this guide. Selectors may vary across websites. For guidance on customizing selectors, refer to the [CSS Extractor documentation](/universal-scraper-api/features/output#css-selectors). If you're having trouble, the [Advanced CSS Selectors Troubleshooting Guide](/universal-scraper-api/troubleshooting/advanced-css-selectors) can help resolve common issues.
1. Within your Lindy assistant, select **Perform an action** from the available options.
2. Choose **HTTP Request** action from the action menu.
3. In the **Url** field, select the **Set Manually** option.
4. Enter the URL generated from your ZenRows configuration.
5. Change the request type for the remaining fields to **Auto** to allow Lindy to handle the configuration automatically.
6. Delete the **Select Trigger** node and proceed directly to testing since we'll not use a trigger for this example.
7. Click `Turn on` to activate your Lindy assistant.
8. Click `Test` to verify the integration works correctly and returns the expected product name data.
### Step 3: Process and transform the scraped data
1. Click `Enter AI Agent` to add an intelligent data processing step to your workflow.
2. Enter the following prompt to help you format the extracted product names into a format suitable for spreadsheet storage:
```plaintext theme={null}
Convert the output object values into individual strings
```
3. Click `+ Add exit condition` to define when the AI agent should complete its task.
4. In the **Condition** field, enter the following prompt:
```plaintext theme={null}
You have individual values extracted from the output object
```
5. Follow the same **Turn on** and **Test** steps to verify that the AI agent properly transforms your data.
### Step 4: Save results to Google Sheets
1. Add Google Sheets' **Append rows** action to your Lindy workflow.
2. Connect your Google account to enable Lindy access to your spreadsheets.
3. Choose your target spreadsheet from the available options.
4. Select the appropriate **Sheet Title** where you want to store the extracted product data.
5. For the **Rows** field, click `Prompt AI` and enter the prompt:
```plaintext theme={null}
Fill the rows with individual product names received from the previous step.
```
6. Follow the same **Turn on** and **Test** steps. The product names will be appended to your specified spreadsheet location.
## Troubleshooting
### AI Agent Processing Issues
* If your AI agent isn't properly converting data formats, review the prompt specificity and ensure it clearly describes the desired output structure.
* Verify that the exit condition is correctly defined. The agent should know exactly when its task is complete.
* Check the input data from the previous HTTP request step to ensure it contains the expected product information.
### Connection and Authentication Errors
* Ensure your ZenRows account has sufficient usage and isn't hitting concurrency limits during testing.
* Verify Google Sheets permissions are correctly granted when connecting your account to Lindy.
### Data Format and Output Problems
* If Google Sheets isn't receiving data in the expected format, test each step individually to isolate where the data transformation fails.
* Review the AI prompts in both the data processing and Google Sheets steps to ensure they're requesting compatible formats.
* Check that your target spreadsheet exists and the specified sheet name matches exactly.
### Request Issues
Different websites require specific configurations to retrieve content successfully. Some sites need additional parameters to handle dynamic content effectively.
**Common parameters you might need:**
* `wait` or `wait_for`: Ensures the page fully loads JavaScript-rendered elements before extraction
* `premium_proxy`: Provides high-quality proxies for reliable access
* `proxy_country`: Specifies the geographical location for the request to bypass geo-restrictions
For comprehensive troubleshooting guidance, explore [ZenRows' troubleshooting documentation](/universal-scraper-api/troubleshooting/troubleshooting-guide).
## Tips and best practices
Follow these practices when integrating Lindy with ZenRows:
1. Define Clear Objectives
* Identify your specific goals before starting. This guides your configuration and workflow design.
* Example: For e-commerce scraping, decide whether you need product names, prices, descriptions, or all three.
2. Write Precise AI Prompts
* Craft specific, goal-oriented prompts for AI agents.
* Good: "Extract product names and format them as a list."
* Avoid: "Process this data."
3. Optimize Data Transformation
* Ensure the AI agent's output format matches subsequent steps (like spreadsheet rows).
* Test different prompts to refine the transformation process.
4. Test Each Step
* Verify each workflow component individually before connecting them.
* Use Lindy's testing tools to debug issues step by step.
## Conclusion
Integrating ZenRows with Lindy automates web data extraction and streamlines your workflows. This combination eliminates manual data collection tasks and enables intelligent processing of scraped information.
## Frequently Asked Questions (FAQ)
Integrating Lindy with ZenRows lets you automate web scraping and data processing workflows. For example, you can extract product data from websites and automatically store it in Google Sheets without manual work.
ZenRows can scrape a wide range of data, such as product details, business listings, articles, and more. The exact data depends on the website and the CSS selectors you set up.
If your CSS selectors aren't extracting the right data, use ZenRows' Parsers section to test and refine selectors. For more help, see the [Advanced CSS Selectors Troubleshooting Guide](/universal-scraper-api/troubleshooting/advanced-css-selectors).
Review your prompt to make sure it clearly describes the desired output. Check that your input data matches what the AI agent expects, and use Lindy's testing tools to debug the step.
Yes, Lindy supports integrations with many tools, including Google Sheets and Slack. You can combine these to build more complex workflows.
If the target website's structure changes, your CSS selectors may stop working. Regularly review and update your scraping setup to keep it working.
Yes, Lindy lets you set triggers or schedules for workflows. This is helpful for tasks like daily scraping or weekly reports.
Check Lindy's official documentation for advanced setups or contact their support teams for help with specific cases.
# How to Integrate LlamaIndex with ZenRows
Source: https://docs.zenrows.com/integrations/llamaindex
Integrate ZenRows with LlamaIndex to enable your RAG applications to access, index, and synthesize up-to-date web content from any website, including those with anti-bot protection and dynamic content.
## What Is LlamaIndex?
LlamaIndex is an open-source framework that connects LLMs to external data sources, databases, documents, and APIs. It provides tools for data ingestion, indexing, and query-based retrieval, commonly used to build retrieval-augmented generation (RAG) applications, which can be used to feed AI agents with up-to-date information.
## Key Integration Benefits
* **Uninterrupted access to data**: Build a reliable data layer that can access information from any website without getting blocked by anti-bot measures.
* **Real-time information retrieval**: Extract real-time data faster and more efficiently before it becomes stale.
* **Direct extraction of LLM-friendly data**: Get pre-formatted LLM-friendly data, such as the Markdown or JSON version of any website. ZenRows also enables the extraction of specific data directly.
* **Less code, more data**: Scrape data continuously with an auto-managed and auto-scaled solution with a simple API call.
* **Business-oriented development**: No extra engineering time and resources will be wasted on debugging or fixes.
* **Handle dynamic content easily**: Access heavily dynamic websites without performing complex waits and user simulations.
* **Borderless data retrieval**: Expose AI applications to data from any specific location without IP limitations using residential proxies with geo-targeted IPs.
## Use Cases of LlamaIndex-ZenRows Integration
* **Real-time price monitoring**: Use ZenRows to scrape prices from several product sites in real-time and synthesize a comprehensive comparison with an LLM.
* **Competitive research**: Scrape several competitors' offerings, product launches, strategies, and more with ZenRows and draw a correlation between the data using an LLM.
* **News and trends summarization**: Use ZenRows to aggregate news, trends, hashtags, and more, across similar platforms. Summarize the aggregated data with an LLM and extract specific insights.
* **Dynamic chatbots**: Build a chatbot that can access the web or specific web pages in real time to provide updated information.
## Getting Started: Basic Usage
This example demonstrates how to extract content from a protected website using the `ZenRowsWebReader`.
The `ZenRowsWebReader` enables you to use the official [ZenRows Universal Scraper API](https://www.zenrows.com/products/universal-scraper) as a data loader for web scraping in LlamaIndex.
```bash theme={null}
pip3 install llama-index-readers-web
```
Import `ZenRowsWebReader` from `llama-index-readers-web`. Initialize `ZenRowsWebReader` as a reader instance. Then, set your ZenRows parameters through this instance.
Load the target site as a document and return its content in the specified format (Markdown response):
```python Python theme={null}
# pip3 install llama-index-readers-web
from llama_index.readers.web import ZenRowsWebReader
api_key = "YOUR_ZENROWS_API_KEY"
# initialize the reader
reader = ZenRowsWebReader(
api_key=api_key,
js_render=True,
premium_proxy=True,
response_type="markdown",
)
# scrape a single URL
documents = reader.load_data(["https://www.scrapingcourse.com/antibot-challenge/"])
print(documents[0].text)
```
The code returns a Markdown format of the target site, as shown:
```markdown Markdown theme={null}
[ Scraping Course](http://www.scrapingcourse.com/)
# Antibot Challenge

## You bypassed the Antibot challenge! :D
```
## Advanced Usage: Building a Simple RAG System
This example creates a simple RAG system that indexes multiple websites and responds to queries using the collected data.
You'll need an OpenAI API key to use the LLM and embedding features. So, prepare your OpenAI API key.
```bash theme={null}
pip3 install llama-index-readers-web llama-index-llms-openai llama-index-embeddings-openai
```
Import the required packages and specify your ZenRows and OpenAI API keys. Initialize `ZenRowsWebReader` using the desired ZenRows parameters. Include `js_render` and `premium_proxy` to effectively bypass anti-bot measures.
```python Python theme={null}
# pip3 install llama-index-readers-web llama-index-llms-openai llama-index-embeddings-openai
from llama_index.core import VectorStoreIndex
from llama_index.readers.web import ZenRowsWebReader
import os
os.environ["OPENAI_API_KEY"] = "YOUR_OPENAI_API_KEY"
api_key = "YOUR_ZENROWS_API_KEY"
# set up ZenRowsWebReader
reader = ZenRowsWebReader(
api_key=api_key,
js_render=True,
premium_proxy=True,
response_type="markdown",
wait=2000,
)
```
Specify the target URLs in a list, load their web pages as documents, and create a vectorized index of the documents:
```python Python theme={null}
# ...
urls = [
"https://www.scrapingcourse.com/ecommerce",
"https://www.scrapingcourse.com/button-click",
"https://www.scrapingcourse.com/infinite-scrolling",
]
# load each URL as a document
documents = reader.load_data(urls)
# create index
index = VectorStoreIndex.from_documents(documents)
```
Initialize a query engine from the index, pass a prompt to query it, and return the query response:
```python Python theme={null}
# ...
# query the content
query_engine = index.as_query_engine()
response = query_engine.query("What are the key features?")
print(response)
```
```python Python theme={null}
# pip3 install llama-index-readers-web llama-index-llms-openai llama-index-embeddings-openai
from llama_index.core import VectorStoreIndex
from llama_index.readers.web import ZenRowsWebReader
import os
os.environ["OPENAI_API_KEY"] = "YOUR_OPENAI_API_KEY"
api_key = "YOUR_ZENROWS_API_KEY"
# set up ZenRowsWebReader
reader = ZenRowsWebReader(
api_key=api_key,
js_render=True,
premium_proxy=True,
response_type="markdown",
wait=2000,
)
urls = [
"https://www.scrapingcourse.com/ecommerce",
"https://www.scrapingcourse.com/button-click",
"https://www.scrapingcourse.com/infinite-scrolling",
]
# load each URL as a document
documents = reader.load_data(urls)
# create index
index = VectorStoreIndex.from_documents(documents)
# query the content
query_engine = index.as_query_engine()
response = query_engine.query("What are the key features?")
print(response)
```
LlamaIndex uses ZenRows to retrieve each website's information in Markdown format, vectorizes it, and synthesizes a response based on the query.
Here's a sample response from the above code:
```markdown Markdown theme={null}
The key features include a menu with options like Shop, Home, Cart, Checkout, and My account. Additionally, there is a list of products with images, names, prices, and options to select or add to cart for each item.
```
Congratulations! 🎉You've integrated ZenRows with LlamaIndex.
## API Reference
| Parameter | Type | Description |
| ---------------------- | ---- | -------------------------------------------------------------------------------------------------------------------------------------------------------------------------------------- |
| `url` | str | Required. The URL to scrape |
| `js_render` | bool | Enable JavaScript rendering with a headless browser. Essential for modern web apps, SPAs, and sites with dynamic content (default: False) |
| `js_instructions` | str | Execute custom JavaScript on the page to interact with elements, scroll, click buttons, or manipulate content |
| `premium_proxy` | bool | Use residential IPs to bypass anti-bot protection. Essential for accessing protected sites (default: False) |
| `proxy_country` | str | Set the country of the IP used for the request. Use for accessing geo-restricted content. Two-letter country code |
| `session_id` | int | Maintain the same IP for multiple requests for up to 10 minutes. Essential for multi-step processes |
| `custom_headers` | dict | Include custom headers in your request to mimic browser behavior |
| `wait_for` | str | Wait for a specific CSS Selector to appear in the DOM before returning content |
| `wait` | int | Wait a fixed amount of milliseconds after page load |
| `block_resources` | str | Block specific resources (images, fonts, etc.) from loading to speed up scraping |
| `response_type` | str | Convert HTML to other formats. Options: "markdown", "plaintext", "pdf" |
| `css_extractor` | str | Extract specific elements using CSS selectors (JSON format) |
| `autoparse` | bool | Automatically extract structured data from HTML (default: False) |
| `screenshot` | str | Capture an above-the-fold screenshot of the page (default: "false") |
| `screenshot_fullpage` | str | Capture a full-page screenshot (default: "false") |
| `screenshot_selector` | str | Capture a screenshot of a specific element using CSS Selector |
| `screenshot_format` | str | Choose between "png" (default) and "jpeg" formats for screenshots |
| `screenshot_quality` | int | For JPEG format, set the quality from 1 to 100. Lower values reduce file size but decrease quality |
| `original_status` | bool | Return the original HTTP status code from the target page (default: False) |
| `allowed_status_codes` | str | Returns the content even if the target page fails with the specified status codes. Useful for debugging or when you need content from error pages |
| `json_response` | bool | Capture network requests in JSON format, including XHR or Fetch data. Ideal for intercepting API calls made by the web page (default: False) |
| `outputs` | str | Specify which data types to extract from the scraped HTML. Accepted values: emails, phone numbers, headings, images, audios, videos, links, menus, hashtags, metadata, tables, favicon |
For complete parameter documentation and details, see the official [ZenRows' Universal Scraper API Reference](/universal-scraper-api/api-reference).
## Troubleshooting
### The returned response is incomplete:
* **Solution 1**: Ensure you activate `js_render` and `premium_proxy` to bypass anti-bot measures and scrape reliably.
* **Solution 2**: Apply enough `wait` time to allow dynamic content to load completely before scraping. If a specific element holding the required data loads slowly, you can also wait for it using the **wait\_for** parameter.
* **Solution 3**: If only partial responses are returned, the LLM may be missing relevant information in the chunk. Adjust the engine query retrieval by increasing the number of chunks the LLM receives from the documents. Increase the chunk by adding a **similarity\_top\_k** parameter to the query engine as shown:
```python Python theme={null}
# ...
# query the content
query_engine = index.as_query_engine(similarity_top_k=10)
# …
```
* **Solution 4**: If you've used the `css_extractor` parameter to target specific elements, ensure you've entered the correct selectors.
### API key or authentication error
* **Solution**: Ensure you've supplied your LLM (e.g., OpenAI) and ZenRows API keys correctly.
### Module not found
* **Solution**: Install all the required modules:
* `llama-index-readers-web`
* `llama-index-llms-openai`
* `llama-index-embeddings-openai`
## Resources
* ZenRowsWebReader on GitHub
## Frequently Asked Questions (FAQ)
The use cases of LlamaIndex-ZenRows integration are diverse. However, the primary application is to enable AI applications to access and reason over live, real-world web data, even from sites with anti-bot protections or dynamic content.
Yes, you can scrape data from specific elements using their CSS selectors via the `css_extractor` parameter.
Yes. The `ZenRowsWebReader` inherits all the features and capabilities of the ZenRows Universal Scraper API.
LlamaIndex supports many popular LLMs, such as Groq, OpenAI, Anthropic, and more. Check LlamaIndex's official documentation for the supported LLMs.
LlamaIndex isn't explicitly designed for web scraping information from websites. However, you can add a scraping layer to LlamaIndex by pairing it with a web scraping tool like ZenRows, which provides it with anti-bot bypass capabilities.
# How to Integrate Make with ZenRows
Source: https://docs.zenrows.com/integrations/make
ZenRows' integration with Make enables you to extract data without writing code. This guide takes you through the steps of integrating ZenRows with Make using a real-life scraping example.
## What Is Make?
Make is a no-code platform for automating tasks by connecting applications and services. The platform operates on scenario workflows, where connected services or apps execute tasks sequentially based on a user's input.
Make integrates with several services, including ZenRows, Google Sheets, Gmail, and many more, allowing users to link processes visually.
ZenRows' integration with Make enables users to automate ZenRows' web scraping service, from data collection to scheduling, storage, and monitoring.
## Available ZenRows Integrations
* **Monitor your API usage**: Returns the Universal Scraper API usage information
* **Make an API Call**: Sends a GET, POST, or PUT request to a target URL via the Universal Scraper API.
* **Scraping a URL with Autoparse**: Automates the Universal Scraper API to auto-parse a target website's HTML elements. It returns structured JSON data.
The autoparse option only works for some websites. Learn more about how it works in the [autoparse FAQ](/universal-scraper-api/faq#what-is-autoparse).
* **Scraping a URL with CSS Selectors**: Automates data extraction from an array of CSS selectors.
## Watch the Video Tutorial
Learn how to set up the Make ↔ ZenRows integration step-by-step by watching this video tutorial:
## Real-World End-to-End Integration Example
We'll build an end-to-end Amazon scraping Scenario using Make and ZenRows with the following steps:
1. Pull target URLs from Google Sheets into Make's Iterator
2. Utilize ZenRows' **Scraping a URL with Autoparse** integration option to extract data from URLs automatically
3. Save the extracted data to Google Sheets
### Step 1: Create a new Scenario on Make
1. Log in to your account at [https://make.com/](https://make.com/)
2. Go to **Scenarios** on the left sidebar
3. Click **+ Create a new scenario** at the top right
### Step 2: Connect the Google Sheets containing the target URLs
1. Enter your Scenario's name at the top-left (e.g., Amazon Scraper)
2. Click the `+` icon in the middle of the screen
3. Search and select **Google Sheets** from the modal
4. Select **Get Range Values** from the options
5. If prompted, click **Create a connection** to link Make with your Google account
6. Click the **Search Method** dropdown and select **Enter manually**
7. Paste the Google Sheets ID in the **Spreadsheet ID** field
8. Enter the sheet's name in the Sheet Name field
9. Provide the range of cells containing the target URLs in the **Range** field (e.g., A2:A11)
10. Click **Save**
### Step 3: Load the Target URLs into an Iterator
1. Click `+` next to the Google Sheets module to create a new connection
2. Search and select **Flow Control**, then click **Iterator**
3. Place your cursor in the Array field and select the column containing the target URLs (i.e., **A**) from the integrated Google Sheets
4. Click **Save**
### Step 4: Connect ZenRows with the Make workflow
1. Click the `+` icon
2. Search and select **ZenRows**
3. Click **Scrape a URL with Autoparse**
4. Click **Create a Connection**
5. Under **Connection type**, select **ZenRows**
6. Enter a connection name in the **Connection name** field
7. Provide your ZenRows API key in the **API Key** field
8. Click **Save**
9. Place your cursor in the URL field, then select **Value** from the Flow Control option in the modal box
10. Click **Show advanced settings**
11. Select **Yes** for **Premium Proxy** and **JavaScript Rendering**
12. Click **Save**
### Step 5: Store the scraped data in a Google Sheets
1. Click **Run once** in the lower left corner to scrape data from the URLs
2. Add another named sheet (e.g., **Products**) to the connected Google Sheets. Include the following columns in the new sheet:
* Name
* Rating Value
* Review Count
* Price (USD)
* Out of Stock
3. Click the `+` icon to add another module. Then, select **Google Sheets**.
4. Select **Add a row**
5. Select **Enter manually** from the **Search Method** dropdown ⇒ enter the **Spreadsheet ID** and **Sheet Name**.
6. Under **Column Range**, select **A-Z**. Then, map the columns using the data extracted from ZenRows.
7. Place your cursor in each column field and map it with the extracted data field as follows:
* **A** = `Value` (from the Iterator)
* **B** = `title`
* **C** = `avg_rating`
* **D** = `review_count`
* **E** = `price`
* **F** = `out_of_stock`
8. Click **Save**
### Step 6: Run the Make Scenario and Validate the Extraction
Click **Run once** in the lower-left corner of the screen. The workflow runs iteratively for each URL in the connected Google Sheets.
The workflow scrapes the data into the Products sheet as shown:
Congratulations! You've successfully integrated ZenRows with Make and automated your web scraping workflow.
## ZenRows Configuration Options
ZenRows supports the following configuration options on Make:
| Configuration | Function |
| --------------------------- | --------------------------------------------------------------------------------------------------------------------- |
| **URL** | The URL of the target website |
| **Headers** | Adds the custom headers to the request |
| **Premium Proxy** | When activated, it routes requests through the ZenRows Residential Proxies, instead of the default Datacenter proxies |
| **Proxy Country** | The country geolocation to use in a request |
| **JavaScript Rendering** | Ensures that dynamic content loads before scraping |
| **Wait for Selector** | Pauses scraping execution until a particular selector is visible in the DOM |
| **Wait Milliseconds** | Waits for a fixed amount of time before executing the scraper |
| **Window Width** | Sets the browser's window width |
| **Window Height** | Sets the browser's window height |
| **JavaScript Instructions** | Passes JavaScript code to execute actions like clicking, scrolling, and more |
| **Session ID** | Uses a session ID to maintain the same IP for multiple API requests for up to 10 minutes |
| **Original Status** | Returns the original status code returned by the target website |
## Troubleshooting
### Issue: The workflow returns incomplete data
**Solution**: Ensure that JavaScript Rendering and Premium Proxy are enabled in the ZenRows configuration.
### Issue: \[400] Error with internal code 'REQS004'
**Solution 1**: Double-check the target URL and ensure it's not malformed or missing essential query strings.
**Solution 2**: If using the CSS selector integration, ensure the extractor parameter is a valid JSON array of objects (e.g., `[{"title":"#productTitle", "price": ".a-price-whole"}]`).
### Issue: Failed request or 401 unauthorized response
**Solution 1**: Ensure you supply your ZenRows API key.
**Solution 2**: Double-check to ensure you've provided the correct ZenRows API key.
### Issue: The Google Sheets module cannot find the spreadsheet
**Solution**: Double-check the Spreadsheet ID and ensure the Google Sheets API is enabled for your account.
## Integration Benefits & Applications
Integrating Make with ZenRows has the following benefits:
* It enables businesses to automate data collection and build a complete data pipeline without writing code.
* You also overcome scraping challenges, such as anti-bot measures, dynamic rendering, geo-restrictions, and more.
* By automating the scraping process, you only focus on data processing and analysis rather than worrying about building out complicated scraping logic.
* Scaling up with Make integration is also easy, as you can add URLs continuously to your queue.
* You can also schedule the scraping job to refresh your data pipeline at specific intervals.
## Frequently Asked Questions (FAQ)
Yes. You don't need a separate ZenRows API key for Make. You need to provide your existing API key while connecting Make with ZenRows.
Make supports ZenRows CSS selector integration. It allows you to manually pass the target website's CSS selectors as an array.
The autoparse integration isn't available for all websites. If you use the **Scraping a URL with Autoparse** integration for an unsupported website, the scraper will return empty or incomplete data or an error. Visit the [ZenRows web scraper](https://www.zenrows.com/scraper) page to view the supported websites.
# How to Integrate MuleSoft with ZenRows
Source: https://docs.zenrows.com/integrations/mulesoft
Connect ZenRows' web scraping capabilities to your MuleSoft workflows through the Anypoint platform. This integration enables automated data extraction from websites directly within your existing automation processes.
## What Is MuleSoft?
MuleSoft is a no-code/low-code automation platform that connects and exchanges data between various applications and systems. One of its core components is the MuleSoft Anypoint platform, which enables users to integrate systems via an API-focused approach.
## Use Cases
Here are some use cases of MuleSoft-ZenRows integration.
* **Competitor monitoring**: Schedule automated scraping of competitor websites to track pricing, product changes, or content updates.
* **Sentiment analysis**: Gather product reviews data from various sources with ZenRows and analyze their sentiment using LLM integration.
* **Demand forecasting**: Use cron jobs to scrape demand signals from retail and ecommerce sites with ZenRows. Calculate trends and historical moves with JavaScript via Anypoint's Scripting module. Store time-series data in a database and forecast anticipated demand using LLM.
* **Best deal recommendation**: Collect product data from various platforms with ZenRows and use an LLM to analyze key points, such as price, demand history, reviews, and ratings, to recommend the best deal for your customers.
## Initial Integration Steps via Anypoint Platform
The best way to integrate MuleSoft with ZenRows is via Anypoint. This guide assumes that you already have an Anypoint account with the Anypoint Studio downloaded and installed.
We'll create a scraping workflow that extracts data from an Amazon product page and stores it in a JSON file.
### Step 1: Create and deploy a ZenRows API Spec
1. Log in to MuleSoft via the Anypoint platform.
2. Click the icon at the top left and go to **Design Center**.
3. Click `Create +` at the top-left and select **New API Specification**.
4. Give your project a name (e.g., ZenRows Universal Scraper). Then click `Create API`.
5. The Design Center creates a new `zenrows-universal-scraper.raml` file. Remove the existing content in the **RAML** code box and paste the following ZenRows RAML configuration inside the code box. This configuration defines the required [specs and parameters](/universal-scraper-api/api-reference#parameter-overview) to use the ZenRows Universal Scraper API:
```yml RAML theme={null}
#%RAML 1.0
title: ZenRows Universal Scraper API
version: v1
baseUri: https://api.zenrows.com/v1
/:
get:
description: A versatile tool designed to simplify and enhance the process of extracting data from websites.
queryParameters:
apikey:
description: Your unique API key for authentication.
type: string
required: true
example: ""
url:
description: The URL of the page you want to scrape.
type: string
required: true
example: ""
js_render:
description: Enable JavaScript rendering with a headless browser.
type: boolean
required: false
default: false
example: true
premium_proxy:
description: Use residential IPs to bypass anti-bot protection.
type: boolean
required: false
default: false
example: true
proxy_country:
description: Set the country of the IP used for the request (requires Premium Proxies).
type: string
required: false
example: ""
autoparse:
description: Automatically parse the content of supported websites and return the data as a JSON object.
type: boolean
required: false
default: false
example: false
response_type:
description: Convert HTML to other formats (Markdown, Plaintext, PDF).
type: string
required: false
example: markdown
wait:
description: Wait a fixed number of milliseconds after page load.
type: integer
required: false
example: 0
wait_for:
description: Wait for a specific CSS Selector to appear in the DOM before returning content.
type: string
required: false
example: ""
css_extractor:
description: Extract specific elements using CSS selectors.
type: string
required: false
example: ""
json_response:
description: Capture network requests in JSON format, including XHR or Fetch data.
type: boolean
required: false
default: false
example: true
js_instructions:
description: Execute custom JavaScript on the page to interact with elements, scroll, click buttons, or manipulate content.
type: string
required: false
example: ""
original_status:
description: Return the original HTTP status code from the target page.
type: boolean
required: false
default: false
example: true
outputs:
description: Specify which data types to extract from the scraped HTML.
type: string
required: false
example: "tables,hashtags,emails"
block_resources:
description: Block specific resources (images, fonts, etc.)
type: string
required: false
example: "image,media,font"
screenshot:
description: Capture an above-the-fold screenshot of the page.
type: boolean
required: false
default: false
example: false
screenshot_selector:
description: Capture a screenshot of a specific element using CSS Selector.
type: string
required: false
example: ""
screenshot_fullpage:
description: Capture a full-page screenshot.
type: boolean
required: false
default: false
example: true
screenshot_format:
description: Choose the screenshot format.
type: string
required: false
example: "png"
screenshot_quality:
description: For JPEG format, set quality from 1 to 100.
type: integer
required: false
example: 70
responses:
200:
body:
application/json:
example: |
{
"success": true,
"data": ""
}
```
6. Click `Get`. Then, click `Publish` at the top right.
7. Keep the **Asset Version** and **API Version** as `1.0.0` and `v1`, respectively. Under **LifeCycle State**, select **Stable**.
8. Click `Publish to Exchange`.
9. Close the confirmation modal.
10. Click the menu icon at the top left and go to **Exchange** to view your published API spec in the Anypoint Exchange marketplace.
### Step 2: Import the ZenRows API Spec into Anypoint Studio
1. Launch the Anypoint Studio on your machine.
2. Click `File` at the top left and go to **New**. Then, select **Mule Project**.
3. Give your project a name (e.g., Scraper) and click `Finish`.
4. Double-click the `` (`scraperflow.xml`) file on the left sidebar to load the flow canvas.
5. From the Mule Pallet on the right side of the canvas, click `Search in Exchange`.
6. Click `Add Account` and authenticate Anypoint Studio with your Anypoint account if you haven't done so already.
7. Search for ZenRows in the search bar and select the **ZenRows Universal Scraper API** spec from the result table.
8. Click `Add` to load the API spec into the Anypoint Studio Mule Palette.
9. Click `Finish`.
10. To test the import, search for ZenRows via the Mule Palette search bar. The ZenRows Universal Scraper spec now appears in the Mule Palette.
anypoint-studio-mule-pallet-api-spec.png]
### Step 3: Create the scraping workflow in Anypoint Studio
1. From the Mule Palette, search for **Scheduler** and drag it into the canvas. Rename your scheduler as you desire.
2. From the **Scheduling Strategy** dropdown, choose between **Frequency** or **Cron**. We've chosen **Frequency** in this case and scheduled the flow to run the request within 10 seconds using a 10-second delay.
3. Search for **Logger** and drag it into the Process tab inside the Scaperflow. We'll use this to log the beginning of automation.
4. In the **Message** box, type a trigger alert message (e.g., Schedule triggered!).
5. Search for **ZenRows** in the Mule Palette. Then, drag the ZenRows Universal Scraper API spec into the workflow.
6. Click the **Connector Configuration** dropdown and select **Create a new configuration**.
7. Rename the ZenRows flow as you desire (e.g., Product Scraper Flow).
8. Click the `+` icon next to **Connector Configuration** and click okay to set it as ZenRows.
9. Set the necessary parameters. We've used the following in this guide:
* ZenRows API key.
* Target URL
* Js\_render = true
* Premium\_proxy = true
* Proxy\_country = us
* css\_extractor:
```json JSON theme={null}
{
"name": "span#productTitle",
"price": "span.aok-offscreen",
"ratings": "span.reviewCountTextLinkedHistogram span.a-size-base.a-color-base",
"reviewSummary": "#product-summary p span",
"reviewCount": "#acrCustomerReviewText"
}
```
10. Press `Ctrl+S` on your keyboard to save the current flow.
11. Again, search and drag a **Logger** flow into the workflow to output the scraping result.
12. Rename the new logger (e.g., Data Logger)
13. In the Logger's **Message**, click `fx` and type `#[payload`.
### Step 4: Save the data
1. Search for **File Write** in the Mule Palette and drag it into your workflow.
2. Rename the Writer (e.g., JSON Writer).
3. Paste the destination folder path in the **Path** field (e.g., `D:/Anypoint-result/result.json`). Keep the **Content** field as **payload** and the **Write Mode** as **OVERWRITE**.
4. Press Ctrl+S to save the changes.
anypoint-studio-final-flow\.png]
### Step 5: Run the flow
To run the flow, right-click `scraperflow.xml`, click `Run As` > `Mule Application`.
Check your JSON storage directory and open the created JSON file to see the scraped data.
Here's a sample JSON result:
```json result.json theme={null}
{
"name": "Gamrombo LED Wireless Controller for PS5, Compatible with PS5 Pro/Slim/PC, Dual Vibration, Marco/Turbo Function, 3.5mm Audio Jack, 6-Axis Motion Contro Gamepad with Speaker",
"price": [
"$49.99 with 17 percent savings",
"List Price: $59.99"
],
"ratings": [
"4.5",
"4.5"
],
"reviewCount": [
"423 ratings",
"423 ratings"
],
"reviewSummary": [
"Customers find the controller's ergonomics responsive and comfortable during long gaming sessions, with buttons that provide crisp feedback and moderate rebound strength. Moreover, the device functions well on both PC and PS5 systems, and customers appreciate its build quality with wear-resistant materials. Additionally, they like its style, particularly the colors and lights, and consider it surprisingly good for its price. The response time receives positive feedback, with customers noting very low wireless delay and fast charging capabilities.",
"",
"AI Generated from the text of customer reviews",
""
]
}
```
Congratulations! 🎉You just integrated ZenRows into your MuleSoft Anypoint automation workflow.
## Troubleshooting
### Error 429 (Too Many Requests)
* **Solution**: Increase the Scheduler's frequency and delay to space out the requests and prevent multiple requests from running within a short time frame.
### Build failed during Anypoint Studio compilation
* **Solution 1**: Check for errors in each flow and fix them individually.
* **Solution 2**: Ensure you enter the correct ZenRows parameters. The `js_render` and `premium_prox` parameters should be set to `true` to increase the success rate.
* **Solution 3**: Verify that your API key is entered correctly.
### Incomplete or empty data
* **Solution 1**: Ensure that you enter the correct CSS selectors.
* **Solution 2**: Validate that the CSS extractor array is formatted correctly.
* **Solution 3**: If using autoparse, ensure that ZenRows supports the target page. Check the [ZenRows Data Collector Marketplace](https://www.zenrows.com/scraper) to view the supported websites.
### File write access denied:
* **Solution 1**: If storing data locally, give the current Anypoint Studio workplace access to the storage location.
* **Solution 2**: Ensure that you append the file name to the file path specified in the Anypoint Studio Writer flow. For example, `D:/Anypoint-result` is wrong. The correct file path format should be `D:/Anypoint-result/result.json`.
## Frequently Asked Questions (FAQ)
ZenRows doesn't charge you extra for making scraping requests via Anypoint. However, while Anypoint comes with a 30-day free trial, it requires an upfront financial commitment, which limits your ability to use the scraping workflow.
Yes, you can save data locally to a CSV file using Anypoint's File Write module. MuleSoft's Anypoint also supports remote database connection using the JDBC (Java Database Connectivity) driver.
No, but integrating ZenRows with MuleSoft is straightforward. You only need to paste the RAML file containing the required ZenRows Universal Scraper API specifications into the Anypoint Platform and publish it to the Exchange. You can then interact with ZenRows visually in your workflow via the published API specification.
Although Anypoint doesn't have built-in support for LLM tools, you can load your desired model using Anypoint's HTTP request flow. This involves authorizing the LLM via the Bearer Authorization header and returning its response using a Logger flow or directly writing it into a file.
# How to Integrate n8n with ZenRows
Source: https://docs.zenrows.com/integrations/n8n
ZenRows provides powerful web scraping capabilities that integrate seamlessly with n8n. This integration enables automated collection of structured data from any website directly into your n8n workflow.
## What Is n8n?
n8n is a workflow automation platform that connects different services and builds custom workflows with a visual interface. Unlike many other automation tools, n8n can be self-hosted, giving you complete control over your data.
With its node-based workflow editor, n8n makes it easy to connect apps, services, and APIs without writing code. You can process, transform, and route data between different services, and trigger actions based on schedules or events.
## Use Cases
Integrating ZenRows with n8n opens up numerous automation possibilities:
* **E-commerce Monitoring**: Scrape product prices, availability, and ratings from competitor websites and store them in Google Sheets or Airtable for analysis.
* **Lead Generation**: Extract contact information from business directories and automatically add it to your CRM system, such as HubSpot or Salesforce.
* **Job Market Analysis**: Monitor job listings across multiple platforms and receive daily notifications of new opportunities via Slack or email.
* **Content Aggregation**: Scrape blog posts, news articles, or research papers and compile summaries in Notion or other knowledge bases.
* **Real Estate Data Collection**: Gather property listings, prices, and features from real estate websites for market analysis.
## Watch the Video Tutorial
Learn how to set up the n8n ↔ ZenRows integration step-by-step by watching this video tutorial:
## How to Set Up ZenRows with n8n
Follow these steps to integrate ZenRows with n8n:
### Step 1: Set up ZenRows
1. [Sign up](https://app.zenrows.com/register?prod=universal_scraper) for a ZenRows account if you don't already have one.
2. Navigate to ZenRows' Universal Scraper API Builder.
3. Configure the settings:
* Enter the URL to Scrape.
* Activate JS Rendering and/or Premium Proxies (as per your requirements).
* Customize other settings as needed for your specific scraping task.
Check out the [Universal Scraper API documentation](/universal-scraper-api/api-reference) for all available features
4. Click on the cURL tab on the right and copy the generated code.
### Step 2: Set up your n8n workflow
1. Sign up or log in to open your n8n instance and create a new workflow.
2. Add a **Manual Trigger** node as the first node. The Manual Trigger node allows you to manually start the workflow for testing or debugging purposes.
3. Next, add an **HTTP Request** node:
* Click on the **+** button next to the Manual Trigger node.
* Select the **Core** tab on the right.
* Then, click the **HTTP Request** tab to open the configuration window.
* Click the **Import cURL** button and paste the ZenRows cURL code you copied earlier. The HTTP Request node will automatically configure all the necessary parameters, including headers, authentication, and query parameters.
* Finally, click **Test step** to confirm your setup is configured correctly. You should get the full HTML of the target page as the output.
## Example Workflow: Scraping Product Titles from a Website
Let's build a complete workflow that scrapes product titles from an e-commerce website and stores them in a Google Sheet.
### Step 1: Create a new workflow
1. In your n8n dashboard, click **Create workflow** and give it a name (e.g., "Product Title Scraper").
2. Add a **Manual Trigger** node as your starting point.
### Step 2: Configure ZenRows
1. Open ZenRows' [Universal Scraper API Request Builder](https://app.zenrows.com/builder).
2. Enter `https://www.scrapingcourse.com/ecommerce/` as the URL to Scrape.
3. Activate JS Rendering.
4. Select **Specific Data** as the Output type and configure the CSS selector under the Parsers tab: `{ "product-names": ".product-name" }`.
5. Copy the generated cURL code.
6. In n8n, add an **HTTP Request** node after your trigger:
* Click on **Import cURL** and paste the generated cURL code.
* This configures a GET request to ZenRows' Universal Scraper API, sending the target URL and parser configuration.
* The request will extract all elements matching the CSS selector `.product-name` (which contains product titles).
### Step 3: Transform the response with AI Transform
After getting the ZenRows response, we need to extract the content values:
1. Click the **+** button next to the **HTTP Request** node and select the **Data transformation** tab on the right.
2. Then, select the AI Transform node. The AI Transform node allows you to process and manipulate data using AI-generated JavaScript code.
3. In the instructions field, enter: "Extract the value of 'product-names' from 'data' as an array of objects" and click the **Generate code** button.
The AI will generate JavaScript code that gets all items from the input, maps through each item, extracts the value from the JSON data, and returns an array of product names.
If you encounter an error, refer to Writing Good Prompts for the correct code. Also, note that in n8n, the data passed between nodes should be an array of objects.
### Step 4: Split the results
Now we need to split the array of product names into individual items:
1. Add a Split Out node after the **AI Transform**, as it takes an array of data and creates a separate output item for each entry.
2. Configure it to split out the `product-name` field.
This node will take the array of items and create a separate output item for each content value.
### Step 5: Send data to Google Sheets
Finally, we'll send our scraped product titles to a Google Sheet:
1. Add a **Google Sheets** node after the **Split Out** node.
2. Under **Sheet Within Document Actions**, select the **Append or Update Row in sheet action**.
3. Next, select your Google Sheets account or create a new connection.
4. Specify the Google Sheets document URL and select the sheet where you want to store the data.
5. Select the Map Each Column Manually mode and choose the column to match.
6. Drag the `['product-name']` variable under Split Out on the left to the Values to Send field.
This configuration will append each product title as a new row in your Google Sheet.
### Step 6: Run the workflow
Click the **Test workflow** to run your automation. If everything is configured correctly, you should see product titles from the website appearing in your Google Sheet.
## Tips and Best Practices
When working with ZenRows and n8n together, keep these best practices in mind:
* **Enable JS Rendering**: For modern websites with dynamic content, always enable the JS Rendering option in ZenRows.
* **Set Appropriate Wait Selectors**: Use the `wait_for` parameter when scraping sites that load content asynchronously.
Make sure to test the selectors by testing them in your browser's developer tools. If the page CSS selector is dynamic, you can also use the `wait` parameter to make the request wait for a specific number of seconds. For more information, check the [Wait Milliseconds](/universal-scraper-api/features/wait) and [Wait for Selector](/universal-scraper-api/features/wait-for) documentation!
* **Implement Retry Logic**: Add Error Handling with retry logic for failed requests using n8n's Error Trigger nodes.
* **Paginate Properly**: For multi-page scraping, create loops with the Loop Over Items node and increment page numbers.
* **Monitor Your Workflows**: Set up notification triggers to receive alerts for failures or successful runs.
## Troubleshooting
Common issues and solutions:
* **API Key Not Working**
* Verify your ZenRows API key is correctly entered in the HTTP Request node.
* Check that your subscription is active in your ZenRows dashboard.
* **Empty Results**
* Confirm your CSS selectors are correct by testing them in your browser's developer tools.
* Try enabling JavaScript rendering if the content is loaded dynamically.
* Increase wait time if the content takes longer to load.
* **Workflow Execution Errors**
* Check the JSON response format in the HTTP Request node output.
* Ensure all nodes are correctly configured with the correct field mappings.
* View execution logs for detailed error messages.
## Conclusion
Congratulations on successfully integrating ZenRows with n8n! This integration allows you to automate your web scraping workflows, collect structured data, and store it effortlessly in tools like Google Sheets.
# How to Integrate Node-RED with ZenRows
Source: https://docs.zenrows.com/integrations/node-red
Automate data extraction in your Node-RED workflows using ZenRows' web scraping capabilities. This guide shows you how to integrate ZenRows with Node-RED and build a continuous data retrieval process.
## What Is Node-RED?
Node-RED is a low-code programming tool that connects different services and APIs using a visual, drag-and-drop interface. It includes built-in workflow nodes for automating repetitive tasks, including action triggers, scheduling, data storage, and more.
## Use Cases
• **Price comparison**: Use Node-RED's schedule node to run a periodic price scraping operation on competitors' sites using ZenRow. Connect your flow to an LLM node to analyze price disparities.
• **Property analysis**: Use ZenRows to scrape property listing pages across popular real-estate sites and use Node-RED workflow to automate continuous data extraction, cleaning, storage, and analysis.
• **Web page monitoring**: Periodically monitor a web page by combining Node-RED's scheduler with ZenRows' scraping capabilities.
• **Sentiment analysis**: Use a ZenRows scraping node to collect data from various platforms, including social media, review sites, Google review pages, and more. Pass the scraped data to an LLM node for sentiment extraction.
• **Lead generation**: Use Node-RED's automation features to automate quality lead scraping using ZenRows' unique scraping capabilities.
## Integration Steps
In this guide, we'll create a scheduled Node-RED workflow that extracts product data from an Amazon product page using ZenRows' [`css_extractor`](/universal-scraper-api/features/output#css-selectors).
### Step 1: Install and Launch Node-RED
1. Install the **node-red** package globally:
```bash theme={null}
npm install -g --unsafe-perm node-red
```
2. Launch the Node-RED server:
```bash theme={null}
node-red
```
This command starts Node-RED on `http://localhost:1880`.
3. Visit the localhost URL via your browser to load Node-RED's platform as shown
### Step 2: Get the request URL from ZenRows
1. Open the **ZenRows Universal Scraper [API Builder](https://app.zenrows.com/builder)**.
2. Paste the target URL in the **link box**, activate **JS Rendering** and **Premium Proxies**.
3. Under **Output**, click **Specific data** and select **Parsers**.
4. Enter the CSS selector array in the **Parsers** field. We'll use the following CSS extractors in this guide:
```json JSON theme={null}
{
"name":"span#productTitle",
"price":"span.a-price.aok-align-center.reinventPricePriceToPayMargin.priceToPay",
"ratings":"#acrPopover",
"description":"ul.a-unordered-list.a-vertical.a-spacing-mini",
"review summary":"#product-summary p span",
"review count":"#acrCustomerReviewLink"
}
```
5. Select **cURL** as your language. Then, copy the URL generated after the cURL command.
### Step 3: Create your scraping workflow
1. Drag the **Inject Node** into the canvas.
2. Double-click the `timestamp` node and enter a name in the **Name** field to rename it (e.g., "Scheduler").
3. Click the **Repeat** dropdown and select a schedule. We'll use a 10-second **Interval** in this guide.
4. Click `Done`.
5. From the search bar at the top left, search for **http request**. Then, drag the **http request** node into the canvas.
6. Link both nodes by dragging a line to connect them at either end.
7. Double-click the **http request** node.
8. Paste the ZenRows connection URL you copied previously in the **URL** field.
9. Change the **Return** field to a **Parsed JSON object** to parse the returned string as a JSON object.
10. Enter a name for your HTTP node in the **Name** field (e.g., Scraper).
11. Click `Done`.
### Step 4: Add storage and output nodes
1. Search for **write file** in the search bar and drag the **write file** node into the canvas.
2. Link the **write file** node with the **Scraper** node.
3. Double-click the **write file** node to configure it.
4. In the **Filename** field, enter the JSON file path.
5. Under **Action**, select a suitable action. We'll choose the **overwrite file** option in this guide.
6. Enter a name in the **Name** field to rename the node (e.g., JSON Writer).
7. Click `Done`.
8. Drag the **debug** node into the canvas and connect it to the file writer.
9. Double-click the **debug** node and rename it as desired (e.g., Output Tracker).
10. Leave the **Output** as **msg** and **payload**.
11. Click `Done`.
### Step 5: Deploy and run the flow
Click `Deploy` at the top right to deploy the flow. Once deployed, the schedule is now triggered. Click the bug icon at the top right. This displays the JSON outputs in the right sidebar for each run.
The workflow also creates a JSON file in the specified directory and updates it at the chosen interval. Here's a sample JSON response:
```json JSON theme={null}
{
"name": "Gamrombo LED Wireless Controller for PS5, Compatible with PS5 Pro/Slim/PC, Dual Vibration, Marco/Turbo Function, 3.5mm Audio Jack, 6-Axis Motion Contro Gamepad with Speaker",
"price": "$59.99",
"ratings": [
"4.4",
"4.4"
],
"reviewCount": [
"455 ratings",
"455 ratings"
],
"reviewSummary": [
"Customers find the PS5 controller smooth and responsive, with buttons that provide crisp feedback and moderate rebound strength. Moreover, the controller is comfortable during long gaming sessions and features wear-resistant materials. Additionally, they appreciate its compatibility with both PS5 and PC, its vibrant lighting design, and consider it good value for money.",
"",
"AI Generated from the text of customer reviews",
""
]
}
```
Congratulations! 🎉 You've now integrated ZenRows with Node-RED.
## Troubleshooting
### Invalid URL/flow fails to run
* **Solution 1**: Ensure you explicitly copied the URL generated by cURL from the builder.
* **Solution 2**: Check the URL format for extra character strings, such as `cURL` appended to the URL (e.g., the URL must be in the form of `http://…` and not `cURL "http"`).
### File write access unavailable or denied
* **Solution 1**: Ensure you set the proper write permission inside the storage location.
* **Solution 2**: While specifying the file path in the **write file** node, you should include the file's absolute path, including the expected file name. For instance, `D:/Node-RED-result` is wrong. The correct file path format should be `D:/Node-RED-result/result.json`.
### Node-RED server jammed or localhost address unavailable
* **Solution**: Stop the running server and restart it. Then, re-open the server address on your browser.
### `node-red` is not recognized as an internal or external command
* **Solution**: Ensure you've installed the Node-RED module globally, not in a localized working directory with `package.json`.
## Frequently Asked Questions (FAQ)
Yes, Node-RED has a built-in file writer node that allows you to access local and remote directories to write files in various formats, including JSON, CSV, Markdown, images, and more. Although there are no built-in database nodes, you can install them individually by clicking the menu at the top right > **Manage palette** > **Install** section. Then, search and install the relevant database module. Once installed, you can then drag the database module into the canvas and configure it for data storage.
Check the Node-RED library page for more information.
No, ZenRows doesn't offer a built-in node on Node-RED. However, you can easily connect to ZenRows via Node-RED's built-in **http request** node and your target website.
While Node-RED doesn't have a built-in Node for interacting with LLMs like `gpt-4o-mini`, you can interact with them via a custom function node or use community-made nodes like `node-red-openai-chatgpt`, `node-red-contrib-anthropic`, or other available LLM nodes.
# ZenRows' Integration Options
Source: https://docs.zenrows.com/integrations/overview
ZenRows powers your web data extraction, from simple automations to complex enterprise pipelines. Integrations connect ZenRows with your existing tools, platforms, and services, enabling you to automate workflows, scale projects, and extract maximum value from web data.
Whether you build custom scrapers, automate business processes, or enrich AI workflows with data, ZenRows integrations help you transform web data into business value efficiently.
## Integration Categories
ZenRows supports integrations across four main categories, each designed for specific technical needs and business goals:
### 1. Developer Tools
Modern browser automation for dynamic website scraping.
Headless Chrome automation for advanced scraping and testing.
Python framework for scalable, modular scraping projects.
Browser-based automation and testing across languages.
High-performance HTTP/1.1 client built for Node.js
These integrations suit software engineers, technical teams, and developers building custom, code-driven scraping workflows.
### 2. No-Code/Low-code Integrations
Automate workflows between ZenRows and 5,000+ SaaS apps.
Visual workflow builder for custom automations.
Open-source workflow automation for self-hosted integrations.
Event-driven automation platform for APIs and data pipelines.
Low-code platform for designing AI-powered workflows and data pipelines.
Enterprise integration platform for connecting apps, data, and APIs.
Visual flow-based programming for IoT and web automation workflows.
No-code integrations are ideal for operations, marketing, and growth teams seeking to automate processes without requiring engineering resources.
Integration not on the list? Chances are you can still integrate ZenRows. [Contact us](mailto:support@zenrows.com) for assistance.
### 3. AI & Automation
Enrich leads and automate outbound workflows using AI.
Deploy AI agents for complex scraping and data extraction.
Orchestrate intelligent, multi-step data extraction workflows using language models.
Build scalable Retrieval-Augmented Generation (RAG) applications by indexing web data collected via ZenRows.
AI and automation integrations are best suited for data scientists, growth hackers, and teams seeking to supercharge workflows with intelligent automation.
### 4. Captcha Solvers
Seamless CAPTCHA solving integration for uninterrupted scraping.
Captcha solvers handle anti-bot protections reliably and efficiently across all scraping workflows.
## Why Integrate ZenRows?
Connecting ZenRows with your existing stack unlocks its full potential. Integrations help you:
* Automate end-to-end workflows by triggering scraping jobs, transforming results, and sending data wherever you need it.
* Boost productivity by reducing manual work and connecting ZenRows to your favorite automation and workflow tools.
* Scale operations by orchestrating hundreds or thousands of scraping tasks in parallel, all managed through platforms you already know.
* Improve reliability by combining ZenRows' anti-bot capabilities with third-party automation and AI tools.
* Solve CAPTCHAs efficiently by integrating CAPTCHA solvers for uninterrupted scraping.
## How Integrations Work
ZenRows integrations are designed to be plug-and-play. Each integration provides:
* **Step-by-step setup guides** to get you started quickly, whether you are connecting code libraries, workflow builders, or AI platforms.
* **Code samples and templates** you can copy, customize, and deploy for your use case.
* **Best practices** for securing your API keys, handling errors, and optimizing performance.
* **Real-world examples** showing how fast-growing startups and enterprises use ZenRows integrations to drive results.
## Example Use Cases
* Monitor competitor pricing using [Playwright](/integrations/playwright) or [Puppeteer](/integrations/puppeteer) with ZenRows to extract prices daily and feed insights into Google Sheets through [Zapier](/integrations/zapier).
* Automate lead enrichment by scraping company data with ZenRows, enriching it using [Clay](/integrations/clay), and pushing it to your CRM in a single automated workflow.
* Power AI-driven research by combining ZenRows with [Lindy](/integrations/lindy) to collect, structure, and analyze data for market research or content generation.
* Scale scraping operations by orchestrating thousands of parallel scraping jobs in [n8n](/integrations/n8n) or [Make](/integrations/make), using [2captcha](/integrations/2captcha) to handle protected sites.
* Create an AI-powered knowledge base by scraping industry news and documentation with ZenRows, indexing the data using [LlamaIndex](/integrations/llamaindex), and enabling instant search and automated question-answering for your team.
## Getting Started
1. Select the integration that best aligns with your workflow and technical expertise.
2. Follow the integration guide for setup instructions, best practices, and troubleshooting tips.
3. Secure your credentials by using environment variables or secure vaults for API keys, such as `YOUR_ZENROWS_API_KEY`.
4. Test your workflow with a simple example, then scale up and customize as your needs grow.
## Best Practices
* Always secure your API keys and never hard-code them in public code repositories.
* Monitor your ZenRows quota at the [Analytics Page](https://app.zenrows.com/analytics/scraper-api) and integration limits to avoid interruptions.
* Use stable CSS selectors when scraping to minimize maintenance. See our [Selector Best Practices](/universal-scraper-api/troubleshooting/advanced-css-selectors) for more guidance.
ZenRows integrations are built to help you move faster, automate more, and unlock the full power of web data, regardless of your stack or skill set. If you have questions, feedback, or would like to suggest a new integration, please get in touch with our team via email anytime.
## Frequently Asked Questions (FAQ)
Choose based on your technical expertise and goals:
* **Developer Tools**: For engineers building custom, code-driven scraping workflows
* **No-code Integrations**: For operations, marketing, and growth teams automating processes without engineering resources
* **AI & Automation**: For data scientists and teams implementing intelligent automation workflows
* **Captcha Solvers**: Essential for any workflow that needs to bypass anti-bot protections
Not necessarily. No-code integrations like Zapier, Make, n8n, and Pipedream let you build automated workflows using visual interfaces without writing code. However, developer tools like Playwright, Puppeteer, Scrapy, and Selenium require programming knowledge in languages like Python, JavaScript, or others.
Always use environment variables or secure vaults to store your API keys. Never hard-code credentials like `YOUR_ZENROWS_API_KEY` directly in your code, especially in public repositories. Most integration platforms provide secure credential storage features you should use.
Yes, you can combine multiple integrations to create powerful workflows. For example, you might use Playwright to scrape data, Zapier to process and route it, Clay to enrich it with AI, and 2captcha to handle protected sites - all in a single automated pipeline.
Use 2captcha when you encounter websites with in-page CAPTCHA protection that blocks your scraping attempts. The Universal Scraper API automatically bypasses website protections, but you should combine it with 2Captcha for interactive or form-based CAPTCHAs. The ZenRows Scraping Browser doesn't include direct 2Captcha integration, but you can achieve this using the 2Captcha SDK.
AI integrations enhance your scraping workflows with intelligent automation:
* **Clay**: Enriches scraped data with AI-powered lead intelligence and automates outbound workflows
* **Lindy**: Deploys AI agents that can make decisions about what to scrape, how to process data, and what actions to take based on results
These integrations turn raw scraped data into actionable business intelligence.
Follow these troubleshooting steps:
1. Check your ZenRows quota and integration limits at the Analytics Page
2. Verify your API keys are correctly configured and haven't expired
3. Review the integration's error logs for specific error messages
4. Ensure your CSS selectors are still valid (websites may have changed)
5. Check our [Selector Best Practices](/universal-scraper-api/troubleshooting/advanced-css-selectors) for guidance
6. Contact our support team
Yes, integrations enable massive scaling through parallel processing. Platforms like n8n, Make, and Pipedream can orchestrate hundreds or thousands of scraping jobs simultaneously. Combine this with ZenRows' anti-bot capabilities and 2captcha for handling protected sites to build enterprise-scale scraping operations.
# How to Integrate Pipedream with ZenRows
Source: https://docs.zenrows.com/integrations/pipedream
ZenRows simplifies web scraping, allowing you to extract data from websites. By connecting ZenRows with Pipedream, a platform for automating workflows, you can automatically collect and process data like product prices, business leads, or content updates with no coding required!
This guide will walk you through setting up a workflow to scrape a demo e-commerce product data and save it to Google Sheets.
## What Is Pipedream?
Pipedream is a serverless platform that connects APIs and automates workflows. With its event-driven architecture, you can build workflows that respond to triggers like webhooks or schedules.
When combined with ZenRows, Pipedream enables you to automate web scraping and integrate structured data into your processes.
## Use Cases
Combining ZenRows with Pipedream creates powerful automation opportunities:
* **Market Intelligence**: Extract competitor pricing and analyze trends automatically.
* **Sales Prospecting**: Scrape business directories and enrich contact data for your CRM.
* **Content Monitoring**: Track brand mentions and trigger notifications for specific keywords.
* **Research Automation**: Collect and organize articles, reports, or blog posts.
* **Property Intelligence**: Gather real estate listings and market data for analysis.
## Real-World End-to-End Integration Example
We'll build a basic end-to-end e-commerce product scraping workflow using Pipedream and ZenRows with the following steps:
* Set up a scheduled trigger to automatically track product prices at regular intervals.
* Use `https://www.scrapingcourse.com/pagination` as the target URL.
* Utilize ZenRows' Universal Scraper API to automatically extract product names and prices from the URL.
* Process and transform the scraped data.
* Save the extracted product information to Google Sheets.
### 1. Create a new workflow on Pipedream
1. Log in to your account at [https://pipedream.com/](https://pipedream.com/).
2. Access your `Workspace` and go to `Projects` in the left sidebar.
3. Click `+ New project` at the top right and enter a name for your project (e.g., "E-commerce Product Scraper").
4. Click `+ New Workflow` and provide a name for your workflow (e.g., "Product name and price scraper").
5. Click the `Create Workflow` button.
### 2. Set up a Schedule trigger
1. Click `Add Trigger` in your new workflow.
2. Search for and select `Schedule`.
3. Choose `Custom Interval` from the trigger options.
4. Set your desired frequency (e.g., "Daily at 1:00 AM UTC").
5. Click `Save and continue`.
### 3. Configure ZenRows integration with Pipedream
To extract specific elements from a dynamic page using ZenRows with Pipedream, follow these steps:
#### Generate the cURL request from ZenRows
1. Open [ZenRows' Universal Scraper API Request Builder](https://app.zenrows.com/builder).
2. Enter `https://www.scrapingcourse.com/pagination` as the URL to scrape.
3. Activate **JS Rendering** to handle dynamic content.
4. Set **Output type** to **Specific Data** and configure the CSS selectors under the **Parsers** tab:
```json theme={null}
{ "name": ".product-name", "price": ".product-price" }
```
The CSS selectors provided in this example (`.product-name`, `.product-price`) are specific to the page used in this guide. Selectors may vary across websites. For guidance on customizing selectors, refer to the [CSS Extractor documentation](/universal-scraper-api/features/output#css-selectors). If you're having trouble, the [Advanced CSS Selectors Troubleshooting Guide](/universal-scraper-api/troubleshooting/advanced-css-selectors) can help resolve common issues.
5. Click on the `cURL` tab on the right and copy the generated code.
Example code:
```bash theme={null}
curl "https://api.zenrows.com/v1/?apikey=YOUR_ZENROWS_API_KEY&url=https%3A%2F%2Fwww.scrapingcourse.com%2Fpagination&js_render=true&premium_proxy=true&proxy_country=us&css_extractor=%257B%2522name%2522%253A%2522.product-name%2522%252C%2522price%2522%253A%2522.product-price%2522%257D"
```
#### Import the cURL into Pipedream
1. In Pipedream, add an `HTTP request` step:
* Click the `+` button below your trigger to add a new step.
* Search for and select `HTTP / Webhook`.
* Choose `Build an HTTP request` from the actions.
2. Click `Import cURL` and configure the HTTP request using the copied cURL code.
3. Test the step to confirm your setup works correctly. You should receive the extracted product names and prices.
### 4. Process and transform the scraped data
1. Click the `+` button to add another step.
2. Select `Node` action and choose `Run Node code`.
3. Add the following data transformation code to format the data as an array of arrays, which will be used in the next step:
```javascript JavaScript theme={null}
export default defineComponent({
async run({ steps, $ }) {
// get the scraped data from the previous HTTP request step
const data = steps.custom_request.$return_value;
// ensure we're working with an array of products
// if data is already an array, use it; otherwise, wrap single item in array
const products = Array.isArray(data) ? data : [data];
// transform each product into a row format for Google Sheets
const rowValues = products.map(product => [product.name, product.price]);
// return the formatted data that Google Sheets "Add Multiple Rows" expects
return {
rowValues
}
},
})
```
4. Test the step to confirm the code works.
Use the **Edit with AI** feature of Pipedream to write the transformation code.
### 5. Save results to Google Sheets
1. Click the `+` button to add a final step.
2. Search for and select `Google Sheets`.
3. Choose `Add Multiple Rows` from the Pre-built Actions.
4. Click `Connect new account` to link your Google account with Pipedream.
5. Select your target Spreadsheet from the dropdown (or provide the Spreadsheet ID).
6. Choose the Worksheet where you want to store the data.
7. Configure Row Values. This field expects an array of arrays. Map the data from your processing step: `{{steps.code.$return_value.rowValues[0]}}`
8. Click `Test step` to verify that the data is correctly added to your Google Sheets.
9. Click `Deploy` in the top right corner of your workflow.
The workflow will now automatically scrape product names and prices from the e-commerce pagination page at your specified intervals and save the results to your Google Sheets.
Congratulations! You've successfully integrated ZenRows with Pipedream and automated your web scraping workflow.
## Troubleshooting
### Authentication Issues
* **Check your ZenRows API key** Go to your ZenRows dashboard and copy your API key. Make sure it is pasted exactly as it appears into your workflow or tool. Even a small typo can prevent it from working.
* **Verify your subscription status** Make sure your ZenRows subscription is active and that your account has enough usage. If your usage run out, the scraping requests will stop working.
You can increase your usage by purchasing Top-Ups or upgrading. For details, see our [Pricing Documentation](/first-steps/pricing).
### No Data Retrieved
* **Check if the page loads content right away** Visit the page in your browser. If you don't see the data immediately, it might load a few seconds later. This means the content is dynamic.
* **Enable JavaScript rendering** If the website loads content using JavaScript, you need to enable JS Rendering in ZenRows. This allows ZenRows to wait and capture the full content, just like a real browser.
* **Check your CSS selectors** Right-click on the item you want to scrape (like a product name or price) and select "Inspect" to find the correct CSS selector. Make sure the selectors you are using match the content on the website.
* **Allow more time for the page to load** If the content takes a few seconds to appear, try increasing the wait time in ZenRows using the wait or `wait_for` options. This gives the page more time to fully load before ZenRows tries to scrape it.
### Workflow Execution Failures
* **Look at the error logs in your tool** If you are using a tool like Pipedream, check the logs to see if there is a specific error message. This can help you understand what went wrong.
* **Review each step in your workflow** Make sure each step has the correct data and settings. If a step depends on information from a previous one, double-check that everything is connected properly.
* **Confirm the format of the API response** Some tools expect data in a specific format. Make sure your setup is handling the response correctly, especially if you are extracting specific fields like text or prices.
## Conclusion
You've successfully learned how to integrate ZenRows with Pipedream! This powerful combination enables you to build sophisticated web scraping automations that can collect, process, and distribute data across your entire tech stack efficiently.
## Frequently Asked Questions (FAQs)
Some websites load their content a few seconds after the page opens. To make sure ZenRows captures everything, turn on JavaScript rendering in your API request. This lets ZenRows wait and load the page like a real browser before scraping.
CSS selectors are used to tell ZenRows what data to extract from the page. For example, if you want to collect product names, you might use `.product-name`. To find the right selector, open the page in your browser, right-click the item you want, and select "Inspect" to view its code.
Yes. You can connect ZenRows to other platforms using tools like Pipedream or Zapier. This allows you to send scraped data to CRMs, databases, Slack, or any tool that accepts API connections.
In Pipedream, use the “Schedule” trigger to run your scraping workflow automatically. You can choose how often it runs, such as daily at a specific time (for example, every day at 1:00 AM UTC).
Limits depend on your ZenRows plan, such as how much usage limit you have. Pipedream also has limits on how many times workflows can run. You can check both platforms to see your current usage and available limits.
# How to Integrate Playwright with ZenRows
Source: https://docs.zenrows.com/integrations/playwright
Playwright is a powerful headless browser that can be integrated with ZenRows to avoid blocks and ensure smooth and reliable data extraction.
In Python, Playwright supports two variations: synchronous (great for small-scale scraping where concurrency isn't an issue) and asynchronous (recommended for projects where concurrency, scalability, and performance are essential factors)This tutorial focuses on the Playwright asynchronous API. So, we need to import the `async_playwright` and `asyncio` modules.
## Use ZenRows' Proxies with Playwright to Avoid Blocks
ZenRows offers residential proxies in 190+ countries that auto-rotate the IP address for you and offer Geolocation and http/https protocols. Integrate them into Playwright to appear as a different user every time so that your chances of getting blocked are reduced exponentially.
You have three ways to get a proxy with ZenRows, one is via [Residential Proxies](/residential-proxies/introduction), where you get our proxy, and it's charged by the bandwidth; the other way is via the Universal Scraper API's Premium Proxy, which is our residential proxy for the API, and you are charged by the request, depending on the params you choose; and the third is by using the [Scraping Browser](/scraping-browser/get-started/playwright) where can integrate into your code with just one line of code.
For this tutorial, we'll focus on the Residential Proxies, the recommended ZenRows proxy for Playwright. In case you already have a running Playwright code, consider testing our [Scraping Browser](/scraping-browser/get-started/playwright).
After logging in, you'll get redirected to the Request Builder page, then go to the [Proxies Generator](https://app.zenrows.com/proxies/generator) page and create your proxy:
Select your Proxy Username, Proxy Country, Protocol, and Sticky TTL. Finally, copy your Proxy URL or use the cURL example at the bottom of the page.
```bash theme={null}
http://:@superproxy.zenrows.com:1337
```
The target site of this tutorial section will be httpbin.io/ip, an endpoint that returns the origin IP of the incoming request. You'll use it to verify that ZenRows is working.
Let's assume you have set the Playwright environment with the initial script below in *Python*.
```python scraper.py theme={null}
import asyncio
from playwright.async_api import async_playwright
async def main():
async with async_playwright() as p:
browser = await p.chromium.launch(headless=True)
page = await browser.new_page()
await page.goto("https://httpbin.io/ip")
# Get the page content
content = await page.content()
print(content)
await browser.close()
# Run the asynchronous main function
asyncio.run(main())
```
## Configure your Residential Proxy in Playwright
Make sure you have Playwright installed and in your `scraper.py` file and add the following code:
```python scraper.py theme={null}
import asyncio
from playwright.async_api import async_playwright
async def main():
proxy = {
"server": "http://superproxy.zenrows.com:1337",
"username": "", # Replace with your ZenRows proxy username
"password": "" # Replace with your ZenRows proxy password
}
async with async_playwright() as p:
# Configure the browser to use the proxy
browser = await p.chromium.launch(proxy=proxy, headless=True)
page = await browser.new_page()
await page.goto("https://httpbin.io/ip")
# Get the page content
content = await page.content()
print(content)
await browser.close()
asyncio.run(main())
```
Awesome! You just integrated ZenRows' Residential Proxies into Playwright. 🚀
## Pricing
ZenRows operates on a pay-per-success model on the Universal Scraper API (that means you only pay for requests that produce the desired result); on the Residential Proxies, it's based on bandwidth use.
To optimize your scraper's success rate, fully replace Playwright with ZenRows. Different pages on the same site may have various levels of protection, but using the parameters recommended above will ensure that you are covered.
ZenRows offers a range of plans, starting at just \$69 monthly. For more detailed information, please refer to our [pricing page](https://www.zenrows.com/pricing).
## Frequently Asked Questions (FAQs)
Playwright is widely recognized by websites' anti-bot systems, which can block your requests. Using residential proxies from ZenRows allows you to rotate IP addresses and appear as a legitimate user, helping to bypass these restrictions and reduce the chances of being blocked.
You can test the proxy connection by running the script provided in the tutorial and checking the output from `httpbin.io/ip`. If the proxy is working, the response will display a different IP address than your local machine's.
Many websites employ advanced anti-bot measures, such as CAPTCHAs and Web Application Firewalls (WAFs), to prevent automated scraping. Simply using proxies may not be enough to bypass these protections.
Instead of relying solely on proxies, consider using [ZenRows' Universal Scraper API](https://app.zenrows.com/builder), which provides:
* **JavaScript Rendering and Interaction Simulation:** Optimized with anti-bot bypass capabilities.
* **Comprehensive Anti-Bot Toolkit:** ZenRows offers advanced tools to overcome complex anti-scraping solutions.
# How to Integrate Puppeteer with ZenRows
Source: https://docs.zenrows.com/integrations/puppeteer
Puppeteer is the most popular headless browser library in JavaScript, but anti-bot solutions can easily detect and prevent it from accessing web pages. Avoid that limitation with a ZenRows Puppeteer integration!
## Use ZenRows' Proxies in Puppeteer to Avoid Blocks
ZenRows offers residential proxies in 190+ countries that auto-rotate the IP address for you and offer Geolocation and http/https protocols. Integrate them into Puppeteer to appear as a different user every time so that your chances of getting blocked are reduced exponentially.
You have three ways to get a proxy with ZenRows, one is via [Residential Proxies](/residential-proxies/introduction), where you get our proxy, and it's charged by the bandwidth; the other way is via the Universal Scraper API's Premium Proxy, which is our residential proxy for the API, and you are charged by the request, depending on the params you choose; and the third is by using the [Scraping Browser](/scraping-browser/get-started/puppeteer) where can integrate into your code with just one line of code.
For this tutorial, we'll focus on the Residential Proxies, the recommended ZenRows proxy for Puppetteer. In case you already have a running Puppeteer code, consider testing our [Scraping Browser](/scraping-browser/get-started/puppeteer).
After logging in, you'll get redirected to the Request Builder page, then go to the [Proxies Generator](https://app.zenrows.com/proxies/generator) page and create your proxy:
Select your Proxy Username, Proxy Country, Protocol, and Sticky TTL. Finally, copy your Proxy URL or use the cURL example at the bottom of the page.
```bash theme={null}
http://:@superproxy.zenrows.com:1337
```
The target site of this tutorial section will be httpbin.io/ip, an endpoint that returns the origin IP of the incoming request. You'll use it to verify that ZenRows is working.
Consider the following basic Puppeteer script. It launches a headless browser, navigates to a target URL, and extracts the page's content (in this case, the IP address returned by the API endpoint).
```javascript scraper.js theme={null}
import puppeteer from "puppeteer";
(async () => {
// Launch Chrome or Chromium in headless mode
// and open a new blank page
const browser = await puppeteer.launch();
const page = await browser.newPage();
// Visit the target URL
await page.goto("https://httpbin.io/ip");
// Retrieve the page content and log it
const body = await page.waitForSelector("body");
const response = await body.getProperty("textContent");
const jsonResponse = await response.jsonValue();
console.log(jsonResponse);
await browser.close();
})();
```
## Configure your Residential Proxy in Puppeteer
To use authenticated residential proxies with Puppeteer, you'll need to use Puppeteer's `--proxy-server` flag and then `page.authenticate` with username and password.
To use ZenRows' premium proxy with Puppeteer, you need to anonymize the proxy URL provided by ZenRows. Replace `` and `` with your actual ZenRows proxy credentials.
```javascript scraper.js theme={null}
const browser = await puppeteer.launch({
args: [`--proxy-server=superproxy.zenrows.com:1337`],
});
const page = await browser.newPage();
await page.authenticate({username: '', password: ''});
```
Use the anonymized proxy URL to launch Puppeteer:
```javascript scraper.js theme={null}
import puppeteer from "puppeteer";
(async () => {
// Launch a headless Chromium instance with ZenRows Residential Proxies configured
const browser = await puppeteer.launch({
args: [`--proxy-server=superproxy.zenrows.com:1337`],
});
const page = await browser.newPage();
await page.authenticate({username: '', password: ''});
// Visit the target URL
await page.goto("https://httpbin.io/ip");
// Retrieve the page content and log it
const body = await page.waitForSelector("body");
const response = await body.getProperty("textContent");
const jsonResponse = await response.jsonValue();
console.log(jsonResponse);
// Release resources
await browser.close();
})();
```
Execute your script using Node.js:
```bash theme={null}
node scraper.js
```
## Troubleshooting
### Chrome Not Found Error
If you encounter the error `Error: Could not find Chrome`, it indicates that Puppeteer is unable to locate the Chrome or Chromium browser on your system. This issue often arises when the browser is installed in a non-standard location or if you're using a custom installation of Chrome.
To resolve this issue, explicitly specify the path to the Chrome executable in your Puppeteer configuration. You can do this by setting the `executablePath` option to the correct path where Chrome is installed on your system.
```javascript scraper.js theme={null}
const browser = await puppeteer.launch({
executablePath: '/your/path/to/chrome-or-chromium',
args: [`--proxy-server=superproxy.zenrows.com:1337`],
});
```
Replace `/your/path/to/chrome-or-chromium` with the actual path to the Chrome executable on your machine.
### Invalid SSL Certificate
You might encounter a `net::ERR_CERT_AUTHORITY_INVALID` error due to SSL certificate issues. Configure Puppeteer to ignore SSL certificate errors by adding the following flag to the `launch` options to resolve this.
```javascript scraper.js theme={null}
const browser = await puppeteer.launch({
args: [`--proxy-server=superproxy.zenrows.com:1337`],
ignoreHTTPSErrors: true
});
```
This allows Puppeteer to access any HTTPS page without SSL certificate issues.
### Stopped by Bot Detection with Puppeteer: CAPTCHAs, WAFs, and Beyond
Many websites employ advanced anti-bot measures like CAPTCHAs and Web Application Firewalls (WAFs) to prevent automated scraping. Simply using proxies may not be enough to bypass these protections.
Instead of relying solely on Puppeteer, consider using [ZenRows' Universal Scraper API](https://app.zenrows.com/builder), which provides:
* **JavaScript Rendering and Interaction Simulation:** Similar to Puppeteer but optimized with anti-bot bypass capabilities.
* **Comprehensive Anti-Bot Toolkit:** ZenRows offers advanced tools to overcome complex anti-scraping solutions.
## Pricing
ZenRows operates on a bandwidth usage model on the Residential Proxies; it is pay-per-success on the Universal Scraper API (that means you only pay for requests that produce the desired result).
To optimize your scraper's success rate, fully replace Pupetteer with ZenRows. Different pages on the same site may have various levels of protection, but using the parameters recommended above will ensure that you are covered.
ZenRows offers a range of plans, starting at just \$69 monthly. For more detailed information, please refer to our [pricing page](https://www.zenrows.com/pricing).
## Frequently Asked Questions (FAQs)
Puppeteer is widely recognized by websites' anti-bot systems, which can block your requests. Using residential proxies from ZenRows allows you to rotate IP addresses and appear as a legitimate user, helping to bypass these restrictions and reduce the chances of being blocked.
You can test the proxy connection by running the script provided in the tutorial and checking the output from `httpbin.io/ip`. If the proxy is working, the response will display a different IP address than your local machine's.
Many websites employ advanced anti-bot measures, such as CAPTCHAs and Web Application Firewalls (WAFs), to prevent automated scraping. Simply using proxies may not be enough to bypass these protections.
Instead of relying solely on proxies, consider using [ZenRows' Universal Scraper API](https://app.zenrows.com/builder), which provides:
* **JavaScript Rendering and Interaction Simulation:** Optimized with anti-bot bypass capabilities.
* **Comprehensive Anti-Bot Toolkit:** ZenRows offers advanced tools to overcome complex anti-scraping solutions.
# How to Integrate Scrapy with ZenRows
Source: https://docs.zenrows.com/integrations/scrapy
Scrapy is a powerful web scraping library, but anti-scraping measures can make it challenging. A ZenRows Scrapy integration can overcome these obstacles.
In this tutorial, you'll learn how to get your ZenRows proxy and integrate it with Scrapy using two methods: via Meta Parameter and Custom Middleware.
## Use ZenRows' Proxies with Scrapy to Avoid Blocks
ZenRows offers premium proxies in 190+ countries that auto-rotate the IP address for you, as well as the `User-Agent` header with the [Universal Scraper API](/universal-scraper-api/api-reference). Integrate them into Scrapy to appear as a different user every time so that your chances of getting blocked are reduced exponentially.
ZenRows provides two options for integrating proxies with Scrapy:
1. **Residential Proxies:** With Residential Proxies, you can directly access our dedicated proxy network, billed by bandwidth usage. This option is ideal if you need flexible, on-demand proxy access.
2. **Universal Scraper API with ZenRows Middleware:** Our Universal Scraper API's is optimized for high-demand scraping scenarios and billed per request based on chosen parameters. Using ZenRows Middleware for Scrapy allows you to seamlessly connect your Scrapy project to the Universal Scraper API, automatically routing requests through the Premium Proxy and handling API-specific configurations.
In this tutorial, we'll focus on using the Universal Scraper API's with the ZenRows Middleware, the recommended setup for seamless Scrapy integration.
Let's assume you have set the Scrapy environment with the initial script below.
```python scraper.py theme={null}
import scrapy
class ScraperSpider(scrapy.Spider):
name = "scraper"
allowed_domains = ["httpbin.io"]
start_urls = ["https://httpbin.io/ip"]
def parse(self, response):
pass
```
Follow the steps below to integrate ZenRows proxies into this scraper!
## Integrate the ZenRows Middleware into Scrapy!
The ZenRows Middleware for Scrapy allows seamless integration of the ZenRows Universal Scraper API into Scrapy projects. This middleware helps you manage proxy settings, enable advanced features like JavaScript rendering, and apply custom headers and cookies.
### Installation
First, install the `scrapy-zenrows` package, which provides the necessary middleware for integrating ZenRows with Scrapy.
```bash theme={null}
pip install scrapy-zenrows
```
### Usage
To use the ZenRows Universal Scraper API with Scrapy, [sign in on ZenRows](https://www.zenrows.com/) to obtain your API key. The API key allows you to access the Premium Proxy, JavaScript rendering, and other advanced scraping features.
### Setting Up Global Middleware
To enable ZenRows as the default proxy across all Scrapy requests, add ZenRows Middleware to your project's `settings.py` file. This setup configures your Scrapy spiders to use the ZenRows API for every request automatically.
```python settings.py theme={null}
DOWNLOADER_MIDDLEWARES = {
"scrapy_zenrows.ZenRowsMiddleware": 543, # Add ZenRows Middleware
}
# ZenRows API Key
ZENROWS_API_KEY = "YOUR_ZENROWS_API_KEY"
```
### Enabling Premium Proxy and JavaScript Rendering
ZenRows offers [Premium Proxy](/universal-scraper-api/features/premium-proxy) and [JavaScript rendering](/universal-scraper-api/features/js-rendering) features, which are essential for handling websites that require complex interactions or are protected by anti-bot systems. To enable these features for all requests, configure them in `settings.py`:
```python settings.py theme={null}
# ...
USE_ZENROWS_PREMIUM_PROXY = True # Enable Premium Proxy for all requests (default is False)
USE_ZENROWS_JS_RENDER = True # Enable JavaScript rendering for all requests (default is False)
```
By default, both features are disabled to keep requests lean and cost-effective.
### Customizing ZenRows Middleware for Specific Requests
In scenarios where you don't need Premium Proxy or JavaScript rendering for every request (e.g., for only certain pages or spiders), you can override global settings and apply these features only to specific requests. This is done using the `ZenRowsRequest` class, which provides a flexible way to configure ZenRows on a per-request basis.
```python scraper.py theme={null}
from scrapy_zenrows import ZenRowsRequest
class YourSpider(scrapy.Spider):
name = "your_spider"
start_urls = ["https://httpbin.io/ip"]
def start_requests(self):
# Use ZenRowsRequest to customize settings per request
for url in self.start_urls:
yield ZenRowsRequest(
url=url,
params={
"js_render": "true", # Enable JavaScript rendering for this request
"premium_proxy": "true", # Enable Premium Proxy for this request
},
)
```
In this example, ZenRowsRequest is configured with js\_render and premium\_proxy set to true, ensuring that only this specific request uses JavaScript rendering and Premium Proxy.
### Using Additional Request Parameters
The `ZenRowsRequest` function supports several other parameters, allowing you to customize each request to meet specific requirements. Here are some useful parameters:
* `proxy_country`: Specifies the country for the proxy, useful for geo-targeting.
* `js_instructions`: Allows custom JavaScript actions on the page, such as waiting for elements to load.
* `autoparse`: Automatically extracts data from supported websites.
* `outputs`: Extracts specific content types like tables, images, or links.
* `css_extractor`: Allows CSS-based content extraction.
Here's an example of using these advanced parameters:
```python scraper.py theme={null}
class YourSpider(scrapy.Spider):
name = "your_spider"
start_urls = ["https://httpbin.io/ip"]
def start_requests(self):
for url in self.start_urls:
yield ZenRowsRequest(
url=url,
params={
"js_render": "true", # Enable JavaScript rendering for this request
"premium_proxy": "true", # Enable Premium Proxy for this request
"proxy_country": "ca", # Use a proxy from Canada
"js_instructions": '[{"wait": 500}]', # Wait 500ms after page load
"autoparse": "true", # Enable automatic parsing
"outputs": "tables", # Extract tables from the page
"css_extractor": '{"links":"a @href","images":"img @src"}' # Extract links and images
},
)
```
Refer to the [ZenRows Universal Scraper API documentation](/universal-scraper-api/api-reference) for a complete list of supported parameters.
### Customizing Headers with ZenRows
Certain websites require specific headers (such as `Referer` or `Origin`) for successful scraping. ZenRows Middleware allows you to set custom headers on a per-request basis. When using custom headers, set the `custom_headers` parameter to `"true"` so that ZenRows includes your headers while managing essential browser headers on its end.
Here's an example of setting a custom Referer header:
```python scraper.py theme={null}
class YourSpider(scrapy.Spider):
name = "your_spider"
start_urls = ["https://httpbin.io/anything"]
def start_requests(self):
for url in self.start_urls:
yield ZenRowsRequest(
url=url,
params={
"custom_headers": "true", # Enable custom headers for this request
},
headers={
"Referer": "https://www.google.com/", # Set a custom Referer header
},
)
```
For `cookies` add them to the cookies dictionary in the request's meta parameter. Just as with custom headers, `custom_headers` must be set to `"true"` for ZenRows to allow custom cookies. This is particularly useful for handling sessions or accessing region-specific content.
```python scraper.py theme={null}
class YourSpider(scrapy.Spider):
name = "your_spider"
start_urls = ["https://httpbin.io/anything"]
def start_requests(self):
for url in self.start_urls:
yield ZenRowsRequest(
url=url,
params={
"custom_headers": "true", # Allow custom cookies
},
cookies={
"currency": "USD",
"country": "UY",
},
)
```
Cookies are often required to maintain user sessions or comply with location-based content restrictions. For more information on cookies and headers, see [ZenRows headers feature documentation](/universal-scraper-api/features/headers).
## Pricing
ZenRows operates on a pay-per-success model on the Universal Scraper API (that means you only pay for requests that produce the desired result); on the Residential Proxies, it's based on bandwidth use.
To optimize your scraper's success rate, fully replace Scrapy with ZenRows. Different pages on the same site may have various levels of protection, but using the parameters recommended above will get you covered.
ZenRows offers a range of plans, starting at just \$69 monthly. For more detailed information, please refer to our [pricing page](https://www.zenrows.com/pricing).
## Troubleshooting Guide
Even with ZenRows handling most scraping challenges, you might encounter issues. Here's how to diagnose and resolve common problems:
### Anti-Bot Detection Issues
#### Problem: Content doesn't match what you see in browser
**Solutions:**
1. **Enable JavaScript rendering**: Some sites load content dynamically
```python theme={null}
# Enable JavaScript rendering for a specific request
yield ZenRowsRequest(
url=url,
params={
"js_render": "true",
},
)
```
2. **Check if Premium Proxies are needed**: Some sites may block datacenter IPs
```python theme={null}
# Enable Premium Proxies for a specific request
yield ZenRowsRequest(
url=url,
params={
"premium_proxy": "true",
},
)
```
3. **Use custom headers to appear more like a real browser**: add a valid referer like Google or Bing
```python theme={null}
yield ZenRowsRequest(
url=url,
params={
"custom_headers": "true",
},
headers={
"Referer": "https://www.google.com/",
},
)
```
#### Problem: Getting redirected to CAPTCHA or security pages
**Solution:**
1. **Use full browser emulation with JS rendering and Premium Proxies**:
```python theme={null}
yield ZenRowsRequest(
url=url,
params={
"js_render": "true",
"premium_proxy": "true",
"wait": "3000", # Wait 3 seconds for page to load fully
},
)
```
2. **Try different geographic locations**:
```python theme={null}
# Try accessing from a different country
yield ZenRowsRequest(
url=url,
params={
"js_render": "true",
"premium_proxy": "true",
"proxy_country": "ca", # Canada
},
)
```
## Frequently Asked Questions (FAQs)
Scrapy is widely recognized by websites' anti-bot systems, which can block your requests. Using residential proxies from ZenRows allows you to rotate IP addresses and appear as a legitimate user, helping to bypass these restrictions and reduce the chances of being blocked.
Yes! You can find code examples demonstrating how to use the `scrapy_zenrows` middleware here!
You can test the proxy connection by running the script provided in the tutorial and checking the output from `httpbin.io/ip`. If the proxy is working, the response will display a different IP address than your local machine's.
Many websites employ advanced anti-bot measures, such as CAPTCHAs and Web Application Firewalls (WAFs), to prevent automated scraping. Simply using proxies may not be enough to bypass these protections.
Instead of relying solely on proxies, consider using [ZenRows' Universal Scraper API](https://app.zenrows.com/builder), which provides:
* **JavaScript Rendering and Interaction Simulation:** Optimized with anti-bot bypass capabilities.
* **Comprehensive Anti-Bot Toolkit:** ZenRows offers advanced tools to overcome complex anti-scraping solutions.
# Selenium Integration with ZenRows
Source: https://docs.zenrows.com/integrations/selenium
Selenium is one of the most popular headless browser automation libraries. However, its widespread use has made it a prime target for anti-scraping technologies, which can identify and block its requests.
To avoid this, you can integrate your Selenium setup with premium proxies, which will help you bypass these blocks and maintain successful web scraping.
The code snippets below are in Python, but the instructions apply to any programming language. Additionally, this tutorial is relevant to all tools that utilize Selenium as a base, such as Selenium Wire, Selenium Stealth, and Undetected ChromeDriver.
## Integrate Selenium with ZenRows' Proxies to Avoid Getting Blocked
ZenRows offers residential proxies in 190+ countries that auto-rotate the IP address for you and offer Geolocation and http/https protocols. Integrate them into Selenium to appear as a different user every time so that your chances of getting blocked are reduced exponentially.
You have two ways to get a proxy with ZenRows, one is via [Residential Proxies](/residential-proxies/introduction), where you get our proxy, and it's charged by the bandwidth; the other way is via the Universal Scraper API's Premium Proxy, which is our residential proxy for the API, and you are charged by the request, depending on the params you choose.
For this tutorial, we'll focus on the Residential Proxies, the recommended ZenRows proxy for Selenium
After logging in, you'll get redirected to the Request Builder page, then go to the [Proxies Generator](https://app.zenrows.com/proxies/generator) page and create your proxy:
Select your Proxy Username, Proxy Country, Protocol, and Sticky TTL. Finally, copy your Proxy URL or use the cURL example at the bottom of the page.
```bash theme={null}
http://:@superproxy.zenrows.com:1337
```
The target site of this tutorial section will be httpbin.io/ip, an endpoint that returns the origin IP of the incoming request. You'll use it to verify that ZenRows is working.
Consider you have the following Python script using Selenium:
```python scraper.py theme={null}
# installed selenium 4.11+
from selenium import webdriver
from selenium.webdriver.chrome.service import Service
from selenium.webdriver.common.by import By
# initialize a controllable Chrome instance
# in headless mode
service = Service()
options = webdriver.ChromeOptions()
options.add_argument("--headless=new")
driver = webdriver.Chrome(service=service, options=options)
# visit the target site in the browser
driver.get("https://httpbin.io/ip")
# get the page content and print it
response = driver.find_element(By.TAG_NAME, "body").text
print(response)
driver.quit()
```
## Configure your Residential Proxy in Selenium
To use an authenticated proxy in Selenium, you can utilize the selenium-wire library, as Chrome does not natively support authenticated proxies.
Selenium Wire extends Selenium's functionality, allowing you to easily configure and use proxies in your scraping projects.
First, install Selenium Wire:
```bash theme={null}
pip install selenium-wire
```
With Selenium Wire installed, you can configure the proxy at the browser level in Selenium. Below is an example configuration where you should replace `` and `` with the actual credentials.
```python scraper.py theme={null}
from seleniumwire import webdriver
from selenium.webdriver.chrome.service import Service
from selenium.webdriver.common.by import By
# Initialize a controllable Chrome instance in headless mode
service = Service()
options = webdriver.ChromeOptions()
options.add_argument("--headless=new")
# Configure the residential proxy
proxy_url = "http://:@superproxy.zenrows.com:1337"
seleniumwire_options = {
"proxy": {
"http": f"{proxy_url}",
"https": f"{proxy_url}",
},
}
# Initialize the Chrome driver with the proxy settings
driver = webdriver.Chrome(
service=service,
seleniumwire_options=seleniumwire_options,
options=options
)
# Visit the target site through the proxy and retrieve the IP address
driver.get("https://httpbin.io/ip")
# Get the page content and print it to verify the IP rotation
response = driver.find_element(By.TAG_NAME, "body").text
print(response)
driver.quit()
```
Execute your script using Python:
```bash theme={null}
python scraper.py
```
Congrats! You just saw how ZenRows enables you to overcome the limitations of Selenium. 🥳
## Troubleshooting
### Chromedriver Version Incompatibility or Chrome Not Found Error
If you encounter an error like `chromedriver version detected in PATH might not be compatible with the detected Chrome version` or `session not created from unknown error: no chrome binary at /usr/bin/google-chrome`, this indicates that the version of Chromedriver in your system's PATH is incompatible with the installed version of Chrome. Additionally, this error may also occur if the Chrome binary is not found at the expected location.
To resolve this issue, explicitly specify the path to the Chrome executable in your Selenium configuration. You can do this by setting the `executable_path` option to the correct path where Chrome is installed on your system.
```python scraper.py theme={null}
service = Service(executable_path="/your/path/to/chrome-or-chromium")
options = webdriver.ChromeOptions()
options.add_argument("--headless=new")
```
### Invalid SSL Certificate
You might encounter an `ERR_CERT_AUTHORITY_INVALID` error due to SSL certificate issues. These errors can prevent your scraper from accessing the content you need.
Instruct Chrome to ignore SSL/certificate errors by setting the `accept_insecure_certs` option to `True`.
```python scraper.py theme={null}
options = webdriver.ChromeOptions()
options.accept_insecure_certs = True
```
This setting allows Selenium to access the page's content without being blocked by SSL certificate errors.
### Stopped by Bot Detection with Selenium: CAPTCHAs, WAFs, and Beyond
Many websites employ advanced anti-bot measures like CAPTCHAs and Web Application Firewalls (WAFs) to prevent automated scraping. Simply using proxies may not be enough to bypass these protections.
Instead of relying solely on Selenium, consider using [ZenRows' Universal Scraper API](https://app.zenrows.com/builder), which provides:
* **JavaScript Rendering and Interaction Simulation:** Similar to Selenium but optimized with anti-bot bypass capabilities.
* **Comprehensive Anti-Bot Toolkit:** ZenRows offers advanced tools to overcome complex anti-scraping solutions.
## Pricing
ZenRows operates on a bandwidth usage model on the Residential Proxies; it is pay-per-success on the Universal Scraper API (that means you only pay for requests that produce the desired result).
To optimize your scraper's success rate, fully replace Selenium with ZenRows. Different pages on the same site may have various levels of protection, but using the parameters recommended above will ensure that you are covered.
ZenRows offers a range of plans, starting at just \$69 monthly. For more detailed information, please refer to our [pricing page](https://www.zenrows.com/pricing).
## Frequently Asked Questions (FAQs)
Selenium is widely recognized by websites' anti-bot systems, which can block your requests. Using residential proxies from ZenRows allows you to rotate IP addresses and appear as a legitimate user, helping to bypass these restrictions and reduce the chances of being blocked.
You can test the proxy connection by running the script provided in the tutorial and checking the output from `httpbin.io/ip`. If the proxy is working, the response will display a different IP address than your local machine's.
Many websites employ advanced anti-bot measures, such as CAPTCHAs and Web Application Firewalls (WAFs), to prevent automated scraping. Simply using proxies may not be enough to bypass these protections.
Instead of relying solely on proxies, consider using [ZenRows' Universal Scraper API](https://app.zenrows.com/builder), which provides:
* **JavaScript Rendering and Interaction Simulation:** Optimized with anti-bot bypass capabilities.
* **Comprehensive Anti-Bot Toolkit:** ZenRows offers advanced tools to overcome complex anti-scraping solutions.
# How to Integrate Undici with ZenRows
Source: https://docs.zenrows.com/integrations/undici
Extract web data with enterprise-grade performance using Undici's HTTP/1.1 client and ZenRows' Universal Scraper API. This guide demonstrates how to leverage Undici's superior performance with ZenRows' robust scraping infrastructure to build high-speed web scraping applications.
## What Is Undici?
Undici is a fast, reliable HTTP/1.1 client written from scratch for Node.js. It provides significant performance improvements over traditional HTTP clients, such as Axios and node-fetch, making it ideal for high-throughput scraping applications. Undici supports advanced features like HTTP/1.1 pipelining, connection pooling, and multiple request methods.
### Key Benefits of Integrating Undici with ZenRows
The undici-zenrows integration brings the following advantages:
* **Superior Performance**: Undici delivers up to 3x better performance compared to traditional HTTP clients, making your scraping operations faster and more efficient.
* **Advanced Connection Management**: Built-in connection pooling and HTTP/1.1 pipelining capabilities optimize resource usage for high-volume scraping.
* **Enterprise-Grade Scraping Reliability**: Combine Undici's robust HTTP handling with ZenRows' scraping infrastructure.
* **Multiple Request Methods**: Choose from `request`, `fetch`, `stream`, or `pipeline` API methods based on your specific use case requirements.
* **Memory Efficient**: Stream-based processing reduces memory overhead for large-scale scraping operations.
* **TypeScript Support**: Full TypeScript support for a better development experience and type safety.
## Getting Started: Basic Usage
Let's start with a simple example that uses Undici to scrape the Antibot Challenge page through ZenRows' Universal Scraper API.
### Step 1: Install Undici
Install the `undici` package using npm:
```bash theme={null}
npm install undici
```
### Step 2: Set Up Your Project
You'll need your ZenRows API key, which you can get from the Request builder dashboard.
You can explore different parameter configurations using the [Request Builder dashboard](https://app.zenrows.com/builder), then apply those settings in your Undici implementation. For a complete list of available parameters and their descriptions, refer to the [API Reference documentation](/universal-scraper-api/api-reference).
Create a new file and import the necessary modules.
```javascript Node.js theme={null}
// npm install undici
import { request } from "undici";
// set your ZenRows API key
const ZENROWS_API_KEY = "YOUR_ZENROWS_API_KEY";
const targetUrl = "https://www.scrapingcourse.com/antibot-challenge";
```
### Step 3: Make Your First Request
Use Undici's `request` method to call ZenRows' Universal Scraper API:
```javascript Node.js theme={null}
// npm install undici
import { request } from "undici";
// set your ZenRows API key
const ZENROWS_API_KEY = "YOUR_ZENROWS_API_KEY";
const targetUrl = "https://www.scrapingcourse.com/antibot-challenge";
async function scrapeWithUndici() {
try {
const { body } = await request("https://api.zenrows.com/v1/", {
method: "GET",
query: {
url: targetUrl,
apikey: ZENROWS_API_KEY,
js_render: "true",
premium_proxy: "true",
},
});
// get the HTML content
const htmlContent = await body.text();
console.log(htmlContent);
} catch (error) {
console.error("Scraping failed:", error.message);
}
}
// execute the scraper
scrapeWithUndici();
```
Understanding the Parameters
In the code above, we're using two key parameters to handle the antibot:
`js_render: "true"`: Activates JavaScript execution to handle dynamic content and render the page completely
`premium_proxy: "true"`: Routes requests through high-quality residential IP addresses to avoid detection
These parameters work together to bypass sophisticated antibots. For a comprehensive list of all available parameters and their usage, check the parameter overview table.
Replace `YOUR_ZENROWS_API_KEY` with your actual API key and run the script:
```bash theme={null}
node scraper.js
```
The script will successfully bypass the antibot and return the HTML content:
```html Output theme={null}
Antibot Challenge - ScrapingCourse.com
You bypassed the Antibot challenge! :D
```
Perfect! You've successfully integrated Undici with ZenRows to bypass antibot protection.
## Complete Example: E-commerce Product Scraper
Now let's build a complete scraper for an e-commerce site to demonstrate practical use cases with Undici and ZenRows.
### Step 1: Scrape the E-commerce Site
Let's start by scraping an e-commerce demo site to see how Undici handles real-world scenarios. We'll extract the complete HTML content of the page:
```javascript Node.js theme={null}
// npm install undici
import { request } from "undici";
// set your ZenRows API key
const ZENROWS_API_KEY = "YOUR_ZENROWS_API_KEY";
const targetUrl = "https://www.scrapingcourse.com/ecommerce/";
async function scrapeEcommerceSite() {
try {
const { body } = await request("https://api.zenrows.com/v1/", {
method: "GET",
query: {
url: targetUrl,
apikey: ZENROWS_API_KEY,
},
});
// get the HTML content
const htmlContent = await body.text();
console.log(htmlContent);
} catch (error) {
console.error("Scraping failed:", error.message);
}
}
// execute the scraper
scrapeEcommerceSite();
```
This will return the complete HTML content of the e-commerce page.
```html Output theme={null}
Ecommerce Test Site to Learn Web Scraping - ScrapingCourse.com
Showing 1-16 of 188 results
```
### Step 2: Parse the Scraped Data
Now that you can successfully scrape the site, let's extract specific product information using CSS selectors. We'll use ZenRows' [`css_extractor`](/universal-scraper-api/features/output#css-selectors) parameter to get structured data:
```javascript Node.js theme={null}
// npm install undici
import { request } from "undici";
// set your ZenRows API key
const ZENROWS_API_KEY = "YOUR_ZENROWS_API_KEY";
const targetUrl = "https://www.scrapingcourse.com/ecommerce/";
async function scrapeEcommerceSite() {
try {
const { body } = await request("https://api.zenrows.com/v1/", {
method: "GET",
query: {
url: targetUrl,
apikey: ZENROWS_API_KEY,
css_extractor: JSON.stringify({
"product-names": ".product-name",
}),
},
});
// get the product data
const productData = await body.json();
console.log(productData);
} catch (error) {
console.error("Scraping failed:", error.message);
}
}
// execute the scraper
scrapeEcommerceSite();
```
The response will be a JSON object containing the extracted product names:
```html Output theme={null}
{
"product-names": [
"Abominable Hoodie",
"Adrienne Trek Jacket",
// ...
"Ariel Roll Sleeve Sweatshirt",
"Artemis Running Short"
]
}
```
### Step 3: Export Data to CSV
Finally, save the scraped product data to a CSV file for further analysis:
```javascript Node.js theme={null}
// npm install undici
import { request } from "undici";
import { writeFileSync } from "fs";
// set your ZenRows API key
const ZENROWS_API_KEY = "YOUR_ZENROWS_API_KEY";
const targetUrl = "https://www.scrapingcourse.com/ecommerce/";
async function scrapeEcommerceSite() {
try {
const { body } = await request("https://api.zenrows.com/v1/", {
method: "GET",
query: {
url: targetUrl,
apikey: ZENROWS_API_KEY,
css_extractor: JSON.stringify({
"product-names": ".product-name",
}),
},
});
// get the product data
const productData = await body.json();
const productNames = productData["product-names"];
// create CSV content
let csvContent = "Product Name\n";
productNames.forEach((name) => {
csvContent += `"${name}"\n`;
});
// write to CSV file
writeFileSync("products.csv", csvContent, "utf8");
console.log(
`Successfully exported ${productNames.length} products to products.csv`
);
} catch (error) {
console.error("Scraping failed:", error.message);
}
}
// execute the scraper
scrapeEcommerceSite();
```
Run the script and you'll get a CSV file containing all the product names:
Congratulations! You now have a complete working scraper that can extract product data from an e-commerce site and export it to a CSV file.
## Next Steps
You now have a complete foundation for high-performance web scraping with Undici and ZenRows. Here are some recommended next steps to optimize your scraping operations:
* Undici Documentation: Explore Undici's advanced features like HTTP/1.1 pipelining, custom dispatchers, and performance optimizations.
* [Complete API Reference](/universal-scraper-api/api-reference): Explore all available ZenRows parameters and advanced configuration options to customize your Undici requests for specific use cases.
* [JavaScript Instructions Guide](/universal-scraper-api/features/js-instructions): Learn how to perform complex page interactions like form submissions, infinite scrolling, and multi-step workflows using ZenRows' browser automation.
* [Output Formats and Data Extraction](/universal-scraper-api/features/output): Master advanced data extraction with CSS selectors, convert responses to Markdown or PDF, and capture screenshots using Undici's streaming capabilities.
## Getting Help
Request failures can happen for various reasons when using Undici with ZenRows. For detailed [troubleshooting guidance](/universal-scraper-api/troubleshooting/troubleshooting-guide), visit our comprehensive troubleshooting guide and check Undici's documentation for HTTP client-specific issues.
If you're still facing issues despite following the troubleshooting tips, our support team is available to help you. Use the chatbox in the [Request Builder](https://app.zenrows.com/builder) dashboard or contact us via email to get personalized help from ZenRows experts.
When contacting support, always include the `X-Request-Id` from your [response headers](/universal-scraper-api/api-reference#response-headers) to help us diagnose issues quickly.
## Frequently Asked Questions (FAQ)
Enable both `js_render` and `premium_proxy` parameters in your ZenRows API calls. This combination offers the highest success rate against sophisticated antibot protection by simulating real browser behavior and utilizing high-quality residential IP addresses.
Enable the `js_render` parameter in your ZenRows API calls. This uses a real browser to execute JavaScript and capture the fully rendered page. Combine with Undici's efficient request handling for optimal performance on modern web applications.
Absolutely! Undici's `stream()` and `pipeline()` methods work perfectly with ZenRows. This is especially useful for processing large responses efficiently without loading everything into memory.
`undici.request()` provides better performance and more control over the request/response lifecycle, while `undici.fetch()` offers a more familiar API similar to browser fetch. For maximum performance with ZenRows, use `undici.request()`.
Use the `css_extractor` parameter in your ZenRows API calls to extract content using CSS selectors directly. The response will be JSON instead of HTML, making it easier to process with Undici.
Yes! Undici's performance characteristics make it excellent for real-time monitoring. Use session management with ZenRows' `session_id` parameter and implement efficient polling with Undici's connection pooling.
Yes! All ZenRows features work with Undici.
# How to Integrate Zapier With ZenRows
Source: https://docs.zenrows.com/integrations/zapier
ZenRows integrates seamlessly with Zapier to automate scraping tasks across several applications. This guide will walk you through a practical example, showing you how to integrate Zapier with ZenRows to efficiently automate your web scraping tasks.
## What Is Zapier & Why Integrate It with ZenRows?
Zapier is a no-code platform that automates repetitive tasks by linking applications into workflows. Each workflow consists of a trigger and one or more actions. Triggers can be scheduled, event-based, or manually initiated using webhooks.
When combined with ZenRows, Zapier enables full automation of your scraping process. Here are some key benefits:
* **Scheduled scraping**: Run scraping tasks on a regular schedule, such as hourly or daily, without manual input.
* **No-code setup**: Create scraping workflows without needing to write or maintain code.
* **Simplified scraping**: ZenRows handles JavaScript rendering, rate limits, dynamic content, anti-bot protection, and geo-restrictions automatically.
* **Seamless data integration**: Store results directly in tools like Google Sheets, Excel, SQL databases, or visualization platforms like Tableau.
* **Automated monitoring**: Track price changes, stock updates, and website modifications with minimal effort.
This integration is ideal for businesses that want to scale scraping workflows quickly and reliably.
## Watch the Video Tutorial
Learn how to set up the Zapier ↔ ZenRows integration step-by-step by watching this video tutorial:
## ZenRows Integration Options
With ZenRows, you can perform various web scraping tasks through Zapier:
* **Scraping a URL**: Returns a full-page HTML from a given URL.
* **Scraping a URL With CSS Selectors**: Extracts specific data from a URL based on given selectors.
* **Scraping a URL With Autoparse**: Parses a web page automatically and returns relevant data in JSON format.
The autoparse option only works for some websites. Learn more about how it works in the [Autoparse FAQ](/universal-scraper-api/faq#what-is-autoparse).
## Real-World Integration
In this guide, we'll use Zapier's schedule to automate web scraping with ZenRows' autoparse integration option. This setup will enable you to collect data at regular intervals and store it in a Google Sheet.
### Step 1: Create a new trigger on Zapier
1. Log in to your Zapier account at Zapier.
2. Click `Create` at the top left and select `Zap`.
3. Click `Untitled Zap` at the top and select `Rename` to give your Zap a specific name.
4. Click `Trigger`.
5. Select `Schedule` to create a scheduled trigger.
6. Click the `Choose an event` dropdown and choose a frequency. You can customize the frequency or choose from existing ones (e.g., "Every Day").
7. Click `Continue`.
8. Click the `Time of the day` dropdown and choose a scheduled time for the trigger, or click the option icon to customize.
9. Click `Continue`.
10. Click `Test trigger` and then `Continue with selected record`.
### Step 2: Add ZenRows Scraping Action
1. Type `ZenRows` in the search bar and click it when it appears.
2. Click the `Action event` dropdown and select `Scraping a URL With Autoparse`. Then click `Continue`.
3. Click the `Connect ZenRows` box and paste your ZenRows API key in the pop-up box. Click `Yes, Continue to ZenRows`, then `Continue`.
4. Paste the following URL in the URL box: `https://www.amazon.com/dp/B0DKJMYXD2/`.
5. Select `True` for Premium Proxy, JavaScript Rendering and click `Continue`.
6. Click `Test step` to confirm the integration and pull initial data from the page.
### Step 3: Save the extracted data
1. Click the `+` icon below the ZenRows step. Then, search and select `Google Sheets`.
2. Click the `Action event` dropdown and select `Create Spreadsheet Row`.
3. Click the `Account` box to connect your Google account, and click `Continue`.
4. Add the following column names to the spreadsheet you want to connect:
* Name
* Price
* Discount
* SKU
* Average rating
* Review count
* Timestamp
5. Click the `Drive` box and select your Google Sheets location. Choose the target `Spreadsheet` and `Worksheet`.
6. Map the columns with the scraped data by clicking the `+` icon next to each column name. Select the corresponding data for each column from the **Scraping a URL With Autoparse** step.
7. Map the `Timestamp` column with the ID data from the schedule trigger and click `Continue`.
8. Click `Test step` to confirm the workflow.
9. Click `Publish` to activate your scraping schedule.
### Step 4: Validate the Workflow
The workflow runs automatically on schedule every day and adds a new row of data to the connected spreadsheet.
Congratulations! 🎉 You just integrated ZenRows with Zapier and are now automating your scraping workflow.
## ZenRows Configuration Options
ZenRows accepts the following configuration options during Zapier integration:
| **Configuration** | **Function** |
| --------------------------- | ---------------------------------------------------------------------------------------------------------------------- |
| **URL** | The URL of the target website. |
| **Premium Proxy** | When activated, it routes requests through the ZenRows Residential Proxies, instead of the default Datacenter proxies. |
| **Proxy Country** | The country geolocation to use in a request. |
| **JavaScript Rendering** | Ensures that dynamic content loads before scraping. |
| **Wait for Selector** | Pauses scraping execution until a particular selector is visible in the DOM. |
| **Wait Milliseconds** | Waits for a fixed amount of time before executing the scraper. |
| **JavaScript Instructions** | Passes JavaScript code to execute actions like clicking, scrolling, and more. |
| **Headers** | Adds the custom headers to the request. |
| **Session ID** | Uses a session ID to maintain the same IP for multiple API requests for up to 10 minutes. |
| **Original Status** | Returns the original status code returned by the target website. |
## Troubleshooting
### Common Issues and Solutions
* **Issue**: Failed to create a URL in ZenRows ('REQS004').
* **Solution**: Double-check the target URL and ensure it's not malformed or missing essential query strings.
* **Solution 2**: If using the CSS selector integration, ensure you pass the selectors as an array (e.g., `[{"title":"#productTitle", "price": ".a-price-whole"}]`).
* **Issue**: Authentication failed (`AUTH002`).
* **Solution**: Double-check your ZenRows API key and ensure you enter a valid one.
* **Issue**: Empty data.
* **Solution**: Ensure ZenRows supports autoparsing for the target website. Check the ZenRows Data Collector Marketplace to view the supported websites.
* **Solution 2**: If using the CSS selector integration, supply the correct CSS selectors that match the data you want to scrape.
***
## Conclusion
You've successfully integrated ZenRows with Zapier and are now automating your scraping workflow, from scheduling to data storage. You can extend your workflow with more applications, including databases like SQL and analytic tools like Tableau.
## Frequently Asked Questions (FAQs)
To authenticate requests, use your ZenRows API key. Replace `ZENROWS API KEY` in the authentication modal that Zapier shows.
Use `wait` to pause the rendering for a specific number of milliseconds. Use `wait_for` with a CSS selector to wait until that element appears before capturing the response. Both require JS Rendering.
ZenRows rotates IPs automatically per request.
# MCP Integration
Source: https://docs.zenrows.com/mcp-integration
Connect your code editor to ZenRows documentation using the Model Context Protocol (MCP) for AI-powered assistance.
## Overview
The Model Context Protocol (MCP) integration connects your code editor directly to ZenRows documentation. This enables AI-powered assistance right in your development environment, giving you instant access to ZenRows APIs, code examples, and best practices without leaving your editor.
## What is MCP?
The Model Context Protocol (MCP) is a standardized communication method that allows AI applications to connect to external data sources and tools. Think of it as a bridge between your AI assistant and live documentation.
Anthropic released MCP in November 2024 to enable two-way interactions. AI assistants can both retrieve accurate information and perform actions using this protocol.
### How ZenRows MCP Integration Helps You
With ZenRows' Documentation MCP integration, your AI assistant can:
* **Query documentation in real-time** - Get up-to-date answers about ZenRows features and APIs
* **Generate code examples** - Create working code snippets for your specific use case
* **Provide API guidance** - Access exact API references and parameter details
* **Suggest best practices** - Get recommendations based on ZenRows documentation
## Supported Editors
ZenRows Documentation MCP integration works with any MCP-compatible code editor, including:
* **Cursor** - AI-powered code editor
* **Visual Studio Code** - With compatible AI extensions
## Installation Instructions
### For Cursor (One-Click Install)
The easiest way to connect ZenRows documentation to **Cursor** is with our one-click install link:
Click to install
Click the link above. **Cursor** will ask you to finish the installation by adding the server to your MCP settings.
### For Visual Studio Code (One-Click Install)
For **VS Code** users, you can use our direct install link:
Click to install
Click the link above. **VS Code** will ask you to finish the installation by adding the server to your MCP settings.
### For Other Editors (Manual Installation)
Follow your code editor's documentation to add a new Remote MCP server with this URL: `https://docs.zenrows.com/mcp`.
## Example Prompts to Try
Once you have MCP connected, try these prompts in your editor's AI chat:
### Getting Started
```
Show me how to make my first request to ZenRows Universal Scraper API with Python, using 'SearchZenRowsDocs'
```
### API Integration
```
Generate a Node.js function that uses ZenRows to scrape a product page with CAPTCHA bypass enabled, using 'SearchZenRowsDocs'
```
### Proxy Configuration
```
How do I configure rotating residential proxies with ZenRows? Show me code examples for different programming languages, using 'SearchZenRowsDocs'
```
### Browser Automation
```
Create a Puppeteer script that works with ZenRows Scraping Browser to handle dynamic content, using 'SearchZenRowsDocs'
```
### Error Handling
```
What are the common ZenRows API error codes and how should I handle them in my application?, using 'SearchZenRowsDocs'
```
### Advanced Use Cases
```
Show me how to maintain sessions across multiple requests using ZenRows Universal Scraper API, using 'SearchZenRowsDocs'
```
### Rate Limits and Optimization
```
What are the rate limits for ZenRows products and how can I optimize my scraping performance?, using 'SearchZenRowsDocs'
```
### Pricing and Plans
```
Compare ZenRows pricing plans and help me choose the right one for scraping 10,000 pages per month, using 'SearchZenRowsDocs'
```
## Benefits of Using MCP with ZenRows
### Real-time Documentation Access
Access ZenRows documentation directly in your editor. No more switching between your editor and browser to find API information.
### Context-Aware Code Generation
The AI understands your current project context. It generates ZenRows integration code that fits your specific needs and coding patterns.
### Always Up-to-Date Information
MCP queries live documentation, ensuring you always get the latest information about ZenRows APIs and features. Unlike static documentation copies, the information stays current.
### Faster Development Workflow
Reduce context switching and speed up development. ZenRows expertise is available directly in your coding environment.
### Interactive Problem Solving
Ask follow-up questions and iterate on solutions without losing context. This makes it easier to implement complex scraping scenarios.
## Troubleshooting
### Connection Issues
* Ensure your editor supports MCP
* Verify the MCP server URL is correct: `https://docs.zenrows.com/mcp`
* Check your internet connection and firewall settings
### Outdated Responses
* MCP provides real-time access to documentation
* If responses seem outdated, try restarting your editor
* Verify the MCP connection is active in your editor settings
### Limited Functionality
* Ensure you're using specific ZenRows-related prompts
* The MCP server focuses on ZenRows documentation and APIs
* For general programming questions, your editor's default AI will handle those
## Next Steps
Now that you have ZenRows documentation connected to your editor:
1. **Explore the Universal Scraper API** - Start with simple scraping requests and gradually add advanced features
2. **Try Browser Automation** - Experiment with Puppeteer/Playwright scripts using ZenRows Scraping Browser
3. **Test Proxy Integration** - Implement geo-targeted scraping with residential proxies
4. **Build Production Workflows** - Use the AI assistant to help design robust, scalable scraping solutions
The combination of ZenRows' scraping infrastructure and AI-powered development assistance helps you build better web scraping applications faster.
# Latest Product News!
Source: https://docs.zenrows.com/news
This is the latests news on ZenRows!!
This is how you use a changelog with a label
and a description.
This is how you use a changelog with a label
and a description.
# Frequently Asked Questions
Source: https://docs.zenrows.com/residential-proxies/faq
Yes, ZenRows Residential Proxies support both HTTP and HTTPS.
ZenRows automatically rotates IPs for each request unless you configure a Sticky TTL to keep the same IP for a certain time period. This helps in scenarios where maintaining the same IP for a session is required.
Many websites employ advanced anti-bot measures, such as CAPTCHAs and Web Application Firewalls (WAFs), to prevent automated scraping. Simply using proxies may not be enough to bypass these protections.
Instead of relying solely on proxies, consider using [ZenRows' Universal Scraper API](https://app.zenrows.com/builder), which provides:
* **JavaScript Rendering and Interaction Simulation:** Optimized with anti-bot bypass capabilities.
* **Comprehensive Anti-Bot Toolkit:** ZenRows offers advanced tools to overcome complex anti-scraping solutions.
No, you cannot use both World Region Targeting and Country Targeting at the same time in the same proxy request. ZenRows only accepts one geo-targeting parameter per request—either a region or a country. Attempting to use both will result in an error, and your request will not be processed.
If you need to scrape data from multiple countries within a region, run separate requests for each country using the appropriate country code.
Yes, you can combine Sticky TTL (for session persistence) and geo-targeting (region or country) in your proxy credentials. This allows you to maintain the same IP address for a specified duration while also targeting a specific region or country.
**How does it work?**
* Add the TTL and session parameters after your password, followed by your region or country targeting code.
* ZenRows will assign an IP from your chosen location and keep it consistent for the duration of the TTL and session.
**Example:**
```bash theme={null}
# Sticky session for 30 seconds, targeting Spain
http://:_ttl-30s_session-abc123_country-es@superproxy.zenrows.com:1337
```
# Country Targeting with ZenRows Residential Proxies
Source: https://docs.zenrows.com/residential-proxies/features/country
ZenRows Residential Proxies allow you to target specific countries for your web scraping operations, providing even more precise geo-targeting than region-level settings. This is invaluable for accessing country-restricted content, conducting localized research, or verifying ads and offers as they appear to users in a particular country.
## Why Use Country Targeting?
Country-level targeting is ideal for:
* Accessing country-restricted content and services
* Monitoring localized pricing, ads, or search results
* Testing website localization and legal compliance
* Ad verification and fraud prevention
## How to Set a Country
To target a country, append the `country` code to your proxy password in the proxy URL. You cannot set both a region and a country at the same time.
### Example: Targeting Spain
```bash theme={null}
http://:_country-es@superproxy.zenrows.com:1337
```
For a complete list of supported countries and their codes, see our [Premium Proxy Countries List](/first-steps/faq#what-is-geolocation-and-what-are-all-the-premium-proxy-countries).
**Note:** If you specify both a region and a country, only one will be used. Always double-check your proxy password for the correct format.
## Best Practices
* Use country targeting for highly localized research, price comparison, or compliance checks.
* Make sure to use the correct country code to avoid errors.
* Rotating proxies within a country can help reduce detection and blocking.
## Troubleshooting
* If you get an error, ensure the country code is supported and correctly formatted.
* Some countries may have limited proxy pools; if you encounter access issues, try a broader region.
# Sticky Sessions and Protocol Support with ZenRows Residential Proxies
Source: https://docs.zenrows.com/residential-proxies/features/protocol-sticky-ttl
ZenRows Residential Proxies support both HTTP and HTTPS protocols, giving you flexibility for any web scraping scenario. In addition, you can use sticky sessions (TTL) to control how long a particular IP address is assigned to your requests, which is essential for maintaining session continuity in tasks like login persistence, checkout processes, or paginated data extraction.
## Why Use Sticky TTL?
Sticky sessions allow you to:
* Maintain the same IP for a set period (from 30 seconds up to 1 day)
* Ensure session consistency for workflows that require login or multi-step navigation
* Reduce the risk of bans or captchas by mimicking real user behavior
## How to Enable Sticky Sessions
To enable sticky sessions, append the `ttl` parameter and a session ID to your proxy password in the proxy URL.
### Example: 30-Second Sticky Session
```bash theme={null}
http://:_ttl-30s_session-1cLiFzDgsq36@superproxy.zenrows.com:1337
```
* `ttl-30s` ensures the IP will be retained for 30 seconds.
* `session-1cLiFzDgsq36` is a random session identifier that you can generate yourself. You can use any combination of letters and numbers, similar in length and style to the example. This allows ZenRows to allocate the same IP for multiple requests as long as you use the same session ID.
### Available Sticky TTL Values
* **30 seconds:** `ttl-30s`
* **1 minute:** `ttl-1m`
* **30 minutes:** `ttl-30m`
* **1 hour:** `ttl-1h`
* **1 day:** `ttl-1d`
The session ID is a random string that uniquely identifies your session and must be generated manually, or on the Residential Proxy Dashboard
## Best Practices
* Use sticky sessions for login-required flows, shopping carts, or any scenario where the same IP is needed across requests.
* Choose the shortest TTL that meets your needs to maximize IP pool rotation and avoid detection.
* Always generate a unique session ID for each session to prevent conflicts.
## Troubleshooting
* If you observe frequent IP changes, double-check your TTL and session ID format.
* Some websites may require longer TTLs for certain workflows; experiment with different values to find the best fit.
Learn more about session management and advanced proxy features in the [ZenRows Proxy documentation](/universal-scraper-api/features/premium-proxy).
# World Region Targeting with ZenRows Residential Proxies
Source: https://docs.zenrows.com/residential-proxies/features/world-region
ZenRows Residential Proxies empower you to access and collect data from websites as if you were located in different parts of the world. This is crucial for bypassing regional restrictions, monitoring localized content, and simulating user behavior from specific continents or large areas.
## Why Use World Region Targeting?
Many websites tailor their content, pricing, or availability based on the visitor's region. By targeting a world region, you can:
* Bypass geo-blocks and access region-restricted content
* Gather region-specific data for market research or compliance
* Test how websites behave for users in different parts of the world
* Rotate IPs within a continent for broader coverage and reduced detection risk
## How to Set a World Region
ZenRows makes it easy to select a region by appending a region code to your proxy password in the proxy URL. This tells ZenRows to assign your requests to residential IPs from the specified region.
### Example: Targeting Europe
```bash theme={null}
http://:_region-eu@superproxy.zenrows.com:1337
```
### Available Region Codes
* **Europe:** `region-eu`
* **North America:** `region-na`
* **Asia Pacific:** `region-ap`
* **South America:** `region-sa`
* **Africa:** `region-af`
* **Middle East:** `region-me`
Use region targeting for broad coverage or when you want to rotate IPs within a large area. For more precise targeting, see our [Country Targeting guide](/universal-scraper-api/features/premium-proxy).
## Best Practices
* Only one region or country can be set per request. If both are specified, only one will be used.
* Always double-check your proxy password for the correct format.
* Use region targeting for tasks like price comparison, ad verification, or compliance testing across continents.
## Troubleshooting
* If you receive an error, verify that the region code is correct and supported.
* Some websites may still apply additional restrictions; consider using sticky sessions or country targeting for more advanced scenarios.
# Make Your First Request with ZenRows Residential Proxies
Source: https://docs.zenrows.com/residential-proxies/get-started/first-request
Learn how to make your first web scraping request using ZenRows' Residential Proxies. This guide walks you through the basics, shows you how to verify your proxy setup, and introduces advanced proxy features, such as geo-targeting and sticky sessions.
ZenRows Residential Proxies enable you to access region-restricted content by routing requests through a pool of millions of real residential IP addresses. You can use them in any programming language that supports HTTP proxies.
## 1. Make a Request Without a Proxy
An initial request without a proxy uses your default IP address.
To confirm the IP address being used, we'll request `https://httpbin.io/ip`, a web page that returns your IP address.
```python Python theme={null}
# pip install requests
import requests
response = requests.get("https://httpbin.io/ip")
if response.status_code != 200:
print(f"An error occurred with {response.status_code}")
else:
print(response.text)
```
```javascript Node.js theme={null}
// npm install axios
const axios = require('axios');
axios.get('https://httpbin.io/ip')
.then((response) => {
if (response.status !== 200) {
console.log(`An error occurred with ${response.status}`);
} else {
console.log(response.data);
}
})
.catch((error) => {
console.log('An error occurred:', error.message);
});
```
You'll see your device's public IP address in the output. Next, let's use ZenRows Residential Proxies.
## 2. Integrate ZenRows Residential Proxies
Improve the previous request with the Residential Proxies by following these steps.
### Step 1: Get Your Proxy Credentials
1. Go to your [ZenRows Residential Proxies dashboard](https://app.zenrows.com/residential-proxies).
2. Copy your proxy username, password, proxy domain, and port.
### Step 2: Configure Your Proxy Settings
Prepare your proxy credentials and build the proxy URL for your HTTP client.
```python Python theme={null}
proxy_username = "PROXY_USERNAME"
proxy_password = "PROXY_PASSWORD"
proxy_domain = "superproxy.zenrows.com"
proxy_port = "1337"
proxy_url = f"http://{proxy_username}:{proxy_password}@{proxy_domain}:{proxy_port}"
proxies = {
"http": proxy_url,
"https": proxy_url,
}
```
```javascript Node.js theme={null}
const proxy = {
protocol: 'http',
host: 'superproxy.zenrows.com',
port: '1337',
auth: {
username: 'PROXY_USERNAME',
password: 'PROXY_PASSWORD',
},
};
```
### Step 3: Use the Residential Proxies for Scraping Requests
To use the Residential Proxies in your request, include the proxy dictionary as a request parameter:
```python Python theme={null}
# pip3 install requests
import requests
# ...
response = requests.get("https://httpbin.io/ip", proxies=proxies)
if response.status_code != 200:
print(f"An error occurred with {response.status_code}")
else:
print(response.text)
```
```javascript Node.js theme={null}
// npm install axios
const axios = require('axios');
// ...
// send a request with the proxies
axios
.get('https://httpbin.org/ip', {
proxy: proxy,
})
.then((res) => {
console.log(res.data);
})
.catch((err) => console.error(err));
```
**Put it all together**
Combine all the snippets, and you'll have the following complete code:
```python Python theme={null}
# pip3 install requests
import requests
# define your proxy credentials
proxy_username = "PROXY_USERNAME"
proxy_password = "PROXY_PASSWORD"
proxy_domain = "superproxy.zenrows.com"
proxy_port = "1337"
# build the proxy URL
proxy_url = f"http://{proxy_username}:{proxy_password}@{proxy_domain}:{proxy_port}"
# configure proxy protocols
proxies = {
"http": proxy_url,
"https": proxy_url,
}
response = requests.get("https://httpbin.io/ip", proxies=proxies)
if response.status_code != 200:
print(f"An error occurred with {response.status_code}")
else:
print(response.text)
```
```javascript Node.js theme={null}
// npm install axios
const axios = require('axios');
// define your proxy credentials
const proxy = {
protocol: 'http',
host: 'superproxy.zenrows.com',
port: '1337',
auth: {
username: 'PROXY_USERNAME',
password: 'PROXY_PASSWORD',
},
};
// send a request with the proxies
axios
.get('https://httpbin.org/ip', {
proxy: proxy,
})
.then((res) => {
console.log(res.data);
})
.catch((err) => console.error(err));
```
Run the code and you'll see a new IP address for each request, confirming your requests are routed through ZenRows Residential Proxies.
### Example Output
```json theme={null}
{
"origin": "71.172.140.38:44752"
}
```
## 3. Advanced Proxy Options
ZenRows Residential Proxies offer advanced features for more control:
### Geo-targeting
Route requests through IPs from a specific country or region. This is useful for:
* Comparing product prices across regions
* Job availability and salary comparison
* Housing and rent price variation
* Logistics and shipping cost analysis
* Testing website localization and compliance
* Demand analysis
* Ad verification
**How to set the proxy country:**
```python Python theme={null}
proxy_username = "PROXY_USERNAME"
proxy_password = "PROXY_PASSWORD_country-ca" # Canada
proxy_domain = "superproxy.zenrows.com"
proxy_port = "1337"
```
```javascript Node.js theme={null}
const proxy = {
protocol: 'http',
host: 'superproxy.zenrows.com',
port: '1337',
auth: {
username: 'PROXY_USERNAME',
password: 'PROXY_PASSWORD_country-ca',
},
};
```
Replace `country-ca` with the desired country code. See the [geo-location FAQ](/universal-scraper-api/features/proxy-country) for more details.
### Regional Rotation
Rotate proxies within a specific region (e.g., Europe):
```python Python theme={null}
proxy_password = "PROXY_PASSWORD_region-eu" # Europe
```
```javascript Node.js theme={null}
password: 'PROXY_PASSWORD_region-eu',
```
You can only set either a country or a region, not both.
### Sticky Sessions (TTL)
The sticky TTL (Time-to-Live) feature allows you to maintain a single proxy for a specified duration.
To add a stick TTL, go to your Residential Proxies dashboard and select a TTL option. The TTL option is added to the generated proxy URL:
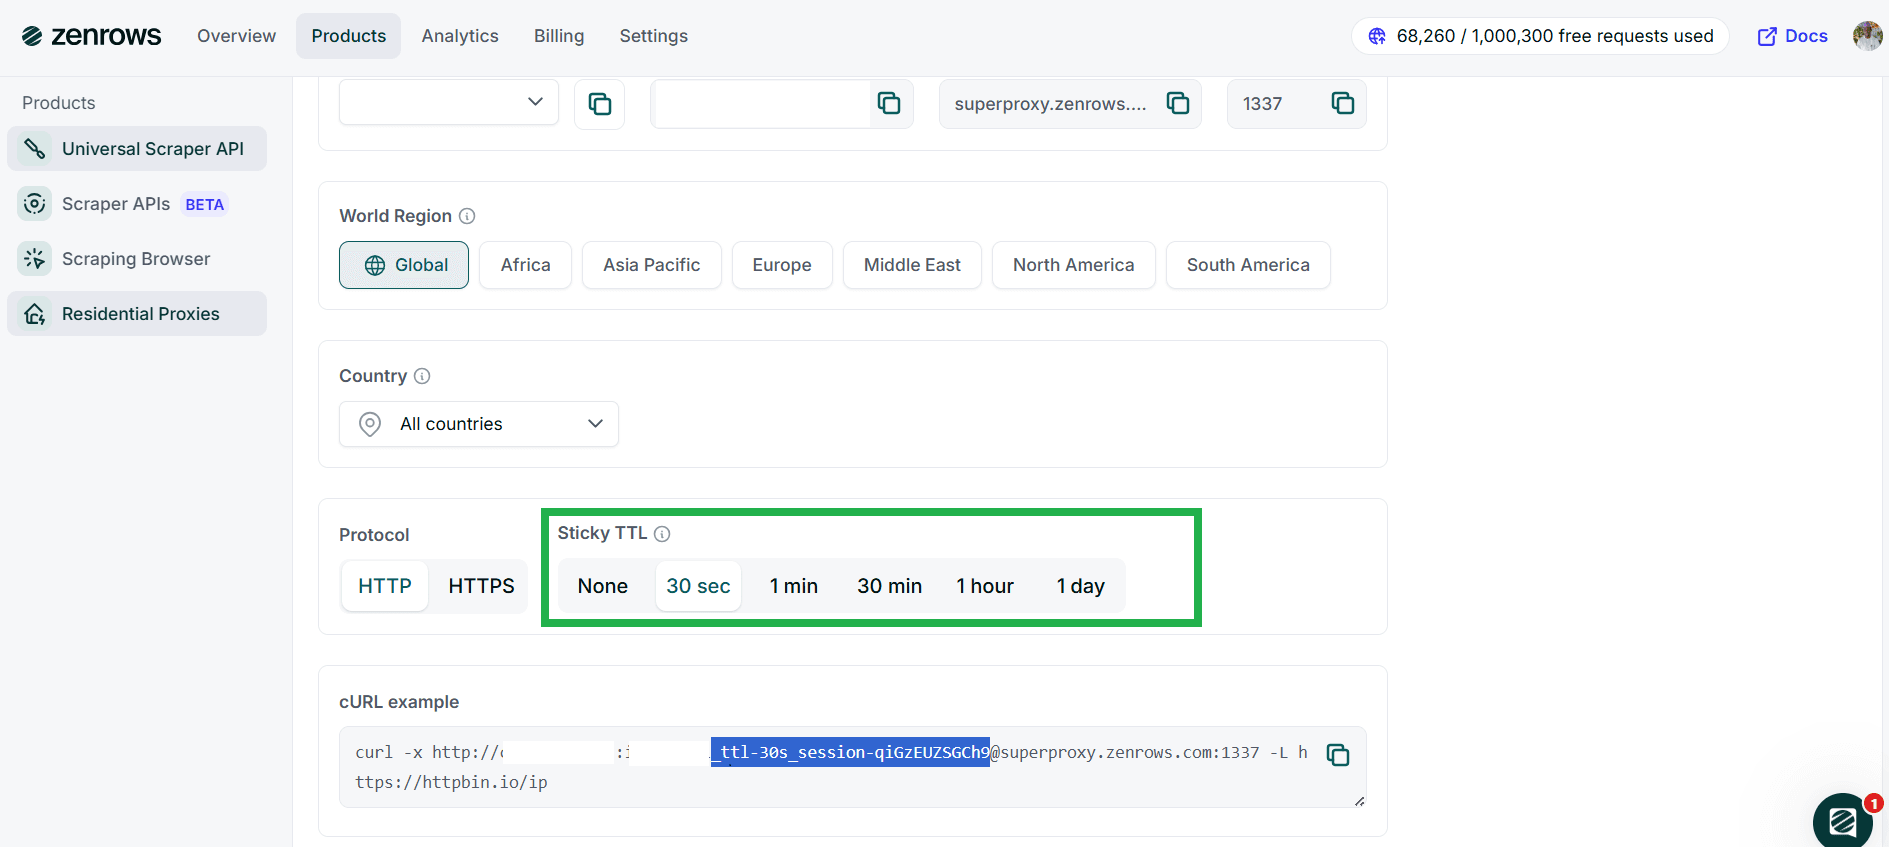
Include the generated TTL session in the password string:
```python Python theme={null}
proxy_password = "PROXY_PASSWORD_ttl-30s_session-qiGzEUZSGCh9"
```
```javascript Node.js theme={null}
password: 'PROXY_PASSWORD_ttl-30s_session-qiGzEUZSGCh9',
```
## Troubleshooting
* **Tunnel failed with response 407 (authentication error):**
* Ensure you enter the correct authentication credentials.
* Enter the correct proxy country or region code.
* **Access denied | 403 forbidden error:**
* Try another country or region.
* Reduce the session TTL to avoid using the same IP address for too long.
* Switch to the Universal Scraper API to increase the scraping success rate.
* **Could not resolve proxy:**
* Check and ensure you've used the correct proxy domain.
## Tips for Accessing Highly Protected Websites
* **Scrape during off-peak hours:** Scraping when the website is less busy can increase your success rate, as anti-bots may be less active. Off-peak hours vary per site but usually fall at night or in the mornings.
* **Use exponential backoffs and retries:** Adequate use of backoffs and retries helps simulate real user behavior and can reduce the chances of IP bans, especially for long TTL sessions.
* **Persist session with proxies to solve CAPTCHAs:** CAPTCHAs are tied to sessions. When solving CAPTCHAs manually while using proxies, maintain the same proxy for the duration of the challenge. Set an appropriate session TTL to keep your IP consistent and prevent repeated challenges.
* **Combine proxies with custom request headers:** Use Residential Proxies with custom headers (like a real browser's User Agent or a trusted Referer) to increase your scraping success rate.
* **Use the Universal Scraper API:** For increased success without manual configuration, switch to the ZenRows Universal Scraper API. It pre-configures all the necessary tools for successful scraping, including bypassing anti-bots and scraping dynamic content.
Check out our article on pro tips to scrape without getting blocked to learn more.
## Frequently Asked Questions (FAQ)
While Residential Proxies significantly reduce the chances of anti-bot detection and IP bans, they don't guarantee you'll escape blocks. Anti-bots analyze more than IPs—they examine headers, fingerprints, behavioral patterns, and more. For a guaranteed anti-bot bypass, switch to the Universal Scraper API.
The Residential Proxies Sticky TTL is flexible, allowing you to persist a single proxy from as little as 1 second up to 24 hours.
No, ZenRows' Residential Proxies are only available on paid subscriptions. However, ZenRows offers a unified pricing model. Subscribing to one product gives you access to all other services.
Residential proxies auto-rotate proxies from a pool of 55+ million IPs across 185+ countries. They support geo-targeting of specific countries and regions, enhancing anonymity and access to region-specific content. This prevents anti-bot measures from tracking you to a single IP or determining your exact location.
# Using Residential Proxies with Node.js (Axios)
Source: https://docs.zenrows.com/residential-proxies/get-started/nodejs-axios
In this guide, we'll walk you through using ZenRows® Residential Proxies with Node.js and Axios. You'll learn how to integrate the proxies into your requests and troubleshoot common issues. We'll also address some frequently asked questions about residential proxies.
## Installing Axios
First, make sure you have Node.js installed. Then, navigate to your project directory and install Axios using `npm` by running:
```bash theme={null}
npm install axios
```
This will install Axios, a popular promise-based `HTTP` client for Node.js, and add it to your project.
## Making Requests with ZenRows Residential Proxies
Follow the steps below to use ZenRows Residential Proxies with Node.js `axios` library.
Navigate to the ZenRows Residential Proxy [Generator Page](https://app.zenrows.com/proxies/generator) to get your username, password, and proxy domain.
If necessary, configure your proxy URL on the Generator Page following the guide on [Residential Proxies Setup](/residential-proxies/residential-proxies-setup). Your proxy URL should be in this format:
```bash theme={null}
http://:@superproxy.zenrows.com:1337
```
Replace `` and `` with your ZenRows proxy credentials.
Here's an example of sending a request through ZenRows Residential Proxies to `httpbin.io/ip`, which returns the IP address used for the request.
```javascript scraper.js theme={null}
const axios = require('axios');
// Proxy credentials
const proxy = {
protocol: 'http'
host: 'superproxy.zenrows.com',
port: '1337',
auth: {
username: '',
password: ''
}
};
// Target URL (httpbin returns your IP address)
const targetURL = 'https://httpbin.io/ip';
// Make request using Axios and Residential Proxy
axios({
method: 'get',
url: targetURL,
proxy: proxy
})
.then(response => {
console.log('Your IP Address:', response.data);
})
.catch(error => {
console.error('Error:', error.message);
});
```
Expected output:
```javascript theme={null}
Your IP Address: { origin: 'your-residential-proxy-ip' }
```
## Troubleshooting
Here are some common issues you may encounter when using ZenRows Residential Proxies with Node.js `axios`.
### Invalid Proxy Credentials
If you encounter a `407 Proxy Authentication Required` or a `401 Unauthorized` error, double-check your `username` and `password` in the auth section of your proxy configuration. Ensure that they match the credentials in the [ZenRows dashboard](https://app.zenrows.com/proxies/generator).
### Axios Version
You're likely to encounter errors if your Axios version is outdated. Ensure you're using a recent version of Axios that supports your proxy configuration. Older versions may have bugs or lack features for specific proxy setups. To ensure you install the latest version, run the following installation command:
```bash theme={null}
npm install axios@latest
```
### Connection Refused or Blocked
If your requests are being blocked or refused, ensure:
* You are correctly matching the protocol (http or https) and port (1337 or 1338).
* The website you're targeting is not actively blocking you. Some websites employ advanced anti-bot measures that detect proxies.
### Invalid Proxy URL Format
Ensure the proxy URL format is correct. It should follow the structure:
```bash theme={null}
http://username:password@proxy-host:port
```
If any component is missing or incorrectly formatted, the request will fail.
### IP Rotation Settings
If you're not seeing your IP change as expected, check your Sticky TTL settings on ZenRows. If the Sticky TTL is too long, the same IP will be used for multiple requests. Reduce the Sticky TTL to rotate IPs more frequently.
## Frequently Asked Questions (FAQs)
Yes, ZenRows Residential Proxies support both HTTP and HTTPS. In Axios, you just need to specify the appropriate protocol in the `proxy.host` value or use an HTTPS URL.
ZenRows automatically rotates IPs for each request unless you configure a Sticky TTL to keep the same IP for a specific period. This helps in scenarios where maintaining the same IP for a session is required.
Many websites employ advanced anti-bot measures, such as CAPTCHAs and Web Application Firewalls (WAFs), to prevent automated scraping. Simply using proxies may not be enough to bypass these protections.
Instead of relying solely on proxies, consider using [ZenRows' Universal Scraper API](https://app.zenrows.com/builder), which provides:
* **JavaScript Rendering and Interaction Simulation:** Optimized with anti-bot bypass capabilities.
* **Comprehensive Anti-Bot Toolkit:** ZenRows offers advanced tools to overcome complex anti-scraping solutions.
The Sticky TTL (Time To Live) feature allows you to maintain the same IP address for a specified duration, from 30 seconds up to 24 hours. If you don't set a Sticky TTL, ZenRows will rotate the IP with every request.
You can test if the proxy is working by sending a request to `https://httpbin.io/ip`. The proxy is successfully applied if the response shows an IP address different from your local IP.
For further assistance, feel free to contact us. 😉
# Using ZenRows® Residential Proxies with Python (Requests)
Source: https://docs.zenrows.com/residential-proxies/get-started/python-requests
This guide'll show you how to integrate ZenRows® Residential Proxies with the Python requests library. You'll learn how to install the necessary libraries, configure the proxy, and make your first request. We'll also cover common mistakes, troubleshooting tips, and frequently asked questions about residential proxies.
## Installing Required Libraries
First, you'll need the `requests` library, which is widely used in Python, to make HTTP requests. If you don't have it installed, use `pip` to install the library:
```bash theme={null}
pip install requests
```
Once installed, you're ready to integrate ZenRows Residential Proxies with `requests`.
## Making Your First Request with ZenRows Residential Proxies
Follow the steps below to use ZenRows Residential Proxies with Python's `requests` library.
Navigate to the ZenRows Residential Proxy [Generator Page](https://app.zenrows.com/proxies/generator) to get your username, password, proxy domain, and port.
If necessary, configure your proxy URL on the Generator Page following the guide on [Residential Proxies Setup](/residential-proxies/residential-proxies-setup). Your proxy URL should be in this format:
```plain theme={null}
http://:@superproxy.zenrows.com:1337
```
Replace `` and `` with your ZenRows proxy credentials.
Here's an example of sending a request through ZenRows Residential Proxies to `httpbin.io/ip`, which returns the IP address used for the request.
```python scraper.py theme={null}
import requests
# Construct the proxy URL
proxy_url = "http://:@superproxy.zenrows.com:1337"
# Set up proxies for requests
proxies = {
"http": proxy_url,
"https": proxy_url,
}
# Make a request through the Residential Proxy
try:
response = requests.get("https://httpbin.io/ip", proxies=proxies)
print(response.text)
except requests.exceptions.RequestException as e:
print(f"An error occurred: {e}")
```
Expected output:
```json theme={null}
{
"origin": "your-residential-proxy-ip"
}
```
## Troubleshooting
Here are some common issues you may encounter when using ZenRows Residential Proxies with Python `requests`.
### Incorrect Credentials
Make sure you are using the correct username, password, proxy host, and port. An incorrect combination of these values will result in an authentication error. If you're unsure of your credentials, revisit the [Generator Page](https://app.zenrows.com/proxies/generator) to verify them.
### Connection Refused or Blocked
If your requests are being blocked or refused, ensure:
* You are correctly matching the protocol (http or https) and port (1337 or 1338).
* The website you're targeting is not actively blocking you. Some websites employ advanced anti-bot measures that detect proxies.
### Invalid Proxy URL Format
Ensure the proxy URL format is correct. It should follow the structure:
```bash theme={null}
http://username:password@proxy-host:port
```
If any component is missing or incorrectly formatted, the request will fail.
### IP Rotation Settings
If you're not seeing your IP change as expected, check your [Sticky TTL](/residential-proxies/residential-proxies-setup#protocol-and-sticky-ttl) settings on ZenRows. If the Sticky TTL is too long, the same IP will be used for multiple requests. Reduce the Sticky TTL to rotate IPs more frequently.
For further assistance, feel free to contact us. 😉
# Introduction to Residential Proxies
Source: https://docs.zenrows.com/residential-proxies/introduction
ZenRows® provides an extensive residential proxy service that includes a pool of over 55 million residential IPs from more than 190 countries. Our premium residential proxies deliver 99.9% uptime and an average response time of 0.35 seconds, ensuring reliable and efficient connections.
**With features like IP auto-rotation and flexible geo-targeting, ZenRows Residential Proxies helps you avoid rate limits and bypass geo-restrictions on a large scale.**
## Key Applications
Proxies are critical for web scraping and data extraction, but their applications extend beyond just avoiding IP blocks. Below are the primary benefits of using residential proxies for data extraction:
* **Bypassing Anti-Bot Systems:** Many websites deploy anti-bot mechanisms to block suspicious IP addresses. Proxies allow you to rotate IP addresses with every request, making your scraping operations undetectable. However, it's important to note that only premium rotating proxies can effectively handle sophisticated anti-bot systems. Free proxies or manual switching will provide a different level of protection.
* **Geolocation Targeting:** Some websites restrict access based on your geographic location. With residential proxies, you gain access to IP addresses from precise regions worldwide, allowing you to retrieve localized data and avoid geo-restrictions.
* **Boosted Performance:** Residential proxies enhance your scraping performance by enabling you to send more requests while minimizing errors, blocks, and timeouts. The result is a higher success rate, leading to more efficient data extraction.
* **Maintaining Anonymity:** Proxies conceal information about your device and identity, ensuring that your web scraping activities remain anonymous and secure.
## Parameter Overview
When using ZenRows Residential Proxies, you can customize your scraping requests with the following parameters to enhance control over proxy usage, geolocation targeting, and response behavior:
| PARAMETER | TYPE | DEFAULT | DESCRIPTION |
| ---------------------------------------------------------------------------------- | -------- | -------- | ---------------------------------------------------------------------------------------------------------------------------------- |
| [**username**](/residential-proxies/residential-proxies-setup#username) `required` | `string` | | Your unique username for authentication |
| [**password**](/residential-proxies/residential-proxies-setup#username) `required` | `string` | | Your password |
| [**region**](/residential-proxies/residential-proxies-setup#world-region) | `string` | `global` | Focus your scraping on a specific geographic region (e.g., `region-eu` for Europe). **When set to global, no parameter is needed** |
| [**country**](/residential-proxies/residential-proxies-setup#country) | `string` | | Target a specific country for geo-restricted data (e.g., `country-es` for Spain). Available only when not using `region` |
| [**ttl**](/residential-proxies/residential-proxies-setup#protocol-and-sticky-ttl) | `number` | | Control how long the same IP address is used for your requests Minimum: 30, Maximum: 1 day. |
## Pricing
The pricing starts at \$69 monthly charging \$5.50 per GB and we offer several other plans that go to \$2.80. For lower price per GB, you could go to Enterprise plans.
The service charges per used bandwidth. For more detailed information, please refer to our [pricing page](https://www.zenrows.com/pricing).
# Setting Up the Residential Proxies
Source: https://docs.zenrows.com/residential-proxies/residential-proxies-setup
In this guide, we'll walk you through setting up your ZenRows® Residential Proxies. You'll learn how to create and access your credentials, including your username, password, and domain, which are essential for integrating the proxies into your applications.
Additionally, we'll cover the available configuration options, such as World Region, Country, Protocol, and Sticky TTL, to help you optimize the use of the proxies based on your specific requirements.
## Initial Setup
To get started with the Residential Proxies, follow these steps:
To begin, you'll need to create a ZenRows account. Visit the [Registration Page](https://app.zenrows.com/register) to sign up. If you already have an account, simply log in to access your dashboard.
A credentials pair (user and password) will be created for you automatically, this step is not mandatory.
Once you're signed in, navigate to the [Credentials Page](https://app.zenrows.com/proxies/credentials) under the Residential Proxies section. Here, you can create credentials by specifying your proxy quota and generating your unique and password. You can create as many credentials as needed, allowing you to manage multiple projects easily!
After generating your credentials, you'll be taken to the [Generator Page](https://app.zenrows.com/proxies/generator), where your credentials — username, password, and various configuration options — will be displayed.
You can copy the Proxy URL and start integrating it into your applications.
## Proxy Configuration Options
ZenRows Residential Proxies are designed to be functional right out of the box. With auto-rotation and residential IPs pre-configured, you can start using them immediately by copying the Proxy URL. However, we also provide additional customization options to help tailor the proxies to your use case.
Auto-rotate and Residential IPs are enabled by default for all users.
You can adjust the following configuration options:
### Username and Password
To make proxy management easier, you can switch between usernames directly in the dashboard. Simply select the desired username, and the proxy URL will automatically update with the corresponding username and password. Note that the domain and port will remain the same.
# Frequently Asked Questions
Source: https://docs.zenrows.com/scraper-apis/faq
When using ZenRows, knowing the right identifier (ID) or query for a given URL is crucial. Whether you're extracting product details, searching for listings, or retrieving reviews, each platform has a unique way of structuring URLs. This guide explains how to find the correct ID or query for different APIs so you can make accurate and efficient requests.
## Amazon Product API
* **Example URL:** `/dp/B07FZ8S74R`
* **Correct ID:** `B07FZ8S74R`
### How do I find the correct ID?
The Amazon Standard Identification Number (ASIN) is the unique product ID, found after `/dp/` in the URL.
Example Request: `https://www.amazon.com/dp/B07FZ8S74R`
## Amazon Discovery API
* **Example URL:** `/s?k=Echo+Dot`
* **Correct Query:** `Echo Dot`
### How do I find the correct query?
Amazon search URLs contain the query after `?k=`. This query must be URL-encoded when making requests.
Example Request: `https://www.amazon.com/s?k=Echo+Dot`
## Walmart Product API
* **Example URL:** `/ip/5074872077`
* **Correct ID:** `5074872077`
### How do I find the correct ID?
Walmart product pages include a numeric item ID, which appears right after `/ip/` in the URL.
Example Request: `https://www.walmart.com/ip/5074872077`
## Walmart Review API
* **Example URL:** `/reviews/product/5074872077`
* **Correct ID:** `5074872077`
### How do I find the correct ID?
The Walmart Review API uses the same product ID as the main product page, found after `/reviews/product/`.
Example Request: `https://www.walmart.com/reviews/product/5074872077`
## Walmart Discovery API
* **Example URL:** `/search?q=Wireless+Headphones`
* **Correct Query:** `Wireless Headphones`
### How do I find the correct query?
The search query appears after `?q=` in the URL and should be URL-encoded when used in API requests.
Example Request: `https://www.walmart.com/search?q=Wireless+Headphones`
## Idealista Property API
* **Example URL:** `/inmueble/106605370/`
* **Correct ID:** `123456789`
### How do I find the correct ID?
Idealista property pages include a numeric identifier found after `/inmueble/`.
Example Request: `https://www.idealista.com/inmueble/106605370/`
## Idealista Discovery API
* **Example URL:** /venta-viviendas/madrid-madrid
* **Correct ID:** NOT\_SUPPORTED
### Why is there no ID?
Idealista search results do not use a unique ID because they return multiple listings instead of a single property.
Example Request: `https://www.idealista.com/venta-viviendas/madrid-madrid`
## Zillow Property API
* **Example URL:** `/homedetails/112-Treadwell-Ave-Staten-Island-NY-10302/32297624_zpid/`
* **Correct ID:** `32297624`
### How do I find the correct ID?
Zillow property pages include a `zpid`, found near the end of the URL before `_zpid/`.
Example Request: `https://www.zillow.com/homedetails/112-Treadwell-Ave-Staten-Island-NY-10302/32297624_zpid/`
## Zillow Discovery API
* **Example URL:** `/homes/for_sale/San-Francisco-CA/`
* **Correct ID:** NOT\_SUPPORTED
### Why is there no ID?
Zillow search results do not have a unique identifier because they display multiple property listings instead of a single home.
Example Request: `https://www.zillow.com/homes/for_sale/San-Francisco-CA/`
## Google Search API
* **Example URL:** `/search?q=nintendo&udm=14`
* **Correct Query:** `Nintendo`
### How do I find the correct query?
The search query appears after `?q=` in the URL and should be URL-encoded when making API requests.
Example Request: `https://www.google.com/search?q=nintendo&udm=14`
The ZenRows® Scraper APIs provide a more efficient and specialized way to extract structured data from popular websites. If you're currently using the Universal Scraper API, switching to the Scraper APIs can simplify your setup, ensure predictable pricing, and improve performance. This guide walks you through the transition process for a seamless upgrade to the Scraper APIs.
## Why Switch to the Scraper APIs
The Scraper APIs are designed to streamline web scraping by offering dedicated endpoints for specific use cases. Unlike the Universal Scraper API, which requires custom configurations for proxies, JavaScript rendering, and anti-bot measures, the Scraper APIs handle these complexities for you. Key benefits include:
* **Predictable Pricing:** Scraper APIs offer a competitive fixed price per successful request, ensuring clear and consistent cost management for your scraping needs.
* **No Setup, Parsing, or Maintenance Required:** With the Scraper APIs, simply select the API use case, and we handle all the anti-bot configuration. This means you can focus on extracting valuable data while we ensure the API responses are structured and reliable. Enjoy high success rates and continuous data streams with no maintenance on your end.
## How the Scraper APIs Work
The core of the ZenRows API is the API Endpoint, which is structured based on the industry, target website, type of request, and query parameters. This modular approach allows you to extract data efficiently from various sources.
```bash theme={null}
https://.api.zenrows.com/v1/targets///?
```
Each part of the URL serves a specific purpose:
* `` The industry category (e.g., ecommerce, realestate, serp).
* `` The target website (e.g., amazon, idealista, google).
* `` The type of data you want (e.g., products, reviews, search).
* `` The unique identifier for the request, such as a product ID, property ID, or query.
* `` Your personal API key for authentication and access.
Here's an example for Amazon Product Information API:
```bash theme={null}
https://ecommerce.api.zenrows.com/v1/targets/amazon/products/{asin}
```
Breaking it down:
* Industry: `ecommerce`
* Website: `amazon`
* Type of Request: `products`
* Query ID: `{asin}` (Amazon Standard Identification Number, used for product lookup)
### Customization with Additional Parameters
Depending on the website, you may include extra parameters to refine your request:
* `.tld` Specify the top-level domain (e.g., `.com`, `.co.uk`, `.de`).
* `country` Set the country code to retrieve localized data.
* `filters` Apply filters to extract specific data.
## Examples on How to Transition from the Universal Scraper API
Switching to the Scraper APIs requires minimal code changes. Below is an example of how to transition from the Universal Scraper API to a dedicated Scraper API.
### E-Commerce (i.e., Amazon Product Information API)
#### Old Code Using Universal Scraper API:
```python Python theme={null}
# pip install requests
import requests
url = 'https://www.amazon.com/dp/B07FZ8S74R'
apikey = 'YOUR_ZENROWS_API_KEY'
params = {
'url': url,
'apikey': apikey,
'js_render': 'true',
'premium_proxy': 'true',
'proxy_country': 'us',
}
response = requests.get('https://api.zenrows.com/v1/', params=params)
print(response.text)
```
#### New Code Using a Dedicated Scraper API:
```python Python theme={null}
# pip install requests
import requests
asin = 'B07FZ8S74R'
api_endpoint = f'https://ecommerce.api.zenrows.com/v1/targets/amazon/products/{asin}'
params = {
'apikey': 'YOUR_ZENROWS_API_KEY',
}
response = requests.get(api_endpoint, params=params)
print(response.text)
```
#### Steps to Switch:
Replace the existing Universal Scraper API endpoint with the dedicated endpoint for Amazon products. The new endpoint follows this format:
```bash theme={null}
https://ecommerce.api.zenrows.com/v1/targets/amazon/products/{asin}
```
Where `{asin}` is the unique Amazon product identifier.
The Scraper APIs are optimized to handle common scraping tasks, such as JS rendering and proxy management, without needing to specify additional parameters like `js_render` or `premium_proxy`. Simply pass the `apikey` and any other relevant parameters (such as `country` or `tld`) and you're good to go.
Refer to the API documentation for a complete list of available parameters.
Once you've made the necessary changes to your code, run it to test the new API call. The response will be structured data tailored to your scraping use case, such as product name, price, and description.
### Real State (i.e., Zillow Property Data API)
#### Old Code Using Universal Scraper API:
```python Python theme={null}
# pip install requests
import requests
url = 'https://www.zillow.com/homedetails/3839-Bitterroot-Dr-Billings-MT-59105/3194425_zpid/'
apikey = 'YOUR_ZENROWS_API_KEY'
params = {
'url': url,
'apikey': apikey,
'js_render': 'true',
'premium_proxy': 'true',
'proxy_country': 'us',
}
response = requests.get('https://api.zenrows.com/v1/', params=params)
print(response.text)
```
#### New Code Using a Dedicated Scraper API:
```python Python theme={null}
# pip install requests
import requests
zpid = '3194425'
url = f"https://realestate.api.zenrows.com/v1/targets/zillow/properties/{zpid}"
params = {
"apikey": "YOUR_ZENROWS_API_KEY",
}
response = requests.get(url, params=params)
print(response.text)
```
#### Steps to Switch:
Replace the existing Universal Scraper API endpoint with the dedicated endpoint for Zillow property data. The new endpoint follows this format:
```bash theme={null}
https://realestate.api.zenrows.com/v1/targets/zillow/properties/{zpid}
```
Where `{zpid}` is the unique Zillow property identifier.
The Scraper APIs are optimized to handle common scraping tasks, such as JS rendering and proxy management, without requiring additional parameters like `js_render` or `premium_proxy`. Simply provide the apikey along with any other relevant parameters (such as `country` or `tld`), and you're good to go.
Refer to the API documentation for a complete list of available parameters.
Once you've made the necessary changes to your code, run it to test the new API call. The response will be structured data tailored to your scraping use case, such as property address, price, and description.
### SERP (i.e., Google Search Results API)
#### Old Code Using Universal Scraper API:
```python Python theme={null}
# pip install requests
import requests
url = 'https://www.google.com/search?q=zenrows'
apikey = 'YOUR_ZENROWS_API_KEY'
params = {
'url': url,
'apikey': apikey,
'js_render': 'true',
'premium_proxy': 'true',
'proxy_country': 'us',
}
response = requests.get('https://api.zenrows.com/v1/', params=params)
print(response.text)
```
#### New Code Using a Dedicated Scraper API:
```python Python theme={null}
# pip install requests
import requests
encoded_query = 'zenrows+scraper+apis'
url = f"https://serp.api.zenrows.com/v1/targets/google/search/{encoded_query}"
params = {
"apikey": "YOUR_ZENROWS_API_KEY",
}
response = requests.get(url, params=params)
print(response.text)
```
#### Steps to Switch:
Replace the existing Universal Scraper API endpoint with the dedicated endpoint for Google search results. The new endpoint follows this format:
```bash theme={null}
https://serp.api.zenrows.com/v1/targets/google/search/{query}
```
Note: `{query}` should be URL-encoded.
The Scraper APIs are optimized to handle common scraping tasks, such as JS rendering and proxy management, without requiring additional parameters like `js_render` or `premium_proxy`. Simply provide the apikey along with any other relevant parameters (such as `country` or `tld`), and you're good to go.
Refer to the API documentation for a complete list of available parameters.
Once you've made the necessary changes to your code, run it to test the new API call. The response will be structured data tailored to your scraping use case, such as advertisements results, links, and titles.
## Need Help?
If you have any questions or face issues during the transition, our support team is here to assist you. Switching to the new Scraper APIs is straightforward, offering optimized performance, predictable pricing, and less maintenance. We're constantly expanding our API catalog and prioritizing new features based on your feedback, so enjoy a more reliable scraping experience today!
You can find your API key in your [ZenRows settings](https://app.zenrows.com/account/settings) under the API Key section.
If you exceed your API usage limits, your requests will return an error. You can either upgrade your plan, wait until your cycle renews, or buy Top-Ups.
No, ZenRows automatically handles proxies, browser fingerprinting, and anti-bot measures, so you don't need to set up anything manually.
Yes, you can integrate ZenRows with various programming languages, including Python, JavaScript, and more. Code snippets are provided in the [API request builder](https://app.zenrows.com/apis/catalog).
Yes, you can specify the top-level domain (`.tld`) and `country` parameters to target localized versions of a website.
Only available on some APIs. Refer to the API documentation for a complete list of available parameters.
If your request fails, check the response message for error details. Common reasons include invalid API keys or exceeding usage limits.
To optimize performance, use filtering options, minimize unnecessary requests, and ensure you're only scraping the required data.
Only available on some APIs. Refer to the API documentation for a complete list of available parameters.
Yes, ZenRows is designed for scalability. You can run multiple concurrent requests to speed up data extraction, and each plan offers a different concurrency limit. If you need higher limits, consider upgrading to a higher-tier plan or contacting support for enterprise solutions.
# Using the Amazon Product Information API
Source: https://docs.zenrows.com/scraper-apis/get-started/amazon-asin
Retrieve detailed product information using Amazon Standard Identification Numbers (ASINs). This scraper is optimized to extract comprehensive data from Amazon product pages, enabling you to build enriched applications or perform in-depth analysis.
Extract product details using ASINs (Amazon Standard Identification Number), such as:
* Product Title, Brand, and Description
* Categories and Breadcrumb Hierarchies
* Pricing (Including Discounts and Currency Information)
* Product Dimensions, Weight, and Model Details
* Ratings, Reviews, and Amazon Badges (e.g., Best Seller)
* Availability Status and Seller Information
* Related ASINs for cross-referencing
* Images and Content for enriched product listings
Example Use Cases:
* **Price Tracking:** Automatically track price changes for products of interest.
* **Competitor Analysis:** Gather competitor product details to refine your strategy.
## Supported Query Parameters
| PARAMETER | TYPE | DEFAULT | DESCRIPTION |
| ------------------- | -------- | ------- | ----------------------------------------------------------------------------------------- |
| **asin** `required` | `string` | | The 10-character Amazon Standard Identification Number of the product. Example: `{asin}`. |
| **url** | `string` | | The full Amazon product URL. Example: `https://www.amazon.com/dp/{asin}`. |
| **tld** | `string` | `.com` | The top-level domain of the Amazon website. Supported values: `.com`, `.it`, `.de`, etc. |
| **country** | `string` | `us` | The originating country for the product retrieval. Example: `country=es`. |
## How to Setup
Request the product endpoint with the ASIN of the desired product:
```bash theme={null}
https://ecommerce.api.zenrows.com/v1/targets/amazon/products/{asin}?apikey=YOUR_ZENROWS_API_KEY
```
### Example:
```bash cURL theme={null}
curl "https://ecommerce.api.zenrows.com/v1/targets/amazon/products/{asin}?apikey=YOUR_ZENROWS_API_KEY&country=gb" #Optional: Target specific country
```
Replace `{asin}` with the actual product ASIN code.
```python Python theme={null}
# pip install requests
import requests
asin = 'B07FZ8S74R'
apikey = 'YOUR_ZENROWS_API_KEY'
api_endpoint = f'https://ecommerce.api.zenrows.com/v1/targets/amazon/products/{asin}'
params = {
'apikey': apikey,
}
response = requests.get(api_endpoint, params=params)
print(response.text)
```
```javascript NodeJS theme={null}
// npm install axios
const axios = require('axios');
const asin = 'B07FZ8S74R';
const apikey = 'YOUR_ZENROWS_API_KEY';
const api_endpoint = `https://ecommerce.api.zenrows.com/v1/targets/amazon/products/${asin}`;
axios
.get(api_endpoint, {
params: { apikey },
})
.then((response) => console.log(response.data))
.catch((error) => console.log(error));
```
```java Java theme={null}
import org.apache.hc.client5.http.fluent.Request;
import org.apache.hc.core5.net.URIBuilder;
import java.net.URI;
public class ZRRequest {
public static void main(final String... args) throws Exception {
String asin = "B07FZ8S74R";
String apikey = "YOUR_ZENROWS_API_KEY";
String api_endpoint = "https://ecommerce.api.zenrows.com/v1/targets/amazon/products/" + asin;
URI uri = new URIBuilder(api_endpoint)
.addParameter("apikey", apikey)
.build();
String response = Request.get(uri)
.execute().returnContent().asString();
System.out.println(response);
}
}
```
```php PHP theme={null}
$apikey,
];
$ch = curl_init();
curl_setopt($ch, CURLOPT_URL, $api_endpoint . '?' . http_build_query($params));
curl_setopt($ch, CURLOPT_RETURNTRANSFER, true);
curl_setopt($ch, CURLOPT_FOLLOWLOCATION, true);
$response = curl_exec($ch);
echo $response . PHP_EOL;
curl_close($ch);
?>
```
```go Go theme={null}
package main
import (
"fmt"
"io/ioutil"
"log"
"net/http"
"net/url"
)
func main() {
asin := "B07FZ8S74R"
apikey := "YOUR_ZENROWS_API_KEY"
api_endpoint := "https://ecommerce.api.zenrows.com/v1/targets/amazon/products/" + asin
params := url.Values{}
params.Add("apikey", apikey)
resp, err := http.Get(api_endpoint + "?" + params.Encode())
if err != nil {
log.Fatalln(err)
}
defer resp.Body.Close()
body, err := ioutil.ReadAll(resp.Body)
if err != nil {
log.Fatalln(err)
}
fmt.Println(string(body))
}
```
```ruby Ruby theme={null}
# gem install faraday
require 'faraday'
asin = 'B07FZ8S74R'
apikey = 'YOUR_ZENROWS_API_KEY'
api_endpoint = "https://ecommerce.api.zenrows.com/v1/targets/amazon/products/#{asin}"
conn = Faraday.new(url: api_endpoint) do |f|
f.params = { apikey: apikey }
end
response = conn.get
puts response.body
```
```json Response Example theme={null}
{
"amazon_choice": false,
"availability_status": "Currently unavailable.",
"category_breadcrumb": ["Amazon Devices"],
"is_available": false,
"price_currency_symbol": "$",
"product_description": "MEET ECHO DOT - Our most compact smart speaker that fits perfectly into small spaces. RICH AND LOUD SOUND - Better speaker quality than Echo Dot Gen 2 for richer and louder sound. Pair with a second Echo Dot for stereo sound. ALEXA HELPS YOU DO MORE WITH PRIME - Listen to millions of songs with Amazon Music, use your voice to for 2-day shipping, listen to audiobooks on Audible, and much more. MAKE YOUR LIFE EASIER - Alexa can set timers, check the weather, read the news, adjust thermostats, answer questions, and more to help with daily tasks. DESIGNED TO PROTECT YOUR PRIVACY – Built with multiple layers of privacy controls including the ability to delete your recordings, mute your mic, and more in-app privacy controls. CONTROL MUSIC WITH A SIMPLE PHRASE - Echo Dot allows you to stream songs from Amazon Music, Apple Music, Spotify, SiriusXM, and others, as well as via Bluetooth. Voice control with Alexa makes it easy to skip to the next song, adjust the volume, and pause without getting up. CONNECT WITH OTHERS HANDS-FREE - Call friends and family who have the Alexa app or an Echo device. Instantly drop in on other rooms or announce to the whole house that dinner's ready. ALEXA HAS SKILLS - With tens of thousands of skills and counting, Alexa is always getting smarter and adding new skills like tracking fitness, playing games, and more.",
"product_images": [
"https://m.media-amazon.com/images/I/61MZfowYoaL._AC_SL1000_.jpg",
"https://m.media-amazon.com/images/I/61MZfowYoaL._AC_SY300_SX300_.jpg"
],
"product_name": "Echo Dot (3rd Gen, 2018 release) - Smart speaker with Alexa - Charcoal",
"product_top_review": "We've only had our Alexa devices setup for about two weeks now, so we're definitely still working out the kinks. With that said, this is a review of everything I've noticed of our entire Alexa ecosystem, which includes 2x Echo Dots, 2x Echo Spots, 2x refurbished Echos, and 1x Echo Sub:Pros: Individually, they all work exactly as they should ALMOST all the time (more on that in the cons section). They all look good, and aren't big, ugly hunks of metal and plastic taking up space in your house. They were all incredibly easy to get through initial setup (except the Echo Sub, more below). Music sounds good in all of them, to include the Echo Dots (but it sounds GREAT on the Echos, and fantastic on the Echo/Sub pair).Cons: The voice recognition is almost too good for its own good. We have a fairly open floor plan, with an Echo Spot in the living room and an Echo in the kitchen. Sometimes they both hear a demand, and the wrong device (meaning the one farther away) will respond. I find myself occasionally whispering to an Echo device so its friends don't butt in to the convo.The Echo Sub needed to be reset 3x when I first got it/went to set it up. I had to log in/out of the app a couple times as well before it was recognized and would actually pair to an Echo.Sometimes Alexa tells me she can't complete a request, then my wife (who uses Alexa far less often than I do) will ask the same request and it works...and vice versa. We haven't figured out what we're doing/saying or not doing/not saying for these discrepancies to happen, but hopefully that'll work itself out with time.The most irritating issue I have so far is getting music to play on the \"Everywhere\" group. Sometimes I say \"Alexa play music everywhere\" and it just doesn't do it. Sometimes it'll play on only some of the devices, and sometimes it'll only play on the device I was speaking to. Our house is two stories, and we have two kids and a dog, so we spend a ridiculous amount of our time cleaning/walking up and down the stairs. A big part of the reason I bought these was for the music to fill the house while cleaning, and it oftentimes requires me to spend some time arguing with Alexa to get that to happen. It's even gotten to the point where I've had to go into the app and manually select \"Everywhere,\" because the voice command just won't work.Individual components:2x Echo Dots (w/ separately purchased wall mounts): No complaints. They setup just fine, and work perfectly. They're actually bigger than I thought they would be, and look a little clunky mounted to the wall, but overall they don't mess up our aesthetic enough for me to dock them a star or anything. 5/5 would recommend.2x Echo Spots: No complaints again. These were the first two devices we bought, and they worked so well I decided to buy the other devices. My favorite part of these is their ability to pull up security cam footage. My desk is in the basement, so it's nice to say \"Alexa show me the driveway\" and see who just pulled in, or to say \"Alexa show me the front door\" when the doorbell rings. I paired these will some web cam covers (also bought on Amazon, of course) so Jeffy and his crew can't record me all day long.2x refurbished Echos (in charcoal): I bought these to play music, and they sound amazing. We'll see how they hold up, given that they're refurbished equipment, but I have my fingers crossed. They also look great, and are not an eye sore like other speakers.1x Echo Sub: The only device that gave me an issue with the setup process. For that, I'd honestly give the Sub 4/5 stars because it really was a pain in the butt getting it properly hooked up. It gave me issues not just connecting to Wifi, but also when pairing with an Echo. Lots of logging in/out of the app, resetting the Sub. Irritating, to say the least. However, with that one star docked, I'd give it a SOLID 4/5 stars. This thing sounds GREAT. I'm a huge music lover, but hip hop/rap is really where my loyalty lies. And I NEED bass when I jam, and this thing delivers bass in spades. Even with the setup issue, I'm planning on buying another for in the basement. If Amazon ever makes a waterproof version, I'll buy one for outside for bbqs/parties too.",
"product_url": "https://www.amazon.com/Amazon-vibrant-helpful-routines-Charcoal/dp/B09B8V1LZ3",
"rating_score": 4.7,
"review_count": 993746,
"sku": "B07FZ8S74R"
}
```
## Troubleshooting and FAQs
To authenticate requests, use your ZenRows API key. Replace `YOUR_ZENROWS_API_KEY` in the URL with your actual API key.
Yes, The `asin` parameter must follow Amazon's 10-character alphanumeric ASIN format. Ensure it matches the pattern `^[A-Z0-9]{10}$`.
Check the `tld` and `country` parameters in your request. They must align with the Amazon site you are targeting. For example, use `tld=.com` and `country=us` for Amazon US.
# Using the Amazon Discovery API
Source: https://docs.zenrows.com/scraper-apis/get-started/amazon-discovery
The Amazon Discovery API enables you to extract search results from Amazon based on specific queries. It provides a structured list of products and their details, empowering you to analyze trends and monitor market activity effectively.
* Product Name, Price, and Discount Details
* Ratings and Review Counts
* Product URLs and Images
* Related Searches and Sponsored Products
Example Use Cases:
* **Market Research:** Identify trending products and evaluate their popularity.
* **Demand Analysis:** Understand product search trends in specific regions or categories.
## Supported Query Parameters
| PARAMETER | TYPE | DEFAULT | DESCRIPTION |
| -------------------- | -------------- | ------- | ----------------------------------------------------------------------------------------------- |
| **query** `required` | `string` | | The search term you want to query on Amazon. Must be URL-encoded. Example: `Echo+Dot`. |
| **url** | `string ` | | The URL of the search results page to retrieve. Example: `https://www.amazon.com/s?k=Echo+Dot`. |
| **tld** | `string` | `.com` | The top-level domain of the Amazon website. Supported values: `.com`, `.it`, `.de`, etc. |
| **country** | `string` | `us` | The originating country for the product retrieval. Example: `country=es`. |
## How to Setup
Request the search endpoint with the desired query:
```bash theme={null}
https://ecommerce.api.zenrows.com/v1/targets/amazon/discovery/{query}?apikey=YOUR_ZENROWS_API_KEY
```
### Example
```bash cURL theme={null}
curl "https://ecommerce.api.zenrows.com/v1/targets/amazon/discovery/{query}?apikey=YOUR_ZENROWS_API_KEY&country=gb" #Optional: Target specific country
```
`{query}` must be encoded.
```python Python theme={null}
# pip install requests
import requests
import urllib.parse
query = "laptop stand"
encoded_query = urllib.parse.quote(query)
api_endpoint = f"https://ecommerce.api.zenrows.com/v1/targets/amazon/discovery/{encoded_query}"
params = {
"apikey": "YOUR_ZENROWS_API_KEY",
"country": "us" # Optional: Target specific country
}
response = requests.get(api_endpoint, params=params)
print(response.text)
```
```javascript NodeJS theme={null}
// npm install axios
const axios = require('axios');
const query = "laptop stand";
const encodedQuery = encodeURIComponent(query);
const api_endpoint = `https://ecommerce.api.zenrows.com/v1/targets/amazon/discovery/${encodedQuery}`;
const apikey = "YOUR_ZENROWS_API_KEY";
axios
.get(api_endpoint, {
params: { apikey, country: "us" }, // Optional: Target specific country
})
.then((response) => console.log(response.data))
.catch((error) => console.log(error));
```
```java Java theme={null}
import org.apache.hc.client5.http.fluent.Request;
import org.apache.hc.core5.net.URIBuilder;
import java.net.URI;
import java.net.URLEncoder;
import java.nio.charset.StandardCharsets;
public class ZRRequest {
public static void main(final String... args) throws Exception {
String query = "laptop stand";
String encodedQuery = URLEncoder.encode(query, StandardCharsets.UTF_8);
String api_endpoint = "https://ecommerce.api.zenrows.com/v1/targets/amazon/discovery/" + encodedQuery;
String apikey = "YOUR_ZENROWS_API_KEY";
URI uri = new URIBuilder(api_endpoint)
.addParameter("apikey", apikey)
.addParameter("country", "us") // Optional: Target specific country
.build();
String response = Request.get(uri)
.execute().returnContent().asString();
System.out.println(response);
}
}
```
```php PHP theme={null}
$apikey,
'country' => 'us' // Optional: Target specific country
];
$ch = curl_init();
curl_setopt($ch, CURLOPT_URL, $api_endpoint . '?' . http_build_query($params));
curl_setopt($ch, CURLOPT_RETURNTRANSFER, true);
curl_setopt($ch, CURLOPT_FOLLOWLOCATION, true);
$response = curl_exec($ch);
echo $response . PHP_EOL;
curl_close($ch);
?>
```
```go Go theme={null}
package main
import (
"fmt"
"io/ioutil"
"log"
"net/http"
"net/url"
)
func main() {
query := "laptop stand"
encodedQuery := url.QueryEscape(query)
api_endpoint := "https://ecommerce.api.zenrows.com/v1/targets/amazon/discovery/" + encodedQuery
apikey := "YOUR_ZENROWS_API_KEY"
params := url.Values{}
params.Add("apikey", apikey)
params.Add("country", "us") // Optional: Target specific country
resp, err := http.Get(api_endpoint + "?" + params.Encode())
if err != nil {
log.Fatalln(err)
}
defer resp.Body.Close()
body, err := ioutil.ReadAll(resp.Body)
if err != nil {
log.Fatalln(err)
}
fmt.Println(string(body))
}
```
```ruby Ruby theme={null}
# gem install faraday
require 'faraday'
require 'uri'
query = "laptop stand"
encoded_query = URI.encode_www_form_component(query)
api_endpoint = "https://ecommerce.api.zenrows.com/v1/targets/amazon/discovery/#{encoded_query}"
apikey = "YOUR_ZENROWS_API_KEY"
conn = Faraday.new(url: api_endpoint) do |f|
f.params = { apikey: apikey, country: "us" } # Optional: Target specific country
end
response = conn.get
puts response.body
```
```json Response Example theme={null}
{
"search_query": "laptop stand",
"pagination": {
"current_page": 1,
"total_pages": 20,
"next_page_url": "https://www.amazon.com/s?k=laptop+stand&page=2&xpid=9u8lcOrIDaHFG&qid=1739387945&ref=sr_pg_1"
},
"products": [
{
"title": "Adjustable Laptop Stand for Desk",
"asin": "B08XYZ1234",
"price": 16.99,
"original_price": 19.99,
"discounted": true,
"rating": 4.5,
"reviews_count": 1250,
"availability": "In Stock",
"seller": "Amazon",
"fulfilled_by_amazon": true,
"url": "https://www.amazon.com/dp/B08XYZ1234",
"image_url": "https://m.media-amazon.com/images/I/71d5FyZOpXL._AC_SL1500_.jpg"
},
{
"title": "Laptop Stand, Ergonomic Aluminum Riser",
"asin": "B09ABC5678",
"price": 29.99,
"original_price": null,
"discounted": false,
"rating": 4.8,
"reviews_count": 3400,
"availability": "In Stock",
"seller": "Best Deals Inc.",
"fulfilled_by_amazon": false,
"url": "https://www.amazon.com/dp/B09ABC5678",
"image_url": "https://m.media-amazon.com/images/I/81QpJ5BXLbL._AC_SL1500_.jpg"
}
],
"sponsored_products": [
{
"title": "Portable Laptop Stand, Foldable & Lightweight",
"asin": "B07LMN4567",
"price": 22.49,
"original_price": 24.99,
"discounted": true,
"rating": 4.6,
"reviews_count": 980,
"availability": "In Stock",
"seller": "Gadgets Hub",
"fulfilled_by_amazon": true,
"url": "https://www.amazon.com/dp/B07LMN4567",
"image_url": "https://m.media-amazon.com/images/I/61zKpLgJtJL._AC_SL1500_.jpg"
}
],
"related_searches": [
"adjustable laptop stand",
"foldable laptop stand",
"laptop stand for desk",
"portable laptop riser"
]
}
```
## Troubleshooting and FAQs
The `pagination.current_page` field in the response helps you track pages. Use the `url` parameter with the next page link provided by Amazon to scrape additional pages.
The `country` parameter determines the currency used in pricing. For example, `country=de` will return prices in Euros (EUR), while `country=us` will return prices in USD.
Sponsored products are included in the `sponsored_product_list` field of the response. Use this field to analyze ad placements.
# Using the Google Search Results API
Source: https://docs.zenrows.com/scraper-apis/get-started/google-search
The Google Search SERP API enables seamless extraction of search engine results from Google, providing structured search results with rich metadata. This API allows users to retrieve search rankings, advertisements, organic results, and other relevant details efficiently, making it an essential tool for SEO analysis, market research, and competitive intelligence.
## Key Features
* Extract organic search result details, including:
* Title, description, and URL.
* Ranking position in the search results.
* Capture paid advertisements (Google Ads) when present.
* Support for pagination to navigate multiple pages of search results.
* Obtain localized search results by specifying language and region settings.
## Supported Query Parameters
| PARAMETER | TYPE | DEFAULT | DESCRIPTION |
| ----------- | -------------- | ------- | -------------------------------------------------------------------------------------------------------------------------- |
| **url** | `string ` | | The full Google Search URL for which results should be extracted. Example: `https://www.google.com/search?q=web+scraping`. |
| **tld** | `string` | `.com` | The top-level domain of the Google website. Supported examples: `.com`, `.ca`, `.co.uk`, ... |
| **country** | `string` | | The originating country for the search. Example: `country=es`. |
## How to Use
To extract Google search results, make a request to the API endpoint with your desired query parameters:
```bash theme={null}
https://serp.api.zenrows.com/v1/targets/google/search?url={url}&apikey=YOUR_ZENROWS_API_KEY
```
### Example
```bash cURL theme={null}
curl "https://serp.api.zenrows.com/v1/targets/google/search/{query}?apikey=YOUR_ZENROWS_API_KEY"
```
`{query}` should be URL-encoded.
```python Python theme={null}
# pip install requests
import requests
import urllib.parse
query = "web scraping" # Example query
encoded_query = urllib.parse.quote(query)
api_endpoint = f"https://serp.api.zenrows.com/v1/targets/google/search/{encoded_query}"
params = {
"apikey": "YOUR_ZENROWS_API_KEY",
}
response = requests.get(api_endpoint, params=params)
print(response.text)
```
```javascript NodeJS theme={null}
// npm install axios
const axios = require('axios');
const query = "web scraping"; // Example query
const encodedQuery = encodeURIComponent(query);
const apikey = 'YOUR_ZENROWS_API_KEY';
const api_endpoint = `https://serp.api.zenrows.com/v1/targets/google/search/${encodedQuery}`;
axios
.get(api_endpoint, {
params: { apikey },
})
.then((response) => console.log(response.data))
.catch((error) => console.log(error));
```
```java Java theme={null}
import org.apache.hc.client5.http.fluent.Request;
import org.apache.hc.core5.net.URIBuilder;
import java.net.URI;
import java.net.URLEncoder;
import java.nio.charset.StandardCharsets;
public class ZRRequest {
public static void main(final String... args) throws Exception {
String query = "web scraping"; // Example query
String encodedQuery = URLEncoder.encode(query, StandardCharsets.UTF_8.toString());
String api_endpoint = "https://serp.api.zenrows.com/v1/targets/google/search/" + encodedQuery;
String apikey = "YOUR_ZENROWS_API_KEY";
URI uri = new URIBuilder(api_endpoint)
.addParameter("apikey", apikey)
.build();
String response = Request.get(uri)
.execute().returnContent().asString();
System.out.println(response);
}
}
```
```php PHP theme={null}
$apikey,
];
$ch = curl_init();
curl_setopt($ch, CURLOPT_URL, $api_endpoint . '?' . http_build_query($params));
curl_setopt($ch, CURLOPT_RETURNTRANSFER, true);
curl_setopt($ch, CURLOPT_FOLLOWLOCATION, true);
$response = curl_exec($ch);
echo $response . PHP_EOL;
curl_close($ch);
```
```go Go theme={null}
package main
import (
"fmt"
"io/ioutil"
"log"
"net/http"
"net/url"
)
func main() {
query := "web scraping" // Example query
encodedQuery := url.PathEscape(query)
api_endpoint := "https://serp.api.zenrows.com/v1/targets/google/search/" + encodedQuery
apikey := "YOUR_ZENROWS_API_KEY"
params := url.Values{}
params.Add("apikey", apikey)
resp, err := http.Get(api_endpoint + "?" + params.Encode())
if err != nil {
log.Fatalln(err)
}
defer resp.Body.Close()
body, err := ioutil.ReadAll(resp.Body)
if err != nil {
log.Fatalln(err)
}
fmt.Println(string(body))
}
```
```ruby Ruby theme={null}
# gem install faraday
require 'faraday'
require 'cgi'
query = "web scraping" # Example query
encoded_query = CGI.escape(query)
api_endpoint = "https://serp.api.zenrows.com/v1/targets/google/search/#{encoded_query}"
apikey = 'YOUR_ZENROWS_API_KEY'
conn = Faraday.new(url: api_endpoint) do |f|
f.params = {
apikey: apikey
}
end
response = conn.get
puts response.body
```
```json Response Example theme={null}
{
"organic_results": [
{
"title": "What is Web Scraping? A Beginner's Guide - ZenRows",
"link": "https://www.zenrows.com/web-scraping-guide",
"snippet": "Learn the fundamentals of web scraping, how it works, and its applications."
},
{
"title": "Best Web Scraping Tools in 2024 - Comparison",
"link": "https://www.example.com/best-web-scraping-tools",
"snippet": "A detailed comparison of the top web scraping tools available today."
}
],
"ad_results": [
{
"title": "Top Web Scraping API - Free Trial Available",
"link": "https://www.exampleads.com/webscraping",
"snippet": "Get structured data from any website effortlessly with our advanced API."
}
]
}
```
## Troubleshooting and FAQs
Yes, you can use the location parameter to target a specific geographic region and the TLD parameter to specify the domain of the search results.
The `query` parameter is the search term you want to look up on Google's website. Make sure to URL-encode the query string (e.g., `Wireless Headphones` becomes `Wireless+Headphones`).
# Using the Idealista Discovery API
Source: https://docs.zenrows.com/scraper-apis/get-started/idealista-discovery
The Idealista Discovery API enables seamless extraction of property listings from Idealista, providing structured search results with detailed property information. This API helps users retrieve real estate data efficiently, including pagination details for easy navigation.
* Retrieve the total number of search results.
* Access detailed property information, including:
* Address (full street, city, and postal code).
* Property size in square meters.
* Number of bedrooms and bathrooms.
* Price, including currency and symbol.
* Direct links to individual property listings.
* Obtain the search query and corresponding title for reference.
## Supported Query Parameters
| PARAMETER | TYPE | DEFAULT | DESCRIPTION |
| --------- | -------------- | ---------------------------------- | ------------------------------------------------------------------------------------------------------------------------------------------------------------------------------------------------------------------------------------------------------------------------------------------------------------------------------------------------------------- |
| **url** | `string ` | | The URL where the desired search data must be retrieved from. Example: `https://www.idealista.com/alquiler-viviendas/barcelona-provincia/`. |
| **lang** | `string` | **Language of the target country** | The language to display results. Supported values: `"en"`, `"es"`, `"ca"`, `"it"`, `"pt"`, `"fr"`, `"de"`, `"da"`, `"fi"`, `"nb"`, `"nl"`, `"pl"`, `"ro"`, `"ru"`, `"sv"`, `"el"`, `"zh"`, `"uk"`. The default is the language of the target country (e.g., `"es"` for `.com`, `"it"` for `.it`, and `"pt"` for `.pt`). Example: `lang=en`. |
| **page** | `number` | | The search results page to retrieve. Example: `page=2`. |
| **order** | `string` | | Determines the sorting of search results based on specified criteria. Supported values: `"relevance"`, `"lowest_price"`, `"highest_price"`, `"most_recent"`, `"least_recent"`, `"highest_price_reduction"`, `"lower_price_per_m2"`, `"highest_price_per_m2"`, `"biggest"`, `"smallest"`, `"highest_floors"`, `"lowest_floors"`. Example: `order=most_recent`. |
### How to Setup
Make a request to the search endpoint with your desired query:
```bash theme={null}
https://realestate.api.zenrows.com/v1/targets/idealista/discovery?url={url}&apikey=YOUR_ZENROWS_API_KEY
```
### Example
```bash cURL theme={null}
curl "https://realestate.api.zenrows.com/v1/targets/idealista/discovery/?apikey=YOUR_ZENROWS_API_KEY&url=https%3A%2F%2Fwww.idealista.com%2Falquiler-viviendas%2Fbarcelona-provincia%2F"
```
The URL search query must be encoded.
```python Python theme={null}
# pip install requests
import requests
url = 'https://www.idealista.com/alquiler-viviendas/barcelona-provincia/'
apikey = 'YOUR_ZENROWS_API_KEY'
params = {
'apikey': apikey,
'url': url,
}
response = requests.get('https://realestate.api.zenrows.com/v1/targets/idealista/discovery/', params=params)
print(response.text)
```
```javascript NodeJS theme={null}
// npm install axios
const axios = require('axios');
const url = 'https://www.idealista.com/alquiler-viviendas/barcelona-provincia/';
const apikey = 'YOUR_ZENROWS_API_KEY';
axios
.get('https://realestate.api.zenrows.com/v1/targets/idealista/discovery/', {
params: {
apikey,
url,
},
})
.then((response) => console.log(response.data))
.catch((error) => console.log(error));
```
```java Java theme={null}
import org.apache.hc.client5.http.fluent.Request;
import org.apache.hc.core5.net.URIBuilder;
import java.net.URI;
public class ZRRequest {
public static void main(final String... args) throws Exception {
String url = "https://www.idealista.com/alquiler-viviendas/barcelona-provincia/";
String apikey = "YOUR_ZENROWS_API_KEY";
URI uri = new URIBuilder("https://realestate.api.zenrows.com/v1/targets/idealista/discovery/")
.addParameter("apikey", apikey)
.addParameter("url", url)
.build();
String response = Request.get(uri)
.execute().returnContent().asString();
System.out.println(response);
}
}
```
```php PHP theme={null}
$apikey,
'url' => $url,
];
$ch = curl_init();
curl_setopt($ch, CURLOPT_URL, 'https://realestate.api.zenrows.com/v1/targets/idealista/discovery/?' . http_build_query($params));
curl_setopt($ch, CURLOPT_RETURNTRANSFER, true);
curl_setopt($ch, CURLOPT_FOLLOWLOCATION, true);
$response = curl_exec($ch);
echo $response . PHP_EOL;
curl_close($ch);
```
```go Go theme={null}
package main
import (
"fmt"
"io/ioutil"
"net/http"
"net/url"
)
func main() {
apikey := "YOUR_ZENROWS_API_KEY"
url := "https://www.idealista.com/alquiler-viviendas/barcelona-provincia/"
params := url.Values{}
params.Add("apikey", apikey)
params.Add("url", url)
resp, err := http.Get("https://realestate.api.zenrows.com/v1/targets/idealista/discovery/?" + params.Encode())
if err != nil {
log.Fatalln(err)
}
defer resp.Body.Close()
body, err := ioutil.ReadAll(resp.Body)
if err != nil {
log.Fatalln(err)
}
fmt.Println(string(body))
}
```
```ruby Ruby theme={null}
# gem install faraday
require 'faraday'
apikey = 'YOUR_ZENROWS_API_KEY'
url = 'https://www.idealista.com/alquiler-viviendas/barcelona-provincia/'
conn = Faraday.new(url: 'https://realestate.api.zenrows.com/v1/targets/idealista/discovery/') do |f|
f.params = {
apikey: apikey,
url: url,
}
end
response = conn.get
puts response.body
```
```json Response Example theme={null}
{
"pagination": {
"current_page": 1,
"items_count": 6315,
"items_per_page": 20,
"page_count": 316
},
"property_list": [
{
"bedrooms_count": 4,
"operation": "rent",
"price_currency_symbol": "€",
"property_description": "FINCAMPS alquila amplio piso señorial en Plaza Granados de Sabadell. Al entrar, un distribuidor nos lleva a un soleado salón-comedor de 40m2 con salida a balcón. Cocina independiente totalmente equipada con electrodomésticos y galería, una habitación con armarios empotrados junto a la cocina. En zona noche encontramos una habitación individual, otra doble y la principal en suite (con bañera) y salida a un gran balcón, todas ellas exteriores. Baño 3 piezas con plato de ducha. Plaza de parking y trastero incluido en el precio.",
"property_dimensions": 195,
"property_id": 107313260,
"property_image": "https://img4.idealista.com/blur/WEB_LISTING/0/id.pro.es.image.master/07/5a/c6/1309244931.webp",
"property_price": 2300,
"property_title": "Piso en plaza de Granados",
"property_type": "flat",
"property_url": "https://www.idealista.com/inmueble/107313260/"
},
{
"bedrooms_count": 2,
"operation": "rent",
"price_currency_symbol": "€",
"property_description": "¡ALQUILA AHORA Y LLÉVATE EL PRIMER MES GRATIS! Piso de 2 dormitorios con terraza de 13 metros! Viviendas muy luminosas de 1, 2 y 3 habitaciones, plantas bajas y áticos. Excelente ubicación, en el centro de Badalona, y con inmejorables conexiones en transporte público (frente a la parada de Metro Pompeu Fabra) o privado. Amplios espacios comunes que incluyen gimnasio, CoWorking, CoLiving, Relax Area y muchos servicios más. Además, el residencial dispone de un gran patio interior al aire libre donde relajarse desconectando del ruido del exterior. Los pisos de alquiler están ubicados en la calle de Coll i Pujol, 1, al lado de la Plaza Alcalde Xifré, a solo 10 minutos caminando de la playa. Su localización, en el centro de Badalona, invita a disfrutar del ocio en la ciudad: compras en la calle del Mar, caminatas por el paseo marítimo, tardes en los parques y jardines, jornadas en los clubs náuticos. BCN HOUSING está contigo y te ayudamos a que la búsqueda de tu futura vivienda de alquiler sea cómoda, fácil y rápida. Nos gustaría mucho mostrarte nuestro residencial: los espacios comunitarios y las viviendas. Puedes pedir tu visita. ¡Pídenos cita personalizada! Ventajas de formar parte de la comunidad BCN HOUSING - Vivienda luminosa que consta de 3 dormitorios y 2 baños. - Electrodomésticos: horno, microondas, placa de inducción, campana, nevera, lavadora-secadora y lavaplatos - Calificación energética A - Gimnasio completamente equipado - CoWorking \u0026 espacio para reuniones - Wellness - Micro Market 24h - Smart Point - Parking - Seguridad: sistema de videovigilancia - Servicio de conserjería - Todos los suministros dados de alta. Se hace cambio de titularidad. - Plaza de garaje opcional por 100€/mes. REQUISITOS 1 mes de fianza Seguro de impago Seguro de hogar Se solicitarán 3 últimas nóminas o similar para acreditar ratio de solvencia. En conformidad a la nueva normativa de vivienda, se informa: •Vivienda perteneciente a gran tenedor. •Precio contrato anterior: 1.655 € •Precio Índice de referencia: no aplica por no existir para el edificio (adjunto en fotografías).",
"property_dimensions": 55,
"property_id": 101784660,
"property_image": "https://img4.idealista.com/blur/WEB_LISTING/0/id.pro.es.image.master/53/19/f9/1133684811.webp",
"property_price": 1620,
"property_title": "Piso en calle Coll i Pujol, 17",
"property_type": "flat",
"property_url": "https://www.idealista.com/inmueble/101784660/"
},
{
"bedrooms_count": 3,
"operation": "rent",
"price_currency_symbol": "€",
"property_description": "ALQUILER TEMPORAL NO SE ATENDERAN LLAMADAS PARA ORGANIZAR VISITAS, ENVIAR SOLICITUD. Volkvillage comercializa piso en alquiler temporal, ideal para Estudiantes Universitarios, Master, MIR o trabajadores destinados temporalmente a la zona de Terrassa o alrededores. Os presentamos bonito piso de 87m2, listo para entrar a vivir, amueblado y equipado para que te sientas como en casa. Esta distribuido en: 3 habitaciones 14/12/9m2, todas exteriores, cocina tipo office de 7m2 con salida a lavadero de 5m2, baño con plato de ducha de 6m2 y gran comedor de 25m2 con salida a balcón de 8m2 orientado a Este. La cocina se entrega equipada Cocina con fogonera, horno, campana, microondas, nevera combi y lavadora. Suelos de terrazo, carpintería exterior de aluminio con vidrios dobles y sistema de rotura térmica, interior en embero, el piso dispone de calefacción y todos los suministros dados de alta. Es un 9º piso y la finca tiene de ascensor. El piso se entrega amueblado y cocina equipada. Está situado en el barrio de Can Jofresa, a 5 minutos del Parc Vallés i Vallparadís. Hay que destacar el fácil acceso/salida a la ciudad y la buena comunicación con transporte público. Envíanos una solicitud y uno de nuestros agentes te llamará para informarte de todo.",
"property_dimensions": 90,
"property_id": 107313258,
"property_image": "https://img4.idealista.com/blur/WEB_LISTING/0/id.pro.es.image.master/a7/32/1e/1309244783.webp",
"property_price": 795,
"property_title": "Piso en calle de Montblanc",
"property_type": "flat",
"property_url": "https://www.idealista.com/inmueble/107313258/"
}
]
}
```
# Using the Idealista Property Data API
Source: https://docs.zenrows.com/scraper-apis/get-started/idealista-property
The Idealista Property Data API provides tailored endpoints to extract comprehensive property details directly from Idealista. With this powerful tool, you can seamlessly integrate real estate data into your applications, enabling in-depth market analysis, reporting, or decision-making.
Easily extract detailed property information from Idealista. This endpoint provides everything you need to analyze or present Idealista property data effectively, such as:
* **Detailed Property Information:** Extract property specifics, including address, bedrooms, bathrooms, pricing, and more.
* **Agent and Agency Details:** Gather information about agencies or agents associated with listed properties, including agency name, logo, and contact information.
* **Geolocation Data:** Retrieve latitude and longitude for properties to integrate with mapping tools.
* **Images and Features:** Access property images and a list of unique features to enhance your data presentations.
* **Dynamic Status Updates:** Ensure up-to-date information with the latest property status, modification dates, pricing, and deactivate dates when applicable.
## Supported Query Parameters
| PARAMETER | TYPE | DEFAULT | DESCRIPTION |
| ------------------------- | -------- | ---------------------------------- | ------------------------------------------------------------------------------------------------------------------------------------------------------------------------------------------------------------------------------------------------------------------------------------------------------------------------------------------- |
| **propertyId** `required` | `string` | | The Unique ID of the Idealista property. Example: `1234567890`. |
| **url** | `string` | | The URL from which the desired property data will be retrieved. Example: `https://www.idealista.com/inmueble/1234567890`. |
| **tld** | `string` | `.com` | The top-level domain of the Walmart website. Supported examples: `.com`, `.it` `.pt` |
| **lang** | `string` | **Language of the target country** | The language to display results. Supported values: `"en"`, `"es"`, `"ca"`, `"it"`, `"pt"`, `"fr"`, `"de"`, `"da"`, `"fi"`, `"nb"`, `"nl"`, `"pl"`, `"ro"`, `"ru"`, `"sv"`, `"el"`, `"zh"`, `"uk"`. The default is the language of the target country (e.g., `"es"` for `.com`, `"it"` for `.it`, and `"pt"` for `.pt`). Example: `lang=en`. |
### How to Setup
Fetch details for a property using its PropertyID.
```bash theme={null}
https://realestate.api.zenrows.com/v1/targets/idealista/properties/{propertyId}?apikey=YOUR_ZENROWS_API_KEY
```
### Example
```bash cURL theme={null}
curl "https://realestate.api.zenrows.com/v1/targets/idealista/properties/{propertyId}?apikey=YOUR_ZENROWS_API_KEY"
```
Replace `{propertyId}` with the actual property ID code.
```python Python theme={null}
# pip install requests
import requests
property_id = "1234567890" # Example property ID
api_endpoint = f"https://realestate.api.zenrows.com/v1/targets/idealista/properties/{property_id}"
params = {
"apikey": "YOUR_ZENROWS_API_KEY",
}
response = requests.get(api_endpoint, params=params)
print(response.text)
```
```javascript NodeJS theme={null}
// npm install axios
const axios = require('axios');
const propertyId = "1234567890"; // Example property ID
const api_endpoint = `https://realestate.api.zenrows.com/v1/targets/idealista/properties/${propertyId}`;
const apikey = 'YOUR_ZENROWS_API_KEY';
axios
.get(api_endpoint, {
params: { apikey },
})
.then((response) => console.log(response.data))
.catch((error) => console.log(error));
```
```java Java theme={null}
import org.apache.hc.client5.http.fluent.Request;
import org.apache.hc.core5.net.URIBuilder;
import java.net.URI;
public class ZRRequest {
public static void main(final String... args) throws Exception {
String propertyId = "1234567890"; // Example property ID
String api_endpoint = "https://realestate.api.zenrows.com/v1/targets/idealista/properties/" + propertyId;
String apikey = "YOUR_ZENROWS_API_KEY";
URI uri = new URIBuilder(api_endpoint)
.addParameter("apikey", apikey)
.build();
String response = Request.get(uri)
.execute().returnContent().asString();
System.out.println(response);
}
}
```
```php PHP theme={null}
$apikey
];
$ch = curl_init();
curl_setopt($ch, CURLOPT_URL, $api_endpoint . '?' . http_build_query($params));
curl_setopt($ch, CURLOPT_RETURNTRANSFER, true);
curl_setopt($ch, CURLOPT_FOLLOWLOCATION, true);
$response = curl_exec($ch);
echo $response . PHP_EOL;
curl_close($ch);
```
```go Go theme={null}
package main
import (
"fmt"
"io/ioutil"
"log"
"net/http"
"net/url"
)
func main() {
propertyId := "1234567890" // Example property ID
api_endpoint := "https://realestate.api.zenrows.com/v1/targets/idealista/properties/" + propertyId
apikey := "YOUR_ZENROWS_API_KEY"
params := url.Values{}
params.Add("apikey", apikey)
resp, err := http.Get(api_endpoint + "?" + params.Encode())
if err != nil {
log.Fatalln(err)
}
defer resp.Body.Close()
body, err := ioutil.ReadAll(resp.Body)
if err != nil {
log.Fatalln(err)
}
fmt.Println(string(body))
}
```
```ruby Ruby theme={null}
# gem install faraday
require 'faraday'
property_id = "1234567890" # Example property ID
api_endpoint = "https://realestate.api.zenrows.com/v1/targets/idealista/properties/#{property_id}"
apikey = 'YOUR_ZENROWS_API_KEY'
conn = Faraday.new(url: api_endpoint) do |f|
f.params = {
apikey: apikey
}
end
response = conn.get
puts response.body
```
```json Response Example theme={null}
{
"property_id": 1234567890,
"address": "Calle de Alcalá, Madrid",
"latitude": 40.423,
"longitude": -3.683,
"location_name": "Madrid",
"location_hierarchy": ["Madrid", "Centro", "Sol"],
"country": "es",
"agency_name": "Best Properties Madrid",
"agency_phone": "+34 912 345 678",
"agency_logo": "https://example.com/logo.png",
"bathroom_count": 2,
"lot_size": 120,
"operation": "sale",
"price_currency_symbol": "€",
"property_condition": "good",
"property_description": "Bright and spacious apartment located in the heart of Madrid, fully renovated with modern finishes.",
"property_equipment": [
"Air Conditioning",
"Heating",
"Elevator",
"Furnished Kitchen"
],
"property_features": [
"Terrace",
"Exterior",
"Balcony",
"Built-in wardrobes"
],
"property_images": [
"https://example.com/image1.jpg",
"https://example.com/image2.jpg",
"https://example.com/image3.jpg"
],
"property_image_tags": [
"facade",
"living room",
"kitchen"
],
"energy_certificate": "D",
"modified_at": 1714078923,
"last_deactivated_at": null
}
```
## Response Structure
Depending on the property status (active or inactive), the returned fields may vary:
1. **For Active Listings:** Full property details are returned, including address, price, features, images, geolocation, agency details, and more.
2. **For Inactive Listings:** Only a subset of fields will be present:
| FIELD | DESCRIPTION |
| --------------------- | ------------------------------------------------------- |
| `property_id` | Unique identifier of the property. |
| `last_deactivated_at` | Timestamp indicating when the listing was deactivated. |
| `operation` | Operation type (e.g., sale, rent). |
| `agency_name` | Name of the agency if the listing was published by one. |
| `agency_logo` | Logo URL of the agency if available. |
## Troubleshooting and FAQs
You can retrieve the `propertyId` from the URL of the property listing on Idealista. For example, the URL `https://www.idealista.com/inmueble/1234567890` contains the propertyId as `1234567890`.
If a property is inactive, the `last_deactivated_at` field will be populated with a Unix timestamp. Some fields like images or descriptions might also be missing when a property is no longer active.
Both `modified_at` and `last_deactivated_at` use Unix timestamps, representing the number of seconds since January 1, 1970 (UTC).
`property_features` lists characteristics of the property such as "Terrace" or "Balcony", while `property_equipment` lists available equipment and amenities like "Air Conditioning" or "Elevator".
`property_images` provides direct URLs to the property's photos. `property_image_tags` gives context to each image, indicating what the photo shows (e.g., "facade", "kitchen").
Yes, if the property does not have an energy certificate available, the `energy_certificate` field may be null or missing.
The `operation` field indicates if the property is listed for "sale" or "rent".
The `address`, `latitude`, `longitude`, `location_name`, `location_hierarchy`, and `country` fields together provide complete information about the property's location.
If a property was updated recently, you will get the latest data, and the `modified_at` timestamp will reflect the most recent modification time.
The `agency_logo` field contains a direct URL to the logo image of the real estate agency managing the property.
# Using the Walmart Discovery API
Source: https://docs.zenrows.com/scraper-apis/get-started/walmart-discovery
The Walmart Discovery API allows you to retrieve structured data from Walmart based on specific search queries. With this endpoint, you can access product details such as:
* Product Name, Price, and Discounts
* Ratings, Reviews, and Popularity Metrics
* Product Links and Images
* Related Searches and Sponsored Products
* This API is useful for a variety of applications, including market analysis, competitive research, and monitoring sponsored products' visibility.
Example Use Cases:
* **Market Analysis:** Identify popular products and analyze trends in specific categories.
* **Ad Performance:** Monitor and evaluate sponsored product visibility for your campaigns or competitors.
## Supported Query Parameters
| PARAMETER | TYPE | DEFAULT | DESCRIPTION |
| -------------------- | -------------- | ------- | ---------------------------------------------------------------------------------------------------------------- |
| **query** `required` | `string` | | The search term you want to query on Walmart. Must be URL-encoded. Example: `Wireless+Headphones`. |
| **url** | `string ` | | The URL of the search results page to retrieve. Example: `https://www.walmart.com/search?q=Wireless+Headphones`. |
| **tld** | `string` | `.com` | The top-level domain of the Walmart website. Supported examples: `.com`, `.ca` |
## How to Setup
Request the search endpoint with your desired query:
```bash theme={null}
https://ecommerce.api.zenrows.com/v1/targets/walmart/discovery/{query}?apikey=YOUR_ZENROWS_API_KEY
```
### Example
```bash cURL theme={null}
curl "https://ecommerce.api.zenrows.com/v1/targets/walmart/discovery/{query}?apikey=YOUR_ZENROWS_API_KEY"
```
Note: should be URL-encoded.
```python Python theme={null}
# pip install requests
import requests
import urllib.parse
query = "laptop stand" # Example query
encoded_query = urllib.parse.quote(query)
api_endpoint = f"https://ecommerce.api.zenrows.com/v1/targets/walmart/discovery/{encoded_query}"
params = {
"apikey": "YOUR_ZENROWS_API_KEY",
}
response = requests.get(api_endpoint, params=params)
print(response.text)
```
```javascript NodeJS theme={null}
// npm install axios
const axios = require('axios');
const query = "laptop stand"; // Example query
const encodedQuery = encodeURIComponent(query);
const apikey = 'YOUR_ZENROWS_API_KEY';
const api_endpoint = `https://ecommerce.api.zenrows.com/v1/targets/walmart/discovery/${encodedQuery}`;
axios
.get(api_endpoint, {
params: { apikey },
})
.then((response) => console.log(response.data))
.catch((error) => console.log(error));
```
```java Java theme={null}
import org.apache.hc.client5.http.fluent.Request;
import org.apache.hc.core5.net.URIBuilder;
import java.net.URI;
import java.net.URLEncoder;
import java.nio.charset.StandardCharsets;
public class ZRRequest {
public static void main(final String... args) throws Exception {
String query = "laptop stand"; // Example query
String encodedQuery = URLEncoder.encode(query, StandardCharsets.UTF_8.toString());
String api_endpoint = "https://ecommerce.api.zenrows.com/v1/targets/walmart/discovery/" + encodedQuery;
String apikey = "YOUR_ZENROWS_API_KEY";
URI uri = new URIBuilder(api_endpoint)
.addParameter("apikey", apikey)
.build();
String response = Request.get(uri)
.execute().returnContent().asString();
System.out.println(response);
}
}
```
```php PHP theme={null}
$apikey,
];
$ch = curl_init();
curl_setopt($ch, CURLOPT_URL, $api_endpoint . '?' . http_build_query($params));
curl_setopt($ch, CURLOPT_RETURNTRANSFER, true);
curl_setopt($ch, CURLOPT_FOLLOWLOCATION, true);
$response = curl_exec($ch);
echo $response . PHP_EOL;
curl_close($ch);
```
```go Go theme={null}
package main
import (
"fmt"
"io/ioutil"
"log"
"net/http"
"net/url"
)
func main() {
query := "laptop stand" // Example query
encodedQuery := url.PathEscape(query)
api_endpoint := "https://ecommerce.api.zenrows.com/v1/targets/walmart/discovery/" + encodedQuery
apikey := "YOUR_ZENROWS_API_KEY"
params := url.Values{}
params.Add("apikey", apikey)
resp, err := http.Get(api_endpoint + "?" + params.Encode())
if err != nil {
log.Fatalln(err)
}
defer resp.Body.Close()
body, err := ioutil.ReadAll(resp.Body)
if err != nil {
log.Fatalln(err)
}
fmt.Println(string(body))
}
```
```ruby Ruby theme={null}
# gem install faraday
require 'faraday'
require 'cgi'
query = "laptop stand" # Example query
encoded_query = CGI.escape(query)
api_endpoint = "https://ecommerce.api.zenrows.com/v1/targets/walmart/discovery/#{encoded_query}"
apikey = 'YOUR_ZENROWS_API_KEY'
conn = Faraday.new(url: api_endpoint) do |f|
f.params = {
apikey: apikey
}
end
response = conn.get
puts response.body
```
```json Response Example theme={null}
{
"pagination": {},
"products_list": [
{
"discounted_product": false,
"is_sponsored_product": true,
"price_currency_code": "USD",
"price_currency_symbol": "$",
"product_image": "https://i5.walmartimages.com/seo/2-Pack-Monitor-Stand-Riser-with-3-Height-Adjustable-and-Mesh-Platform-for-Laptop-Computer-Printer_44a610f2-8aff-4e34-ba45-6a3ee7953961.9c19d429044fc663fd286a501f919a17.jpeg?odnHeight=580&odnWidth=580&odnBg=FFFFFF",
"product_name": "2-Pack Monitor Stand Riser with 3 Height Adjustable and Mesh Platform for Laptop, Computer, Printer",
"product_price": 19.99,
"product_url": "https://www.walmart.com/sp/track?bt=1&eventST=click&plmt=sp-search-middle~desktop~&pos=1&tax=4044_103150_97116_1071224_4693685&rdf=1&rd=https%3A%2F%2Fwww.walmart.com%2Fip%2F2-Pack-Monitor-Stand-Riser-with-3-Height-Adjustable-and-Mesh-Platform-for-Laptop-Computer-Printer%2F589900557%3FclassType%3DREGULAR%26athbdg%3DL1600%26adsRedirect%3Dtrue&adUid=88d8d4d8-3706-4b09-9a79-011c0b047aa8&mloc=sp-search-middle&pltfm=desktop&pgId=laptop%20stand&pt=search&spQs=zlCCCQ6bXwgcJMBnpc7HUG07FCKn9TJHleXCILUoDQCBZLTUk2xnvYBhZxhhe3Nud8mHCByXsCbL3IpDbDcynOk0FtVgUYIMZmTduaYkDe7RmDgIMKKqtw5tHhKJTfAhxnNKiTuyFe7sVA6E31gWz6kroUpV5V2tXLVLhCQYvXGSN1BsLzThgFnzOfI-YAXBfonZ6ccMlO0nfiQHy97_ArlpdrhKDH4XeG7QyguUUulAJ3e4nX4M42VwYCHHQpQmEmKAcGZzZr3cZxe_bpF6701W4npF0CgQVQWN2JG24uDbUx0coKyLMbnA83CIKiQW&storeId=3081&couponState=na&bkt=ace1_default%7Cace2_default%7Cace3_default%7Cbb_11236%7Ccoldstart_on%7Csearch_merged_ranker_xe_v2%7Csearch_wic.online&classType=REGULAR&athbdg=L1600",
"rating_score": 4.7,
"review_count": 265
},
{
"discounted_product": false,
"is_sponsored_product": true,
"price_currency_code": "USD",
"price_currency_symbol": "$",
"product_image": "https://i5.walmartimages.com/seo/Laptop-Stand-for-Desk-KEXIN-Aluminum-Adjustable-Stand-of-Laptop-for-Mac-HP-Dell-Samsung-10-17-inches-Foldable-Computer-Holder_275e43d2-0540-4ffc-97ab-5c74259f48e7.ce2af724da4de7736fa3d5d31a6992ac.jpeg?odnHeight=580&odnWidth=580&odnBg=FFFFFF",
"product_name": "Laptop Stand for Desk, KEXIN Aluminum Adjustable Stand of Laptop for Mac / HP / Dell / Samsung, 10-16 inches Foldable Computer Holder",
"product_price": 20.99,
"product_url": "https://www.walmart.com/sp/track?bt=1&eventST=click&plmt=sp-search-middle~desktop~&pos=2&tax=4044_103150_97116_1071224_4693685&rdf=1&rd=https%3A%2F%2Fwww.walmart.com%2Fip%2FLaptop-Stand-for-Desk-KEXIN-Aluminum-Adjustable-Stand-of-Laptop-for-Mac-HP-Dell-Samsung-10-17-inches-Foldable-Computer-Holder%2F1210717083%3FclassType%3DVARIANT%26adsRedirect%3Dtrue&adUid=88d8d4d8-3706-4b09-9a79-011c0b047aa8&mloc=sp-search-middle&pltfm=desktop&pgId=laptop%20stand&pt=search&spQs=sRfbwGhVSWu-lVqRZfuvTDyP40eiYItpvPPoxGUbxPzY8Gh9W3P4glNcY_XVPoR8SDg5xtvQBrdm6k4TwS0Or91rJMFuGFPh9nhpAfkaMlZKUld2KT_0RpWPLcOCR7Pb8q46BCLU3V6bRUn53E70tQagpx4WrYx20RKz_N_Oz2zsEoVe6qvOzilTvn6CW56Ki2PwnwAV0VyHD3AlOIF-FzdlExP4MQThgq7cAs-u7-3bvxMmAAh3bi-1De1rHI-A&storeId=3081&couponState=na&bkt=ace1_default%7Cace2_default%7Cace3_default%7Cbb_11236%7Ccoldstart_on%7Csearch_merged_ranker_xe_v2%7Csearch_wic.online&classType=VARIANT",
"rating_score": 4.8,
"review_count": 132
},
{
"discounted_product": false,
"is_sponsored_product": true,
"price_currency_code": "USD",
"price_currency_symbol": "$",
"product_image": "https://i5.walmartimages.com/seo/Laptop-Stand-Desk-Adjustable-Computer-360-Rotating-Base-Ergonomic-Riser-Collaborative-Work-Foldable-Portable-Stand-fits-All-10-17-Laptops_75b2e2a4-0eca-40a6-bcf5-4c1ea3f8efd2.af9c821dd57967a71aec546edaba6036.jpeg?odnHeight=580&odnWidth=580&odnBg=FFFFFF",
"product_name": "Laptop Stand for Desk, Adjustable Computer Stand with 360° Rotating Base, Ergonomic Laptop Riser for Collaborative Work, Foldable & Portable Laptop Stand, fits for All 10-16\" Laptops - Grey",
"product_price": 32.38,
"product_url": "https://www.walmart.com/sp/track?bt=1&eventST=click&plmt=sp-search-middle~desktop~&pos=3&tax=4044_103150_97116_1071224_4693685&rdf=1&rd=https%3A%2F%2Fwww.walmart.com%2Fip%2FLaptop-Stand-Desk-Adjustable-Computer-360-Rotating-Base-Ergonomic-Riser-Collaborative-Work-Foldable-Portable-Stand-fits-All-10-17-Laptops%2F8413806345%3FclassType%3DVARIANT%26adsRedirect%3Dtrue&adUid=88d8d4d8-3706-4b09-9a79-011c0b047aa8&mloc=sp-search-middle&pltfm=desktop&pgId=laptop%20stand&pt=search&spQs=j3zERNIdY5W9QDLWjFbVgOrPVNGpjzo5DMzndPXOadKGDiP4axcgYVHGlIRtWYd2hRSK-FEH_d2d7CFNNCQ1Td1rJMFuGFPh9nhpAfkaMlZAkOESxsQpz7ivMGpVeiRFY-iV2G9dQOfPT0pAcNW6rUQUbfGI0m0u8gg-l61PwuURUwYjyjPZLPzyMINgZ_0MzaYMyT9EyjIpGo_ZSgWaWqu2NWlqzG2aw76uWU_AA3N1sJm1v8XEPPYy3EDO2i6SZrc23D39rZh-S4rOeCa1KM-IZSoHdqWM6rzimgpxxytj9R0Q1S7yNFSTBHo7arNw&storeId=3081&couponState=na&bkt=ace1_default%7Cace2_default%7Cace3_default%7Cbb_11236%7Ccoldstart_on%7Csearch_merged_ranker_xe_v2%7Csearch_wic.online&classType=VARIANT",
"rating_score": 4.4,
"review_count": 5
},
{
"discounted_product": false,
"is_sponsored_product": true,
"price_currency_code": "USD",
"price_currency_symbol": "$",
"product_image": "https://i5.walmartimages.com/seo/Laptop-Stand-for-Desk-Adjustable-Ergonomic-Desk-Riser-MacBook-Stand-for-All-10-17-inch-Laptops-Portable-Cool-Mesh-Riser-Stand-For-Laptops_0a6f8b6e-9e1d-4388-b400-e4209be4db4e.40fc2ad5d1009024957e82c674fdfdb6.jpeg?odnHeight=580&odnWidth=580&odnBg=FFFFFF",
"product_name": "Laptop Stand for Desk, Adjustable Ergonomic Desk Riser, MacBook Stand for All 10-17 inch Laptops, Portable Cool Mesh Riser Stand For Laptops - Silver",
"product_price": 27.67,
"product_url": "https://www.walmart.com/sp/track?bt=1&eventST=click&plmt=sp-search-middle~desktop~&pos=4&tax=4044_103150_97116_1071224_4693685&rdf=1&rd=https%3A%2F%2Fwww.walmart.com%2Fip%2FLaptop-Stand-for-Desk-Adjustable-Ergonomic-Desk-Riser-MacBook-Stand-for-All-10-17-inch-Laptops-Portable-Cool-Mesh-Riser-Stand-For-Laptops%2F735781176%3FclassType%3DREGULAR%26adsRedirect%3Dtrue&adUid=88d8d4d8-3706-4b09-9a79-011c0b047aa8&mloc=sp-search-middle&pltfm=desktop&pgId=laptop%20stand&pt=search&spQs=mbfb9QpFqltQs9UEuAw9yZo4xw9Ac6OLhxGZCvZzleFahzgNOck8esPQxbh4dpcggg80-Kn_Ubnn6Kcc9MY8P9X5i9Fj_8DJfmqsCqhyqsGEQnDAcBjrZIg6nIotmJ7gE8zZt2lwdmQXTfF50dd1ldBqDke0Me_6z9fy55YbA-wFegDtAT2UgNm6mV8aAC7FyH-GGv0Ln0oH3HYicT-9iJd7ewytdTgLt5HzvC9_g2u1vPtahqLPuBhPYXY9pD0CmNJfLBXLmV2JbMXRo_6fZXE4cb19g&storeId=3081&couponState=na&bkt=ace1_default%7Cace2_default%7Cace3_default%7Cbb_11236%7Ccoldstart_on%7Csearch_merged_ranker_xe_v2%7Csearch_wic.online&classType=REGULAR",
"rating_score": 4.4,
"review_count": 16
}
]
}
```
## Troubleshooting and FAQs
The `query` parameter is the search term you want to look up on Walmart's website. It could be a product name, category, or keyword. Make sure to URL-encode the query string (e.g., `Wireless Headphones` becomes `Wireless+Headphones`).
# Using the Walmart Product Information API
Source: https://docs.zenrows.com/scraper-apis/get-started/walmart-product
The Walmart Product Information API allows you to seamlessly extract detailed product data, search results, and customer reviews directly from Walmart. With this API, you can integrate Walmart insights into your applications and streamline workflows such as price monitoring, inventory management, and product analysis.
* Product Information: Name, Brand, Description, and SKU.
* Pricing Details: Regular and Discounted Prices, Currency Information.
* Images: High-quality product images.
* Availability: Stock status and fulfillment details.
* Categories: Breadcrumb hierarchy for navigation.
* Customization Options: Variations like color and size, along with associated prices.
* Warranty Information: Details about included warranties
Example Use Cases:
* **Price Comparison:** Monitor pricing changes and compare products.
* **Inventory Management:** Integrate real-time stock data into inventory systems.
## Supported Query Parameters
| PARAMETER | TYPE | DEFAULT | DESCRIPTION |
| ------------------ | -------- | ------- | ---------------------------------------------------------------------------------------------------- |
| **sku** `required` | `string` | | The Walmart item ID (numeric, 8 to 20 characters). Example: `5074872077`. |
| **url** | `string` | | The full Walmart product URL. Example: `https://www.walmart.com/ip/5074872077`. |
| **tld** | `string` | `.com` | Top-level domain (TLD) for the Walmart website. Default is `.com`. Supported examples: `.com`, `.ca` |
## How to Setup
Request the product endpoint using the SKU of the desired product:
```bash theme={null}
https://ecommerce.api.zenrows.com/v1/targets/walmart/products/{sku}?apikey=YOUR_ZENROWS_API_KEY
```
### Example
```bash cURL theme={null}
curl "https://ecommerce.api.zenrows.com/v1/targets/walmart/products/{sku}?apikey=YOUR_ZENROWS_API_KEY"
```
Replace `{sku}` with the actual product ID.
```python Python theme={null}
# pip install requests
import requests
sku = "123456789" # Example SKU
api_endpoint = f"https://ecommerce.api.zenrows.com/v1/targets/walmart/products/{sku}"
params = {
"apikey": "YOUR_ZENROWS_API_KEY",
}
response = requests.get(api_endpoint, params=params)
print(response.text)
```
```javascript NodeJS theme={null}
// npm install axios
const axios = require('axios');
const apikey = 'YOUR_ZENROWS_API_KEY';
const sku = '123456789'; // Example SKU
const api_endpoint = `https://ecommerce.api.zenrows.com/v1/targets/walmart/products/${sku}`;
axios
.get(api_endpoint, {
params: {
apikey,
},
})
.then((response) => console.log(response.data))
.catch((error) => console.log(error));
```
```java Java theme={null}
import org.apache.hc.client5.http.fluent.Request;
import org.apache.hc.core5.net.URIBuilder;
import java.net.URI;
public class ZRRequest {
public static void main(final String... args) throws Exception {
String apikey = "YOUR_ZENROWS_API_KEY";
String sku = "123456789"; // Example SKU
String api_endpoint = "https://ecommerce.api.zenrows.com/v1/targets/walmart/products/" + sku;
URI uri = new URIBuilder(api_endpoint)
.addParameter("apikey", apikey)
.build();
String response = Request.get(uri)
.execute().returnContent().asString();
System.out.println(response);
}
}
```
```php PHP theme={null}
$apikey,
];
$ch = curl_init();
curl_setopt($ch, CURLOPT_URL, $api_endpoint . '?' . http_build_query($params));
curl_setopt($ch, CURLOPT_RETURNTRANSFER, true);
curl_setopt($ch, CURLOPT_FOLLOWLOCATION, true);
$response = curl_exec($ch);
echo $response . PHP_EOL;
curl_close($ch);
```
```go Go theme={null}
package main
import (
"fmt"
"io/ioutil"
"log"
"net/http"
"net/url"
)
func main() {
apikey := "YOUR_ZENROWS_API_KEY"
sku := "123456789" // Example SKU
api_endpoint := "https://ecommerce.api.zenrows.com/v1/targets/walmart/products/" + sku
params := url.Values{}
params.Add("apikey", apikey)
resp, err := http.Get(api_endpoint + "?" + params.Encode())
if err != nil {
log.Fatalln(err)
}
defer resp.Body.Close()
body, err := ioutil.ReadAll(resp.Body)
if err != nil {
log.Fatalln(err)
}
fmt.Println(string(body))
}
```
```ruby Ruby theme={null}
# gem install faraday
require 'faraday'
apikey = 'YOUR_ZENROWS_API_KEY'
sku = '123456789' # Example SKU
api_endpoint = "https://ecommerce.api.zenrows.com/v1/targets/walmart/products/#{sku}"
conn = Faraday.new(url: api_endpoint) do |f|
f.params = {
apikey: apikey,
}
end
response = conn.get
puts response.body
```
```json Response Example theme={null}
{
"availability_status": "In Stock",
"brand": "Apple",
"category_breadcrumb": [
"Electronics",
"Cell Phones",
"Smartphones"
],
"customization_options": [
{
"image": "https:\/\/i5.walmartimages.com\/asr\/98765432-10ab-cdef-5678-90abcdef1234.jpg",
"is_selected": true,
"option_name": "Color",
"price": 799.99,
"value": "Black"
}
],
"description": "The latest iPhone with A15 Bionic chip, 5G capability, and advanced dual-camera system.",
"fast_track_message": "Get it by tomorrow with fast shipping!",
"fulfilled_by_walmart": true,
"gtin": "00123456789012",
"images": [
"https:\/\/i5.walmartimages.com\/asr\/12345678-90ab-cdef-1234-567890abcdef.9d9d9d9d9d9d.jpg"
],
"price": 799.99,
"price_before_discount": 799.99,
"price_currency_code": "USD",
"price_currency_symbol": "$",
"product_name": "Apple iPhone 13",
"product_url": "https:\/\/www.walmart.com\/ip\/Apple-iPhone-13\/123456789",
"rating": 4.8,
"review_count": 3500,
"sku": "123456789",
"warranty": "1-year limited warranty"
}
```
## Troubleshooting and FAQs
The country parameter allows you to target specific countries (e.g., `us`, `ca`, `es`). The default is us for the United States. You can modify this in your API request by setting the country parameter (e.g., `country=es` for Spain).
Yes, the Walmart Product Scraper API can be used for both personal and commercial projects. Be sure to adhere to Walmart's terms of service and any applicable legal requirements when using the data.
# Using the Walmart Product Reviews API
Source: https://docs.zenrows.com/scraper-apis/get-started/walmart-review
The Walmart Product Reviews API allows you to retrieve detailed product reviews from Walmart, providing valuable insights into customer feedback. You can obtain key information such as ratings, review content, helpful votes, and product details. The tool is ideal for sentiment analysis, product feedback, and market research, helping businesses make informed decisions based on customer opinions.
* Ratings: Aggregate rating scores and distribution by stars.
* Review Details: Content, Titles, Dates, and Verified Purchase Status.
* Navigation: Links for paginated review data.
* Helpful Votes: Count of votes indicating helpfulness.
* Product Information: Name, URL, and SKU of the product.
Example Use Cases:
* **Sentiment Analysis:** Analyze customer feedback for better decision-making.
* **Product Feedback:** Identify common customer concerns and praises.
## Supported Query Parameters
| PARAMETER | TYPE | DEFAULT | DESCRIPTION |
| ------------------ | -------- | ------- | --------------------------------------------------------------------------------------------------------------------------- |
| **sku** `required` | `string` | | The Walmart item ID (numeric, 8 to 20 characters). Example: `5074872077`. |
| **url** | `string` | | The URL of the Walmart product page from which reviews are to be fetched. Example: `https://www.walmart.com/ip/5074872077`. |
| **tld** | `string` | `.com` | Top-level domain (TLD) for the Walmart website. Default is `.com`. Supported examples: `.com`, `.ca`. |
| **sort** | `string` | | The sorting method for reviews. Options: `submission-desc`, `relevancy`, `helpful`, `rating-desc`, `rating-asc`. |
## How to Setup
Request the reviews endpoint for the product:
```bash theme={null}
https://ecommerce.api.zenrows.com/v1/targets/walmart/reviews/{sku}?apikey=YOUR_ZENROWS_API_KEY
```
### Example
```bash cURL theme={null}
curl "https://ecommerce.api.zenrows.com/v1/targets/walmart/reviews/{sku}?apikey=YOUR_ZENROWS_API_KEY"
```
Replace `{sku}` with the actual product ID.
```python Python theme={null}
# pip install requests
import requests
sku = "123456789" # Example SKU
api_endpoint = f"https://ecommerce.api.zenrows.com/v1/targets/walmart/reviews/{sku}"
params = {
"apikey": "YOUR_ZENROWS_API_KEY",
}
response = requests.get(api_endpoint, params=params)
print(response.text)
```
```javascript NodeJS theme={null}
// npm install axios
const axios = require('axios');
const apikey = 'YOUR_ZENROWS_API_KEY';
const sku = encodeURIComponent('123456789'); // Example SKU
const api_endpoint = `https://ecommerce.api.zenrows.com/v1/targets/walmart/reviews/${sku}`;
axios
.get(api_endpoint, {
params: {
apikey,
},
})
.then((response) => console.log(response.data))
.catch((error) => console.log(error));
```
```java Java theme={null}
import org.apache.hc.client5.http.fluent.Request;
import org.apache.hc.core5.net.URIBuilder;
import java.net.URI;
import java.net.URLEncoder;
import java.nio.charset.StandardCharsets;
public class ZRRequest {
public static void main(final String... args) throws Exception {
String apikey = "YOUR_ZENROWS_API_KEY";
String sku = URLEncoder.encode("123456789", StandardCharsets.UTF_8.toString()); // Example SKU
String api_endpoint = "https://ecommerce.api.zenrows.com/v1/targets/walmart/reviews/" + sku;
URI uri = new URIBuilder(api_endpoint)
.addParameter("apikey", apikey)
.build();
String response = Request.get(uri)
.execute().returnContent().asString();
System.out.println(response);
}
}
```
```php PHP theme={null}
$apikey,
];
$ch = curl_init();
curl_setopt($ch, CURLOPT_URL, $api_endpoint . '?' . http_build_query($params));
curl_setopt($ch, CURLOPT_RETURNTRANSFER, true);
curl_setopt($ch, CURLOPT_FOLLOWLOCATION, true);
$response = curl_exec($ch);
echo $response . PHP_EOL;
curl_close($ch);
```
```go Go theme={null}
package main
import (
"fmt"
"io/ioutil"
"log"
"net/http"
"net/url"
)
func main() {
apikey := "YOUR_ZENROWS_API_KEY"
sku := url.QueryEscape("123456789") // Example SKU
api_endpoint := "https://ecommerce.api.zenrows.com/v1/targets/walmart/reviews/" + sku
params := url.Values{}
params.Add("apikey", apikey)
resp, err := http.Get(api_endpoint + "?" + params.Encode())
if err != nil {
log.Fatalln(err)
}
defer resp.Body.Close()
body, err := ioutil.ReadAll(resp.Body)
if err != nil {
log.Fatalln(err)
}
fmt.Println(string(body))
}
```
```ruby Ruby theme={null}
# gem install faraday
require 'faraday'
require 'cgi'
apikey = 'YOUR_ZENROWS_API_KEY'
sku = CGI.escape('123456789') # Example SKU
api_endpoint = "https://ecommerce.api.zenrows.com/v1/targets/walmart/reviews/#{sku}"
conn = Faraday.new(url: api_endpoint) do |f|
f.params = {
apikey: apikey,
}
end
response = conn.get
puts response.body
```
```json Response Example theme={null}
{
"average_score": 4.5,
"five_star_count": 123,
"five_star_ratio": 0.73,
"four_star_count": 123,
"four_star_ratio": 0.15,
"one_star_count": 123,
"one_star_ratio": 0.04,
"page_navigation": "https:\/\/www.walmart.com\/reviews\/product\/5074872077?page=2",
"product_details": {
"product_name": "iPhone 13",
"product_url": "https:\/\/www.walmart.com\/ip\/Apple-iPhone-13\/123456789"
},
"reviews_list": [
{
"helpful_votes": 2,
"is_verified_purchase": true,
"rating_score": 5,
"review_content": "It\u2019s great. Works for what we need it to do.",
"review_date": "Reviewed in the United States on September 4, 2022",
"review_source": "influenster.com",
"review_title": "works good",
"reviewer_name": "Brittany"
}
],
"three_star_count": 123,
"three_star_ratio": 0.06,
"total_ratings_count": 12494,
"total_reviews_count": 123,
"two_star_count": 123,
"two_star_ratio": 0.02
}
```
## Troubleshooting and FAQs
The Walmart SKU is typically part of the product URL. For example, in the URL `https://www.walmart.com/ip/123456789`, the SKU is `123456789`. You can use this ID directly in the API request.
The response includes detailed information about the product, its reviews, and overall ratings. Here is what you can expect:
* **average\_score:** The average rating score of the product.
* **total\_ratings\_count:** The total number of ratings received.
* **total\_reviews\_count:** The total number of written reviews.
* **star counts and ratios:** Number and percentage of reviews for each rating (five-star, four-star, three-star, two-star, and one-star).
* **page\_navigation:** A URL to the next page of reviews, if available.
* **product\_details:** Basic information about the product, including its name and URL.
* **reviews\_list:** An array containing individual review details such as:
* **review\_title:** Title of the review.
* **review\_content:** Text of the review.
* **rating\_score:** Rating given in the review.
* **review\_date:** Date when the review was posted.
* **reviewer\_name:** Name of the reviewer.
* **is\_verified\_purchase:** Whether the review is from a verified purchase.
* **helpful\_votes:** Number of helpful votes the review received.
* **review\_source:** Source of the review if applicable.
This structure gives you both a high-level overview of the product's reputation and access to each individual review for deeper analysis.
Yes, the Walmart Product Scraper API can be used for both personal and commercial projects. Be sure to adhere to Walmart's terms of service and any applicable legal requirements when using the data.
# Using the Zillow Discovery API
Source: https://docs.zenrows.com/scraper-apis/get-started/zillow-discovery
Easily extract search results from Zillow, including a comprehensive list of properties, their details, and pagination links for navigating through search results, such as:
* The total number of results for your search query.
* A list of properties with details:
* Address (full street, city, state, and ZIP code).
* Dimensions (size of the property in square feet).
* Number of bedrooms and bathrooms.
* Price, including currency and symbol.
* Direct links to individual property listings.
* The search query used and its corresponding title.
## Supported Query Parameters
| PARAMETER | TYPE | DEFAULT | DESCRIPTION |
| --------- | -------------- | ------- | ------------------------------------------------------------------------------------------------------------------------------ |
| **url** | `string ` | | The URL where the desired property data must be retrieved from. Example: `https://www.zillow.com/ks/?searchQueryState=%7B%7D`. |
### How to Setup
Request the search endpoint with your desired query:
```bash theme={null}
https://realestate.api.zenrows.com/v1/targets/zillow/discovery?url={url}&apikey=YOUR_ZENROWS_API_KEY
```
### Example
```bash cURL theme={null}
curl "https://realestate.api.zenrows.com/v1/targets/zillow/discovery?apikey=YOUR_ZENROWS_API_KEY&url=https://www.zillow.com/ks/?searchQueryState=%7B%7D" # URL-encoded search query
```
The URL search query must be encoded.
```python Python theme={null}
# pip install requests
import requests
url = 'https://www.zillow.com/ks/?searchQueryState=%7B%7D'
apikey = 'YOUR_ZENROWS_API_KEY'
params = {
'apikey': apikey,
'url': url,
}
response = requests.get('https://realestate.api.zenrows.com/v1/targets/zillow/discovery/', params=params)
print(response.text)
```
```javascript NodeJS theme={null}
// npm install axios
const axios = require('axios');
const url = 'https://www.zillow.com/ks/?searchQueryState=%7B%7D';
const apikey = 'YOUR_ZENROWS_API_KEY';
axios
.get('https://realestate.api.zenrows.com/v1/targets/zillow/discovery/', {
params: {
apikey,
url,
},
})
.then((response) => console.log(response.data))
.catch((error) => console.log(error));
```
```java Java theme={null}
import org.apache.hc.client5.http.fluent.Request;
import org.apache.hc.core5.net.URIBuilder;
import java.net.URI;
public class ZRRequest {
public static void main(final String... args) throws Exception {
String url = "https://www.zillow.com/ks/?searchQueryState=%7B%7D";
String apikey = "YOUR_ZENROWS_API_KEY";
URI uri = new URIBuilder("https://realestate.api.zenrows.com/v1/targets/zillow/discovery/")
.addParameter("apikey", apikey)
.addParameter("url", url)
.build();
String response = Request.get(uri)
.execute().returnContent().asString();
System.out.println(response);
}
}
```
```php PHP theme={null}
$apikey,
'url' => $url,
];
$ch = curl_init();
curl_setopt($ch, CURLOPT_URL, 'https://realestate.api.zenrows.com/v1/targets/zillow/discovery/?' . http_build_query($params));
curl_setopt($ch, CURLOPT_RETURNTRANSFER, true);
curl_setopt($ch, CURLOPT_FOLLOWLOCATION, true);
$response = curl_exec($ch);
echo $response . PHP_EOL;
curl_close($ch);
```
```go Go theme={null}
package main
import (
"fmt"
"io/ioutil"
"net/http"
"net/url"
)
func main() {
apikey := "YOUR_ZENROWS_API_KEY"
url := "https://www.zillow.com/ks/?searchQueryState=%7B%7D"
params := url.Values{}
params.Add("apikey", apikey)
params.Add("url", url)
resp, err := http.Get("https://realestate.api.zenrows.com/v1/targets/zillow/discovery/?" + params.Encode())
if err != nil {
log.Fatalln(err)
}
defer resp.Body.Close()
body, err := ioutil.ReadAll(resp.Body)
if err != nil {
log.Fatalln(err)
}
fmt.Println(string(body))
}
```
```ruby Ruby theme={null}
# gem install faraday
require 'faraday'
apikey = 'YOUR_ZENROWS_API_KEY'
url = 'https://www.zillow.com/ks/?searchQueryState=%7B%7D'
conn = Faraday.new(url: 'https://realestate.api.zenrows.com/v1/targets/zillow/discovery/') do |f|
f.params = {
apikey: apikey,
url: url,
}
end
response = conn.get
puts response.body
```
```json Response Example theme={null}
{
"number_of_results": 8000,
"property_list": [
{
"address": "123 Main St, New York, NY 10001",
"dimensions": 1000,
"number_of_bathrooms": 2,
"number_of_bedrooms": 2,
"price_currency_code": "USD",
"price_currency_symbol": "$",
"property_url": "https:\/\/www.zillow.com\/homedetails\/10314-W-Deanne-Dr-Sun-City-AZ-85351\/7694235_zpid\/"
}
],
"query": "houses for sale in New York",
"search_title": "New York"
}
```
# Using the Zillow Property Data API
Source: https://docs.zenrows.com/scraper-apis/get-started/zillow-property
The Zillow Scraper API allows you to extract detailed property information, search results, and agent details directly from Zillow. This API is ideal for integrating real estate data into your applications for analysis, reporting, or decision-making.
With the Zillow Property Data API, you can access detailed property data such as:
* Full address details, including city, state, and ZIP code.
* Agent and agency information, such as name and contact details.
* Property features, including:
* Number of bedrooms and bathrooms.
* Living area size and lot size.
* Year built and property type.
* Listing details, such as:
* Listing date, number of days listed, views, and favorites.
* Status (e.g., For Sale, Sold).
* Price, including currency and tax rate.
* Property description and images.
* Geographic coordinates (latitude and longitude).
* A direct URL to the property listing.
## Supported Query Parameters
| PARAMETER | TYPE | DEFAULT | DESCRIPTION |
| ------------------- | -------------- | ------- | ------------------------------------------------------------------------------------------------------------------------------ |
| **zpid** `required` | `string` | | The Zillow Property ID (ZPID) for the property (must be a valid 7-10 digit number). Example: `1234567890`. |
| **url** | `string ` | | The URL where the desired property data must be retrieved from. Example: `https://www.zillow.com/homedetails/1234567890_zpid`. |
### How to Setup
Request the property endpoint using the ZPID of the desired product:
```bash theme={null}
https://realestate.api.zenrows.com/v1/targets/zillow/properties/{zpid}?apikey=YOUR_ZENROWS_API_KEY
```
### Example
```bash cURL theme={null}
curl "https://realestate.api.zenrows.com/v1/targets/zillow/properties/{zpid}?apikey=YOUR_ZENROWS_API_KEY&country=us" #Optional: Target specific country
```
Replace `{zpid}` with the actual property ZPID code.
```python Python theme={null}
# pip install requests
import requests
zpid = '446407388'
url = f"https://realestate.api.zenrows.com/v1/targets/zillow/properties/{zpid}"
params = {
"apikey": "YOUR_ZENROWS_API_KEY",
"country": "us" # Optional: Target specific country
}
response = requests.get(url, params=params)
print(response.text)
```
```javascript NodeJS theme={null}
// npm install axios
const axios = require('axios');
const zpid = '446407388';
const apikey = 'YOUR_ZENROWS_API_KEY';
axios
.get(`https://realestate.api.zenrows.com/v1/targets/zillow/properties/${zpid}`, {
params: {
apikey,
country: 'us', // Optional: Target specific country
},
})
.then((response) => console.log(response.data))
.catch((error) => console.log(error));
```
```java Java theme={null}
import org.apache.hc.client5.http.fluent.Request;
import org.apache.hc.core5.net.URIBuilder;
import java.net.URI;
public class ZRRequest {
public static void main(final String... args) throws Exception {
String zpid = "446407388";
String apikey = "YOUR_ZENROWS_API_KEY";
URI uri = new URIBuilder("https://realestate.api.zenrows.com/v1/targets/zillow/properties/" + zpid)
.addParameter("apikey", apikey)
.addParameter("country", "us") // Optional: Target specific country
.build();
String response = Request.get(uri)
.execute().returnContent().asString();
System.out.println(response);
}
}
```
```php PHP theme={null}
$apikey,
'country' => 'us' // Optional: Target specific country
];
$ch = curl_init();
curl_setopt($ch, CURLOPT_URL, 'https://realestate.api.zenrows.com/v1/targets/zillow/properties/' . $zpid . http_build_query($params));
curl_setopt($ch, CURLOPT_RETURNTRANSFER, true);
curl_setopt($ch, CURLOPT_FOLLOWLOCATION, true);
$response = curl_exec($ch);
echo $response . PHP_EOL;
curl_close($ch);
```
```go Go theme={null}
package main
import (
"fmt"
"io/ioutil"
"net/http"
"net/url"
"log"
)
func main() {
zpid := "446407388"
apikey := "YOUR_ZENROWS_API_KEY"
params := url.Values{}
params.Add("apikey", apikey)
params.Add("country", "us") // Optional: Target specific country
resp, err := http.Get("https://realestate.api.zenrows.com/v1/targets/zillow/properties/" + zpid + params.Encode())
if err != nil {
log.Fatalln(err)
}
defer resp.Body.Close()
body, err := ioutil.ReadAll(resp.Body)
if err != nil {
log.Fatalln(err)
}
fmt.Println(string(body))
}
```
```ruby Ruby theme={null}
# gem install faraday
require 'faraday'
zpid = '446407388'
apikey = 'YOUR_ZENROWS_API_KEY'
conn = Faraday.new(url: "https://realestate.api.zenrows.com/v1/targets/zillow/properties/#{zpid}") do |f|
f.params = {
apikey: apikey,
country: "us" # Optional: Target specific country
}
end
response = conn.get
puts response.body
```
```json Response Example theme={null}
{
"address": "496 Glen Canyon Rd",
"agency_name": "Room Real Estate",
"agent_name": "MaryBeth McLaughlin",
"agent_phone": "831-252-4085",
"bedroom_count": 0,
"city": "Santa Cruz",
"country": "USA",
"latitude": 37.005463,
"listing_date": "2025-01-27",
"listing_days": 15,
"listing_favorites": 182,
"listing_views": 2729,
"living_area_size": 378,
"longitude": -122.00976,
"lot_size": 116740,
"price_currency_code": "USD",
"property_description": "Expansive views of Santa Cruz proper, the ocean glitters in the distance. End of a private gravel road just off Glen Canyon Road < 2 miles to midtown. While close to town the property feels much farther away from the hustle and bustle of town. +/- 3 acres. A secluded paradise. Theres space to grow your own food and live in harmony with the land. There are 20+ fruit trees including citrus, peaches, asian pears, apples, persimmons, olives and figs and several raised garden beds gopher wired and fenced for rabbits. There is irrigation to the garden beds. The entire property has 8 ft perimeter fencing (no deer here) and two large driveway gates. There is ample sun and you are above the fog line. The road was rocked with both drain rock and base rock and recently paved in sections. Listen to the sounds of the owls at night and the baby quails in the spring. Gaze at the stars on a clear night. Breath in the fresh air. The sunrises and sunsets are magical & colorful up here. This property is very special.",
"property_id": 446407388,
"property_image": "https://photos.zillowstatic.com/fp/e1a2e6634b66a1fde877abd3d1504bf8-p_f.jpg",
"property_price": 659000,
"property_type": "SINGLE_FAMILY",
"property_url": "https://www.zillow.com/homedetails/496-Glen-Canyon-Rd-Santa-Cruz-CA-95060/446407388_zpid/",
"state": "CA",
"status": "PENDING",
"tax_rate": 1.1,
"year_built": 2021,
"zillow_estimated_price": 663600,
"zipcode": "95060"
}
```
## Troubleshooting and FAQs
The ZPID is a unique property ID assigned by Zillow, which can be found in the URL of the property listing (e.g., in the URL `https://www.zillow.com/homedetails/1234567890_zpid`, the ZPID is `1234567890`).
# Migrating from the Universal Scraper API to Amazon Scraper APIs
Source: https://docs.zenrows.com/scraper-apis/help/migrating-universalscraperapi-to-amazonapi
Switching from the Universal Scraper API to the dedicated Amazon Scraper APIs streamlines extraction and minimizes development effort.
This guide provides a step-by-step migration process:
* First, we present an end-to-end script using the Universal Scraper API.
* Then, we demonstrate how to transition to the dedicated Scraper APIs for improved accuracy and ease of use.
Follow this guide to implement the new API in just a few steps.
## Initial Method via the Universal Scraper API
Using the Universal Scraper API, you'd typically extract product URLs from a product listing, visit each page via the URL, and save individual product data into a CSV file:
```python Universal Scraper API theme={null}
# pip install requests
import requests
STARTING_URL = "https://www.amazon.com/s?k=keyboard"
def get_html(url):
apikey = "YOUR_ZENROWS_API_KEY"
params = {
"url": url,
"apikey": apikey,
"js_render": "true",
"premium_proxy": "true",
}
response = requests.get("https://api.zenrows.com/v1/", params=params)
if response.status_code == 200:
return BeautifulSoup(response.text, "html.parser")
else:
print(
f"Request failed with status code {response.status_code}: {response.text}"
)
return None
```
### Parsing Logic and Extracting Product Data
Once the HTML content is obtained, the next step is to parse the webpage and extract the product information you need: title, price, link, and availability.
```python Parsing logic theme={null}
from bs4 import BeautifulSoup
def extract_product_links():
soup = get_html(STARTING_URL)
products = []
if not soup:
return products
for item in soup.find_all("div", class_="s-result-item"):
title_elem = item.find("a", class_="s-link-style")
link_elem = item.find("a", class_="s-link-style")
price_elem = item.find("span", class_="a-offscreen")
title = title_elem.get_text(strip=True) if title_elem else "N/A"
product_url = (
f"https://www.amazon.com{link_elem['href']}" if link_elem else "N/A"
)
price = price_elem.get_text(strip=True) if price_elem else "N/A"
products.append(
{
"title": title,
"url": product_url,
"price": price,
"availability": "Unknown",
}
)
return products
def get_availability(product_url):
soup = get_html(product_url)
if soup:
availability_elem = soup.find(id="availability")
return (
availability_elem.get_text(strip=True)
if availability_elem
else "Unavailable"
)
return "Unavailable"
def update_availability(products):
for product in products:
if product["url"] != "N/A":
product["availability"] = get_availability(product["url"])
return products
```
### Store the data in a CSV file
Once all data is collected and structured, the following function saves the data into a CSV file:
```python Store in a CSV file theme={null}
import csv
def save_to_csv(data, filename="amazon_products.csv"):
with open(filename, mode="w", newline="", encoding="utf-8") as file:
writer = csv.DictWriter(
file, fieldnames=["title", "url", "price", "availability"]
)
writer.writeheader()
writer.writerows(data)
# save to CSV
data = extract_product_links()
data = update_availability(data)
save_to_csv(data)
print("Data saved to amazon_products.csv")
```
### Here's Everything Together
Here's the complete Python script combining all the logic we explained above.
```Python Complete code theme={null}
# pip install requests beautifulsoup4 csv
import requests
import csv
from bs4 import BeautifulSoup
STARTING_URL = "https://www.amazon.com/s?k=keyboard"
def get_html(url):
apikey = "YOUR_ZENROWS_API_KEY"
params = {
"url": url,
"apikey": apikey,
"js_render": "true",
"premium_proxy": "true",
}
response = requests.get("https://api.zenrows.com/v1/", params=params)
if response.status_code == 200:
return BeautifulSoup(response.text, "html.parser")
else:
print(
f"Request failed with status code {response.status_code}: {response.text}"
)
return None
def extract_product_links():
soup = get_html(STARTING_URL)
products = []
if not soup:
return products
for item in soup.find_all("div", class_="s-result-item"):
title_elem = item.find("a", class_="s-link-style")
link_elem = item.find("a", class_="s-link-style")
price_elem = item.find("span", class_="a-offscreen")
title = title_elem.get_text(strip=True) if title_elem else "N/A"
product_url = (
f"https://www.amazon.com{link_elem['href']}" if link_elem else "N/A"
)
price = price_elem.get_text(strip=True) if price_elem else "N/A"
products.append(
{
"title": title,
"url": product_url,
"price": price,
"availability": "Unknown",
}
)
return products
def get_availability(product_url):
soup = get_html(product_url)
if soup:
availability_elem = soup.find(id="availability")
return (
availability_elem.get_text(strip=True)
if availability_elem
else "Unavailable"
)
return "Unavailable"
def update_availability(products):
for product in products:
if product["url"] != "N/A":
product["availability"] = get_availability(product["url"])
return products
def save_to_csv(data, filename="amazon_products.csv"):
with open(filename, mode="w", newline="", encoding="utf-8") as file:
writer = csv.DictWriter(
file, fieldnames=["title", "url", "price", "availability"]
)
writer.writeheader()
writer.writerows(data)
# save to CSV
data = extract_product_links()
data = update_availability(data)
save_to_csv(data)
print("Data saved to amazon_products.csv")
```
## Transition to the Amazon Scraper API
The Scraper API offers a more streamlined experience than the Universal Scraper API. It **eliminates the parsing stage** and instantly delivers ready-to-use data at your fingertips.
You can extract product data from Amazon using the following Scraper APIs:
* Amazon Product Discovery API: Retrieves a list of products based on a search term. Here's the endpoint: `https://ecommerce.api.zenrows.com/v1/targets/amazon/discovery/`
To implement your Amazon scraper, simply provide your ZenRows API key as a request parameter and append your search term to the API endpoint.
* Product Information API: Fetches detailed information from individual product pages. See the endpoint below: `https://ecommerce.api.zenrows.com/v1/targets/amazon/products/`
Some product details (e.g., Availability data) are only available on individual product pages and won't be returned in a product listing. To retrieve this information, you can access each product page using the ASIN extracted from the Product Discovery endpoint.
To streamline this process, the Amazon Scraper APIs allow you to enhance the previous Universal Scraper API method with the following steps:
* Retrieve Amazon search results using the Product Discovery endpoint.
* Extract each product's ASIN from the JSON response.
* Use the ASIN to fetch product details (e.g., Availability) from the Product Information endpoint.
* Update the initial search results with each product's availability data obtained from the Product Information endpoint.
Here's the updated code using the Amazon Scraper APIs:
```Python theme={null}
# pip install requests
import requests
import csv
params = {
"apikey": "YOUR_ZENROWS_API_KEY",
}
# API Endpoints
discovery_endpoint = "https://ecommerce.api.zenrows.com/v1/targets/amazon/discovery/"
product_endpoint = "https://ecommerce.api.zenrows.com/v1/targets/amazon/products/"
# search Term
search_term = "keyboard"
# generic function to fetch data from the Scraper APIs
def scraper(endpoint, suffix):
url = f"{endpoint}{suffix}"
response = requests.get(url, params=params)
try:
return response.json()
except ValueError:
print(f"Failed to parse JSON from {url}")
return {}
def scrape_discovery(search_term):
return scraper(discovery_endpoint, search_term).get("products_list", [])
def scrape_product(asin):
return scraper(product_endpoint, asin)
# fetch product list
data = scrape_discovery(search_term)
# fetch product details for each item
for item in data:
asin = item.get("product_id")
if asin:
product_result = scrape_product(asin)
item["availability_status"] = product_result.get(
"availability_status", "Unknown"
)
```
### Store the data
You can store the combined data in a CSV or dedicated database. The code below writes each product detail to a new CSV row and stores the file as `products.csv`:
```python theme={null}
# ...
# save to CSV
csv_filename = "products.csv"
with open(csv_filename, mode="w", newline="", encoding="utf-8") as file:
writer = csv.DictWriter(file, fieldnames=data[0].keys())
writer.writeheader()
writer.writerows(data)
```
Here's the complete code:
```Python theme={null}
# pip install requests
import requests
import csv
params = {
"apikey": "YOUR_ZENROWS_API_KEY",
}
# API Endpoints
discovery_endpoint = "https://ecommerce.api.zenrows.com/v1/targets/amazon/discovery/"
product_endpoint = "https://ecommerce.api.zenrows.com/v1/targets/amazon/products/"
# search Term
search_term = "laptops"
# generic function to fetch data from the Scraper APIs
def scraper(endpoint, **kwargs):
url = f"{endpoint}{kwargs.get('suffix', '')}"
response = requests.get(url, params=params)
try:
return response.json()
except ValueError:
print(f"Failed to parse JSON from {url}")
return {}
# fetch product list
result = scraper(discovery_endpoint, suffix=search_term)
data = result.get("products_list", [])
# fetch product details for each item
for item in data:
ASIN = item.get("product_id")
if ASIN:
product_result = scraper(product_endpoint, suffix=ASIN)
item["availability_status"] = product_result.get(
"availability_status", "Unknown"
)
# save to CSV
csv_filename = "products.csv"
with open(csv_filename, mode="w", newline="", encoding="utf-8") as file:
writer = csv.DictWriter(file, fieldnames=data[0].keys())
writer.writeheader()
writer.writerows(data)
```
You'll get an output similar to the following:
Congratulations! 🎉 You've successfully upgraded your scraper to a more reliable, handier solution that precisely fetches your needed data. No more dealing with endless runtime failures from missing elements!
The Scraper APIs also offer even better scalability. For example, with the pagination details returned by the Amazon Discovery API, you can easily follow and scrape subsequent pages.
## Conclusion
With only a few code changes, you've optimized your scraping script with the new Scraper APIs for a smoother and more efficient experience. No more time-consuming pagination challenges and parsing issues. Now, you can confidently collect data at scale while the ZenRows Scraper APIs handle the heavy lifting.
# Migrating From the Universal Scraper API to the Google Search API
Source: https://docs.zenrows.com/scraper-apis/help/migrating-universalscraperapi-to-googleapi
This guide takes you through the **step-by-step migration process** from the Universal Scraper API to the new dedicated Google Search Results API:
* We'll first show an end-to-end code demonstrating how you've been doing it with the Universal Scraper API.
* Next, we'll show you how to upgrade to the new Google Search API.
This guide helps you transition to the Search API in just a few steps.
## Previous Method via the Universal Scraper API
Previously, you've handled requests targeting Google's search results page using the Universal Scraper API. This approach involves:
* **Manually parsing** the search result page with an HTML parser like Beautiful Soup
* **Exporting the data** to a CSV
* **Dealing with fragile, complex selectors that change frequently** - a common challenge when scraping Google.
First, you'd request the HTML content of the search result page:
```python theme={null}
# pip install requests
import requests
def get_html(url):
apikey = "YOUR_ZENROWS_API_KEY"
params = {
"url": url,
"apikey": apikey,
"js_render": "true",
"premium_proxy": "true",
"wait": "3000",
}
response = requests.get("https://api.zenrows.com/v1/", params=params)
if response.status_code == 200:
return response.text
else:
print(
f"Request failed with status code {response.status_code}: {response.text}"
)
return None
```
### Parsing Logic and Search Result Data Extraction
The next step involves identifying and extracting titles, links, snippets, and displayed links from deeply nested elements. This is where things get tricky.
Google's HTML structure is not only dense but also highly dynamic, which makes selector-based scraping brittle. Here's an example:
```python theme={null}
# pip install beautifulsoup4
from bs4 import BeautifulSoup
def scraper(url):
html_content = get_html(url)
soup = BeautifulSoup(html_content, "html.parser")
serps = soup.find_all("div", class_="N54PNb")
results = []
for content in serps:
data = {
"title": content.find("h3", class_="LC20lb").get_text(),
"link": content.find("a")["href"],
"displayed_link": content.find("cite").get_text(),
"snippet": content.find(class_="VwiC3b").get_text(),
}
results.append(data)
return results
```
The above selectors (e.g., `N54PNb`, `LC20lb`, `VwiC3b`) are not stable. They may change often and break your scraper overnight. Maintaining such selectors is only viable if you're scraping Google daily and are ready to troubleshoot frequently.
### Store the Data
The last step after scraping the result page is to store the data:
```python theme={null}
import csv
def save_to_csv(data, filename="serp_results.csv"):
with open(filename, mode="w", newline="", encoding="utf-8") as file:
writer = csv.DictWriter(
file,
fieldnames=[
"title",
"link",
"displayed_link",
"snippet",
],
)
writer.writeheader()
writer.writerows(data)
url = "https://www.google.com/search?q=nintendo/"
data = scraper(url)
save_to_csv(data)
print("Data stored to serp_results.csv")
```
### Putting Everything Together
Combining all these steps gives the following complete code:
```python theme={null}
# pip install requests beautifulsoup
import requests
from bs4 import BeautifulSoup
import csv
def get_html(url):
apikey = "YOUR_ZENROWS_API_KEY"
params = {
"url": url,
"apikey": apikey,
"js_render": "true",
"premium_proxy": "true",
"wait": "3000",
}
response = requests.get("https://api.zenrows.com/v1/", params=params)
if response.status_code == 200:
return response.text
else:
print(
f"Request failed with status code {response.status_code}: {response.text}"
)
return None
def scraper(url):
html_content = get_html(url)
soup = BeautifulSoup(html_content, "html.parser")
serps = soup.find_all("div", class_="N54PNb")
results = []
for content in serps:
data = {
"title": content.find("h3", class_="LC20lb").get_text(),
"link": content.find("a")["href"],
"displayed_link": content.find("cite").get_text(),
"snippet": content.find(class_="VwiC3b").get_text(),
}
results.append(data)
return results
def save_to_csv(data, filename="serp_results.csv"):
with open(filename, mode="w", newline="", encoding="utf-8") as file:
writer = csv.DictWriter(
file,
fieldnames=[
"title",
"link",
"displayed_link",
"snippet",
],
)
writer.writeheader()
writer.writerows(data)
url = "https://www.google.com/search?q=nintendo/"
data = scraper(url)
save_to_csv(data)
print("Data stored to serp_results.csv")
```
## Transition the Search to the Google Search Results API
The [Google Search Results API](/scraper-apis/get-started/google-search) **automatically handles the parsing stage**, providing the data you need out of the box, with no selector maintenance required.
To use the Search API, **you only need its endpoint and a query term**. The API then returns a JSON data containing the query results, including pagination details like the next search result page URL.
See the Google Search API endpoint below:
```bash theme={null}
https://serp.api.zenrows.com/v1/targets/google/search/
```
The Google Search Results API only requires these three simple steps:
* Send a query (e.g., Nintendo) through the Google Search Result API.
* Retrieve the search result in JSON format.
* Get the organic search results from the JSON data.
Here's the code to achieve the above steps:
```python theme={null}
# pip install requests and urllib.parse
import requests
import urllib.parse
# Define the search query
query = "Nintendo"
encoded_query = urllib.parse.quote(query)
# Set up API endpoint and parameters
api_endpoint = f"https://serp.api.zenrows.com/v1/targets/google/search/{encoded_query}"
# function to get the JSON search result from the API
def scraper():
apikey = "YOUR_ZENROWS_API_KEY"
params = {
"apikey": apikey,
}
response = requests.get(
f"{api_endpoint}",
params=params,
)
return response.json()
# get the organic search result from the JSON
serp_results = scraper().get("organic_results")
print(serp_results)
```
This would return a JSON object with the following structure:
```json theme={null}
[
{
"displayed_link": "https://www.nintendo.com \u203a ...",
"link": "https://www.nintendo.com/us/",
"snippet": "Visit the official Nintendo site...",
"title": "Nintendo - Official Site: Consoles, Games, News, and More"
},
{
"displayed_link": "https://my.nintendo.com \u203a ...",
"link": "https://my.nintendo.com/?lang=en-US",
"snippet": "My Nintendo makes playing games and interacting...",
"title": "My Nintendo"
},
...
]
```
### Store the Data
You can store the organic search results retrieved above in a CSV file or a local or remote database.
The following code exports the scraped data to a CSV file by creating each result in a new row under the relevant columns:
```python theme={null}
# save the data to CSV
csv_filename = "serp_results.csv"
with open(csv_filename, mode="w", newline="", encoding="utf-8") as file:
writer = csv.DictWriter(file, fieldnames=serp_results[0].keys())
writer.writeheader()
writer.writerows(serp_results)
```
Here's the full code:
```python theme={null}
# pip install requests, urllib.parse and csv
import requests
import csv
import urllib.parse
# Define the search query
query = "Nintendo"
encoded_query = urllib.parse.quote(query)
# Set up API endpoint and parameters
api_endpoint = f"https://serp.api.zenrows.com/v1/targets/google/search/{encoded_query}"
# function to get the JSON search result from the API
def scraper():
apikey = "YOUR_ZENROWS_API_KEY"
params = {
"apikey": apikey,
}
response = requests.get(
f"{api_endpoint}",
params=params,
)
return response.json()
# get the organic search result from the JSON
serp_results = scraper().get("organic_results")
# save the data to CSV
csv_filename = "serp_results_api.csv"
with open(csv_filename, mode="w", newline="", encoding="utf-8") as file:
writer = csv.DictWriter(file, fieldnames=serp_results[0].keys())
writer.writeheader()
writer.writerows(serp_results)
```
Your result will be similar to the one below:
That was quite an upgrade! Congratulations!! 🎉 Your Google search result scraper got much better, more efficient, and more reliable with the dedicated Google Search Results API.
### Scaling Up Your Scraping
Once you have your first results, it is easy to scale up. You can follow subsequent result pages by extracting the next page query from the `pagination` field in the JSON response.
For example, if the JSON includes a pagination object like this:
```json theme={null}
{
"...": "...",
"pagination": {
"next_page": "https://www.google.com/search?q=Nintendo&sca_...&start=10&sa..."
}
}
```
You can see that the next page query contains start=10. To continue scraping, you simply update the start value: the next page would use start=10, then start=20, and so on.
```bash theme={null}
Nintendo&start=10
```
By incrementing the start parameter in multiples of 10, you can retrieve as many results as needed while maintaining full control over the pagination.
## Conclusion
By migrating to the Google Search Results API, you've eliminated the need to manage fragile selectors and parse complex HTML, making your scraping setup far more reliable and efficient.
Instead of reacting to frequent front-end changes, you now receive clean, structured JSON that saves time, reduces maintenance, and allows you to focus on building valuable tools like SEO dashboards, rank trackers, or competitor monitors. With ZenRows handling the heavy lifting, your team can stay productive and scale confidently.
# Migrating From the Universal Scraper API to the Idealista API
Source: https://docs.zenrows.com/scraper-apis/help/migrating-universalscraperapi-to-idealistaapi
Making the switch from the Universal Scraper API to specialized Idealista Scraper APIs significantly simplifies the scraping process. This guide walks you through the migration process from the Universal Scraper API to using dedicated Idealista APIs.
Throughout this guide, you'll learn:
* How to extract Idealista property data using the Universal Scraper API.
* Steps to migrate to the dedicated Idealista Scraper APIs.
* Key benefits of using Idealista Scraper APIs.
## Initial Method via the Universal Scraper API
When scraping property data from Idealista with the Universal Scraper API, you need to configure your requests and then process the returned data. To collect data from an Idealista property listing, you'll need to configure the Universal Scraper API with appropriate parameters:
```python Universal Scraper API theme={null}
# pip install requests
import requests
url = 'https://www.idealista.com/en/inmueble/107012340/'
apikey = 'YOUR_ZENROWS_API_KEY'
params = {
'url': url,
'apikey': apikey,
'js_render': 'true', # Enable JavaScript rendering
'premium_proxy': 'true', # Use premium proxy feature
}
response = requests.get('https://api.zenrows.com/v1/', params=params)
# Check if the request was successful
if response.status_code == 200:
print(response.text) # Return the raw HTML content
else:
print(f"Request failed with status code {response.status_code}: {response.text}")
```
This code sends a request through the Universal Scraper API with the required parameters to fetch property data from Idealista.
### Parsing Logic and Extracting Data
Once the HTML content is obtained, the next step is to parse the webpage using BeautifulSoup to extract relevant property details and transforms them into a structured format.
```python Parsing Logic theme={null}
from bs4 import BeautifulSoup
def parse_property_html(html):
if not html:
print("No HTML to parse")
return None
try:
soup = BeautifulSoup(html, "html.parser")
# Property title
title_tag = soup.select_one("span.main-info__title-main")
title = title_tag.get_text(strip=True) if title_tag else "N/A"
# Price
price_tag = soup.select_one("span.info-data-price")
price = price_tag.get_text(strip=True).replace('\xa0', ' ') if price_tag else "N/A"
# Area (square meters)
area_tag = soup.select_one("div.info-features span:nth-of-type(1)")
square_feet = area_tag.get_text(strip=True) if area_tag else "N/A"
# Bedrooms
bedrooms_tag = soup.select_one("div.info-features span:nth-of-type(2)")
bedrooms = bedrooms_tag.get_text(strip=True) if bedrooms_tag else "N/A"
# Bathrooms — from the details section
bathrooms_tag = soup.select_one("div.details-property_features li:-soup-contains('bathrooms')")
if not bathrooms_tag:
bathrooms_tag = soup.find("li", string=lambda text: text and "bathrooms" in text.lower())
bathrooms = bathrooms_tag.get_text(strip=True) if bathrooms_tag else "N/A"
processed_data = {
"property_title": title,
"price": price,
"bedrooms": bedrooms,
"bathrooms": bathrooms,
"square_feet": square_feet
}
return processed_data
except Exception as e:
print(f"Error parsing HTML: {e}")
return None
```
These CSS selectors are fragile and may break if the website structure changes, as websites like Idealista can update their HTML at any time. They require constant maintenance and monitoring to keep your scraper functional.
### Storing Data In A CSV File
After retrieving the data, save the parsed property details to a CSV file. CSV format makes it easy to share and analyze the information further.
```python Saving Data In A CSV File theme={null}
import csv
# ...
def save_to_csv(data, filename="idealista_property.csv"):
if not data:
print("No data to save")
return
try:
# Save to CSV format
with open(filename, mode="w", newline="", encoding="utf-8") as file:
writer = csv.DictWriter(file, fieldnames=data.keys())
writer.writeheader()
writer.writerow(data)
print(f"Data saved to {filename}")
except Exception as e:
print(f"Error saving data to CSV: {e}")
```
This function converts the raw property data into a usable format and exports it to a CSV file for analysis and reference.
### Putting Everything Together
Here's the complete script that fetches, processes, and stores Idealista property data using the Universal Scraper API:
```python Python theme={null}
import requests
import csv
from bs4 import BeautifulSoup
property_url = "https://www.idealista.com/en/inmueble/107012340/"
apikey = "YOUR_ZENROWS_API_KEY"
# Step 1: API Call
def get_property_html(property_url):
params = {
"url": property_url,
"apikey": apikey,
"js_render": "true", # Enables JavaScript rendering
"premium_proxy": "true" # Uses premium proxies for better reliability
}
response = requests.get("https://api.zenrows.com/v1/", params=params)
if response.status_code == 200:
return response.text # Return the raw HTML
else:
print(f"Request failed with status code {response.status_code}: {response.text}")
return None
# Step 2: Parsing the HTML Response
def parse_property_html(html):
if not html:
print("No HTML to parse")
return None
try:
soup = BeautifulSoup(html, "html.parser")
# Property title
title_tag = soup.select_one("span.main-info__title-main")
title = title_tag.get_text(strip=True) if title_tag else "N/A"
# Price
price_tag = soup.select_one("span.info-data-price")
price = price_tag.get_text(strip=True).replace('\xa0', ' ') if price_tag else "N/A"
# Area (square meters)
area_tag = soup.select_one("div.info-features span:nth-of-type(1)")
square_feet = area_tag.get_text(strip=True) if area_tag else "N/A"
# Bedrooms
bedrooms_tag = soup.select_one("div.info-features span:nth-of-type(2)")
bedrooms = bedrooms_tag.get_text(strip=True) if bedrooms_tag else "N/A"
# Bathrooms — from the details section
bathrooms_tag = soup.select_one("div.details-property_features li:-soup-contains('bathrooms')")
if not bathrooms_tag:
bathrooms_tag = soup.find("li", string=lambda text: text and "bathrooms" in text.lower())
bathrooms = bathrooms_tag.get_text(strip=True) if bathrooms_tag else "N/A"
processed_data = {
"property_title": title,
"price": price,
"bedrooms": bedrooms,
"bathrooms": bathrooms,
"square_feet": square_feet
}
return processed_data
except Exception as e:
print(f"Error parsing HTML: {e}")
return None
# Step 3: Storing Data In A CSV File
def save_to_csv(data, filename="idealista_property.csv"):
if not data:
print("No data to save")
return
try:
# Save to CSV format
with open(filename, mode="w", newline="", encoding="utf-8") as file:
writer = csv.DictWriter(file, fieldnames=data.keys())
writer.writeheader()
writer.writerow(data)
print(f"Data saved to {filename}")
except Exception as e:
print(f"Error saving data to CSV: {e}")
# Everything Together: Full Workflow
html_response = get_property_html(property_url) # Step 1: Fetch the raw property HTML via the API
parsed_data = parse_property_html(html_response) # Step 2: Parse the raw HTML into a structured format
save_to_csv(parsed_data) # Step 3: Save the structured data into a CSV file
```
## Transitioning to the Idealista Scraper APIs
The Idealista Scraper APIs deliver properly formatted real estate data through two specialized endpoints: the Idealista Property Data API and the Idealista Discovery API. These purpose-built solutions offer numerous improvements over the Universal Scraper API:
* **No need to maintain selectors or parsing logic**: The Zillow APIs return structured data, so you don't need to use BeautifulSoup, XPath, or fragile CSS selectors.
* **Maintenance-Free Operation**: The APIs automatically adapt to Idealista website changes without requiring any code updates or parameter adjustments like `js_render`, `premium_proxy`, or `autoparse`.
* **Easier implementation**: Specialized endpoints for Idealista data requiring much less code.
* **Higher data quality**: Custom extraction algorithms that consistently deliver accurate data.
* **Predictable cost structure**: Transparent pricing that helps plan for large-scale data collection.
### Using the Idealista Property Data API
The [Idealista Property Data API](/scraper-apis/get-started/idealista-property) delivers complete property data, including features, pricing, agent details, etc., in a ready-to-use format.
Here's how to implement the Idealista Property Data API:
```python Idealista Property Data API theme={null}
# pip install requests and csv
import requests
import csv
property_id = "107012340"
api_endpoint = "https://realestate.api.zenrows.com/v1/targets/idealista/properties/"
# Step 1: Fetch property data from the ZenRows Idealista API
def get_property_data(property_id):
url = api_endpoint + property_id
params = {
"apikey": "YOUR_ZENROWS_API_KEY",
}
response = requests.get(url, params=params)
if response.status_code == 200:
return response.json() # Return full API response
else:
print(f"Request failed with status code {response.status_code}: {response.text}")
return None
# Step 2: Save the property data to CSV
def save_property_to_csv(property_data, filename="idealista_property.csv"):
if not property_data:
print("No data to save")
return
# the API returns clean, structured data that can be saved directly
with open(filename, mode="w", newline="", encoding="utf-8") as file:
fieldnames = property_data.keys()
writer = csv.DictWriter(file, fieldnames=fieldnames)
writer.writeheader()
writer.writerow(property_data)
print(f"Property data saved to {filename}")
# Step 3: Process and save
property_data = get_property_data(property_id)
save_property_to_csv(property_data)
```
Running this code exports a CSV file containing all property details in an organized, ready-to-use format:
Well done! You've successfully transitioned to using the Idealista Property Data API, which provides clean, structured property data without the complexity of parsing HTML.
Let's now explore how the Idealista Discovery API simplifies searching and scraping properties across the platform.
### Using the Idealista Discovery API
The [Idealista Discovery API](/scraper-apis/get-started/idealista-discovery) lets you search for properties and returns essential information like addresses, prices, room counts, property classifications, links to detailed listings, etc.
The API offers several optional customization options to tailor your property searches:
* Language: Specify the language for results (e.g., `en` for English, `es` for Spanish).
* Page Number: Request specific search results pages rather than just the first page.
* Sorting: Control how results are ordered (e.g., `most_recent`, `highest_price`, `relevance`).
Here's how to implement the Idealista Discovery API:
```python Python theme={null}
# pip install requests
import requests
import csv
# Find properties by location
url = "https://www.idealista.com/en/venta-viviendas/barcelona/eixample/"
params = {
"apikey": "YOUR_ZENROWS_API_KEY",
"url": url,
}
response = requests.get("https://realestate.api.zenrows.com/v1/targets/idealista/discovery/", params=params)
if response.status_code == 200:
data = response.json()
properties = data.get("property_list", [])
pagination_info = data.get("pagination", {})
if properties:
with open("idealista_search_results.csv", mode="w", newline="", encoding="utf-8") as file:
writer = csv.DictWriter(file, fieldnames=properties[0].keys())
writer.writeheader()
writer.writerows(properties)
print(f"{len(properties)} properties saved to idealista_search_results.csv")
print(f"Current page: {pagination_info.get('current_page')}")
if 'next_page' in pagination_info:
print(f"Next page URL: {pagination_info.get('next_page')}")
else:
print("No properties found in search results")
else:
print(f"Request failed with status code {response.status_code}: {response.text}")
```
This code produces a CSV containing the search results with property listings.
## Conclusion
The shift from the Universal Scraper API to Idealista Scraper APIs provides substantial improvements to how you collect and process real estate data. These dedicated tools eliminate the need for complex HTML parsing, dramatically reduce ongoing maintenance, and provide higher quality data, all while automatically adapting to any changes on the Idealista website.
# Migrating from the Universal Scraper API to Zillow Scraper APIs
Source: https://docs.zenrows.com/scraper-apis/help/migrating-universalscraperapi-to-zillowapi
Switching from the Universal Scraper API to dedicated Zillow Scraper APIs simplifies data extraction while reducing development overhead and ongoing maintenance. This guide provides a step-by-step migration path from the Universal Scraper API to using specialized APIs that deliver clean, structured data with minimal code.
In this guide, you'll learn:
* How to extract property data using the Universal Scraper API.
* How to transition to the dedicated Zillow Scraper APIs.
* The advantages of using Zillow Scraper APIs.
## Initial Method via the Universal Scraper API
When extracting property data from Zillow using the Universal Scraper API, you need to make HTTP requests to specific property URLs and manually process the returned HTML.
### Retrieving Property Data
To extract data from a Zillow property page, you need to set up proper parameters for the Universal Scraper API:
```python Universal Scraper API theme={null}
# pip install requests
import requests
url = 'https://www.zillow.com/homedetails/177-Benedict-Rd-Staten-Island-NY-10304/32294383_zpid/'
apikey = 'YOUR_ZENROWS_API_KEY'
params = {
'url': url,
'apikey': apikey,
'js_render': 'true', # Enable JavaScript rendering
'premium_proxy': 'true', # Use premium proxy feature
}
response = requests.get('https://api.zenrows.com/v1/', params=params)
# Check if the request was successful
if response.status_code == 200:
print(response.text) # Return the raw HTML content
else:
print(f"Request failed with status code {response.status_code}: {response.text}")
```
This script sends a request to the Universal Scraper API with the necessary parameters to retrieve property data from Zillow.
### Parsing the Returned Data
Once the raw HTML is retrieved, you'll need to parse the page using BeautifulSoup to extract relevant information.
```python Parsing Logic theme={null}
from bs4 import BeautifulSoup
def parse_property_html(html):
if not html:
print("No HTML to parse")
return None
try:
soup = BeautifulSoup(html, "html.parser")
# Address
address_tag = soup.select_one("div[class*='AddressWrapper']")
address = address_tag.get_text(strip=True) if address_tag else "N/A"
# Price
price_tag = soup.select_one("span[data-testid='price']")
price = price_tag.get_text(strip=True) if price_tag else "N/A"
# Bedrooms
bedrooms_tag = soup.select("span[class*='StyledValueText']")
bedrooms = bedrooms_tag[0].get_text(strip=True) if len(bedrooms_tag) > 0 else "N/A"
# Bathrooms
bathrooms_tag = soup.select("span[class*='StyledValueText']")
bathrooms = bathrooms_tag[1].get_text(strip=True) if len(bathrooms_tag) > 1 else "N/A"
# Square feet
sqft_tag = soup.select("span[class*='StyledValueText']")
square_feet = sqft_tag[2].get_text(strip=True) if len(sqft_tag) > 2 else "N/A"
return {
"url": property_url,
"address": address,
"price": price,
"bedrooms": bedrooms,
"bathrooms": bathrooms,
"square_feet": square_feet,
}
except Exception as e:
print(f"Error parsing HTML: {e}")
return None
```
This function converts the raw property data into a usable format.
The CSS selectors in this example are unstable and may break without warning. They require constant maintenance and monitoring to keep your scraper functional.
### Storing the Data in a CSV File
Once parsed, the data can be stored for later analysis:
```python Storing Data in a CSV File theme={null}
import csv
# ...
def save_to_csv(data, filename="zillow_property.csv"):
if not data:
print("No data to save")
return
try:
# Save to CSV format
with open(filename, mode="w", newline="", encoding="utf-8") as file:
writer = csv.DictWriter(file, fieldnames=data.keys())
writer.writeheader()
writer.writerow(data)
print(f"Data saved to {filename}")
except Exception as e:
print(f"Error saving data to CSV: {e}")
```
This function saves the data into a CSV file for easy access and analysis.
### Putting Everything Together
Here's the complete Python script that fetches, processes, and stores Zillow property data using the Universal Scraper API:
```python Complete Script theme={null}
import requests
import csv
from bs4 import BeautifulSoup
property_url = "https://www.zillow.com/homedetails/177-Benedict-Rd-Staten-Island-NY-10304/32294383_zpid/"
apikey = "YOUR_ZENROWS_API_KEY"
# Step 1: Retrieving Property Data
def get_property_data(property_url):
params = {
"url": property_url,
"apikey": apikey,
"js_render": "true", # Enable JavaScript rendering
"premium_proxy": "true", # Use premium proxy feature
}
response = requests.get("https://api.zenrows.com/v1/", params=params)
if response.status_code == 200:
return response.text # Return the raw HTML content
else:
print(f"Request failed with status code {response.status_code}: {response.text}")
return None
# Step 2: Parsing the Returned Data
def parse_property_html(html):
if not html:
print("No HTML to parse")
return None
try:
soup = BeautifulSoup(html, "html.parser")
# Address
address_tag = soup.select_one("div[class*='AddressWrapper']")
address = address_tag.get_text(strip=True) if address_tag else "N/A"
# Price
price_tag = soup.select_one("span[data-testid='price']")
price = price_tag.get_text(strip=True) if price_tag else "N/A"
# Bedrooms
bedrooms_tag = soup.select("span[class*='StyledValueText']")
bedrooms = bedrooms_tag[0].get_text(strip=True) if len(bedrooms_tag) > 0 else "N/A"
# Bathrooms
bathrooms_tag = soup.select("span[class*='StyledValueText']")
bathrooms = bathrooms_tag[1].get_text(strip=True) if len(bathrooms_tag) > 1 else "N/A"
# Square feet
sqft_tag = soup.select("span[class*='StyledValueText']")
square_feet = sqft_tag[2].get_text(strip=True) if len(sqft_tag) > 2 else "N/A"
return {
"url": property_url,
"address": address,
"price": price,
"bedrooms": bedrooms,
"bathrooms": bathrooms,
"square_feet": square_feet,
}
except Exception as e:
print(f"Error parsing HTML: {e}")
return None
# Step 3: Storing the Data in a CSV File
def save_to_csv(data, filename="zillow_property.csv"):
if not data:
print("No data to save")
return
try:
with open(filename, mode="w", newline="", encoding="utf-8") as file:
writer = csv.DictWriter(file, fieldnames=data.keys())
writer.writeheader()
writer.writerow(data)
print(f"Data saved to {filename}")
except Exception as e:
print(f"Error saving data to CSV: {e}")
# Everything Together: Full Workflow
html_response = get_property_data(property_url) # Step 1: Fetch the raw property HTML via the API
parsed_data = parse_property_html(html_response) # Step 2: Parse the raw HTML into a structured format
save_to_csv(parsed_data) # Step 3: Save the structured data into a CSV file
```
## Transitioning to the Zillow Scraper APIs
The dedicated Zillow Scraper APIs provide structured, ready-to-use real estate data through two specialized endpoints, the Zillow Property Data API and the Zillow Discovery API. These APIs offer several advantages over the Universal Scraper API:
* **No need to maintain selectors or parsing logic**: The Zillow APIs return structured data, so you don't need to use BeautifulSoup, XPath, or fragile CSS selectors.
* **No need to maintain parameters**: Unlike the Universal Scraper API, you don't need to manage parameters such as `js_render`, `premium_proxy`, or others.
* **Simplified integration**: Purpose-built endpoints for Zillow data that require minimal code to implement.
* **Reliable and accurate**: Specialized extraction logic that consistently delivers property data.
* **Fixed pricing for predictable scaling**: Clear cost structure that makes budgeting for large-scale scraping easier.
### Using the Zillow Property Data API
The [Zillow Property Data API](/scraper-apis/get-started/zillow-property) returns valuable data points such as precise location coordinates, address, price, tax rates, property dimensions, agent details, etc., all in a standardized JSON format that's immediately usable in your applications.
Here's the updated code using the Zillow Property Data API:
```python Zillow Property Data API theme={null}
# pip install requests
import requests
import csv
# example Zillow property ZPID
zpid = "32294383"
api_endpoint = "https://realestate.api.zenrows.com/v1/targets/zillow/properties/"
# get the property data
def get_property_data(zpid):
url = api_endpoint + zpid
params = {
"apikey": "YOUR_ZENROWS_API_KEY",
}
response = requests.get(url, params=params)
if response.status_code == 200:
return response.json()
else:
print(f"Request failed with status code {response.status_code}: {response.text}")
return None
# save the property data to CSV
def save_property_to_csv(property_data, filename="zillow_property.csv"):
if not property_data:
print("No data to save")
return
# the API returns clean, structured data that can be saved directly
with open(filename, mode="w", newline="", encoding="utf-8") as file:
# get all fields from the API response
fieldnames = property_data.keys()
writer = csv.DictWriter(file, fieldnames=fieldnames)
writer.writeheader()
writer.writerow(property_data)
print(f"Property data saved to {filename}")
# process and save to CSV
property_data = get_property_data(zpid)
save_property_to_csv(property_data)
```
When you run the code, you'll get an output CSV file with all the data points:
Congratulations! 🎉 You've successfully upgraded to using an API that delivers clean, structured property data ready for immediate use.
Now, let's explore how the Zillow Discovery API can help you search for properties and retrieve multiple listings with similar ease.
### Using the Zillow Discovery API
The [Zillow Discovery API](/scraper-apis/get-started/zillow-discovery) enables property searching with results that include essential details like property addresses, prices with currency symbols, bedroom/bathroom counts, listing status, property types, direct links to property pages, etc.
The API also handles pagination, making it easy to navigate through multiple pages of results.
```python Zillow Discovery API theme={null}
# pip install requests
import requests
import csv
# Search properties by URL
url = 'https://www.zillow.com/new-york-ny/'
params = {
'apikey': "YOUR_ZENROWS_API_KEY",
'url': url,
}
response = requests.get('https://realestate.api.zenrows.com/v1/targets/zillow/discovery/', params=params)
if response.status_code == 200:
data = response.json()
properties = data.get("property_list", [])
if properties:
with open("zillow_search_results.csv", mode="w", newline="", encoding="utf-8") as file:
writer = csv.DictWriter(file, fieldnames=properties[0].keys())
writer.writeheader()
writer.writerows(properties)
print(f"{len(properties)} properties saved to zillow_search_results.csv")
else:
print("No properties found in search results")
else:
print(f"Request failed with status code {response.status_code}: {response.text}")
```
When you run the code, you'll get a CSV file containing property listings.
## Conclusion
The benefits of migrating from the Universal Scraper API to the dedicated Zillow Scraper API extend beyond simplified code. It offers maintenance-free operation as ZenRows handles all Zillow website changes, provides more reliable performance with consistent response times, and enhances data coverage with specialized fields not available through the Universal Scraper API, where you need to maintain parameters.
By following this guide, you have successfully upgraded to using APIs that deliver clean, structured property data ready for immediate use, allowing you to build scalable real estate data applications without worrying about the complexities of web scraping or HTML parsing.
# Introduction to Scraper APIs
Source: https://docs.zenrows.com/scraper-apis/introduction
ZenRows® introduces the Scraper APIs, **a specialized tool for seamless data extraction from major e-commerce platforms and real estate websites**. Designed for precision and performance, this API provides direct access to structured data, empowering businesses and developers to extract information effortlessly.
## Key Features
Discover the core functionalities of our API, designed to simplify data extraction and provide unparalleled accuracy. Here are the highlights:
* **Domain-Specific Targeting:** Extract data from popular e-commerce sites like Amazon and Walmart or top real estate platforms like Zillow and Idealista.
* **Geolocation Support:** Use the country parameter to access localized data for specific regions. We offer a pool of over 55 million residential IPs from more than 190 countries.
* **Simplified Integration:** Predefined, intuitive endpoints make it easy to fetch product details, reviews, property listings, and search results without complex configurations.
* **Reliable and Accurate:** Our API delivers consistently high-quality, structured data, ensuring you get the information you need with minimal effort.
## Parameter Overview
To make the most of our API, understanding the available parameters for each request is essential. Here's a breakdown:
| PARAMETER | TYPE | DEFAULT | DESCRIPTION |
| --------------------------------- | -------------- | -------------------------------------------------------------------- | ------------------------------------------------------------------------------------------------------------------------------------------------------------------------------------------------------------------------------------------------------------------------------------------------------------------------------------------------------------- |
| [**apikey**](#api-key) `required` | `string` | [**Get Your Free API Key**](https://app.zenrows.com/register?p=free) | Your unique API key for authentication. |
| **country** `optional` | `string` | | Target a specific country for geo-restricted data (e.g., `es` for Spain). |
| **url** | `string ` | | The URL where the desired data must be retrieved from. |
| **lang** | `string` | | The language to display results. Supported values: `"en"`, `"es"`, `"ca"`, `"it"`, `"pt"`, `"fr"`, `"de"`, `"da"`, `"fi"`, `"nb"`, `"nl"`, `"pl"`, `"ro"`, `"ru"`, `"sv"`, `"el"`, `"zh"`, `"uk"`. Example: `lang=en`. |
| **page** | `number` | | The search results page to retrieve. Example: `page=2`. |
| **order** | `string` | | Determines the sorting of search results based on specified criteria. Supported values: `"relevance"`, `"lowest_price"`, `"highest_price"`, `"most_recent"`, `"least_recent"`, `"highest_price_reduction"`, `"lower_price_per_m2"`, `"highest_price_per_m2"`, `"biggest"`, `"smallest"`, `"highest_floors"`, `"lowest_floors"`. Example: `order=most_recent`. |
| **tld** | `string` | `.com` | The top-level domain of the website. Supported examples: `.com`, `.it`, `.pt`, `.de`, etc. |
| **country** | `string` | `us` | The originating country for the product retrieval. Example: `country=es`. |
| **query** `required` | `string` | | The search term you want to query on Walmart. Must be URL-encoded. Example: `Wireless+Headphones`. |
Some parameters depend on the target website and/or the type of request, allowing for more precise and tailored data extraction. For more details, head to the desired API documentation.
## Pricing
ZenRows® offers flexible plans tailored to different web scraping needs, starting from \$69 per month. This entry-level plan allows you to scrape starting at \$1.05 per 1,000 requests, offering cost-effective options for varying volumes. For more demanding needs, our Enterprise plans scale up to \$0.75 per 1,000 requests.
# Setting Up the Scraper APIs
Source: https://docs.zenrows.com/scraper-apis/scraper-apis-setup
Learn how to set up and integrate ZenRows® Scraper APIs seamlessly. This guide covers everything from generating API credentials to optimizing your configuration for efficient data extraction.Whether you're a beginner or an experienced developer, you'll learn how to generate and access your API credentials, integrate them into your applications, and configure key settings to optimize data extraction.
ZenRows offers multiple APIs tailored for different industries and use cases. You'll be able to retrieve structured data from e-commerce, real estate, travel, and many other websites with minimal effort.
## Initial Setup
To get started with the Residential Proxies, follow these steps:
To get started, create a ZenRows account by visiting the [Registration Page](https://app.zenrows.com/register). Simply provide your email, set a password, and follow the verification steps. If you already have an account, log in to access your dashboard.
Once logged in, navigate to the [Playground Page](https://app.zenrows.com/apis/catalog) under the Scraper APIs section. Here, you'll find a variety of APIs tailored for different scraping needs.
Select the API that best suits your requirements to proceed with integration.
After selecting an API, configure the necessary parameters such as the target URL, request method, and any additional options required for your use case.
Click the **"Create Code"** button to generate an API request code tailored to your selections. The system will provide a ready-to-use snippet in multiple programming languages.
Copy the generated code and integrate it into your application to start extracting data seamlessly.
## How it Works
The core of the ZenRows API is the API Endpoint, which is structured based on the industry, target website, type of request, and query parameters. This modular approach allows you to extract data efficiently from various sources.
```bash theme={null}
https://.api.zenrows.com/v1/targets///?
```
Each part of the URL serves a specific purpose:
* `` The industry category (e.g., ecommerce, realestate, serp).
* `` The target website (e.g., amazon, idealista, google).
* `` The type of data you want (e.g., products, reviews, search).
* `` The unique identifier for the request, such as a product ID, property ID, or query.
* `` Your personal API key for authentication and access.
Here's an example for Amazon Product Information API:
```bash theme={null}
https://ecommerce.api.zenrows.com/v1/targets/amazon/products/{asin}
```
Breaking it down:
* Industry: `ecommerce`
* Website: `amazon`
* Type of Request: `products`
* Query ID: `{asin}` (Amazon Standard Identification Number, used for product lookup)
### Customization with Additional Parameters
Depending on the website, you may include extra parameters to refine your request:
* `.tld` Specify the top-level domain (e.g., `.com`, `.co.uk`, `.de`).
* `country` Set the country code to retrieve localized data.
* `filters` Apply filters to extract specific data.
## API key
Your API Key is the gateway to the ZenRows Scraper APIs, functioning as both an authentication tool and an identifier for all your requests. Without it, you won't be able to access ZenRows' features or receive any scraped data.
You can easily [create your API Key](https://app.zenrows.com/register?p=free) by signing up for an account.
Make sure to store your key securely and never share it publicly.
## Frequently Asked Questions (FAQs)
To authenticate requests, use your ZenRows API key. Replace `YOUR_ZENROWS_API_KEY` in the URL with your actual API key.
Yes, you can regenerate your API key from your settings page. Keep in mind that once regenerated, the old key will no longer be valid.
Yes, ZenRows offers a free tier so you can test the API before committing to a paid plan.
# Frequently Asked Questions
Source: https://docs.zenrows.com/scraping-browser/faq
Using ZenRows Scraping Browser saves you from the hassle of managing proxies, rotating IPs, and dealing with browser automation setup. With just one line of code, you get access to a fully managed browser with residential proxies.
At the moment, ZenRows® Scraping Browser cannot solve CAPTCHAs. You will need to handle CAPTCHA solving through third-party services if required.
You can also try our [Universal Scraper API](/universal-scraper-api/api-reference), which comes with everything available on the Scraping Browser, plus antibot capabilities, anti-CAPTCHAs and many more.
The ZenRows® Scraping Browser uses the Chrome DevTools Protocol (CDP) as its communication standard. CDP is a powerful protocol used for browser automation and debugging, allowing you to control a browser instance programmatically.
## Why CDP?
CDP is widely adopted because it provides deep control over browser behavior, offering features like:
* **Page interaction:** Automate navigation, clicks, form submissions, etc.
* **Network monitoring:** Access detailed network activity, including headers, responses, and requests.
* **DOM manipulation:** Direct interaction with and modification of the Document Object Model (DOM).
* **JavaScript execution:** Run JavaScript code within the page context.
* **Performance tracking:** Monitor performance metrics, including rendering and page load speeds.
* **Screenshots & PDFs:** Capture visual representations of the page.
By leveraging CDP, the ZenRows Scraping Browser allows you to interact with web pages just like a human user would, while also benefiting from additional features like IP rotation and proxy management.
## How is CDP different from other protocols?
Compared to other protocols like WebDriver (used by Selenium), CDP is generally faster and more capable because it communicates directly with the browser's core without the intermediary of a WebDriver layer. This direct interaction gives CDP greater flexibility and control, making it the protocol of choice for ZenRows Scraping Browser.
No, ZenRows Scraping Browser does not allow programmatically changing the viewport or window size. Methods like page.setViewportSize() or similar browser commands are blocked and will not take effect. The browser window and viewport are managed automatically to optimize for anti-bot protection and reliability.
If you need to take screenshots at different sizes, this is currently not supported by resizing the window or viewport. The browser will always use a real, consistent window size that matches the fingerprint.
For reference, ZenRows also restricts other browser-modifying actions, such as changing the user agent or certain device metrics. If you have specific requirements or questions about supported features, please contact our support team.
# Country Targeting for ZenRows Scraping Browser
Source: https://docs.zenrows.com/scraping-browser/features/country
ZenRows Scraping Browser enables precise country-level targeting for your web scraping operations, letting you access content as if you were browsing from a specific country. This is essential for geo-restricted content, localized pricing, and market research across nations.
## What is Country Targeting?
Country-targeting routes your scraping requests through residential IP addresses from a specific country, providing the most precise geolocation control available. Unlike world region targeting, which covers broad areas, country targeting gives you IPs from individual nations.
**Key benefits:**
* Access country-specific content and services
* Accurate localized pricing and product data
* Compliance testing for legal jurisdictions
* Ad verification and fraud prevention by country
* Market research with country-level precision
Auto-rotate and Residential IPs are pre-configured and enabled by default for all ZenRows Scraping Browser users. Country targeting works seamlessly with these features to provide optimal performance.
## How to Configure Country Targeting
You can configure country targeting in two ways:
* **ZenRows SDK:** Recommended for most users (simplest, most robust)
* **Direct WebSocket URL:** For advanced or custom integrations
For custom integrations or direct control, specify the country using the `proxy_country` parameter in the WebSocket URL.
```bash theme={null}
wss://browser.zenrows.com?apikey=YOUR_ZENROWS_API_KEY&proxy_country=es
```
```javascript Node.js theme={null}
const puppeteer = require('puppeteer-core');
const wsUrl = 'wss://browser.zenrows.com?apikey=YOUR_ZENROWS_API_KEY&proxy_country=es';
(async () => {
const browser = await puppeteer.connect({ browserWSEndpoint: wsUrl });
const page = await browser.newPage();
await page.goto('https://example.com');
console.log(await page.title());
await browser.close();
})();
```
```python Python theme={null}
import asyncio
from pyppeteer import connect
async def main():
ws_url = 'wss://browser.zenrows.com?apikey=YOUR_ZENROWS_API_KEY&proxy_country=es'
browser = await connect(browserWSEndpoint=ws_url)
page = await browser.newPage()
await page.goto('https://example.com')
print(await page.title())
await browser.close()
asyncio.get_event_loop().run_until_complete(main())
```
ZenRows supports residential IPs from over 100 countries worldwide. For the complete list and codes, see our [Premium Proxy Countries List](/first-steps/faq#what-is-geolocation-and-what-are-all-the-premium-proxy-countries).
**Most Popular:**
* **us** - United States
* **gb** - United Kingdom
* **br** - Brazil
* **de** - Germany
* **ca** - Canada
* **au** - Australia
* **fr** - France
* **in** - India
* **es** - Spain
* **it** - Italy
* **nl** - Netherlands
For custom integrations or direct control, specify the country using the `proxy_country` parameter in the WebSocket URL.
```bash theme={null}
wss://browser.zenrows.com?apikey=YOUR_ZENROWS_API_KEY&proxy_country=es
```
```javascript Node.js theme={null}
const { ScrapingBrowser, ProxyCountry } = require('@zenrows/scraping-browser');
const { chromium } = require('playwright');
(async () => {
const scrapingBrowser = new ScrapingBrowser({ apiKey: 'YOUR_ZENROWS_API_KEY' });
// Target Germany
const connectionURL = scrapingBrowser.getConnectURL({
proxy: { location: ProxyCountry.DE },
});
const browser = await chromium.connectOverCDP(connectionURL);
const page = await browser.newPage();
await page.goto('https://example.com');
console.log(await page.title());
await browser.close();
})();
```
```python Python theme={null}
import asyncio
from playwright.async_api import async_playwright
async def main():
ws_url = 'wss://browser.zenrows.com?apikey=YOUR_ZENROWS_API_KEY&proxy_country=es'
async with async_playwright() as p:
browser = await p.chromium.connect_over_cdp(ws_url)
page = await browser.new_page()
await page.goto('https://example.com')
print(await page.title())
await browser.close()
asyncio.run(main())
```
ZenRows supports residential IPs from over 100 countries worldwide. For the complete list and codes, see our [Premium Proxy Countries List](/first-steps/faq#what-is-geolocation-and-what-are-all-the-premium-proxy-countries).
**Most Popular:**
* **us** - United States
* **gb** - United Kingdom
* **br** - Brazil
* **de** - Germany
* **ca** - Canada
* **au** - Australia
* **fr** - France
* **in** - India
* **es** - Spain
* **it** - Italy
* **nl** - Netherlands
The ZenRows SDK offers the easiest way to configure country targeting, with built-in error handling and connection management.
```javascript Node.js Puppeteer theme={null}
const { ScrapingBrowser, ProxyCountry } = require('@zenrows/scraping-browser');
const puppeteer = require('puppeteer-core');
(async () => {
const scrapingBrowser = new ScrapingBrowser({ apiKey: 'YOUR_ZENROWS_API_KEY' });
// Target Spain
const connectionURL = scrapingBrowser.getConnectURL({
proxy: { location: ProxyCountry.ES },
});
const browser = await puppeteer.connect({ browserWSEndpoint: connectionURL });
const page = await browser.newPage();
await page.goto('https://example.com');
console.log(await page.title());
await browser.close();
})();
```
```javascript Node.js Playwright theme={null}
const { ScrapingBrowser, ProxyCountry } = require('@zenrows/scraping-browser');
const { chromium } = require('playwright');
(async () => {
const scrapingBrowser = new ScrapingBrowser({ apiKey: 'YOUR_ZENROWS_API_KEY' });
// Target Germany
const connectionURL = scrapingBrowser.getConnectURL({
proxy: { location: ProxyCountry.DE },
});
const browser = await chromium.connectOverCDP(connectionURL);
const page = await browser.newPage();
await page.goto('https://example.com');
console.log(await page.title());
await browser.close();
})();
```
**Popular SDK Country Options:**
* `ProxyCountry.US` - United States
* `ProxyCountry.GB` - United Kingdom
* `ProxyCountry.BR` - Brazil
* `ProxyCountry.DE` - Germany
* `ProxyCountry.FR` - France
* `ProxyCountry.IN` - India
* `ProxyCountry.ES` - Spain
* `ProxyCountry.CA` - Canada
* `ProxyCountry.AU` - Australia
* `ProxyCountry.JP` - Japan
## Best Practices
**Choosing the Right Country:**
* Select countries based on your target market or content
* Consider local business hours and time zones for time-sensitive scraping
* Test with multiple countries to understand regional content differences
**SDK vs Direct Connection:**
* **Use the SDK** for most projects. It offers better error handling and automatic retries
* **Direct WebSocket** is for custom frameworks or specific connection control
**Performance Optimization:**
* Some countries have larger IP pools and better performance
* Monitor success rates and adjust the country selection accordingly
* Use fallback countries if your primary choice has issues
## Troubleshooting
**Common Issues and Solutions:**
**Country Code Errors:**
* Use the correct ISO country code (e.g., 'es' for Spain)
* Check the country list to ensure support
* Use lowercase codes in direct WebSocket connections
**No Content Differences:**
* Some sites may not vary by country. Test manually by accessing the website
* Try different countries to verify geo-targeting
* Some sites use detection beyond IP geolocation
**Connection Issues:**
* Some countries may have smaller IP pools. Try alternative countries
* Monitor the response error for indications that may help
* Use world region targeting if country-level access is problematic
You cannot use both world region and country targeting at the same time. Select the level of precision you require, whether broad regional coverage or targeted to a specific country.
## Next Steps
* Explore [Session TTL Configuration](/scraping-browser/features/session-ttl) to control browser session duration
* Learn about [World Region Targeting](/scraping-browser/features/world-region) for broader coverage
* See the ZenRows SDK Repository for advanced features and examples
* Review [Premium Proxy Countries List](/first-steps/faq#what-is-geolocation-and-what-are-all-the-premium-proxy-countries) for all available countries
* Check the [Practical Use Cases](/scraping-browser/help/practical-use-cases) for real world examples
# Session TTL Configuration for ZenRows Scraping Browser
Source: https://docs.zenrows.com/scraping-browser/features/session-ttl
ZenRows Scraping Browser lets you control the duration of your browser sessions with Session TTL (Time To Live) configuration. This is crucial for managing resource usage, maintaining session consistency, and optimizing scraping workflows.
## What is Session TTL?
Session TTL (Time To Live) controls how long a browser session stays active before terminating. Think of it as a timer for your scraping session after the time expires, the session closes automatically, freeing up resources and ensuring clean session management.
**Why Session TTL matters:**
* **Resource Management:** Prevents sessions from running indefinitely
* **Cost Control:** Helps manage usage costs by auto-terminating idle sessions
* **Session Consistency:** Maintains stable connections for multi-step workflows
* **Workflow Optimization:** Lets you match session duration to your scraping needs
The default Session TTL is 3 minutes (180 seconds), which works well for most tasks. You can customize this between 1 minute (60 seconds) and 15 minutes (900 seconds).
## How to Configure Session TTL
You can configure Session TTL in two ways:
* **ZenRows SDK:** Recommended for most users (simple, robust)
* **Direct WebSocket URL:** For advanced or custom integrations
For advanced users or custom integrations, specify Session TTL in the WebSocket URL using the `session_ttl` parameter with duration strings.
```bash theme={null}
wss://browser.zenrows.com?apikey=YOUR_ZENROWS_API_KEY&session_ttl=2m
```
**Duration String Examples:**
* `1m` - 1 minute (60 seconds)
* `2m` - 2 minutes (120 seconds)
* `5m` - 5 minutes (300 seconds)
* `10m` - 10 minutes (600 seconds)
* `15m` - 15 minutes (900 seconds - max)
```javascript Node.js theme={null}
const puppeteer = require('puppeteer-core');
const wsUrl = 'wss://browser.zenrows.com?apikey=YOUR_ZENROWS_API_KEY&session_ttl=5m';
(async () => {
const browser = await puppeteer.connect({ browserWSEndpoint: wsUrl });
const page = await browser.newPage();
await page.goto('https://example.com');
await browser.close();
})();
```
```python Python theme={null}
import asyncio
from pyppeteer import connect
async def main():
ws_url = 'wss://browser.zenrows.com?apikey=YOUR_ZENROWS_API_KEY&session_ttl=5m'
browser = await connect(browserWSEndpoint=ws_url)
page = await browser.newPage()
await page.goto('https://example.com')
await browser.close()
asyncio.get_event_loop().run_until_complete(main())
```
For advanced users or custom integrations, specify Session TTL in the WebSocket URL using the `session_ttl` parameter with duration strings.
```bash theme={null}
wss://browser.zenrows.com?apikey=YOUR_ZENROWS_API_KEY&session_ttl=2m
```
**Duration String Examples:**
* `1m` - 1 minute (60 seconds)
* `2m` - 2 minutes (120 seconds)
* `5m` - 5 minutes (300 seconds)
* `10m` - 10 minutes (600 seconds)
* `15m` - 15 minutes (900 seconds - max)
```javascript Node.js theme={null}
const { chromium } = require('playwright');
const wsUrl = 'wss://browser.zenrows.com?apikey=YOUR_ZENROWS_API_KEY&session_ttl=5m';
(async () => {
const browser = await chromium.connectOverCDP(wsUrl);
const page = await browser.newPage();
await page.goto('https://example.com');
await browser.close();
})();
```
```python Python theme={null}
import asyncio
from playwright.async_api import async_playwright
async def main():
ws_url = 'wss://browser.zenrows.com?apikey=YOUR_ZENROWS_API_KEY&session_ttl=5m'
async with async_playwright() as p:
browser = await p.chromium.connect_over_cdp(ws_url)
page = await browser.new_page()
await page.goto('https://example.com')
await browser.close()
asyncio.run(main())
```
The ZenRows SDK offers the most user-friendly way to configure Session TTL, featuring automatic session management and error handling.
```javascript Node.js Puppeteer theme={null}
const { ScrapingBrowser } = require('@zenrows/scraping-browser');
const puppeteer = require('puppeteer-core');
(async () => {
const scrapingBrowser = new ScrapingBrowser({ apiKey: 'YOUR_ZENROWS_API_KEY' });
// 2-minute session
const connectionURL = scrapingBrowser.getConnectURL({ sessionTTL: 120 });
const browser = await puppeteer.connect({ browserWSEndpoint: connectionURL });
const page = await browser.newPage();
await page.goto('https://example.com');
await browser.close();
})();
```
```javascript Node.js Playwright theme={null}
const { ScrapingBrowser } = require('@zenrows/scraping-browser');
const { chromium } = require('playwright');
(async () => {
const scrapingBrowser = new ScrapingBrowser({ apiKey: 'YOUR_ZENROWS_API_KEY' });
// 5-minute session
const connectionURL = scrapingBrowser.getConnectURL({ sessionTTL: 300 });
const browser = await chromium.connectOverCDP(connectionURL);
const page = await browser.newPage();
await page.goto('https://example.com');
await browser.close();
})();
```
**SDK Configuration Examples:**
```javascript theme={null}
// 1-minute session
const quickSession = scrapingBrowser.getConnectURL({ sessionTTL: 60 });
// 5-minute session
const mediumSession = scrapingBrowser.getConnectURL({ sessionTTL: 300 });
// 15-minute session (maximum)
const longSession = scrapingBrowser.getConnectURL({ sessionTTL: 900 });
```
## Choosing the Right Session TTL
**Session Duration Guidelines:**
**1-2 Minutes (60-120 seconds):**
* Quick data extraction from single pages
* Simple form submissions
* Basic content scraping
* Testing and development
**3-5 Minutes (180-300 seconds):**
* Multi-page navigation
* Workflows with several steps
* Moderate data collection
* Most general scraping
**10-15 Minutes (600-900 seconds):**
* Complex multi-step workflows
* Large-scale extraction
* User interaction simulation
* Long-running automation
## Combining Session TTL with Other Features
Session TTL works seamlessly with other ZenRows features for advanced scraping setups.
### Session TTL + Country Targeting
```javascript Node.js theme={null}
const connectionURL = scrapingBrowser.getConnectURL({
sessionTTL: 300, // 5 minutes
proxy: { location: ProxyCountry.ES },
});
```
### Session TTL + World Region Targeting
```javascript Node.js theme={null}
const connectionURL = scrapingBrowser.getConnectURL({
sessionTTL: 600, // 10 minutes
proxy: { location: ProxyRegion.Europe },
});
```
### Direct WebSocket with Multiple Parameters
```bash theme={null}
wss://browser.zenrows.com?apikey=YOUR_API_KEY&session_ttl=8m&proxy_country=us
```
## Best Practices
**Optimize for Your Workflow:**
* Match session duration to your scraping needs
* Add a small buffer (30-60 seconds) for delays
* Use shorter sessions for simple tasks
**SDK vs Direct Connection:**
* **SDK:** Use for most projects and handles sessions automatically
* **Direct WebSocket:** Use for custom frameworks or specific control
**Monitoring and Debugging:**
* Monitor session usage in the ZenRows dashboard
* Log session start/end times
* Use proper durations to avoid premature expiry
**Error Handling:**
```javascript Node.js theme={null}
try {
const browser = await puppeteer.connect({ browserWSEndpoint: connectionURL });
// Your scraping code
} catch (error) {
if (error.message.includes('session expired')) {
console.log('Session TTL expired, consider increasing duration');
}
// Other errors
}
```
## Troubleshooting
**Common Issues and Solutions:**
**Session Expires Too Quickly:**
* Increase sessionTTL for more time
* Monitor execution time and add buffer
* Break long workflows into smaller sessions
**Invalid TTL Values:**
* TTL must be 60-900 seconds in SDK
* Use valid duration strings (1m, 2m, etc.) for WebSocket
* Match TTL to workflow
**Session Management Issues:**
* Always close browser connections properly
* Handle session expiration errors
* Monitor usage in the [Analytics dashboard](https://app.zenrows.com/analytics/scraping-browser)
The sessionTTL parameter uses seconds with the SDK (e.g., 120 for 2 min) and duration strings for direct WebSocket (e.g., "2m").
## Next Steps
* Learn about [Country Targeting](/scraping-browser/features/country)
* Explore [World Region Targeting](/scraping-browser/features/world-region)
* See the ZenRows SDK Repository for advanced features and examples
* Review the [Practical Use Cases](/scraping-browser/help/practical-use-cases) for real world examples
# World Region Configuration for ZenRows Scraping Browser
Source: https://docs.zenrows.com/scraping-browser/features/world-region
ZenRows Scraping Browser empowers you to target specific regions of the world for your web scraping operations, unlocking geo-restricted content and enabling region-specific data collection. This guide shows you how to configure world region targeting using both the ZenRows SDK (recommended) and direct WebSocket connections.
## What is World Region Targeting?
World region targeting routes your scraping requests through residential IPs from a chosen geographic area. This is crucial when websites display different content, pricing, or availability based on visitor location.
**Typical use cases:**
* Accessing geo-locked content or services
* Price comparison across markets
* Testing website localization and UX
* Circumventing geo-blocks for data gathering
* Ad verification in multiple regions
Auto-rotate and Residential IPs are pre-configured and enabled by default for all ZenRows Scraping Browser users, ensuring optimal performance and reliability.
## How to Configure World Region
You can configure world region targeting in two ways:
* **ZenRows SDK:** Easiest and most robust option for most users
* **Direct WebSocket URL:** For advanced or custom integrations
Specify the region in the WebSocket URL with the `proxy_region` parameter:
```bash theme={null}
wss://browser.zenrows.com?apikey=YOUR_ZENROWS_API_KEY&proxy_region=eu
```
**Examples:**
```javascript Node.js theme={null}
const puppeteer = require('puppeteer-core');
const connectionURL = 'wss://browser.zenrows.com?apikey=YOUR_ZENROWS_API_KEY&proxy_region=eu';
(async () => {
const browser = await puppeteer.connect({ browserWSEndpoint: connectionURL });
const page = await browser.newPage();
await page.goto('https://example.com');
console.log(await page.title());
await browser.close();
})();
```
```python Python theme={null}
import asyncio
from pyppeteer import connect
async def main():
ws_url = 'wss://browser.zenrows.com?apikey=YOUR_ZENROWS_API_KEY&proxy_region=eu'
browser = await connect(browserWSEndpoint=ws_url)
page = await browser.newPage()
await page.goto('https://example.com')
print(await page.title())
await browser.close()
asyncio.get_event_loop().run_until_complete(main())
```
**Available Region Codes:**
* `eu` - Europe
* `na` - North America
* `ap` - Asia Pacific
* `sa` - South America
* `af` - Africa
* `me` - Middle East
Specify the region in the WebSocket URL with the `proxy_region` parameter:
```bash theme={null}
wss://browser.zenrows.com?apikey=YOUR_ZENROWS_API_KEY&proxy_region=eu
```
**Examples:**
```javascript Node.js theme={null}
const { chromium } = require('playwright');
(async () => {
const browser = await chromium.connectOverCDP('wss://browser.zenrows.com?apikey=YOUR_ZENROWS_API_KEY&proxy_region=eu');
const page = await browser.newPage();
await page.goto('https://example.com');
console.log(await page.title());
await browser.close();
})();
```
```python Python theme={null}
import asyncio
from playwright.async_api import async_playwright
async def main():
async with async_playwright() as p:
browser = await p.chromium.connect_over_cdp('wss://browser.zenrows.com?apikey=YOUR_ZENROWS_API_KEY&proxy_region=eu')
page = await browser.new_page()
await page.goto('https://example.com')
print(await page.title())
await browser.close()
asyncio.run(main())
```
**Available Region Codes:**
* `eu` - Europe
* `na` - North America
* `ap` - Asia Pacific
* `sa` - South America
* `af` - Africa
* `me` - Middle East
The ZenRows SDK makes region configuration simple and manages connections automatically. Recommended for most users.
```javascript Node.js Puppeteer theme={null}
const { ZenRowsBrowser, ProxyRegion } = require('zenrows');
(async () => {
const browser = await ZenRowsBrowser.puppeteer({
apiKey: 'YOUR_ZENROWS_API_KEY',
proxyRegion: ProxyRegion.Europe // or .NorthAmerica, .AsiaPacific, etc.
});
const page = await browser.newPage();
await page.goto('https://example.com');
console.log(await page.title());
await browser.close();
})();
```
```javascript Node.js Playwright theme={null}
const { ZenRowsBrowser, ProxyRegion } = require('zenrows');
(async () => {
const browser = await ZenRowsBrowser.playwright({
apiKey: 'YOUR_ZENROWS_API_KEY',
proxyRegion: ProxyRegion.Europe // or .NorthAmerica, .AsiaPacific, etc.
});
const page = await browser.newPage();
await page.goto('https://example.com');
console.log(await page.title());
await browser.close();
})();
```
**Available SDK Region Options:**
* `ProxyRegion.Europe` - European residential IPs
* `ProxyRegion.NorthAmerica` - North American residential IPs
* `ProxyRegion.AsiaPacific` - Asia-Pacific residential IPs
* `ProxyRegion.SouthAmerica` - South American residential IPs
* `ProxyRegion.Africa` - African residential IPs
* `ProxyRegion.MiddleEast` - Middle Eastern residential IPs
## Best Practices
**Choosing the Right Region:**
* Select the region closest to your target audience or where the content is most relevant
* Consider local time zones and business hours for time-sensitive scraping
**SDK vs Direct Connection:**
* Use the SDK for most projects (better error handling and connection management)
* Use direct WebSocket only for fine-grained control or custom framework integration
**Testing and Validation:**
* Test your region config with a simple request to verify IP location
* Monitor scraping results to ensure you're seeing expected regional content
## Troubleshooting
**Common Issues:**
* **Invalid region code:** Double-check you're using the correct region codes
* **No regional content difference:** Some sites may not vary by region. Verify with manual testing
* **Connection timeouts:** Proxy pools may vary by region; try another if needed
**Debugging Tips:**
* Use browser dev tools to inspect the IP address
* Test the same URL from different regions to confirm content variation
* Check ZenRows dashboard for logs and error details
For more granular targeting, see [Country Targeting](/scraping-browser/features/country).
## Next Steps
* Learn about [Country Targeting](/scraping-browser/features/country) for precision
* Explore [Session TTL Configuration](/scraping-browser/features/session-ttl) to manage session duration
* See the ZenRows SDK Repository for advanced features and examples
* Review the [Practical Use Cases](/scraping-browser/help/practical-use-cases) for real world examples
# Integrating ZenRows Scraping Browser with Playwright
Source: https://docs.zenrows.com/scraping-browser/get-started/playwright
Learn to extract data from any website using ZenRows' Scraping Browser with Playwright. This guide walks you through creating your first browser-based scraping request that can handle complex JavaScript-heavy sites with full browser automation.
ZenRows' Scraping Browser provides cloud-based Chrome instances you can control using Playwright. Whether dealing with dynamic content, complex user interactions, or sophisticated anti-bot protection, you can get started in minutes with Playwright's powerful automation capabilities.
## 1. Set Up Your Project
### Set Up Your Development Environment
Before diving in, ensure you have the proper development environment and Playwright installed. The Scraping Browser works seamlessly with both Python and Node.js versions of Playwright.
While previous versions may work, we recommend using the latest stable versions for optimal performance and security.
Python 3+ installed (latest stable version recommended). Using an IDE like PyCharm or Visual Studio Code with the Python extension is recommended.
```bash theme={null}
# Install Python (if not already installed)
# Visit https://www.python.org/downloads/ or use package managers:
# macOS (using Homebrew)
brew install python
# Ubuntu/Debian
sudo apt update && sudo apt install python3 python3-pip
# Windows (using Chocolatey)
choco install python
# Install Playwright
pip install playwright
playwright install
```
If you need help setting up your environment, check out our detailed [Playwright web scraping guide](https://www.zenrows.com/blog/playwright-scraping)
Node.js 18+ installed (latest LTS version recommended). Using an IDE like Visual Studio Code or IntelliJ IDEA will enhance your coding experience.
```bash theme={null}
# Install Node.js (if not already installed)
# Visit https://nodejs.org/ or use package managers:
# macOS (using Homebrew)
brew install node
# Ubuntu/Debian (using NodeSource)
curl -fsSL https://deb.nodesource.com/setup_lts.x | sudo -E bash -
sudo apt-get install -y nodejs
# Windows (using Chocolatey)
choco install nodejs
# Install Playwright
npm install playwright
npx playwright install
```
If you need help setting up your environment, check out our detailed [Playwright web scraping guide](https://www.zenrows.com/blog/playwright-scraping)
### Get Your API Key and Connection URL
[Sign Up](https://app.zenrows.com/register?prod=scraping_browser) for a free ZenRows account and get your API key from the [Scraping Browser dashboard](https://app.zenrows.com/scraping-browser). You'll need this key to authenticate your WebSocket connection.
## 2. Make Your First Request
Start with a simple request to understand how the Scraping Browser works with Playwright. We'll use the E-commerce Challenge page to demonstrate how to connect to the browser and extract the page title.
```python Python theme={null}
# pip install playwright
import asyncio
from playwright.async_api import async_playwright
# scraping browser connection URL
connection_url = "wss://browser.zenrows.com?apikey=YOUR_ZENROWS_API_KEY"
async def scraper():
async with async_playwright() as p:
# connect to the scraping browser
browser = await p.chromium.connect_over_cdp(connection_url)
context = browser.contexts[0] if browser.contexts else await browser.new_context()
page = await context.new_page()
await page.goto('https://www.scrapingcourse.com/ecommerce/')
print(await page.title())
await browser.close()
if __name__ == "__main__":
asyncio.run(scraper())
```
```javascript Node.js theme={null}
// npm install playwright
const { chromium } = require('playwright');
// scraping browser connection URL
const connectionURL = 'wss://browser.zenrows.com?apikey=YOUR_ZENROWS_API_KEY';
const scraper = async () => {
// connect to the scraping browser
const browser = await chromium.connectOverCDP(connectionURL);
const page = await browser.newPage();
await page.goto('https://www.scrapingcourse.com/ecommerce/');
console.log(await page.title());
await browser.close();
};
scraper();
```
Replace `YOUR_ZENROWS_API_KEY` with your actual API key and run the script:
```bash Python theme={null}
python scraper.py
```
```bash Node.js theme={null}
node scraper.js
```
### Expected Output
The script will print the page title:
```plaintext theme={null}
ScrapingCourse.com E-commerce Challenge
```
Perfect! You've just made your first web scraping request with the ZenRows Scraping Browser using Playwright.
## 3. Build a Real-World Scraping Scenario
Let's scale up to a practical scraping scenario by extracting product information from the e-commerce site. Using Playwright's powerful selectors and data extraction methods, we'll modify our code to extract product names, prices, and URLs from the page.
```python Python theme={null}
# pip install playwright
import asyncio
from playwright.async_api import async_playwright
# scraping browser connection URL
connection_url = "wss://browser.zenrows.com?apikey=YOUR_ZENROWS_API_KEY"
async def scraper(url):
async with async_playwright() as p:
# connect to the scraping browser
browser = await p.chromium.connect_over_cdp(connection_url)
page = await browser.new_page()
try:
await page.goto(url)
# extract the desired data
await page.wait_for_selector(".product")
products = await page.query_selector_all(".product")
data = []
for product in products:
name = await product.query_selector(".product-name")
price = await product.query_selector(".price")
product_url = await product.query_selector(".woocommerce-LoopProduct-link")
data.append({
"name": await name.text_content() or "",
"price": await price.text_content() or "",
"productURL": await product_url.get_attribute("href") or "",
})
return data
except Exception as error:
return error
finally:
await page.close()
await browser.close()
if __name__ == "__main__":
url = "https://www.scrapingcourse.com/ecommerce/"
products = asyncio.run(scraper(url))
print(products)
```
```javascript Node.js theme={null}
// npm install playwright
const { chromium } = require('playwright');
// connection URL
const connectionURL = 'wss://browser.zenrows.com?apikey=YOUR_ZENROWS_API_KEY';
const scraper = async (url) => {
// connect to the scraping browser
const browser = await chromium.connectOverCDP(connectionURL);
const page = await browser.newPage();
try {
await page.goto(url);
await page.waitForSelector('.product');
// extract the desired data
const data = await page.$$eval('.product', (products) =>
products.map((product) => ({
name: product.querySelector('.product-name')?.textContent.trim() || '',
price: product.querySelector('.price')?.textContent.trim() || '',
productURL: product.querySelector('.woocommerce-LoopProduct-link')?.href || '',
}))
);
return data;
} finally {
await page.close();
await browser.close();
}
};
// execute the scraper function
(async () => {
const url = 'https://www.scrapingcourse.com/ecommerce/';
const products = await scraper(url);
console.log(products);
})();
```
### Run Your Application
Execute your script to test the scraping functionality:
```bash Python theme={null}
python scraper.py
```
```bash Node.js theme={null}
node scraper.js
```
**Example Output**
The script will extract and display product information:
```json theme={null}
[
{
"name": "Abominable Hoodie",
"price": "$69.00",
"productURL": "https://www.scrapingcourse.com/ecommerce/product/abominable-hoodie/"
},
{
"name": "Artemis Running Short",
"price": "$45.00",
"productURL": "https://www.scrapingcourse.com/ecommerce/product/artemis-running-short/"
}
// ... more products
]
```
Congratulations! 🎉 You've successfully built a real-world scraping scenario with Playwright and the ZenRows Scraping Browser.
## 4. Alternative: Using the ZenRows Browser SDK
For a more streamlined development experience, you can use the ZenRows Browser SDK instead of managing WebSocket URLs manually. The SDK simplifies connection management and provides additional utilities.
The ZenRows Browser SDK is currently only available for JavaScript. For more details, see the GitHub Repository.
### Install the SDK
```bash Node.js theme={null}
npm install @zenrows/browser-sdk
```
### Quick Migration from WebSocket URL
If you have existing Playwright code using the WebSocket connection, migrating to the SDK requires minimal changes:
**Before (WebSocket URL):**
```javascript Node.js theme={null}
const { chromium } = require('playwright');
const connectionURL = 'wss://browser.zenrows.com?apikey=YOUR_ZENROWS_API_KEY';
const browser = await chromium.connectOverCDP(connectionURL);
```
**After (SDK):**
```javascript Node.js theme={null}
const { chromium } = require('playwright');
const { ScrapingBrowser } = require('@zenrows/browser-sdk');
const scrapingBrowser = new ScrapingBrowser({ apiKey: 'YOUR_ZENROWS_API_KEY' });
const connectionURL = scrapingBrowser.getConnectURL();
const browser = await chromium.connectOverCDP(connectionURL);
```
### Complete Example with SDK
```javascript Node.js theme={null}
// npm install @zenrows/browser-sdk playwright
const { chromium } = require('playwright');
const { ScrapingBrowser } = require('@zenrows/browser-sdk');
const scraper = async () => {
// Initialize SDK
const scrapingBrowser = new ScrapingBrowser({ apiKey: 'YOUR_ZENROWS_API_KEY' });
const connectionURL = scrapingBrowser.getConnectURL();
const browser = await chromium.connectOverCDP(connectionURL);
const page = await browser.newPage();
await page.goto('https://www.scrapingcourse.com/ecommerce/');
console.log(await page.title());
await browser.close();
};
scraper();
```
### SDK Benefits
* **Simplified configuration:** No need to manually construct WebSocket URLs
* **Better error handling:** Built-in error messages and debugging information
* **Future-proof:** Automatic updates to connection protocols and endpoints
* **Additional utilities:** Access to helper methods and advanced configuration options
The SDK is particularly useful for production environments where you want cleaner code organization and better error handling.
## How Playwright with Scraping Browser Helps
Combining Playwright with ZenRows' Scraping Browser provides powerful advantages for web scraping:
### Key Benefits
* **Cloud-based browser instances:** Run Playwright scripts on remote Chrome instances, freeing up local resources for other tasks.
* **Seamless integration:** Connect your existing Playwright code to ZenRows with just a WebSocket URL change - no complex setup required.
* **Advanced automation:** Use Playwright's full feature set, which includes page interactions, form submissions, file uploads, and complex user workflows.
* **Built-in anti-detection:** Benefit from residential proxy rotation and genuine browser fingerprints automatically.
* **Cross-browser support:** While we use Chromium for optimal compatibility, Playwright's API remains consistent across different browser engines.
* **High concurrency:** Scale your Playwright scripts with up to 150 concurrent browser instances, depending on your plan.
* **Reliable execution:** Cloud infrastructure ensures consistent performance without local browser management overhead.
## Troubleshooting
Below are common issues you might encounter when using Playwright with the Scraping Browser:
If you receive a Connection Refused error, it might be due to:
* **API Key Issues:** Verify that you're using the correct API key.
* **Network Issues:** Check your internet connection and firewall settings.
* **WebSocket Endpoint:** Ensure that the WebSocket URL (`wss://browser.zenrows.com`) is correct.
* Use `page.waitForSelector()` to ensure elements load before extraction
* Increase timeout values for slow-loading pages
```javascript scraper.js theme={null}
await page.goto('https://example.com', { timeout: 60000 }); // 60 seconds
```
* Verify CSS selectors are correct using browser developer tools
* Add `page.waitForLoadState('networkidle')` for dynamic content
* Use existing context when available: `browser.contexts[0] if browser.contexts else await browser.new_context()`
* Properly close pages and browsers to prevent resource leaks
* Handle exceptions properly to ensure cleanup occurs
Although ZenRows rotates IPs, some websites may block them based on location. Try adjusting the region or country settings.
For more information, check our Scraping Browser [Region Documentation](/scraping-browser/scraping-browser-setup#world-region) and [Country Documentation](/scraping-browser/scraping-browser-setup#country).
Our support team is available to assist you if issues persist despite following these solutions. Use the [Scraping Browser dashboard](https://app.zenrows.com/scraping-browser) or email us for personalized help from ZenRows experts.
## Next Steps
You now have a solid foundation for Playwright-based web scraping with ZenRows. Here are some recommended next steps:
* **[Practical Use Cases](/scraping-browser/help/practical-use-cases)**: Learn common scraping patterns, including screenshots, custom JavaScript execution, and form handling.
* **[Complete Scraping Browser Documentation](/scraping-browser/introduction)**: Explore all available features and advanced configuration options for the Scraping Browser.
* **[Playwright Web Scraping Guide](https://www.zenrows.com/blog?q=playwright)**: Dive deeper into Playwright techniques for sophisticated scraping scenarios.
* **[Pricing and Plans](/first-steps/pricing)**: Understand how browser usage is calculated and choose the plan that fits your scraping volume.
## Frequently Asked Questions (FAQ)
Yes, ZenRows Scraping Browser is compatible with Puppeteer as well. The integration is similar, requiring only a change in the connection method to utilize our WebSocket endpoint.
For detailed instructions, refer to our [Puppeteer Integration article](/scraping-browser/get-started/puppeteer).
No, ZenRows Scraping Browser handles proxy configuration and IP rotation automatically. You don't need to set up proxies manually.
Currently, ZenRows® Scraping Browser does not support CAPTCHA solving. For handling CAPTCHAs, you may need to use third-party services.
Consider using our [Universal Scraper API](/universal-scraper-api/api-reference) for additional features like CAPTCHA solving, advanced anti-bot bypass, and more.
Yes! The Scraping Browser supports the full Playwright API. You can use page interactions, screenshots, PDF generation, network interception, and all other Playwright features seamlessly.
You can create multiple pages within the same browser context using `await browser.newPage()` or `await context.newPage()`. Each page operates independently while sharing the same browser session.
Absolutely! Playwright's `expect()` assertions, `waitForSelector()`, and other built-in retry mechanisms work perfectly with the Scraping Browser. These features help handle dynamic content and improve scraping reliability.
Use Playwright's standard screenshot methods:
```python theme={null}
await page.screenshot(path='screenshot.png')
```
The screenshot will be saved locally while the browser runs in the cloud.
Yes! You can intercept requests, modify responses, and monitor network traffic using Playwright's `page.route()` and `page.on('request')` methods with the Scraping Browser.
The main difference is that the browser runs in ZenRows' cloud infrastructure instead of locally. This provides better IP rotation, fingerprint management, and resource efficiency while maintaining the exact same Playwright API.
File downloads work with Playwright's standard download handling. Use `page.waitForDownload()` and the download will be transferred from the cloud browser to your local environment automatically.
# Integrating ZenRows Scraping Browser with Puppeteer
Source: https://docs.zenrows.com/scraping-browser/get-started/puppeteer
Discover how to scrape data from any website using ZenRows' Scraping Browser with Puppeteer. This comprehensive guide demonstrates how to create your first browser automation request capable of handling JavaScript-heavy sites and bypassing sophisticated anti-bot measures.
ZenRows' Scraping Browser offers cloud-hosted Chrome instances that integrate seamlessly with Puppeteer's automation framework. From scraping dynamic content to performing complex browser interactions, you can build robust scraping solutions in minutes using Puppeteer's intuitive API.
## 1. Set Up Your Project
### Set Up Your Development Environment
Ensure you have the necessary development tools and Puppeteer installed before starting. The Scraping Browser supports both Node.js Puppeteer and Python Pyppeteer implementations.
We recommend using the latest stable versions to ensure optimal compatibility and access to the newest features.
Node.js 18+ installed (latest LTS version recommended). Consider using an IDE like Visual Studio Code or WebStorm for enhanced development experience.
```bash theme={null}
# Install Node.js (if not already installed)
# Visit https://nodejs.org/ or use package managers:
# macOS (using Homebrew)
brew install node
# Ubuntu/Debian (using NodeSource)
curl -fsSL https://deb.nodesource.com/setup_lts.x | sudo -E bash -
sudo apt-get install -y nodejs
# Windows (using Chocolatey)
choco install nodejs
# Install Puppeteer Core
npm install puppeteer-core
```
Need help with your setup? Check out our comprehensive [Puppeteer web scraping guide](https://www.zenrows.com/blog/puppeteer-web-scraping)
Python 3+ installed (latest stable version recommended). IDEs like PyCharm or Visual Studio Code with Python extensions provide excellent development support.
```bash theme={null}
# Install Python (if not already installed)
# Visit https://www.python.org/downloads/ or use package managers:
# macOS (using Homebrew)
brew install python
# Ubuntu/Debian
sudo apt update && sudo apt install python3 python3-pip
# Windows (using Chocolatey)
choco install python
# Install Pyppeteer
pip install pyppeteer
```
For detailed setup instructions, refer to our [Pyppeteer scraping tutorial](https://www.zenrows.com/blog/pyppeteer)
### Get Your API Key and Connection URL
[Create a Free Account](https://app.zenrows.com/register?prod=scraping_browser) with ZenRows and retrieve your API key from the [Scraping Browser Dashboard](https://app.zenrows.com/scraping-browser). This key authenticates your WebSocket connection to our cloud browsers.
## 2. Make Your First Request
Begin with a basic request to familiarize yourself with how Puppeteer connects to the Scraping Browser. We'll target the E-commerce Challenge page to demonstrate browser connection and title extraction.
```javascript Node.js theme={null}
// npm install puppeteer-core
const puppeteer = require('puppeteer-core');
// scraping browser connection URL
const connectionURL = 'wss://browser.zenrows.com?apikey=YOUR_ZENROWS_API_KEY';
const scraper = async () => {
// connect to the scraping browser
const browser = await puppeteer.connect({ browserWSEndpoint: connectionURL });
const page = await browser.newPage();
await page.goto('https://www.scrapingcourse.com/ecommerce/');
console.log(await page.title());
await browser.close();
};
scraper();
```
```python Python theme={null}
# pip install pyppeteer
import asyncio
from pyppeteer import connect
# scraping browser connection URL
connection_url = "wss://browser.zenrows.com?apikey=YOUR_ZENROWS_API_KEY"
async def scraper():
# connect to the scraping browser
browser = await connect(browserWSEndpoint=connection_url)
page = await browser.newPage()
await page.goto('https://www.scrapingcourse.com/ecommerce/')
print(await page.title())
await page.close()
await browser.disconnect()
if __name__ == "__main__":
asyncio.run(scraper())
```
Replace `YOUR_ZENROWS_API_KEY` with your actual API key and execute the script:
```bash Node.js theme={null}
node scraper.js
```
```bash Python theme={null}
python scraper.py
```
**Expected Output:**
Your script will display the page title:
```plaintext theme={null}
ScrapingCourse.com E-commerce Challenge
```
Excellent! You've successfully completed your first web scraping request using ZenRows Scraping Browser with Puppeteer.
## 3. Build a Real-World Scraping Scenario
Now let's advance to a comprehensive scraping example by extracting product data from the e-commerce site. We'll enhance our code to collect product names, prices, and URLs using Puppeteer's robust element selection and data extraction capabilities.
```javascript Node.js theme={null}
// npm install puppeteer-core
const puppeteer = require('puppeteer-core');
// scraping browser connection URL
const connectionURL = 'wss://browser.zenrows.com?apikey=YOUR_ZENROWS_API_KEY';
const scraper = async (url) => {
// connect to the scraping browser
const browser = await puppeteer.connect({
browserWSEndpoint: connectionURL,
});
const page = await browser.newPage();
try {
await page.goto(url, { waitUntil: 'networkidle2' });
await page.waitForSelector('.product');
// extract the desired data
const data = await page.$$eval('.product', (products) =>
products.map((product) => ({
name: product.querySelector('.product-name')?.textContent.trim() || '',
price: product.querySelector('.price')?.textContent.trim() || '',
productURL: product.querySelector('.woocommerce-LoopProduct-link')?.href || '',
}))
);
return data;
} finally {
await page.close();
await browser.close();
}
};
// execute the scraper function
(async () => {
const url = 'https://www.scrapingcourse.com/ecommerce/';
const products = await scraper(url);
console.log(products);
})();
```
```python Python theme={null}
# pip install pyppeteer
import asyncio
from pyppeteer import connect
# scraping browser connection URL
connection_url = "wss://browser.zenrows.com?apikey=YOUR_ZENROWS_API_KEY"
async def scraper(url):
# connect to the scraping browser
browser = await connect(browserWSEndpoint=connection_url)
page = await browser.newPage()
try:
await page.goto(url, {"waitUntil": "networkidle2"})
await page.waitForSelector(".product")
# extract the desired data
product_elements = await page.querySelectorAll(".product")
products = []
for product in product_elements:
name_el = await product.querySelector(".product-name")
name = await page.evaluate("(el) => el.textContent.trim()", name_el) if name_el else ""
price_el = await product.querySelector(".price")
price = await page.evaluate("(el) => el.textContent.trim()", price_el) if price_el else ""
url_el = await product.querySelector(".woocommerce-LoopProduct-link")
product_url = await page.evaluate("(el) => el.href", url_el) if url_el else ""
products.append({
"name": name,
"price": price,
"productURL": product_url,
})
return products
finally:
await page.close()
await browser.disconnect()
# execute the scraper function
if __name__ == "__main__":
url = "https://www.scrapingcourse.com/ecommerce/"
products = asyncio.run(scraper(url))
print(products)
```
### Run Your Application
Launch your script to verify the scraping functionality:
```bash Node.js theme={null}
node scraper.js
```
```bash Python theme={null}
python scraper.py
```
**Example Output:**
Your script will collect and display the product information:
```json theme={null}
[
{
"name": "Abominable Hoodie",
"price": "$69.00",
"productURL": "https://www.scrapingcourse.com/ecommerce/product/abominable-hoodie/"
},
{
"name": "Artemis Running Short",
"price": "$45.00",
"productURL": "https://www.scrapingcourse.com/ecommerce/product/artemis-running-short/"
}
// ... additional products
]
```
Outstanding! 🎉 You've successfully implemented a production-ready scraping solution using Puppeteer and the ZenRows Scraping Browser.
## 4. Alternative: Using the ZenRows Browser SDK
For enhanced developer experience, consider using the ZenRows Browser SDK rather than manually managing WebSocket URLs. The SDK streamlines connection handling and offers additional development utilities.
The ZenRows Browser SDK is currently only available for JavaScript. For more details, see the GitHub Repository.
### Install the SDK
```bash Node.js theme={null}
npm install @zenrows/browser-sdk
```
### Quick Migration from WebSocket URL
Transitioning from direct WebSocket connections to the SDK requires minimal code changes:
**Before (WebSocket URL):**
```javascript Node.js theme={null}
const puppeteer = require('puppeteer-core');
const connectionURL = 'wss://browser.zenrows.com?apikey=YOUR_ZENROWS_API_KEY';
const browser = await puppeteer.connect({ browserWSEndpoint: connectionURL });
```
**After (SDK):**
```javascript Node.js theme={null}
const puppeteer = require('puppeteer-core');
const { ScrapingBrowser } = require('@zenrows/browser-sdk');
const scrapingBrowser = new ScrapingBrowser({ apiKey: 'YOUR_ZENROWS_API_KEY' });
const connectionURL = scrapingBrowser.getConnectURL();
const browser = await puppeteer.connect({ browserWSEndpoint: connectionURL });
```
### Complete Example with SDK
```javascript Node.js theme={null}
// npm install @zenrows/browser-sdk puppeteer-core
const puppeteer = require('puppeteer-core');
const { ScrapingBrowser } = require('@zenrows/browser-sdk');
const scraper = async () => {
// Initialize SDK
const scrapingBrowser = new ScrapingBrowser({ apiKey: 'YOUR_ZENROWS_API_KEY' });
const connectionURL = scrapingBrowser.getConnectURL();
const browser = await puppeteer.connect({ browserWSEndpoint: connectionURL });
const page = await browser.newPage();
await page.goto('https://www.scrapingcourse.com/ecommerce/');
console.log(await page.title());
await browser.close();
};
scraper();
```
### SDK Benefits
* **Streamlined configuration:** Eliminates manual WebSocket URL construction
* **Enhanced error handling:** Provides detailed error messages and debugging capabilities
* **Future-proof architecture:** Automatic updates to connection protocols and endpoints
* **Extended utilities:** Access to helper functions and advanced configuration options
The SDK proves especially valuable in production environments where code maintainability and robust error handling are priorities.
## How Puppeteer with Scraping Browser Helps
Integrating Puppeteer with ZenRows' Scraping Browser delivers significant advantages for web automation:
### Key Benefits
* **Cloud-hosted browser instances:** Execute Puppeteer scripts on remote Chrome browsers, preserving local system resources for other applications.
* **Drop-in replacement:** Transform existing Puppeteer code to use ZenRows by simply changing the connection method - no architectural changes required.
* **Full automation capabilities:** Leverage Puppeteer's complete feature set including form interactions, file handling, network monitoring, and custom JavaScript execution.
* **Automatic anti-detection:** Benefit from built-in residential proxy rotation and authentic browser fingerprints without additional configuration.
* **Proven reliability:** Cloud infrastructure delivers consistent performance without the complexity of local browser management.
* **Massive scalability:** Execute up to 150 concurrent browser instances depending on your subscription plan.
* **Network optimization:** Reduced latency and improved success rates through globally distributed infrastructure.
## Troubleshooting
Common challenges when integrating Puppeteer with the Scraping Browser and their solutions:
If you encounter Connection Refused errors, verify these potential causes:
* **API Key Validation:** Confirm you're using the correct API key from your dashboard.
* **Network Connectivity:** Check your internet connection and firewall configurations.
* **WebSocket Endpoint:** Ensure the WebSocket URL (`wss://browser.zenrows.com`) is properly formatted.
* Use `page.waitForSelector()` to ensure elements are available before interaction
* Extend timeout values for slow-loading websites
```javascript Node.js theme={null}
await page.goto('https://example.com', { timeout: 60000 }); // 60 seconds
```
* Validate CSS selectors using browser developer tools
* Implement `waitUntil: 'networkidle2'` for dynamic content loading
* Handle navigation exceptions with proper try-catch blocks
* Ensure proper browser and page cleanup to prevent memory leaks
* Use `page.waitForNavigation()` for multi-step workflows
While ZenRows automatically rotates IP addresses, some websites implement location-based blocking. Consider adjusting regional settings for better access.
Learn more about geographic targeting in our [Region Documentation](/scraping-browser/scraping-browser-setup#world-region) and [Country Configuration](/scraping-browser/scraping-browser-setup#country).
If challenges persist after implementing these solutions, our technical support team is ready to assist. Access help through the [Scraping Browser dashboard](https://app.zenrows.com/scraping-browser) or contact our support team for expert guidance.
## Next Steps
You've established a strong foundation for Puppeteer-based web scraping with ZenRows. Continue your journey with these resources:
* **[Practical Use Cases](/scraping-browser/help/practical-use-cases)**: Explore common automation patterns including screenshot capture, custom JavaScript execution, and form interactions.
* **[Complete Scraping Browser Documentation](/scraping-browser/introduction)**: Discover all available features and configuration options for the Scraping Browser platform.
* **[Puppeteer Web Scraping Guide](https://www.zenrows.com/blog?q=puppeteer)**: Explore advanced Puppeteer techniques for complex scraping challenges.
* **[Pricing and Plans](/first-steps/pricing)**: Learn about browser usage calculations and select the optimal plan for your requirements.
## Frequently Asked Questions (FAQ)
Absolutely! ZenRows Scraping Browser supports both Puppeteer and Playwright automation frameworks. The integration process is similar, requiring only connection method adjustments.
For comprehensive instructions, see our [Playwright Integration guide](/scraping-browser/get-started/playwright).
No manual proxy configuration is required. ZenRows Scraping Browser automatically handles proxy management and IP rotation behind the scenes.
Currently, ZenRows Scraping Browser doesn't include built-in CAPTCHA solving capabilities. For CAPTCHA handling, consider integrating third-party CAPTCHA solving services.
Explore our [Universal Scraper API](/universal-scraper-api/api-reference) for additional features including CAPTCHA solving and advanced anti-bot bypass mechanisms.
Yes! The Scraping Browser provides full access to Puppeteer's API, including page manipulation, screenshot generation, PDF creation, network interception, and all other native features.
Create additional pages using `await browser.newPage()` within the same browser instance. Each page operates independently while sharing the browser session and resources.
Certainly! Puppeteer's `waitForSelector()`, `waitForNavigation()`, and other waiting functions work seamlessly with the Scraping Browser, helping ensure reliable data extraction from dynamic content.
Use Puppeteer's standard screenshot functionality:
```javascript theme={null}
await page.screenshot({ path: 'screenshot.png' });
```
Screenshots are captured from the cloud browser and saved to your local environment automatically.
Yes! Puppeteer's network monitoring capabilities, including `page.on('request')` and `page.on('response')` event handlers, function normally with the Scraping Browser.
The primary distinction is execution location: browsers run in ZenRows' cloud infrastructure rather than locally. This provides superior IP management, fingerprint diversity, and resource efficiency while maintaining identical Puppeteer API functionality.
File downloads work through Puppeteer's standard download handling mechanisms. Files are downloaded to the cloud browser and then transferred to your local environment automatically.
# Scraping Browser Practical Use Cases
Source: https://docs.zenrows.com/scraping-browser/help/practical-use-cases
Discover common automation patterns and real-world scenarios when using ZenRows' Scraping Browser with Puppeteer and Playwright. These practical examples demonstrate how to leverage browser automation for various data extraction and interaction tasks.
The Scraping Browser excels at handling complex scenarios that traditional HTTP-based scraping cannot address. From capturing visual content to executing custom JavaScript, these use cases showcase the full potential of browser-based automation for your scraping projects.
**Websites often change their structure or update CSS class names and HTML tags.** This means the selectors you use for scraping (like `.product`, `.products`, or specific element tags) might stop working if the site layout changes. To keep your scraper reliable, regularly check and update your selectors as needed.
## Navigation and Page Content Extraction
Extract complete page content and metadata by navigating to target websites. This fundamental pattern forms the foundation for most scraping workflows and demonstrates how to retrieve both visible content and underlying HTML structure.
```javascript Node.js theme={null}
const puppeteer = require('puppeteer-core');
const connectionURL = 'wss://browser.zenrows.com?apikey=YOUR_ZENROWS_API_KEY';
const scraper = async () => {
const browser = await puppeteer.connect({ browserWSEndpoint: connectionURL });
const page = await browser.newPage();
try {
console.log('Navigating to target page...');
await page.goto('https://www.scrapingcourse.com/ecommerce/', {
waitUntil: 'domcontentloaded'
});
// Extract page metadata
const title = await page.title();
console.log('Page title:', title);
// Get complete HTML content
console.log('Extracting page content...');
const html = await page.content();
// Extract specific elements
const productCount = await page.$$eval('.product', products => products.length);
console.log(`Found ${productCount} products on the page`);
// Extract text content from specific elements
const headings = await page.$$eval('h1, h2, h3', elements =>
elements.map(el => el.textContent.trim())
);
console.log('Page headings:', headings);
return {
title,
productCount,
headings,
htmlLength: html.length
};
} finally {
await browser.close();
}
};
scraper().then(result => console.log('Extraction complete:', result));
```
```python Python theme={null}
# pip install pyppeteer
import asyncio
from pyppeteer import connect
connection_url = "wss://browser.zenrows.com?apikey=YOUR_ZENROWS_API_KEY"
async def scraper():
browser = await connect(browserWSEndpoint=connection_url)
page = await browser.newPage()
try:
print('Navigating to target page...')
await page.goto('https://www.scrapingcourse.com/ecommerce/', {
'waitUntil': 'domcontentloaded'
})
# Extract page metadata
title = await page.title()
print(f'Page title: {title}')
# Get complete HTML content
print('Extracting page content...')
html = await page.content()
# Extract specific elements
product_count = await page.querySelectorAllEval('.product', 'products => products.length')
print(f'Found {product_count} products on the page')
# Extract text content from specific elements
headings = await page.querySelectorAllEval('h1, h2, h3', '''elements =>
elements.map(el => el.textContent.trim())
''')
print(f'Page headings: {headings}')
return {
'title': title,
'product_count': product_count,
'headings': headings,
'html_length': len(html)
}
finally:
await page.close()
await browser.disconnect()
if __name__ == "__main__":
result = asyncio.run(scraper())
print('Extraction complete:', result)
```
```javascript Node.js theme={null}
const { chromium } = require('playwright');
const connectionURL = 'wss://browser.zenrows.com?apikey=YOUR_ZENROWS_API_KEY';
const scraper = async () => {
const browser = await chromium.connectOverCDP(connectionURL);
const page = await browser.newPage();
try {
console.log('Navigating to target page...');
await page.goto('https://www.scrapingcourse.com/ecommerce/');
// Extract page metadata
const title = await page.title();
console.log('Page title:', title);
// Get complete HTML content
console.log('Extracting page content...');
const html = await page.content();
// Extract specific elements
const products = await page.locator('.product').count();
console.log(`Found ${products} products on the page`);
// Extract text content from headings
const headings = await page.locator('h1, h2, h3').allTextContents();
console.log('Page headings:', headings);
return {
title,
productCount: products,
headings,
htmlLength: html.length
};
} finally {
await browser.close();
}
};
scraper().then(result => console.log('Extraction complete:', result));
```
```python Python theme={null}
import asyncio
from playwright.async_api import async_playwright
connection_url = "wss://browser.zenrows.com?apikey=YOUR_ZENROWS_API_KEY"
async def scraper():
async with async_playwright() as p:
browser = await p.chromium.connect_over_cdp(connection_url)
page = await browser.new_page()
try:
print('Navigating to target page...')
await page.goto('https://www.scrapingcourse.com/ecommerce/')
# Extract page metadata
title = await page.title()
print(f'Page title: {title}')
# Get complete HTML content
print('Extracting page content...')
html = await page.content()
# Extract specific elements
products = await page.locator('.product').count()
print(f'Found {products} products on the page')
# Extract text content from headings
headings = await page.locator('h1, h2, h3').all_text_contents()
print(f'Page headings: {headings}')
return {
'title': title,
'product_count': products,
'headings': headings,
'html_length': len(html)
}
finally:
await browser.close()
if __name__ == "__main__":
result = asyncio.run(scraper())
print('Extraction complete:', result)
```
### Key Benefits
* **Complete content access:** Retrieve both rendered content and raw HTML source
* **Metadata extraction:** Access page titles, descriptions, and other document properties
* **Element counting:** Quickly assess page structure and content volume
* **Structured data collection:** Extract specific elements using CSS selectors
## Taking Screenshots
Capture visual representations of web pages for monitoring, documentation, or visual verification purposes. Screenshots prove invaluable for debugging scraping workflows and creating visual records of dynamic content.
```javascript Node.js theme={null}
const puppeteer = require('puppeteer-core');
const connectionURL = 'wss://browser.zenrows.com?apikey=YOUR_ZENROWS_API_KEY';
const screenshotScraper = async () => {
const browser = await puppeteer.connect({ browserWSEndpoint: connectionURL });
const page = await browser.newPage();
try {
console.log('Navigating to target page...');
await page.goto('https://www.scrapingcourse.com/ecommerce/', {
waitUntil: 'domcontentloaded'
});
console.log('Page loaded:', await page.title());
// Take full page screenshot
console.log('Capturing full page screenshot...');
await page.screenshot({
path: 'full-page-screenshot.png',
fullPage: true
});
// Take viewport screenshot (uses default 1920x1080 viewport)
console.log('Capturing viewport screenshot...');
await page.screenshot({
path: 'viewport-screenshot.png'
});
// Take screenshot of specific element
console.log('Capturing product grid screenshot...');
const productGrid = await page.$('.products');
if (productGrid) {
await productGrid.screenshot({
path: 'product-grid-screenshot.png'
});
}
// Take screenshot with custom clipping (alternative to viewport resizing)
console.log('Capturing custom-sized screenshot...');
await page.screenshot({
path: 'custom-size-screenshot.png',
type: 'jpeg',
quality: 100,
clip: { x: 0, y: 0, width: 1200, height: 800 }
});
console.log('All screenshots saved successfully');
} finally {
await browser.close();
}
};
screenshotScraper();
```
```python Python theme={null}
# pip install pyppeteer
import asyncio
from pyppeteer import connect
connection_url = "wss://browser.zenrows.com?apikey=YOUR_ZENROWS_API_KEY"
async def screenshot_scraper():
browser = await connect(browserWSEndpoint=connection_url)
page = await browser.newPage()
try:
print('Navigating to target page...')
await page.goto('https://www.scrapingcourse.com/ecommerce/', {
'waitUntil': 'domcontentloaded'
})
print(f'Page loaded: {await page.title()}')
# Take full page screenshot
print('Capturing full page screenshot...')
await page.screenshot({
'path': 'full-page-screenshot.png',
'fullPage': True
})
# Take viewport screenshot (uses default 1920x1080 viewport)
print('Capturing viewport screenshot...')
await page.screenshot({
'path': 'viewport-screenshot.png'
})
# Take screenshot of specific element
print('Capturing product grid screenshot...')
product_grid = await page.querySelector('.products')
if product_grid:
await product_grid.screenshot({
'path': 'product-grid-screenshot.png'
})
# Take high-quality JPEG screenshot
print('Capturing high-quality JPEG screenshot...')
await page.screenshot({
'path': 'high-quality-screenshot.jpg',
'type': 'jpeg',
'quality': 90,
'fullPage': True
})
# Take screenshot with custom clipping (alternative to viewport resizing)
print('Capturing custom-sized screenshot...')
await page.screenshot({
'path': 'custom-size-screenshot.png',
'type': 'png',
'fullPage': True,
'clip': {'x': 0, 'y': 0, 'width': 1200, 'height': 800}
})
print('All screenshots saved successfully')
finally:
await page.close()
await browser.disconnect()
if __name__ == "__main__":
asyncio.run(screenshot_scraper())
```
```javascript Node.js theme={null}
const { chromium } = require('playwright');
const connectionURL = 'wss://browser.zenrows.com?apikey=YOUR_ZENROWS_API_KEY';
const screenshotScraper = async () => {
const browser = await chromium.connectOverCDP(connectionURL);
const page = await browser.newPage();
try {
console.log('Navigating to target page...');
await page.goto('https://www.scrapingcourse.com/ecommerce/', {
waitUntil: 'domcontentloaded'
});
// Wait for page to be fully loaded
await page.waitForSelector('body', { timeout: 10000 });
console.log('Page loaded:', await page.title());
// Take full page screenshot
console.log('Capturing full page screenshot...');
await page.screenshot({
path: 'full-page-screenshot.png',
fullPage: true
});
// Take viewport screenshot (uses default 1920x1080 viewport)
console.log('Capturing viewport screenshot...');
await page.screenshot({
path: 'viewport-screenshot.png'
});
// Take screenshot of specific element (with error handling)
console.log('Capturing product grid screenshot...');
try {
await page.waitForSelector('.products', { timeout: 5000 });
await page.locator('.products').screenshot({
path: 'product-grid-screenshot.png'
});
} catch (error) {
console.log('Product grid not found, skipping element screenshot');
}
// Take high-quality JPEG screenshot
console.log('Capturing high-quality JPEG screenshot...');
await page.screenshot({
path: 'high-quality-screenshot.jpg',
type: 'jpeg',
quality: 90,
fullPage: true
});
// Take screenshot with custom clipping (alternative to viewport resizing)
console.log('Capturing custom-sized screenshot...');
await page.screenshot({
path: 'custom-size-screenshot.png',
type: 'png',
clip: { x: 0, y: 0, width: 1200, height: 800 }
});
console.log('All screenshots saved successfully');
} catch (error) {
console.error('Screenshot scraper error:', error.message);
// Take emergency screenshot if navigation fails
try {
await page.screenshot({ path: 'error-screenshot.png' });
console.log('Emergency screenshot saved');
} catch (screenshotError) {
console.error('Could not take emergency screenshot:', screenshotError.message);
}
} finally {
await browser.close();
}
};
screenshotScraper();
```
```python Python theme={null}
import asyncio
from playwright.async_api import async_playwright
connection_url = "wss://browser.zenrows.com?apikey=YOUR_ZENROWS_API_KEY"
async def screenshot_scraper():
async with async_playwright() as p:
browser = await p.chromium.connect_over_cdp(connection_url)
page = await browser.new_page()
try:
print('Navigating to target page...')
await page.goto('https://www.scrapingcourse.com/ecommerce/',
wait_until='domcontentloaded'
)
# Wait for page to be fully loaded
await page.wait_for_selector('body', timeout=10000)
print(f'Page loaded: {await page.title()}')
# Take full page screenshot
print('Capturing full page screenshot...')
await page.screenshot(path='full-page-screenshot.png', full_page=True)
# Take viewport screenshot (uses default 1920x1080 viewport)
print('Capturing viewport screenshot...')
await page.screenshot(path='viewport-screenshot.png')
# Take screenshot of specific element (with error handling)
print('Capturing product grid screenshot...')
try:
await page.wait_for_selector('.products', timeout=5000)
await page.locator('.products').screenshot(path='product-grid-screenshot.png')
except Exception:
print('Product grid not found, skipping element screenshot')
# Take high-quality JPEG screenshot
print('Capturing high-quality JPEG screenshot...')
await page.screenshot(
path='high-quality-screenshot.jpg',
type='jpeg',
quality=90,
full_page=True
)
# Take screenshot with custom clipping (alternative to viewport resizing)
print('Capturing custom-sized screenshot...')
await page.screenshot(
path='custom-size-screenshot.png',
type='png',
clip={'x': 0, 'y': 0, 'width': 1200, 'height': 800}
)
print('All screenshots saved successfully')
except Exception as error:
print(f'Screenshot scraper error: {error}')
# Take emergency screenshot if navigation fails
try:
await page.screenshot(path='error-screenshot.png')
print('Emergency screenshot saved')
except Exception as screenshot_error:
print(f'Could not take emergency screenshot: {screenshot_error}')
finally:
await browser.close()
if __name__ == "__main__":
asyncio.run(screenshot_scraper())
```
### Screenshot Options
* **Full page capture:** Include content below the fold with `fullPage: true`
* **Element-specific screenshots:** Target individual components or sections
* **Custom clipping:** Focus on specific page areas using coordinate-based clipping
* **Format options:** PNG (lossless) or JPEG (with quality control from 0-100)
* **Default viewport:** Screenshots use the standard 1920x1080 viewport size
Screenshots are captured from the cloud browser and automatically transferred to your local environment. Large full-page screenshots may take additional time to process and download.
## Running Custom JavaScript Code
Execute custom JavaScript within the browser context to manipulate pages, extract computed values, or perform complex data transformations. This powerful capability enables sophisticated automation scenarios beyond standard element selection.
```javascript Node.js theme={null}
const puppeteer = require('puppeteer-core');
const connectionURL = 'wss://browser.zenrows.com?apikey=YOUR_ZENROWS_API_KEY';
const customJavaScriptScraper = async () => {
const browser = await puppeteer.connect({ browserWSEndpoint: connectionURL });
const page = await browser.newPage();
try {
console.log('Navigating to target page...');
await page.goto('https://www.scrapingcourse.com/ecommerce/', {
waitUntil: 'domcontentloaded'
});
// Extract page title using custom JavaScript
const pageTitle = await page.evaluate(() => {
return document.title;
});
console.log('Page title via JavaScript:', pageTitle);
// Get page statistics
const pageStats = await page.evaluate(() => {
return {
totalLinks: document.querySelectorAll('a').length,
totalImages: document.querySelectorAll('img').length,
totalForms: document.querySelectorAll('form').length,
pageHeight: document.body.scrollHeight,
viewportHeight: window.innerHeight,
currentURL: window.location.href,
userAgent: navigator.userAgent
};
});
console.log('Page statistics:', pageStats);
// Extract product data with custom processing
const productData = await page.evaluate(() => {
const products = Array.from(document.querySelectorAll('.product'));
return products.map((product, index) => {
const name = product.querySelector('.product-name')?.textContent?.trim();
const priceText = product.querySelector('.price')?.textContent?.trim();
// Custom price processing
const priceMatch = priceText?.match(/\$(\d+(?:\.\d{2})?)/);
const priceNumber = priceMatch ? parseFloat(priceMatch[1]) : null;
return {
id: index + 1,
name: name || 'Unknown Product',
originalPrice: priceText || 'Price not available',
numericPrice: priceNumber,
isOnSale: product.querySelector('.sale-badge') !== null,
position: index + 1
};
});
});
console.log('Processed product data:', productData);
// Scroll and capture dynamic content
const scrollResults = await page.evaluate(async () => {
// Scroll to bottom of page
window.scrollTo(0, document.body.scrollHeight);
// Wait for any lazy-loaded content
await new Promise(resolve => setTimeout(resolve, 2000));
return {
finalScrollPosition: window.pageYOffset,
totalHeight: document.body.scrollHeight,
lazyImagesLoaded: document.querySelectorAll('img[data-src]').length
};
});
console.log('Scroll results:', scrollResults);
// Inject custom CSS and modify page appearance
await page.evaluate(() => {
const style = document.createElement('style');
style.textContent = `
.product { border: 2px solid red !important; }
.price { background-color: yellow !important; }
`;
document.head.appendChild(style);
});
console.log('Custom styles applied');
} finally {
await browser.close();
}
};
customJavaScriptScraper();
```
```python Python theme={null}
# pip install pyppeteer
import asyncio
from pyppeteer import connect
connection_url = "wss://browser.zenrows.com?apikey=YOUR_ZENROWS_API_KEY"
async def custom_javascript_scraper():
browser = await connect(browserWSEndpoint=connection_url)
page = await browser.newPage()
try:
print('Navigating to target page...')
await page.goto('https://www.scrapingcourse.com/ecommerce/', {
'waitUntil': 'domcontentloaded',
'timeout': 60000
})
# Extract page title using custom JavaScript
page_title = await page.evaluate('() => document.title')
print(f'Page title via JavaScript: {page_title}')
# Get page statistics
page_stats = await page.evaluate('''() => ({
totalLinks: document.querySelectorAll('a').length,
totalImages: document.querySelectorAll('img').length,
totalForms: document.querySelectorAll('form').length,
pageHeight: document.body.scrollHeight,
viewportHeight: window.innerHeight,
currentURL: window.location.href,
userAgent: navigator.userAgent
})''')
print(f'Page statistics: {page_stats}')
# Extract and process product data
product_data = await page.evaluate('''() => {
const products = Array.from(document.querySelectorAll('.product'));
return products.map((product, index) => {
const name = product.querySelector('.product-name')?.textContent?.trim();
const priceText = product.querySelector('.price')?.textContent?.trim();
// Custom price processing
const priceMatch = priceText?.match(/\\$([0-9]+(?:\\.[0-9]{2})?)/);
const priceNumber = priceMatch ? parseFloat(priceMatch[1]) : null;
return {
id: index + 1,
name: name || 'Unknown Product',
originalPrice: priceText || 'Price not available',
numericPrice: priceNumber,
isOnSale: product.querySelector('.sale-badge') !== null,
position: index + 1
};
});
}''')
print(f'Processed product data: {product_data}')
# Scroll and capture dynamic content
scroll_results = await page.evaluate('''async () => {
// Scroll to bottom of page
window.scrollTo(0, document.body.scrollHeight);
// Wait for any lazy-loaded content
await new Promise(resolve => setTimeout(resolve, 2000));
return {
finalScrollPosition: window.pageYOffset,
totalHeight: document.body.scrollHeight,
lazyImagesLoaded: document.querySelectorAll('img[data-src]').length
};
}''')
print(f'Scroll results: {scroll_results}')
# Inject custom CSS and modify page appearance
await page.evaluate('''() => {
const style = document.createElement('style');
style.textContent = `
.product { border: 2px solid red !important; }
.price { background-color: yellow !important; }
`;
document.head.appendChild(style);
}''')
print('Custom styles applied')
except Exception as error:
print(f'Custom JavaScript scraper error: {error}')
finally:
await page.close()
await browser.disconnect()
if __name__ == "__main__":
asyncio.run(custom_javascript_scraper())
```
```javascript Node.js theme={null}
const { chromium } = require('playwright');
const connectionURL = 'wss://browser.zenrows.com?apikey=YOUR_ZENROWS_API_KEY';
const customJavaScriptScraper = async () => {
const browser = await chromium.connectOverCDP(connectionURL);
const page = await browser.newPage();
try {
console.log('Navigating to target page...');
await page.goto('https://www.scrapingcourse.com/ecommerce/');
// Extract page title using custom JavaScript
const pageTitle = await page.evaluate(() => document.title);
console.log('Page title via JavaScript:', pageTitle);
// Get page statistics
const pageStats = await page.evaluate(() => ({
totalLinks: document.querySelectorAll('a').length,
totalImages: document.querySelectorAll('img').length,
totalForms: document.querySelectorAll('form').length,
pageHeight: document.body.scrollHeight,
viewportHeight: window.innerHeight,
currentURL: window.location.href,
userAgent: navigator.userAgent
}));
console.log('Page statistics:', pageStats);
// Extract and process product data
const productData = await page.evaluate(() => {
const products = Array.from(document.querySelectorAll('.product'));
return products.map((product, index) => {
const name = product.querySelector('.product-name')?.textContent?.trim();
const priceText = product.querySelector('.price')?.textContent?.trim();
// Custom price processing
const priceMatch = priceText?.match(/\$(\d+(?:\.\d{2})?)/);
const priceNumber = priceMatch ? parseFloat(priceMatch[1]) : null;
return {
id: index + 1,
name: name || 'Unknown Product',
originalPrice: priceText || 'Price not available',
numericPrice: priceNumber,
isOnSale: product.querySelector('.sale-badge') !== null,
position: index + 1
};
});
});
console.log('Processed product data:', productData);
// Scroll and capture dynamic content
await page.evaluate(() => window.scrollTo(0, document.body.scrollHeight));
await page.waitForTimeout(2000);
const scrollResults = await page.evaluate(() => ({
finalScrollPosition: window.pageYOffset,
totalHeight: document.body.scrollHeight,
lazyImagesLoaded: document.querySelectorAll('img[data-src]').length
}));
console.log('Scroll results:', scrollResults);
// Inject custom CSS
await page.addStyleTag({
content: `
.product { border: 2px solid red !important; }
.price { background-color: yellow !important; }
`
});
console.log('Custom styles applied');
} finally {
await browser.close();
}
};
customJavaScriptScraper();
```
```python Python theme={null}
import asyncio
from playwright.async_api import async_playwright
connection_url = "wss://browser.zenrows.com?apikey=YOUR_ZENROWS_API_KEY"
async def custom_javascript_scraper():
async with async_playwright() as p:
browser = await p.chromium.connect_over_cdp(connection_url)
page = await browser.new_page()
try:
print('Navigating to target page...')
await page.goto('https://www.scrapingcourse.com/ecommerce/')
# Extract page title using custom JavaScript
page_title = await page.evaluate('() => document.title')
print(f'Page title via JavaScript: {page_title}')
# Get page statistics
page_stats = await page.evaluate('''() => ({
totalLinks: document.querySelectorAll('a').length,
totalImages: document.querySelectorAll('img').length,
totalForms: document.querySelectorAll('form').length,
pageHeight: document.body.scrollHeight,
viewportHeight: window.innerHeight,
currentURL: window.location.href,
userAgent: navigator.userAgent
})''')
print(f'Page statistics: {page_stats}')
# Extract and process product data
product_data = await page.evaluate('''() => {
const products = Array.from(document.querySelectorAll('.product'));
return products.map((product, index) => {
const name = product.querySelector('.product-name')?.textContent?.trim();
const priceText = product.querySelector('.price')?.textContent?.trim();
// Custom price processing
const priceMatch = priceText?.match(/\\$([0-9]+(?:\\.[0-9]{2})?)/);
const priceNumber = priceMatch ? parseFloat(priceMatch[1]) : null;
return {
id: index + 1,
name: name || 'Unknown Product',
originalPrice: priceText || 'Price not available',
numericPrice: priceNumber,
isOnSale: product.querySelector('.sale-badge') !== null,
position: index + 1
};
});
}''')
print(f'Processed product data: {product_data}')
# Scroll and capture dynamic content
await page.evaluate('() => window.scrollTo(0, document.body.scrollHeight)')
await page.wait_for_timeout(2000)
scroll_results = await page.evaluate('''() => ({
finalScrollPosition: window.pageYOffset,
totalHeight: document.body.scrollHeight,
lazyImagesLoaded: document.querySelectorAll('img[data-src]').length
})''')
print(f'Scroll results: {scroll_results}')
# Inject custom CSS
await page.add_style_tag(content='''
.product { border: 2px solid red !important; }
.price { background-color: yellow !important; }
''')
print('Custom styles applied')
finally:
await browser.close()
if __name__ == "__main__":
asyncio.run(custom_javascript_scraper())
```
### JavaScript Execution Capabilities
* **Data extraction and processing:** Transform raw data within the browser context
* **Page statistics collection:** Gather comprehensive page metrics and analytics
* **Dynamic content interaction:** Trigger JavaScript events and handle dynamic updates
* **Custom styling injection:** Modify page appearance for testing or visual enhancement
* **Scroll automation:** Navigate through infinite scroll or lazy-loaded content
* **Complex calculations:** Perform mathematical operations on extracted data
Custom JavaScript execution runs within the browser's security context, providing access to all DOM APIs and browser features available to the target website.
## PDF Generation and Document Export
Generate PDF documents from web pages for archival, reporting, or documentation purposes. This capability proves valuable for creating snapshots of dynamic content or generating reports from scraped data.
```javascript Node.js theme={null}
const puppeteer = require('puppeteer-core');
const connectionURL = 'wss://browser.zenrows.com?apikey=YOUR_ZENROWS_API_KEY';
const pdfGenerationScraper = async () => {
const browser = await puppeteer.connect({ browserWSEndpoint: connectionURL });
const page = await browser.newPage();
try {
console.log('Navigating to target page...');
await page.goto('https://www.scrapingcourse.com/ecommerce/', {
waitUntil: 'domcontentloaded'
});
console.log('Page loaded:', await page.title());
// Generate basic PDF
console.log('Generating basic PDF...');
await page.pdf({
path: 'basic-page.pdf',
format: 'A4',
printBackground: true
});
// Generate custom PDF with options
console.log('Generating custom PDF...');
await page.pdf({
path: 'custom-page.pdf',
format: 'A4',
printBackground: true,
margin: {
top: '20mm',
bottom: '20mm',
left: '20mm',
right: '20mm'
},
displayHeaderFooter: true,
headerTemplate: '
'
)
# Generate landscape PDF
print('Generating landscape PDF...')
await page.pdf(
path='landscape-page.pdf',
format='A4',
landscape=True,
print_background=True,
scale=0.8
)
print('All PDFs generated successfully')
finally:
await browser.close()
if __name__ == "__main__":
asyncio.run(pdf_generation_scraper())
```
### PDF Generation Features
* **Multiple format support:** Generate A4, Letter, Legal, and custom page sizes
* **Custom headers and footers:** Add branding, page numbers, and metadata
* **Background preservation:** Include CSS backgrounds and styling in PDFs
* **Margin control:** Configure precise spacing and layout
* **Orientation options:** Create portrait or landscape documents
* **Scale adjustment:** Optimize content size for better readability
PDF generation works seamlessly with the cloud browser, automatically transferring generated files to your local environment while maintaining high quality and formatting.
## Conclusion
ZenRows' Scraping Browser transforms complex web automation challenges into straightforward solutions. These practical use cases demonstrate the platform's versatility in handling everything from basic content extraction to sophisticated browser automation workflows.
## Next Steps for Implementation
Start with the basic navigation and content extraction patterns to establish your foundation, then progressively incorporate advanced features like form interactions and network monitoring as your requirements evolve. The modular nature of these examples allows you to combine techniques for sophisticated automation workflows.
Consider implementing error handling and retry logic around these patterns for production deployments. The Scraping Browser's consistent cloud environment reduces many common failure points, but robust error handling ensures reliable operation at scale.
## Frequently Asked Questions (FAQ)
Absolutely! These use cases are designed to work together. For example, you can navigate to a page, take screenshots, extract data, and generate PDFs all within the same browser session. This approach is more efficient and maintains session state across operations.
```javascript Node.js theme={null}
// Example combining multiple use cases
await page.goto('https://example.com');
await page.screenshot({ path: 'before.png' });
await page.fill('input[name="search"]', 'query');
await page.click('button[type="submit"]');
await page.screenshot({ path: 'after.png' });
const data = await page.$$eval('.result', elements => /* extract data */);
await page.pdf({ path: 'results.pdf' });
```
Use explicit waiting mechanisms to ensure content is fully loaded before interaction:
```javascript Node.js theme={null}
// Wait for specific elements
await page.waitForSelector('.dynamic-content');
// Wait for network to be idle
await page.goto(url, { waitUntil: 'domcontentloaded' });
// Wait for custom conditions
await page.waitForFunction(() => document.querySelectorAll('.product').length > 0);
```
The Scraping Browser handles JavaScript rendering automatically, making these waiting strategies highly effective.
Several strategies can significantly improve performance:
* **Block unnecessary resources:** Use request interception to block images, fonts, and other non-essential content
* **Reuse browser instances:** Keep browsers open for multiple operations instead of creating new connections
* **Implement concurrent processing:** Use multiple browser instances for parallel scraping
* **Optimize waiting strategies:** Use specific selectors instead of generic timeouts
The network monitoring examples demonstrate resource blocking techniques that can improve scraping speed.
Both approaches provide identical functionality, but the SDK offers several advantages:
* **Simplified configuration:** No need to manually construct WebSocket URLs
* **Better error handling:** Built-in error messages and debugging information
* **Future compatibility:** Automatic updates to connection protocols
* **Additional utilities:** Helper methods for common tasks
For production applications, the SDK is recommended for better maintainability and error handling, while direct WebSocket connections work well for simple scripts and testing.
Follow this systematic troubleshooting approach:
1. **Verify API key:** Ensure your ZenRows API key is correct and active
2. **Check element selectors:** Use browser developer tools to verify CSS selectors
3. **Add debugging output:** Include console.log statements to track execution flow
4. **Implement error handling:** Wrap operations in try-catch blocks
5. **Test with simpler examples:** Start with basic navigation before adding complexity
The network monitoring examples are particularly valuable for debugging, as they reveal exactly what requests are being made and their responses.
# Introduction to the Scraping Browser
Source: https://docs.zenrows.com/scraping-browser/introduction
ZenRows®' Scraping Browser is the perfect solution for effortlessly extracting data from dynamic websites, especially if you're already using tools like Puppeteer or Playwright. **With just one line of code, you can integrate the Scraping Browser into your existing setup** and immediately benefit from our vast network of over 55 million residential IPs across 190+ countries, offering 99.9% uptime for uninterrupted scraping.
Whether you're dealing with complex JavaScript content or interacting with web elements, ZenRows makes it easy to scrape without worrying about managing proxies or handling dynamic user interactions.
## Ideal for Puppeteer and Playwright Users
If you already have web scraping code using [Puppeteer](https://www.zenrows.com/blog/puppeteer-web-scraping) or [Playwright](https://www.zenrows.com/blog/playwright-scraping), integrating ZenRows' Scraping Browser is incredibly simple.
By adding just one line, you can unlock the power of our residential proxy network and browser simulation, without needing to rewrite your entire scraping logic. ZenRows enhances your scraping capabilities with minimal effort:
```bash Browser URL theme={null}
wss://browser.zenrows.com?apikey=YOUR_ZENROWS_API_KEY
```
This integration ensures that your existing scraping operations become more robust, efficient, and scalable.
## Key Advantages
The Scraping Browser goes beyond traditional scraping techniques, offering solutions for the most challenging web scraping tasks:
* **One Line of Code:** Start scraping instantly with ZenRows' Scraping Browser. No complicated setup — just a simple API call that does all the heavy lifting for you.
* **Dynamic Web Content Extraction:** Many websites rely on JavaScript to display content dynamically. The Scraping Browser simulates a real user session, allowing you to extract data even from single-page applications (SPAs) or websites that load content asynchronously.
* **Handling User Interactions:** Simulate user actions like clicking, scrolling, or waiting for elements to load, all while avoiding IP blocks and ensuring the data is extracted seamlessly.
* **Geolocation Targeting:** Access localized content by selecting from millions of IPs across 190+ countries, bypassing geo-restrictions to scrape the data you need.
* **IP Auto-Rotation:** Rotate IPs with every request to avoid bans and blocks, ensuring your scraping remains undetected.
## Parameter Overview
Customize your Scraping Browser requests using the following parameters:
| PARAMETER | TYPE | DEFAULT | DESCRIPTION |
| -------------------------------------------------------------------------- | -------- | -------------------------------------------------------------------- | ------------------------------------------------------------------------------------------------------------------------------ |
| [**apikey**](#api-key) `required` | `string` | [**Get Your Free API Key**](https://app.zenrows.com/register?p=free) | Your unique API key for authentication |
| [**proxy\_region**](/scraping-browser/scraping-browser-setup#world-region) | `string` | `global` | Focus your scraping on a specific geographic region (e.g., eu for Europe). **When set to global, no parameter is needed**. |
| [**proxy\_country**](/scraping-browser/scraping-browser-setup#country) | `string` | | Target a specific country for geo-restricted data (e.g., `es` for Spain). Available only when `proxy_region` is set to global. |
| [**session\_ttl**](/scraping-browser/scraping-browser-setup#session-ttl) | `number` | `180` | The time to live for the browser session, in seconds. Minimum: 60, Maximum: 900 (1-15 minutes). Defaults to 3 minutes. |
## Pricing
Our pricing starts at \$69 per month, with a competitive rate of \$5.50 per GB for bandwidth usage. For users with higher data requirements, we offer plans with prices as low as \$2.80 per GB, available through our Enterprise plans for greater cost efficiency.
In addition to bandwidth, ZenRows charges a fixed \$0.09 per hour for scraping sessions when using the Scraping Browser.
Scraping sessions are billed in 30 second increments. This means:
* If your session lasts 10 seconds, you'll still be charged for 30 seconds.
* If your session lasts 31 seconds, you'll be charged for 1 minute.
* If your session lasts 1 minute and 1 second, you'll be charged for 1 minute and 30 seconds, and so on.
**With ZenRows, you only pay for the data and time you use**, and we offer a commitment-free trial — no credit card required. Explore our flexible plans and find more details on our [pricing page](https://www.zenrows.com/pricing).
## Tips for Optimal Performance
1. **Manage Session Duration**: Keep session durations as short as possible since billing is in 30-second increments.
2. **Reuse Browser Sessions**: For multiple operations on the same site, reuse the browser session rather than creating a new one each time.
3. **Use Proper Page Closure**: Always close pages when done to free up resources:
```javascript theme={null}
// Close individual pages when done
await page.close();
```
4. **Set Reasonable Timeouts**: Use appropriate timeouts for your operations to prevent long-running sessions:
```javascript theme={null}
// Set navigation timeout
await page.goto(url, { timeout: 30000 });
// Set selector timeout
await page.waitForSelector('.element', { timeout: 15000 });
```
5. **Optimize Resource Usage**: Block unnecessary resources when they're not needed:
```javascript theme={null}
// Block images, fonts, etc.
await page.setRequestInterception(true);
page.on('request', (request) => {
if (request.resourceType() === 'image' || request.resourceType() === 'font') {
request.abort();
} else {
request.continue();
}
});
```
6. **Target Specific Countries Wisely**: Only specify a country when needed for your use case, as more specific targeting might have different success rates.
# Setting Up the Scraping Browser
Source: https://docs.zenrows.com/scraping-browser/scraping-browser-setup
ZenRows® Scraping Browser works seamlessly with your existing Puppeteer or Playwright code — just one line of code is needed to integrate, making it ideal for developers looking for fast and easy solutions.
## Initial Setup
To start using the Scraping Browser, follow these steps:
If you haven't already, create a ZenRows account by visiting the [Registration Page](https://app.zenrows.com/register).
Once registered, log in to your dashboard to access your [Scraping Browser page](https://app.zenrows.com/scraping-browser).
## Scraping Browser Parameters
ZenRows® Scraping Browser is designed for ease of use with minimal configuration. However, you can still customize some options to suit your needs, including World Region, Country and Session TTL.
Auto-rotate and Residential IPs are pre-configured and enabled by default for all users.
### Available Parameter Options
The Scraping Browser offers several customizable parameters to enhance your scraping experience:
* [World Region](/scraping-browser/features/world-region) - Target specific geographic regions for your scraping operations
* [Country Selection](/scraping-browser/features/country) - Choose from our extensive list of premium proxy countries for geo-restricted content
* [Session TTL](/scraping-browser/features/session-ttl) - Control browser session duration from 1 to 15 minutes
Each parameter page page provides both SDK and direct WebSocket URL examples to help you implement the settings that best fit your scraping requirements.
# Introduction to the Universal Scraper API
Source: https://docs.zenrows.com/universal-scraper-api/api-reference
The ZenRows® Universal Scraper API is a versatile tool designed to simplify and enhance the process of extracting data from websites. Whether you're dealing with static or dynamic content, our API provides a range of features to meet your scraping needs efficiently.
With Premium Proxies, ZenRows gives you access to over 55 million residential IPs from 190+ countries, ensuring 99.9% uptime and highly reliable scraping sessions. Our system also handles advanced fingerprinting, header rotation, and IP management, **enabling you to scrape even the most protected sites without needing to manually configure these elements**.
ZenRows makes it easy to bypass complex anti-bot measures, handle JavaScript-heavy sites, and interact with web elements dynamically — all with the right features enabled.
## Key Features
### JavaScript Rendering
Render JavaScript on web pages using a headless browser to scrape dynamic content that traditional methods might miss.
**When to use:** Use this feature when targeting modern websites built with JavaScript frameworks (React, Vue, Angular), single-page applications (SPAs), or any site that loads content dynamically after the initial page load.
**Real-world scenarios:**
* E-commerce product listings that load items as you scroll
* Dashboards and analytics platforms that render charts/data with JavaScript
* Social media feeds that dynamically append content
* Sites that hide certain content until JavaScript is rendered
**Additional options:**
* Wait times to ensure elements are fully loaded
* Interaction with the page to click buttons, fill forms, or scroll
* Screenshot capabilities for visual verification
* CSS-based extraction of specific elements
### Premium Proxies
Leverage a vast network of residential IP addresses across 190+ countries, ensuring a 99.9% uptime for uninterrupted scraping.
**When to use:** Essential for accessing websites with sophisticated anti-bot systems, geo-restricted content, or when you consistently encounter blocks with standard datacenter IPs.
**Real-world scenarios:**
* Scraping major e-commerce platforms (Amazon, Walmart)
* Accessing real estate listings (Zillow, Redfin)
* Gathering pricing data from travel sites (Expedia, Booking.com)
* Collecting data from financial or investment platforms
**Additional options:**
* Geolocation selection to access region-specific content
* Automatic IP rotation to prevent detection
### Custom Headers
Add custom HTTP headers to your requests for more control over how your requests appear to target websites.
**When to use:** When you need to mimic specific browser behavior, set cookies, or a referer.
**Real-world scenarios:**
* Setting language preferences to get content in specific languages
* Adding a referer to avoid being blocked by bot detection systems
### Session Management
Use a session ID to maintain the same IP address across multiple requests for up to 10 minutes.
**When to use:** When scraping multi-page flows or processes that require maintaining the same IP across multiple requests.
**Real-world scenarios:**
* Multi-step forms processes
* Maintaining consistent session for search results and item visits
### Advanced Data Extraction
Extract only the data you need with CSS selectors or automatic parsing.
**When to use:** When you need specific information from pages and want to reduce bandwidth usage or simplify post-processing.
**Real-world scenarios:**
* Extracting pricing information from product pages
* Gathering contact details from business directories
* Collecting specific metrics from analytics pages
### Language agnostic
While Python examples are provided, the API works with any programming language that can make HTTP requests.
## Parameter Overview
Customize your scraping requests using the following parameters:
| PARAMETER | TYPE | DEFAULT | DESCRIPTION |
| ------------------------------------------------------------------------------------------- | --------------- | -------------------------------------------------------------------- | ---------------------------------------------------------------------------------------------------------------------------------------------------------------------------------------------------------------------------------------------------------------------------------------------------------------------------- |
| [**apikey**](#api-key) `required` | `string` | [**Get Your Free API Key**](https://app.zenrows.com/register?p=free) | Your unique API key for authentication |
| [**url**](#url) `required` | `string` | | The URL of the page you want to scrape |
| [**mode**](/universal-scraper-api/features/adaptive-stealth-mode) | `string` | | Enables Adaptive Stealth Mode when set to `auto`. *Use-case: [Adaptive Stealth Mode vs Manual Parameters](/universal-scraper-api/features/adaptive-stealth-mode#adaptive-stealth-mode-vs-manual-configuration)* |
| [**js\_render**](/universal-scraper-api/features/js-rendering) | `boolean` | false | Enable JavaScript rendering with a headless browser. Essential for modern web apps, SPAs, and sites with dynamic content. *Use-case: [Load dynamic pages (SPAs, dashboards, infinite scroll)](/universal-scraper-api/features/js-rendering#when-to-use-javascript-rendering)* |
| [**js\_instructions**](/universal-scraper-api/features/js-instructions) | `string` | | Execute custom JavaScript on the page to interact with elements, scroll, click buttons, or manipulate content. Use when you need to perform actions before the content is returned. *Use-case: [Submit forms or simulate user actions](/universal-scraper-api/features/js-instructions#common-use-cases-and-workflows)* |
| [**custom\_headers**](/universal-scraper-api/features/headers#custom-headers) | `boolean` | false | Enables you to add custom HTTP headers to your request, such as cookies or referer, to better simulate real browser traffic or provide site-specific information. *Use-case: [Simulate browser behavior and avoid detection](/universal-scraper-api/features/headers#example-use-case%3A-using-referer)* |
| [**premium\_proxy**](/universal-scraper-api/features/premium-proxy) | `boolean` | false | Use residential IPs to bypass anti-bot protection. Essential for accessing protected sites. *Use-case: [Access bypass anti-bot protection by using residential IPs](/universal-scraper-api/features/premium-proxy#basic-usage)* |
| [**proxy\_country**](/universal-scraper-api/features/proxy-country) | `string` | | Set the country of the IP used for the request (requires Premium Proxies). Use for accessing geo-restricted content or seeing region-specific content. *Use-case: [Access geo-restricted content](/universal-scraper-api/features/proxy-country#common-use-cases)* |
| [**session\_id**](/universal-scraper-api/features/other#session-id) | `integer` | | Maintain the same IP for multiple requests for up to 10 minutes. Essential for multi-step processes. *Use-case: [Keep session/IP across requests](/universal-scraper-api/features/other#session-id)* |
| [**original\_status**](/universal-scraper-api/features/other#original-http-code) | `boolean` | false | Return the original HTTP status code from the target page. Useful for debugging in case of errors. *Use-case: [Debug failed requests](/universal-scraper-api/features/other#original-http-code)* |
| [**allowed\_status\_codes**](/universal-scraper-api/features/other#return-content-on-error) | `string` | | Returns the content even if the target page fails with specified status codes. Useful for debugging or when you need content from error pages. *Use-case: [Debug failed requests and return the failed page](/universal-scraper-api/features/other#return-content-on-error)* |
| [**wait\_for**](/universal-scraper-api/features/wait-for) | `string` | | Wait for a specific CSS Selector to appear in the DOM before returning content. Essential for elements that load asynchronously. *Use-case: [Capture elements that load at unpredictable times](/universal-scraper-api/features/wait-for#basic-usage)* |
| [**wait**](/universal-scraper-api/features/wait) | `integer` | 0 | Wait a fixed amount of milliseconds after page load. Use for sites that load content in stages or have delayed rendering. *Use-case: [Pause the request process after the initial page load](/universal-scraper-api/features/wait#basic-usage)* |
| [**block\_resources**](/universal-scraper-api/features/block-resources) | `string` | | Block specific resources (images, fonts, etc.) from loading to speed up scraping and reduce bandwidth usage. Enabled by default, carefull when changing it. *Use-case: [Optimize performance and minimize bandwidth](/universal-scraper-api/features/block-resources#basic-usage)* |
| [**json\_response**](/universal-scraper-api/features/json-response) | `string` | false | Capture network requests in JSON format, including XHR or Fetch data. Ideal for intercepting API calls made by the web page. *Use-case: [Capture API calls and background requests](/universal-scraper-api/features/json-response#basic-usage)* |
| [**css\_extractor**](/universal-scraper-api/features/output#css-selectors) | `string (JSON)` | | Extract specific elements using CSS selectors. Perfect for targeting only the data you need from complex pages. *Use-case: [Extract only specific data fields](/universal-scraper-api/features/output#css-selectors)* |
| [**autoparse**](/universal-scraper-api/features/output#auto-parsing) | `boolean` | false | Automatically extract structured data from HTML. Great for quick extraction without specifying selectors. *Use-case: [Parse data in JSON format automatically](/universal-scraper-api/features/output#auto-parsing)* |
| [**response\_type**](/universal-scraper-api/features/output#markdown-response) | `string` | | Convert HTML to other formats (Markdown, Plaintext, PDF). Useful for content readability, storage, or to train AI models. *Use-case: [Extract only specific formats](/universal-scraper-api/features/output#markdown-response)* |
| [**screenshot**](/universal-scraper-api/features/output#page-screenshot) | `boolean` | false | Capture an above-the-fold screenshot of the page. Helpful for visual verification or debugging. *Use-case: [Visual verification of page rendering](/universal-scraper-api/features/output#page-screenshot)* |
| [**screenshot\_fullpage**](/universal-scraper-api/features/output#page-screenshot) | `boolean` | false | Capture a full-page screenshot. Useful for content that extends below the fold. *Use-case: [Capture complete page content](/universal-scraper-api/features/output#additional-options)* |
| [**screenshot\_selector**](/universal-scraper-api/features/output#page-screenshot) | `string` | | Capture a screenshot of a specific element using CSS Selector. Perfect for capturing specific components. *Use-case: [Capture specific page elements](/universal-scraper-api/features/output#additional-options)* |
| [**screenshot\_format**](/universal-scraper-api/features/output#image-format-and-quality) | `string` | | Choose between `png` (default) and `jpeg` formats for screenshots. *Use-case: [Choose appropriate image format](/universal-scraper-api/features/output#image-format-and-quality)* |
| [**screenshot\_quality**](/universal-scraper-api/features/output#image-format-and-quality) | `integer` | | For JPEG format, set quality from `1` to `100`. Lower values reduce file size but decrease quality. *Use-case: [Control image compression levels](/universal-scraper-api/features/output#image-format-and-quality)* |
| [**outputs**](/universal-scraper-api/features/output#output-filters) | `string` | | Specify which data types to extract from the scraped HTML. *Use-case: [Extract only specific data fields](/universal-scraper-api/features/output#output-filters)* |
## Pricing
ZenRows® provides flexible plans tailored to different web scraping needs, starting from \$69 per month. This entry-level plan allows you to scrape up to 250,000 URLs using basic requests. For more demanding needs, our Enterprise plans scale up to 38 million URLs or more.
For complex or highly protected websites, enabling advanced features like JavaScript rendering (`js_render`) and Premium Proxies unlocks ZenRows' full potential, ensuring the best success rate possible.
The pricing depends on the complexity of the request — you only pay for the scraping tech you need.
* **Basic request:** Standard rate per 1,000 requests
* **JS rendering:** 5x cost
* **Premium proxies:** 10x cost
* **Both (JS & proxies):** 25x cost
For example, on the Business plan:
* **Basic:** \$0.10 per 1,000 requests
* **JS:** \$0.45 per 1,000
* **Proxies:** \$0.90 per 1,000
* **Both:** \$2.50 per 1,000
For detailed information about different plan options and pricing, visit our [pricing page](https://www.zenrows.com/pricing) and our [pricing documentation page](/first-steps/pricing).
### Concurrency and Response Size Limits
Concurrency determines how many requests can run simultaneously:
| Plan | Concurrency Limit | Response Size Limit |
| ------------ | ----------------- | ------------------- |
| Developer | 5 | 5 MB |
| Startup | 20 | 10 MB |
| Business | 50 | 10 MB |
| Business 500 | 100 | 20 MB |
| Business 1K | 150 | 20 MB |
| Business 2K | 200 | 50 MB |
| Business 3K | 250 | 50 MB |
| Enterprise | Custom | 50 MB |
**Important notes about concurrency:**
* Canceling requests on the client side does NOT immediately free up concurrency slots
* The server continues processing canceled requests until completion
* If you exceed your concurrency limit, you'll receive a `429 Too Many Requests` error
**If response size is exceeded:**
* You'll receive a `413 Content Too Large` error
* No partial data will be returned when a size limit is hit
**Strategies for handling large pages:**
1. **Use CSS selectors**: Target only the specific data you need with `css_extractor` parameter
2. **Use `response_type`**: Convert to markdown or plaintext to reduce size
3. **Disable screenshots**: If using `screenshot` features, these can significantly increase response size
4. **Segment your scraping**: Break down large pages into smaller, more manageable sections
## Response Headers
ZenRows provides useful information through response headers:
| Header | Description | Example Value | Usage |
| ------------------------- | ------------------------------------------------------------- | ---------------------------------- | ------------------------------- |
| **Concurrency-Limit** | Maximum concurrent requests allowed by your plan | `20` | Monitor your plan's capacity |
| **Concurrency-Remaining** | Available concurrent request slots | `17` | Adjust request rate dynamically |
| **X-Request-Cost** | Cost of this request | `0.001` | Track balance consumption |
| **X-Request-Id** | Unique identifier for this request | `67fa4e35647515d8ad61bb3ee041e1bb` | Include when contacting support |
| **Zr-Final-Url** | The final URL after any redirects occurred during the request | `https://example.com/page?id=123` | Track redirects |
Why these headers matter:
* **Monitoring usage**: Track your concurrent usage and stay within limits
* **Support requests**: When reporting issues, always include the `X-Request-Id` for faster troubleshooting
* **Cost tracking**: The `X-Request-Cost` helps you monitor your usage per request
* **Redirection tracking**: `Zr-Final-Url` shows where you ended up after any redirects
## Additional Considerations
Beyond the core features and limits, these additional aspects are important to consider when using the Universal Scraper API:
### Cancelled Request Behavior
When you cancel a request on the client side:
* The server **continues processing** the request until completion
* The concurrency slot remains occupied for up to 3 minutes
* This can result in unexpected `429 Too Many Requests` errors
* Implement request timeouts carefully to avoid depleting concurrency slots
### Security Best Practices
To keep your ZenRows integration secure:
* Store API keys as environment variables, never hardcode them
* Monitor usage patterns to detect unauthorized use
* Rotate API keys periodically for critical applications
### Regional Performance Optimization
To optimize performance based on target website location:
* Consider the geographical distance between your servers and the target website
* For global applications, distribute scraping across multiple regions - the system does it by default
* Monitor response times by region to identify optimization opportunities
* For region-specific content, use the appropriate `proxy_country` parameter
### Compression Support
ZenRows API supports response compression to optimize bandwidth usage and improve performance. Enabling compression offers several benefits for your scraping operations:
* **Reduced latency**: Smaller response sizes mean faster data transfer times
* **Lower bandwidth consumption**: Minimize data transfer costs and usage
* **Improved client performance**: Less data to process means reduced memory usage
ZenRows supports the following compression encodings: `gzip`, `deflate`, `br`.
To use compression, include the appropriate `Accept-Encoding` header in your requests. Most HTTP clients already compress the request automatically. But you can also provide simple options to enable it:
```python Python (Requests) theme={null}
import requests
response = requests.get(
"https://api.zenrows.com/v1/",
params={
"apikey": "YOUR_API_KEY",
"url": "https://example.com"
},
# Python Requests uses compression by default
# headers={"Accept-Encoding": "gzip, deflate"}
)
```
```javascript Javascript (Axios) theme={null}
const axios = require('axios');
const response = await axios.get('https://api.zenrows.com/v1/', {
params: {
apikey: 'YOUR_API_KEY',
url: 'https://example.com'
},
headers: {
'Accept-Encoding': 'gzip, deflate', // axios does not support br by default
},
decompress: true, // Enables automatic handling of compression
});
```
```bash cURL theme={null}
curl --compressed "https://api.zenrows.com/v1/?apikey=YOUR_API_KEY&url=https://example.com"
```
Most modern HTTP clients automatically handle decompression, so you'll receive the uncompressed content in your response object without any additional configuration.
# Common Use Cases & Recipes
Source: https://docs.zenrows.com/universal-scraper-api/common-use-cases
This guide shows you the most common web scraping scenarios and the exact parameters you need for each one. Use these ready-to-implement recipes to quickly solve your specific scraping challenges with the Universal Scraper API.
## Use Case Overview
| Use Case | Key Parameters | When You Need This |
| ------------------------------------------------------ | ------------------------------------------------------------- | ----------------------------------------------------------------- |
| Load dynamic pages (SPAs, dashboards, infinite scroll) | `js_render`, `wait_for`, `block_resources`, `js_instructions` | When content loads via JavaScript or requires user interaction |
| Keep session/IP across requests | `session_id`, `custom_headers` | For multi-step workflows like account access → search → checkout |
| Submit forms or simulate user actions | `js_instructions`, `js_render`, `wait_for` | When you need to click buttons, fill forms, or navigate pages |
| Access geo-restricted content | `premium_proxy`, `proxy_country` | When content varies by location or is region-locked |
| Handle pagination and infinite scroll | `js_render`, `js_instructions`, `wait_for` | When content loads dynamically as you scroll or click "Load More" |
| Extract only specific data fields | `css_extractor`, `autoparse`, `outputs` | When you want structured data instead of full HTML |
| Capture API calls and background requests | `json_response`, `js_render`, `wait_for` | When the data you need comes from AJAX/XHR requests |
| Bypass anti-bot protection | `premium_proxy`, `js_render`, `custom_headers`, `session_id` | When sites use Cloudflare or other bot detection |
| Debug failed requests | `original_status`, `allowed_status_codes`, `screenshot` | When requests fail and you need to understand why |
| Optimize performance and costs | `block_resources`, `outputs`, `wait_for` | When you want faster responses and lower bandwidth usage |
## Code Recipes
### 1. Search for products using the search form
This example shows how to automatically fill and submit a search form, then wait for the search results to load.
```python Python theme={null}
import requests
url = "https://api.zenrows.com/v1/"
params = {
"apikey": "YOUR_ZENROWS_API_KEY",
"url": "https://www.scrapingcourse.com/ecommerce/",
"js_render": "true",
"js_instructions": """[
{"wait_for":"#wp-block-search__input-1"},
{"fill":["#wp-block-search__input-1","hoodie"]},
{"wait":500},
{"click":"#block-2 > form > div > button"},
{"wait_for":"#main"}
]""",
"premium_proxy": "true",
}
response = requests.get(url, params=params)
print(response.text)
```
The `js_instructions` parameter fills the search field with "hoodie", clicks the search button, and waits for the main content area to load with search results before returning the content.
Head to the [JS Instructions Documentation](/universal-scraper-api/features/js-instructions) for more details.
### 2. Maintain a Session Across Requests
Use the same `session_id` value to maintain cookies and session state across multiple requests.
```python Python theme={null}
import requests
# Define session ID and API endpoint
session_id = "1234"
url = "https://api.zenrows.com/v1/"
# First request establishes a session
params1 = {
"apikey": "",
"url": "https://www.scrapingcourse.com/",
"session_id": session_id
}
response1 = requests.get(url, params=params1)
# Second request reuses the same session
params2 = {
"apikey": "",
"url": "https://www.scrapingcourse.com/pagination",
"session_id": session_id
}
response2 = requests.get(url, params=params2)
```
This approach is essential for workflows where you need to maintain the same IP across requests.
Learn more about the `session_id` parameter [here](/universal-scraper-api/features/other#session-id).
### 3. Extract Specific Fields Only
Instead of getting the full HTML, extract only the data you need using CSS selectors.
```python Python theme={null}
params = {
"apikey": "",
"url": "https://www.scrapingcourse.com/ecommerce/",
"css_extractor": """{"product_name":".product-name","price":".price"}""",
}
```
Returns clean, structured data:
```json JSON expandable theme={null}
{
"price": [
"$69.00",
"$57.00",
"$48.00",
"$24.00",
"$74.00",
"$7.00",
"$45.00",
"$69.00",
"$40.00",
"$42.00",
"$34.00",
"$32.50",
"$20.00",
"$22.00",
"$39.00",
"$45.00"
],
"product_name": [
"Abominable Hoodie",
"Adrienne Trek Jacket",
"Aeon Capri",
"Aero Daily Fitness Tee",
"Aether Gym Pant",
"Affirm Water Bottle",
"Aim Analog Watch",
"Ajax Full-Zip Sweatshirt",
"Ana Running Short",
"Angel Light Running Short",
"Antonia Racer Tank",
"Apollo Running Short",
"Arcadio Gym Short",
"Argus All-Weather Tank",
"Ariel Roll Sleeve Sweatshirt",
"Artemis Running Short"
]
}
```
Check the [CSS Extractor Documentation](/universal-scraper-api/features/output#css-selectors) for more details.
### 4. Scrape Localized Content
Access geo-restricted content or get localized pricing by routing your request through specific countries.
```python Python theme={null}
params = {
"apikey": "",
"url": "https://www.scrapingcourse.com/ecommerce/",
"premium_proxy": "true",
"proxy_country": "de"
}
```
This example routes your request through Germany, allowing you to see content as it appears to German users.
Find more details about geolocation on the [Proxy Country Documentation](/universal-scraper-api/features/proxy-country).
### 5. Debugging a Blocked Request
When requests fail, use these parameters to understand what's happening without losing the response data.
#### Check the actual HTTP status
Use the `original_status` parameter to see the real HTTP status code the target page returns.
```python Python theme={null}
params = {
"apikey": "",
"url": "https://example.com/blocked",
"original_status": "true",
}
response = requests.get('https://api.zenrows.com/v1/', params=params)
print(response)
```
Check more about the `original_status` parameter [here](/universal-scraper-api/features/other#original-http-code).
#### Allow specific error status codes
Use the `allowed_status_codes` parameter to receive the actual HTML content even when the page returns error status codes.
```python Python theme={null}
params = {
"apikey": "",
"url": "https://example.com/blocked",
"allowed_status_codes": "403,404,500",
}
response = requests.get('https://api.zenrows.com/v1/', params=params)
print(response.text)
```
Find out more on the [Allowed Status Codes Documentation](/universal-scraper-api/features/other#return-content-on-error).
#### Add custom headers
Use custom headers to simulate browser behavior and avoid detection.
```python Python theme={null}
params = {
"apikey": "",
"url": "https://example.com/blocked",
}
headers = {
'cookie': 'your-cookie',
'referer': 'https://www.google.com',
}
response = requests.get('https://api.zenrows.com/v1/', params=params, headers=headers)
print(response.text)
```
ZenRows handles all browser-based headers. To find out more about it, check our [Headers Documentation](/universal-scraper-api/features/headers).
## What's Next
Ready to implement these recipes? Here are your next steps:
* Explore the [Parameter Reference](/universal-scraper-api/api-reference#parameter-overview)
* Follow the [First Request Guide](/universal-scraper-api/first-request)
* Jump back to [Welcome](/first-steps/welcome)
# Frequently Asked Questions
Source: https://docs.zenrows.com/universal-scraper-api/faq
Headers, including cookies, returned by the target website are prefixed with Zr- and included in all our responses.
Suppose you are scraping a website that requires session cookies for authentication. By capturing the Zr-Cookies header from the initial response, you can include these cookies in your subsequent requests to maintain the session and access authenticated content.
```plaintext theme={null}
Zr-Content-Encoding: gzip
Zr-Content-Type: text/html
Zr-Cookies: _pxhd=Bq7P4CRaW1B...
Zr-Final-Url: https://www.example.com/
```
You could send those cookies in a subsequent request as [Custom Headers](/universal-scraper-api/features/headers) and also use [session\_id](/universal-scraper-api/features/other#session_id) to keep the same IP for up to 10 minutes.
By following this process, you can handle sessions and access restricted areas of the website seamlessly.
If you need to scrape data from a website that requires login authentication, you can log in or register and access content behind a login. However, due to privacy and legal reasons, we offer limited support for these cases.
Login and registration work like regular forms and can be treated as such. There are two main methods to send forms:
1. Send [POST requests](/universal-scraper-api/faq#how-do-i-send-post-requests).
2. Fill in and submit a form using [JavaScript Instructions](/universal-scraper-api/features/js-instructions).
```bash theme={null}
{"fill": [".input-selector", "website_username"]} // Fill the username input
{"fill": [".input-selector", "website_password"]} // Fill the password input
```
All requests will return headers, including the [session cookies](/universal-scraper-api/faq#can-i-get-cookies-from-the-responses). By using these cookies in subsequent requests, you can operate as a logged-in user. Additionally, you can include a [Session ID](/universal-scraper-api/features/other#session-id) to maintain the same IP address for up to 10 minutes.
ZenRows is a scraping tool, not a VPN. If your goal is to log in once and browse the internet with the same IP, you may need a different service.
Suppose you need to perform multiple actions on a website that requires maintaining the same session/IP. You can use the [Session ID](/universal-scraper-api/features/other#session-id) parameter to maintain the same IP between requests. ZenRows will store the IP for 10 minutes from the first request with that ID. All subsequent requests with that ID will use the same IP.
However, session\_id will not store any other request data, such as session cookies. You will receive those cookies as usual and can decide which ones to send on the next request.
Multiple Session IDs can run concurrently, with no limit to the number of sessions.
Each plan comes with a concurrency limit. For example, the Developer plan allows 10 concurrent requests, meaning you can have up to 10 requests running simultaneously, significantly improving speed.
Sending requests above that limit will result in a 429 Too Many Requests error.
We wrote a [guide on using concurrency](/universal-scraper-api/features/concurrency#using-concurrency) that provides more details, including examples in Python and JavaScript. The same principles apply to other languages and libraries.
There are different ways to approach submitting forms on a website when you need to retrieve data.
POST Requests:
The most straightforward way for non-secured endpoints is to send a [POST request](/universal-scraper-api/faq#how-do-i-send-post-requests) as the page does. You can examine and replicate the requests in the browser DevTools.
Imitate User Behavior Using JavaScript Instructions:
Use [JavaScript Instructions](/universal-scraper-api/features/js-instructions) to visit pages protected by anti-bot solutions and interact with them. This includes filling in inputs, clicking buttons, and performing other actions.
## Common Issues with CSS Selectors
One of the most common issues users encounter when working with CSS Selectors in web scraping is improper encoding. CSS Selectors need to be correctly encoded to be recognized and processed by the API.
You can use ZenRows' [Builder](https://app.zenrows.com/builder) or an online tool to properly encode your CSS Selectors before sending them in a request.
## Example of Using a CSS Selector
Let's say you want to extract content from the `.my-class` CSS selector and store it in a property named `test`. You would encode the selector and include it in your request like this:
```bash theme={null}
curl "https://api.zenrows.com/v1/?apikey=YOUR_ZENROWS_API_KEY&url=YOUR_URL&css_extractor=%257B%2522test%2522%253A%2520%2522.my-class%2522%257D"
```
## Troubleshooting CSS Selector Issues
If you're still getting empty responses or the parser reports an error:
1. **Check the Raw HTML:** Request the plain HTML to see if the content served by the website differs from what you see in your browser. Some websites serve different content based on the user's location, device, or other factors.
2. **Verify the Selector:** Ensure the selector you're using is correct by testing it in your browser's Developer Tools (e.g., using Chrome's Console with `document.querySelectorAll(".my-class")`).
3. **Review the Documentation:** Refer to the ZenRows [documentation](/universal-scraper-api/features/output#css-selectors) for detailed information on using CSS Selectors with the API.
If the HTML looks correct, the selector works in the browser, but the parser still fails, contact us, and we'll help you troubleshoot the issue.
## See Also
For comprehensive examples of working with complex layouts and advanced selector techniques, check out our [Advanced CSS Selector Examples](/universal-scraper-api/troubleshooting/advanced-css-selector-examples) guide.
`session_id` won't store any request data, such as session cookies. You will get those back as usual and decide which ones to send on the next request.
Once you've extracted data using ZenRows, you might want to store it in CSV format. For simplicity, we'll focus on a single URL and save the data to one file. In real-world scenarios, you might need to handle multiple URLs and aggregate the results.
To start, we'll explore how to export data to CSV using both Python and JavaScript.
## From JSON using Python
If you've obtained JSON output from ZenRows with the `autoparse` feature enabled, you can use Python to convert this data into a CSV file.
[Autoparsing can work for many websites](https://www.zenrows.com/scraper) but some are not included on this feature
The Pandas library will help us flatten nested JSON attributes and save the data as a CSV file.
Here's a sample Python script:
```python scraper.py theme={null}
# pip install requests pandas
import requests
import json
import pandas as pd
url = "https://www.zillow.com/san-francisco-ca/"
apikey = "YOUR_ZENROWS_API_KEY"
params = {"autoparse": True, "url": url, "apikey": apikey}
response = requests.get("https://api.zenrows.com/v1/", params=params)
content = json.loads(response.text)
data = pd.json_normalize(content)
data.to_csv("result.csv", index=False)
```
You can also adjust the `json_normalize` function to control how many nested levels to flatten and rename fields. For instance, to flatten only one inner level and remove `latLong` from latitude and longitude fields:
```python theme={null}
data = pd.json_normalize(content, max_level=1).rename(
columns=lambda x: x.replace("latLong.", ""))
```
## From HTML using Python
When dealing with HTML output without the `autoparse` feature, you can use BeautifulSoup to parse the HTML and extract data. We'll use the example of an eCommerce site from [Scraping Course](https://www.scrapingcourse.com/ecommerce/). Create a dictionary for each product with essential details, then use Pandas to convert this list of dictionaries into a DataFrame and save it as a CSV file.
Here's how to do it:
```python scraper.py theme={null}
# pip install requests beautifulsoup4 pandas
import requests
from bs4 import BeautifulSoup
import pandas as pd
url = "https://www.scrapingcourse.com/ecommerce/"
apikey = "YOUR_ZENROWS_API_KEY"
params = {"url": url, "apikey": apikey}
response = requests.get("https://api.zenrows.com/v1/", params=params)
soup = BeautifulSoup(response.content, "html.parser")
content = [{
"product_name": product.select_one(".product-name").text.strip(),
"price": product.select_one(".price").text.strip(),
"rating": product.select_one(".rating").text.strip() if product.select_one(".rating") else "N/A",
"link": product.select_one(".product-link").get("href"),
} for product in soup.select(".product")]
data = pd.DataFrame(content)
data.to_csv("result.csv", index=False)
```
## From JSON using JavaScript
For JavaScript and Node.js, you can use the `json2csv` library to handle the JSON to CSV conversion.
After getting the data, we will parse it with a `flatten` transformer. As the name implies, it will flatten the nested structures inside the JSON. Then, save the file using `writeFileSync`.
Here's an example using the ZenRows Universal Scraper API with Node.js:
```javascript scraper.js theme={null}
// npm install zenrows json2csv
const fs = require("fs");
const {
Parser,
transforms: { flatten },
} = require("json2csv");
const { ZenRows } = require("zenrows");
(async () => {
const client = new ZenRows("YOUR_ZENROWS_API_KEY");
const url = "https://www.scrapingcourse.com/ecommerce/";
const { data } = await client.get(url, { autoparse: "true" });
const parser = new Parser({ transforms: [flatten()] });
const csv = parser.parse(data);
fs.writeFileSync("result.csv", csv);
})();
```
## From HTML using JavaScript
For extracting data from HTML without `autoparse` you can use the cheerio library to parse the HTML and extract relevant information. We'll use the [Scraping Course eCommerce](https://www.scrapingcourse.com/ecommerce/) example for this task:
As with the Python example, we will use AutoScout24 to extract data from HTML without the autoparse feature. For that, we will get the plain result and load it into cheerio. It will allow us to query elements as we would in the browser or with jQuery. We will return an object with essential data for each car entry in the list. Parse that list into CSV using `json2csv`, and no flatten is needed this time. And lastly, store the result. These last two steps are similar to the autoparse case.
```javascript scraper.js theme={null}
// npm install zenrows json2csv cheerio
const fs = require("fs");
const cheerio = require("cheerio");
const { Parser } = require("json2csv");
const { ZenRows } = require("zenrows");
(async () => {
const client = new ZenRows("YOUR_ZENROWS_API_KEY");
const url = "https://www.scrapingcourse.com/ecommerce/";
const { data } = await client.get(url);
const $ = cheerio.load(data);
const content = $(".product").map((_, product) => ({
product_name: $(product).find(".product-name").text().trim(),
price: $(product).find(".price").text().trim(),
rating: $(product).find(".rating").text().trim() || "N/A",
link: $(product).find(".product-link").attr("href"),
}))
.toArray();
const parser = new Parser();
const csv = parser.parse(content);
fs.writeFileSync("result.csv", csv);
})();
```
If you encounter any issues or need further assistance with your scraper setup, please contact us, and we'll be happy to help!
We'll explore popular use cases for scraping, such as lists, tables, and product grids. Use these as inspiration and a guide for your scrapers.
## Scraping from Lists
We will use the Wikipedia page on Web scraping for testing. A section at the bottom, "See also", contains links in a list. We can get the content by using the [CSS selector](/universal-scraper-api/features/output#css-selectors) for the list items: `{"items": ".div-col > ul li"}`.
That will get the text, but what of the links? To access attributes, we need a non-standard syntax for the selector: `@href`. It won't work with the previous selector since the last item is the `li` element, which does not have an `href` attribute. So we must change it for the link element: `{"links": ".div-col > ul a @href"}`.
CSS selectors, in some languages, must be [encoded](/universal-scraper-api/faq#how-to-encode-urls) to avoid problems with URLs.
```bash theme={null}
curl "https://api.zenrows.com/v1/?apikey=YOUR_ZENROWS_API_KEY&url=https%3A%2F%2Fen.wikipedia.org%2Fwiki%2FWeb_scraping&css_extractor=%257B%2522items%2522%253A%2520%2522.div-col%2520%253E%2520ul%2520li%2522%252C%2520%2522links%2522%253A%2520%2522.div-col%2520%253E%2520ul%2520a%2520%2540href%2522%257D"
```
Our [Builder](https://app.zenrows.com/builder) can help you write and test the selectors and output code in several languages.
## Scraping from Tables
Assuming regular tables (no empty cells, rows with fewer items, and others), we can extract table data with CSS selectors. We'll use a list of countries, the first table on the page, the one with the class `wikitable`.
To extract the rank, which is the first column, we can use `"table.wikitable tr > :first-child"`. It will return an array with 243 items, 2 header lines, and 241 ranks. For the country name, second column, something similar but adding an `a` to avoid capturing the flags: `"table.wikitable tr > :nth-child(2) a"`. In this case, the array will have one less item since the second heading has no link. That might be a problem if we want to match items by array index.
```bash theme={null}
curl "https://api.zenrows.com/v1/?apikey=YOUR_ZENROWS_API_KEY&url=https%3A%2F%2Fen.m.wikipedia.org%2Fwiki%2FList_of_countries_and_dependencies_by_population&css_extractor=%257B%2522rank%2522%253A%2520%2522table.wikitable%2520tr%2520%253E%2520%253Afirst-child%2522%252C%2520%2522countries%2522%253A%2520%2522table.wikitable%2520tr%2520%253E%2520%253Anth-child%282%29%2520a%2522%257D"
```
Outputs:
```json theme={null}
{
"countries": ["Country or dependent territory", "China", "India", ...],
"rank": ["Rank", "-", "1", "2", ...]
}
```
As stated above, this might prove difficult for non-regular tables. For those, we might prefer to get the Plain HTML and [scrape the content with a tool or library](/zenrows-academy/how-to-extract-data#using-external-libraries) so we can add conditionals and logic.
This example lists items by column, not row, which might prove helpful in various cases. However, there are no easy ways to extract structured data from tables using CSS Selectors and group it by row.
## Scraping from Product Grids
As with the tables, non-regular grids might cause problems. We'll scrape the price, product name, and link from an online store. By manually searching the page's content, we arrive at cards with the class `.product`. Those contain all the data we want.
It is essential to avoid duplicates, so we have to use some precise selectors. For example, `".product-item .product-link @href"` for the links. We added the `.product-link` class because it is unique to the product cards. The same goes for name and price, which also have unique classes.
All in all, the final selector would be:
```json theme={null}
{
"links": ".product-item .product-link @href",
"names": ".product-item .product-name",
"prices": ".product-item .product-price"
}
```
Several items are on the page at the time of this writing. And each array has the same number of elements, so everything looks fine. If we were to group them, we could zip the arrays.
For example, in python, taking advantage of the auto-encoding that `requests.get` does to parameters. Remember to [encode](/universal-scraper-api/faq#how-to-encode-urls) the URL and CSS extractor for different scenarios when that is not available.
```python scraper.py theme={null}
# pip install requests
import requests
import json
zenrows_api_base = "https://api.zenrows.com/v1/?apikey=YOUR_ZENROWS_API_KEY"
url = "https://www.scrapingcourse.com/ecommerce/"
css_extractor = """{
"links": ".product .product-link @href",
"names": ".product .product-name",
"prices": ".product .product-price"
}"""
response = requests.get(zenrows_api_base, params={
"url": url, "css_extractor": css_extractor})
parsed_json = json.loads(response.text)
result = zip(parsed_json["links"], parsed_json["names"], parsed_json["prices"])
print(list(result))
# [('/products/product1', 'Product 1', '$10.00'), ... ]
```
Remember that this approach won't work properly if, for example, some products have no price. Not all the arrays would have the same length, and the zipping would misassign data. Getting the Plain HTML and parsing the content with a library and custom logic is a better solution for those cases.
If you encounter any problems or cannot correctly set up your scraper, contact us, and we'll help you.
ZenRows allows you to send [Custom Headers](/universal-scraper-api/features/headers) on requests on case you need to scrape a website that requires a specific headers.
However, it's important to test the success rate when changing them. ZenRows® automatically manages certain headers, especially those related to the browser environment, such as User-Agent.
Defensive systems inspect headers as a whole, and not all browsers use the same ones. If you choose to send custom headers, ensure the rest of the headers match accordingly.
By default, POST requests use `application/x-www-form-urlencoded`. To send JSON data, you need to add the `Content-Type: application/json` header manually, though some software/tools may do this automatically.
Before trying on your target site, we recommend using a testing site like httpbin.io to verify that the parameters are sent correctly.
Ensure that the parameters are sent and the format is correct. If in doubt, switch between both modes to confirm that the changes are applied correctly.
For more info on POST requests, see [How do I send POST requests?](/universal-scraper-api/faq#how-do-i-send-post-requests).
Send [POST requests](/universal-scraper-api/features/other#post-put-requests) using your chosen programming language. ZenRows will transparently forward the data to the target site.
Before trying on your target site, we recommend using a testing site like httpbin.io to verify that the parameters are sent correctly.
Testing is important because not all languages and tools handle POST requests the same way. Ensure that the parameters and format are correct. By default, browsers send content as `application/x-www-form-urlencoded`, but many sites expect JSON content, requiring the `Content-Type: application/json header`.
When working with the ZenRows Universal Scraper API, it's crucial to encode your target URLs, especially if they contain query parameters. Encoding ensures that your URLs are correctly interpreted by the API, avoiding potential conflicts between the target URL's parameters and those used in the API request.
Consider the following URL example:
`https://www.scrapingcourse.com/ecommerce/?course=web-scraping§ion=advanced`
If you were to send this URL directly as part of your API request without encoding, and you also include the `premium_proxy` parameter, the request might look something like this:
```bash theme={null}
curl "https://api.zenrows.com/v1/?apikey=YOUR_ZENROWS_API_KEY&url=https://www.scrapingcourse.com/ecommerce/?course=web-scraping§ion=advanced&premium_proxy=true"
```
In this scenario, the API might incorrectly interpret the `course` and `section` parameters as part of the API's query string rather than the target URL. This could lead to errors or unintended behavior.
To avoid such issues, you should encode your target URL before including it in the API request. URL encoding replaces special characters (like `&`, `?`, and `=`) with a format that can be safely transmitted over the internet.
Here's how you can encode the URL in Python:
```python encoder.py theme={null}
import urllib.parse
encoded_url = urllib.parse.quote("https://www.scrapingcourse.com/ecommerce/?course=web-scraping§ion=advanced")
```
After encoding, your Universal Scraper API request would look like this:
```bash theme={null}
curl "https://api.zenrows.com/v1/?apikey=YOUR_ZENROWS_API_KEY&url=https%3A%2F%2Fwww.scrapingcourse.com%2Fecommerce%2F%3Fcourse%3Dweb-scraping%26section%3Dadvanced&premium_proxy=true"
```
Many HTTP clients, such as `axios` (JavaScript) and `requests` (Python), automatically encode URLs for you. However, if you are manually constructing requests or using a client that doesn't handle encoding, you can use programming language functions or online tools to encode your URLs.
For quick manual encoding, you can use an online tool, but remember that this method is not scalable for automated processes.
If you are scraping a site with high-security measures and encounter blocks even with Premium Proxies and JS Render enabled, try these steps to unblock your requests:
Use [geotargeting](/universal-scraper-api/features/proxy-country) by selecting a country for the proxy, e.g., `proxy_country=us`. Many sites respond better to proxies close to their operation centers.
Implement [Wait For Selector](/universal-scraper-api/features/wait-for) to have the scraper look for specific content before returning. This feature can change how the system interacts with the site and might help unblock the request.
Adjust the [Block Resources](/universal-scraper-api/features/block-resources) settings. ZenRows blocks certain resources by default, such as CSS or images, to speed up scraping. Use your browser's DevTools to identify other resources to block, such as media or xhr (`block_resources=stylesheet,image,media,xhr`). Alternatively, disable blocking by setting it to false (`block_resources=none`).
Many websites inspect the headers of a request to determine if it is coming from a legitimate browser. Adding custom headers to mimic normal browser behavior can help bypass these checks.
Refer to our documentation on [Custom Headers](/universal-scraper-api/features/headers) for more details.
Combining these methods may yield the expected results.
For high-security endpoints or inner pages, you may need to simulate a typical user session to avoid detection. First, obtain session cookies from a less protected page on the same site. This step mimics the initial user interaction with the site. Then, use these session cookies to access the more secure target page.
Additionally, you can use the [Session ID](/universal-scraper-api/features/other#session-id) feature to maintain the same IP address for up to 10 minutes, ensuring consistency in your requests and reducing the likelihood of being blocked.
## Understanding Proxy Types: Data Center vs. Residential IPs
When it comes to web scraping proxies, there are two main types of IPs you can use: data center and residential.
1. **Data Center IPs:** These are IP addresses provided by cloud service providers or hosting companies. They are typically fast and reliable, but because they are easily recognizable as belonging to data centers, they are more likely to be blocked by websites that have anti-scraping measures in place.
2. **Residential IPs:** These IP addresses are assigned by Internet Service Providers (ISPs) to real residential users. Since they appear as regular users browsing the web, they are much harder to detect and block. This makes residential IPs particularly valuable when scraping sites with strong anti-bot protections, like Google or other heavily guarded domains.
## How ZenRows Uses Residential IPs
By default, ZenRows uses data center connections for your requests. However, if you're facing blocks or need to scrape highly protected websites, you can opt for residential IPs by setting the `premium_proxy` parameter to `true`. This will route your request through a residential IP, significantly increasing your chances of success.
It's important to note that using residential IPs comes with an additional cost due to the higher value and lower detection rate of these proxies.
YOu can check out more about Premium Proxies [here!](/universal-scraper-api/features/premium-proxy)
## Example of a Request with Residential IPs
Here's how you can make a request using a residential IP:
```bash theme={null}
curl "https://api.zenrows.com/v1/?apikey=YOUR_ZENROWS_API_KEY&url=YOUR_URL&premium_proxy=true"
```
In cases where you're also targeting content localized to specific regions, ZenRows supports [geotargeting](/first-steps/faq#what-is-geolocation-and-what-are-all-the-premium-proxy-countries) with residential IPs, allowing you to specify the country of the IP.
## Troubleshooting Blocks
If you continue to experience blocks even with residential IPs, feel free to contact us, and we'll work with you to find a solution.
## Simplifying Data Extraction with Autoparse
ZenRows offers a powerful feature called Autoparse, designed to simplify the process of extracting structured data from websites. This feature leverages custom parsers allowing you to easily retrieve data in a structured JSON format rather than raw HTML.
## How It Works
By default, when you call the ZenRows API, the response will be in Plain HTML. However, when you activate the `autoparse` parameter, the API will automatically parse the content of supported websites and return the data as a JSON object. This makes it much easier to work with the data, especially when dealing with complex websites that require extensive parsing logic.
## Example of a Request with Autoparse
Here's how you can make an API call with the Autoparse feature enabled:
```bash theme={null}
curl "https://api.zenrows.com/v1/?apikey=YOUR_ZENROWS_API_KEY&url=YOUR_URL&autoparse=true"
```
## Limitations and Troubleshooting
1. **Supported Domains:** The Autoparse feature is in experimental phase and doesn't work in all domains. You can view some of the supported domains on the [ZenRows Scraper page](https://www.zenrows.com/scraper). If the website you're trying to scrape isn't supported, the response will either be empty, incomplete, or an error.
2. **Fallback to HTML:** If you find that Autoparse doesn't return the desired results, you can simply remove the `autoparse` parameter and try the request again. This will return the plain HTML response, allowing you to manually parse the data as needed.
Enabling JavaScript Rendering not only allows you to scrape content that would otherwise be inaccessible, but it also unlocks advanced scraping features. For example, with JavaScript Rendering, you can use the `wait_for` parameter to delay scraping until a specific element is present on the page, ensuring you capture the content you need.
Check out more about JavaScript Rendering [here!](/universal-scraper-api/features/js-rendering)
Browser-based headers are crucial for ensuring that requests appear legitimate to target websites. ZenRows manages these headers to mimic real user behavior, which significantly reduces the risk of being blocked. By preventing customers from manually setting these headers, ZenRows can optimize the success rate and avoid common pitfalls associated with improper header configurations.
## Example of Sending Custom Headers
Here's an example using `cURL` to send custom headers that are permitted along with your ZenRows request:
```bash bash theme={null}
curl \
-H "Accept: application/json" \
-H "Referer: https://www.google.com" \
"https://api.zenrows.com/v1/?apikey=YOUR_ZENROWS_API_KEY&url=YOUR_URL&custom_headers=true"
```
# Adaptive Stealth Mode
Source: https://docs.zenrows.com/universal-scraper-api/features/adaptive-stealth-mode
ZenRows intelligent scraping mode that automatically selects optimal configurations while minimizing costs and maintenance overhead.
Adaptive Stealth Mode is ZenRows' automated execution mode that analyzes each request and selects the most cost-effective configuration needed for successful data extraction. Instead of manually configuring parameters, Adaptive Stealth Mode starts with basic settings and escalates only when necessary, eliminating ongoing maintenance as websites change their protection mechanisms.
**When you enable Adaptive Stealth Mode, ZenRows:**
* **Prioritizes successful extraction** above all else
* **Starts with the cheapest viable configuration** for each request
* **Automatically escalates** to more powerful features only when necessary
* **Bills only for the configuration that succeeds** - failed attempts incur no charges
* **Adapts automatically** as website behavior changes over time
* **Reduces maintenance overhead** by eliminating the need to monitor and update scraping configurations
Adaptive Stealth Mode eliminates the need for manual parameter tuning in production environments.
## How Adaptive Stealth Mode Works
Adaptive Stealth Mode executes each request using a progressive strategy:
1. **Target Analysis:** Evaluates the target URL using known patterns and runtime signals to predict the best starting configuration.
2. **Lowest-Cost Attempt:** Executes the request with the least expensive configuration likely to succeed based on the analysis.
3. **Automatic Escalation:** Retries with stronger features if the initial attempt fails, progressively adding capabilities as needed.
4. **Success-Only Billing:** You are billed only for the configuration that completes successfully. Failed attempts incur no charges.
This approach ensures reliable data extraction without overpaying for unnecessary features.
## Basic Usage
### API Usage
Add `mode=auto` to your request:
```python Python theme={null}
# pip install requests
import requests
url = 'https://www.scrapingcourse.com/ecommerce/'
apikey = 'YOUR_ZENROWS_API_KEY'
params = {
'url': url,
'apikey': apikey,
'mode': 'auto',
}
response = requests.get('https://api.zenrows.com/v1/', params=params)
print(response.text)
```
```javascript Node.js theme={null}
// npm install axios
const axios = require('axios');
const url = 'https://www.scrapingcourse.com/ecommerce/';
const apikey = 'YOUR_ZENROWS_API_KEY';
axios({
url: 'https://api.zenrows.com/v1/',
method: 'GET',
params: {
'url': url,
'apikey': apikey,
'mode': 'auto',
},
})
.then(response => console.log(response.data))
.catch(error => console.log(error));
```
```java Java theme={null}
import org.apache.hc.client5.http.fluent.Request;
public class APIRequest {
public static void main(final String... args) throws Exception {
String apiUrl = "https://api.zenrows.com/v1/?apikey=YOUR_ZENROWS_API_KEY&url=https%3A%2F%2Fwww.scrapingcourse.com%2Fecommerce%2F&mode=auto";
String response = Request.get(apiUrl)
.execute().returnContent().asString();
System.out.println(response);
}
}
```
```php PHP theme={null}
```
```go Go theme={null}
package main
import (
"io"
"log"
"net/http"
)
func main() {
client := &http.Client{}
req, err := http.NewRequest("GET", "https://api.zenrows.com/v1/?apikey=YOUR_ZENROWS_API_KEY&url=https%3A%2F%2Fwww.scrapingcourse.com%2Fecommerce%2F&mode=auto", nil)
resp, err := client.Do(req)
if err != nil {
log.Fatalln(err)
}
defer resp.Body.Close()
body, err := io.ReadAll(resp.Body)
if err != nil {
log.Fatalln(err)
}
log.Println(string(body))
}
```
```ruby Ruby theme={null}
# gem install faraday
require 'faraday'
url = URI.parse('https://api.zenrows.com/v1/?apikey=YOUR_ZENROWS_API_KEY&url=https%3A%2F%2Fwww.scrapingcourse.com%2Fecommerce%2F&mode=auto')
conn = Faraday.new()
conn.options.timeout = 180
res = conn.get(url, nil, nil)
print(res.body)
```
```bash cURL theme={null}
curl "https://api.zenrows.com/v1/?url=https://www.scrapingcourse.com/ecommerce/&apikey=YOUR_ZENROWS_API_KEY&mode=auto"
```
## When to Use Adaptive Stealth Mode
**Recommended when:**
* Scraping multiple websites with different behaviors
* Website requirements are unknown or change frequently
* Reliability matters more than manual optimization
* You're running production workloads at scale
* You want to minimize maintenance overhead from website changes
**Consider manual configuration for:**
* Single, stable domains where you know the optimal setup
* Scenarios requiring predictable, consistent feature usage
* Cost-sensitive applications with well-understood requirements
## Managed Parameters
Adaptive Stealth Mode automatically manages these API parameters:
| Parameter | Purpose | When Applied |
| --------------- | ---------------------------------------- | ------------------------------------------------------- |
| `js_render` | JavaScript rendering for dynamic content | Sites using React, Vue, Angular, or AJAX loading |
| `premium_proxy` | Residential IP addresses | Sites blocking datacenter IPs or requiring geo-location |
The managed parameters above are disabled when using Adaptive Stealth Mode to prevent conflicting configurations. Other parameters remain available for use.
If you set the parameters manually, Adaptive Stealth Mode will return a 400 error:
```json theme={null}
{
"code": "REQ_INVALID_PARAMS",
"message": "js_render and premium_proxy parameters cannot be used with automatic mode"
}
```
## Adaptive Stealth Mode vs Manual Configuration
| Aspect | Adaptive Stealth Mode (`mode=auto`) | Manual Parameters |
| -------------------------- | ----------------------------------- | -------------------------- |
| Setup time | Single parameter | Requires tuning |
| Success optimization | Automatic | User-managed |
| Cost optimization | Automatic, per request | Fixed by chosen config |
| Adaptation to site changes | Automatic | Requires updates |
| Failed attempts billed | No | No |
| Best for | Production, multi-domain workloads | Stable, well-known targets |
## Troubleshooting
### Common Issues
**Adaptive Stealth Mode not working as expected**
* Verify the `mode=auto` parameter is correctly set
* Check that other conflicting parameters aren't overriding Adaptive Stealth Mode
* Review the response headers for cost and feature information
**Higher costs than expected**
* Monitor the `X-Request-Cost` header to understand feature usage
* Consider manual configuration if cost patterns are predictable
* Use the Builder UI to preview costs before running requests
**Inconsistent results**
* Adaptive Stealth Mode adapts to website changes, which may affect feature selection
* Use `session_id` to maintain consistency across related requests
* Switch to manual configuration for completely predictable behavior
## Pricing
Adaptive Stealth Mode uses transparent, usage-based pricing with these cost multipliers:
| Configuration | Cost Multiplier | When Used |
| -------------------- | --------------- | ---------------------------------------------------- |
| Basic request | 1x | Simple static websites |
| JavaScript rendering | 5x | Dynamic content requiring browser processing |
| Premium Proxies | 10x | Sites blocking datacenter IPs |
| Combined features | 25x | Highly protected sites requiring both JS and proxies |
You are billed only once, for the configuration that succeeds. If Adaptive Stealth Mode requires multiple internal attempts before success, ZenRows bills only for the successful configuration.
## Frequently Asked Questions (FAQ)
No. Adaptive Stealth Mode minimizes costs by avoiding unnecessary features and charging only for successful requests. It often reduces costs compared to manually over-configuring parameters.
You retain full visibility through response headers (including request cost) and the Analytics dashboard, without needing to manage configuration decisions manually.
Adaptive Stealth Mode adapts automatically without requiring parameter updates on your end. The system learns from new blocking patterns and adjusts accordingly.
Yes, but with limitations. When you use `mode=auto`, only the managed parameters (`js_render`, and `premium_proxy`) are disabled to prevent conflicts. You can still use other API parameters like `css_extractor`, `session_id`, or custom request settings alongside Adaptive Stealth Mode.
# Block Resources
Source: https://docs.zenrows.com/universal-scraper-api/features/block-resources
The Block Resources parameter prevents your headless browser from downloading specific types of content that aren't essential for your scraping task. By blocking unnecessary resources, such as images, stylesheets, fonts, and media files, you can significantly improve scraping efficiency, reduce loading times, optimize performance, and minimize bandwidth usage.
When you block resources, ZenRows instructs the browser to ignore requests for the specified content types, allowing pages to load faster and consume less data. This is particularly valuable when scraping content-heavy sites where you only need the text data or specific elements.
ZenRows automatically blocks certain resource types by default, such as stylesheets and images, to optimize scraping speed and reduce unnecessary data load. **We recommend only using this parameter when you need to customize the default blocking behavior or when troubleshooting specific issues.**
## How Block Resources works
Block Resources operates at the network level within the browser, intercepting requests for specified resource types before they're downloaded. When the browser encounters a request for a blocked resource type, it prevents the download entirely, reducing both loading time and bandwidth consumption.
This process affects:
* Page loading speed by eliminating unnecessary downloads
* Bandwidth usage by preventing large file transfers
* Memory consumption by reducing the amount of data processed
* Rendering time by focusing only on essential content
* Network request volume by filtering out non-critical resources
The blocking happens transparently during page rendering, ensuring that essential functionality remains intact while removing unnecessary overhead.
## Basic usage
Add the `block_resources` parameter with comma-separated resource types to your request:
```python Python theme={null}
# pip install requests
import requests
url = 'https://httpbin.io/anything'
apikey = 'YOUR_ZENROWS_API_KEY'
params = {
'url': url,
'apikey': apikey,
'js_render': 'true',
'block_resources': 'image,media,font',
}
response = requests.get('https://api.zenrows.com/v1/', params=params)
print(response.text)
```
```javascript Node.js theme={null}
// npm install axios
const axios = require('axios');
const url = 'https://httpbin.io/anything';
const apikey = 'YOUR_ZENROWS_API_KEY';
axios({
url: 'https://api.zenrows.com/v1/',
method: 'GET',
params: {
'url': url,
'apikey': apikey,
'js_render': 'true',
'block_resources': 'image,media,font',
},
})
.then(response => console.log(response.data))
.catch(error => console.log(error));
```
```java Java theme={null}
import org.apache.hc.client5.http.fluent.Request;
public class APIRequest {
public static void main(final String... args) throws Exception {
String apiUrl = "https://api.zenrows.com/v1/?apikey=YOUR_ZENROWS_API_KEY&url=https%3A%2F%2Fhttpbin.io%2Fanything&js_render=true&block_resources=image%2Cmedia%2Cfont";
String response = Request.get(apiUrl)
.execute().returnContent().asString();
System.out.println(response);
}
}
```
```php PHP theme={null}
```
```go Go theme={null}
package main
import (
"io"
"log"
"net/http"
)
func main() {
client := &http.Client{}
req, err := http.NewRequest("GET", "https://api.zenrows.com/v1/?apikey=YOUR_ZENROWS_API_KEY&url=https%3A%2F%2Fhttpbin.io%2Fanything&js_render=true&block_resources=image%2Cmedia%2Cfont", nil)
resp, err := client.Do(req)
if err != nil {
log.Fatalln(err)
}
defer resp.Body.Close()
body, err := io.ReadAll(resp.Body)
if err != nil {
log.Fatalln(err)
}
log.Println(string(body))
}
```
```ruby Ruby theme={null}
# gem install faraday
require 'faraday'
url = URI.parse('https://api.zenrows.com/v1/?apikey=YOUR_ZENROWS_API_KEY&url=https%3A%2F%2Fhttpbin.io%2Fanything&js_render=true&block_resources=image%2Cmedia%2Cfont')
conn = Faraday.new()
conn.options.timeout = 180
res = conn.get(url, nil, nil)
print(res.body)
```
```bash cURL theme={null}
curl "https://api.zenrows.com/v1/?apikey=YOUR_ZENROWS_API_KEY&url=https%3A%2F%2Fhttpbin.io%2Fanything&js_render=true&block_resources=image%2Cmedia%2Cfont"
```
This example blocks images, media files, and fonts while allowing other resources to load normally, resulting in faster page loading and reduced data usage.
## Available resource types
ZenRows supports blocking the following resource types:
### Content resources
* `stylesheet` - CSS files that define visual styling and layout
* `image` - All image formats including JPG, PNG, GIF, SVG, and WebP
* `media` - Audio and video files of all formats
* `font` - Web fonts including WOFF, WOFF2, TTF, and OTF files
### Script and dynamic content
* `script` - JavaScript files and inline scripts
* `xhr` - XMLHttpRequest calls used for AJAX functionality
* `fetch` - Modern Fetch API requests for dynamic content loading
* `eventsource` - Server-sent events for real-time data streams
* `websocket` - WebSocket connections for bidirectional communication
### Application resources
* `texttrack` - Video subtitle and caption files
* `manifest` - Web app manifests containing application metadata
* `other` - Any resource types not specifically categorized above
### Special values
* `none` - Disables all resource blocking, allowing everything to load
## When to use Block Resources
Block Resources is essential for these scenarios:
### Performance optimization:
* **Large-scale scraping** - Reduce bandwidth and processing time across many requests
* **Content-heavy sites** - Skip images and media when extracting text data
* **Slow connections** - Minimize data transfer in bandwidth-limited environments
* **High-volume operations** - Optimize resource usage for continuous scraping tasks
* **Cost reduction** - Lower bandwidth costs for cloud-based scraping operations
### Content-specific extraction:
* **Text-only scraping** - Extract articles, reviews, or descriptions without visual elements
* **Data mining** - Focus on structured data while ignoring presentation layers
* **API monitoring** - Allow dynamic requests while blocking static resources
* **Search engine optimization** - Analyze content structure without styling interference
* **Accessibility testing** - Test content availability without visual dependencies
### Troubleshooting and debugging:
* **JavaScript conflicts** - Isolate issues by selectively blocking script types
* **Loading problems** - Identify problematic resources causing page failures
* **Performance analysis** - Measure impact of different resource types on loading speed
* **Content validation** - Verify that essential content doesn't depend on blocked resources
## Disabling resource blocking
To turn off ZenRows' default resource blocking and allow all content to load:
```python Python theme={null}
params = {
'js_render': 'true',
'block_resources': 'none', # Disable all resource blocking
}
```
Use `block_resources=none` when:
* You need complete visual fidelity
* Debugging layout or styling issues
* Testing how pages appear to real users
* Analyzing complete resource loading patterns
* Ensuring no content dependencies are missed
## Best practices
### Monitor content integrity
Verify that blocked resources don't affect essential content:
```python Python theme={null}
def validate_content_integrity(url, target_selectors):
"""
Compare content availability with and without resource blocking
"""
from bs4 import BeautifulSoup
# Test with default blocking
default_response = requests.get('https://api.zenrows.com/v1/', params={
'url': url,
'apikey': 'YOUR_ZENROWS_API_KEY',
'js_render': 'true',
})
# Test with aggressive blocking
aggressive_response = requests.get('https://api.zenrows.com/v1/', params={
'url': url,
'apikey': 'YOUR_ZENROWS_API_KEY',
'js_render': 'true',
'block_resources': 'image,media,font,stylesheet,script',
})
default_soup = BeautifulSoup(default_response.text, 'html.parser')
aggressive_soup = BeautifulSoup(aggressive_response.text, 'html.parser')
integrity_report = {}
for selector in target_selectors:
default_elements = default_soup.select(selector)
aggressive_elements = aggressive_soup.select(selector)
integrity_report[selector] = {
'default_count': len(default_elements),
'aggressive_count': len(aggressive_elements),
'content_preserved': len(default_elements) == len(aggressive_elements),
}
return integrity_report
# Validate that important content is preserved
selectors = ['.product-title', '.price', '.description', '.reviews']
integrity = validate_content_integrity('https://ecommerce.com/product/123', selectors)
for selector, data in integrity.items():
status = "✓" if data['content_preserved'] else "✗"
print(f"{status} {selector}: {data['default_count']} → {data['aggressive_count']} elements")
```
### Combine with other parameters
Use Block Resources with complementary features for optimal results:
```python Python theme={null}
params = {
'js_render': 'true',
'block_resources': 'image,media,font,stylesheet', # Block visual resources
'wait_for': '.main-content', # Wait for essential content
'json_response': 'true', # Capture API calls
'premium_proxy': 'true', # For protected sites
}
```
## Troubleshooting
### Common issues and solutions
| Issue | Cause | Solution |
| ----------------- | -------------------------- | -------------------------------------- |
| Missing content | Essential scripts blocked | Remove `script` from blocked resources |
| Incomplete data | XHR/Fetch requests blocked | Allow `xhr` and `fetch` resources |
| Layout issues | CSS dependencies | Remove `stylesheet` from blocking |
| Slow loading | Too many resources allowed | Add more resource types to blocking |
| JavaScript errors | Font or media dependencies | Test with individual resource types |
### Debugging missing content
When content disappears after blocking resources:
Compare the HTML obtained with and without resource blocking to identify missing elements.
```python Python theme={null}
# Get baseline without custom blocking
baseline = requests.get('https://api.zenrows.com/v1/', params={
'url': url,
'apikey': 'YOUR_ZENROWS_API_KEY',
'js_render': 'true',
})
# Get result with blocking
blocked = requests.get('https://api.zenrows.com/v1/', params={
'url': url,
'apikey': 'YOUR_ZENROWS_API_KEY',
'js_render': 'true',
'block_resources': 'image,media,font,script',
})
print(f"Baseline length: {len(baseline.text)}")
print(f"Blocked length: {len(blocked.text)}")
```
Block one resource type at a time to identify the problematic category.
```python Python theme={null}
resource_types = ['image', 'media', 'font', 'stylesheet', 'script', 'xhr']
for resource_type in resource_types:
response = requests.get('https://api.zenrows.com/v1/', params={
'url': url,
'apikey': 'YOUR_ZENROWS_API_KEY',
'js_render': 'true',
'block_resources': resource_type,
})
# Check if target content exists
has_content = 'target-selector' in response.text
print(f"Blocking {resource_type}: Content present = {has_content}")
```
Remove problematic resource types from your blocking configuration.
```python Python theme={null}
# If script blocking causes issues, exclude it
safe_blocking = 'image,media,font,stylesheet' # Exclude script, xhr, fetch
response = requests.get('https://api.zenrows.com/v1/', params={
'url': url,
'apikey': 'YOUR_ZENROWS_API_KEY',
'js_render': 'true',
'block_resources': safe_blocking,
})
```
### Performance vs. content trade-offs
Balance optimization with content completeness:
```python Python theme={null}
def find_optimal_blocking(url, required_selectors):
"""
Find the most aggressive blocking that preserves required content
"""
blocking_configurations = [
'image',
'image,media',
'image,media,font',
'image,media,font,stylesheet',
'image,media,font,stylesheet,other',
]
optimal_config = None
for config in blocking_configurations:
response = requests.get('https://api.zenrows.com/v1/', params={
'url': url,
'apikey': 'YOUR_ZENROWS_API_KEY',
'js_render': 'true',
'block_resources': config,
})
from bs4 import BeautifulSoup
soup = BeautifulSoup(response.text, 'html.parser')
# Check if all required content is present
all_content_present = all(
soup.select(selector) for selector in required_selectors
)
if all_content_present:
optimal_config = config
print(f"✓ Configuration '{config}' preserves all content")
else:
print(f"✗ Configuration '{config}' missing content")
break
return optimal_config
# Find optimal blocking for specific content requirements
required_elements = ['.product-title', '.price', '.description']
best_config = find_optimal_blocking('https://shop.com/product/123', required_elements)
print(f"Recommended blocking: {best_config}")
```
## Pricing
The `block_resources` parameter doesn't increase the request cost. You pay the JavaScript Render (5 times the standard price) regardless of the wait value you choose.
## Frequently Asked Questions (FAQ)
ZenRows automatically blocks stylesheets and images by default to optimize scraping speed and reduce data usage. You can override this behavior by setting `block_resources=none` to allow all resources, or by specifying custom blocking for specific resource types.
Yes, blocking scripts can prevent dynamic content from loading properly. If you need content that's loaded via JavaScript, avoid blocking the `script`, `xhr`, and `fetch` resource types. Focus on blocking visual resources like `image`, `media`, `font`, and `stylesheet` instead.
Bandwidth savings vary significantly depending on the website's content and design. Image-heavy sites can significantly reduce data transfer by blocking images and media. Text-focused sites may achieve savings by blocking stylesheets and fonts.
No, the `block_resources` parameter only works with `js_render=true` because resource blocking operates within the browser environment during JavaScript rendering. For static HTML requests, resource blocking isn't applicable.
Blocking XHR or Fetch requests prevents the page from making AJAX calls, which can result in missing dynamic content. Only block these if you're certain the content you need is available in the initial HTML without requiring additional API calls.
Yes, if you block `xhr` or `fetch` resources, those requests won't appear in the JSON Response XHR array. However, blocking visual resources, such as images and stylesheets, won't affect the capture of API calls and can reduce the overall response size.
No, you must specify exact resource type names from the supported list. You cannot use wildcards or custom patterns. To block multiple types, separate them with commas, such as `image,media,font`.
Start by blocking only visual resources (`image,media,font,stylesheet`) and test if your target content is still available. If content is missing, remove resource types one by one until you find the minimal blocking configuration that preserves your required data.
# Concurrency
Source: https://docs.zenrows.com/universal-scraper-api/features/concurrency
Understand how ZenRows® concurrency works
Concurrency in web scraping is essential for efficient data extraction, especially when dealing with multiple URLs. Managing the number of concurrent requests helps prevent overwhelming the target server and ensures you stay within rate limits. Depending on your subscription plan, you can perform twenty or more concurrent requests.
In short, concurrency refers to the number of API requests you can have in progress (or *running*) simultaneously. If your plan supports 5 concurrent requests, you can process up to 5 requests simultaneously. You'll get an error if you send a sixth request while five are already processing.
## Understanding Concurrency
Concurrency is a fundamental concept in web scraping, referring to the ability to handle multiple tasks simultaneously. In the context of ZenRows, it defines how many scraping requests can be processed at the same time.
Think of concurrency like a team of workers in a factory. Each worker represents a "concurrent request slot." If you have 5 workers, you can assign them 5 tasks (or requests) simultaneously. If you try to assign a 6th task while all workers are occupied, you will need to wait until one of them finishes their current task before the new one can be started.
In ZenRows, each "task" is an API request, and each "worker" is a concurrent request slot available to you based on your subscription.
### Impact of Request Duration on Throughput
The duration that each request takes to complete significantly influences how many requests you can process in a given timeframe. This concept is crucial for optimizing your scraping efficiency and maximizing throughput. Here's how it works:
* **Fast Requests:** If each request takes 1 second to complete and you have 5 concurrent slots available, you can process 5 requests every second. Over a 60-second period, this means you can handle 300 requests (5 requests/second × 60 seconds).
* **Slow Requests:** Conversely, if each request takes 10 seconds to complete, you can process 5 requests every 10 seconds. Over the same 60-second period, you'll only manage 30 requests (5 requests/10 seconds × 60 seconds).
This demonstrates that reducing the duration of each request increases the number of requests you can process in the same amount of time.
### Example Scenario
To better understand this, consider a situation where your plan allows 5 concurrent requests:
Scenario:
* **1st Request**: Takes 10 seconds to finish.
* **2nd Request**: Takes 7 seconds to finish.
* **3rd Request**: Takes 8 seconds to finish.
* **4th Request**: Takes 9 seconds to finish.
* **5th Request**: Takes 14 seconds to finish.
You start all 5 requests simultaneously. Each request occupies one of the 5 available slots. If you then attempt to send a:
* **6th & 7th Request**: Since all 5 slots are occupied, you will receive "[429 Too Many Requests](/api-error-codes#AUTH008)" errors. The system can only process additional requests once one of the initial 5 requests finishes. In this example, the quickest request (the 2nd request) completes in 7 seconds, freeing up a slot for new requests.
## Concurrency Headers
To help you manage and optimize your API usage, each response from our API includes two important HTTP headers related to concurrency:
1. `Concurrency-Limit`: Indicates the total number of concurrent requests allowed by your current plan. This header helps you understand the maximum concurrency capacity available to you.
2. `Concurrency-Remaining`: Shows the number of available concurrency slots at the time the request was received by the server. This provides insight into how many slots are still free.
For example, if your plan supports 20 concurrent requests and you send 3 requests simultaneously, the response headers might be:
* `Concurrency-Limit: 20`
* `Concurrency-Remaining: 17`
This means that at the time of the request, 17 slots were available, while 3 were occupied by the requests you had in progress.
### Using Concurrency Headers for Optimization
These headers are valuable tools for optimizing your scraping tasks. By monitoring and interpreting these headers in real time, you can adjust your request patterns to make the most efficient use of your concurrency slots.
Optimization Tips:
1. Before sending a batch of requests, inspect the `Concurrency-Remaining` header of the most recent response.
2. Based on the value of this header, adjust the number of parallel requests you send. For example, if `Concurrency-Remaining` is 5, avoid sending more than 5 simultaneous requests.
By adapting your request strategy based on these headers, you can reduce the likelihood of encountering "429 Too Many Requests" errors and ensure a smoother, more efficient interaction with the API.
## Using Concurrency
Most programming languages and clients do not natively support concurrency, so you may need to implement your solution. Alternatively, you can use the solutions provided below. 😉
### ZenRows SDK for Python
To run the examples, ensure you have Python 3 installed. Install the necessary libraries with:
```bash theme={null}
pip install zenrows
```
ZenRows Python SDK comes with built-in concurrency and retries. You can set these parameters in the constructor. Keep in mind that each client instance has its own limit, so running multiple scripts might lead to 429 Too Many Requests errors.
The `asyncio.gather` function will wait for all the calls to finish and store all the responses in an array. Afterward, you can loop over the array and extract the necessary data. Each response will include the status, request, response content, and other values. Remember to run the scripts with `asyncio.run` to avoid a `coroutine 'main' was never awaited` error.
```python scraper.py theme={null}
from zenrows import ZenRowsClient
import asyncio
from urllib.parse import urlparse, parse_qs
client = ZenRowsClient("YOUR_ZENROWS_API_KEY", concurrency=5, retries=1)
urls = [
# ...
]
async def main():
responses = await asyncio.gather(*[client.get_async(url) for url in urls])
for response in responses:
original_url = parse_qs(urlparse(response.request.url).query)["url"]
print({
"response": response,
"status_code": response.status_code,
"request_url": original_url,
})
asyncio.run(main())
```
### Python with `requests`
If you prefer using the `requests` library and want to handle multiple requests concurrently, Python's multiprocessing package can be an effective solution. This approach is particularly useful when you're dealing with a large list of URLs and need to speed up the data collection process by sending multiple requests simultaneously.
```bash theme={null}
pip install requests
```
The `multiprocessing` package in Python includes a `ThreadPool` class, which allows you to manage a pool of worker threads. Each thread can handle a separate task, enabling multiple HTTP requests to be processed in parallel. This is particularly beneficial when scraping data from a large number of websites, as it reduces the overall time required.
```python scraper.py theme={null}
import requests
from multiprocessing.pool import ThreadPool
apikey = "YOUR_ZENROWS_API_KEY"
concurrency = 10
urls = [
# ... your URLs here
]
def scrape_with_zenrows(url):
response = requests.get(
url="https://api.zenrows.com/v1/",
params={
"url": url,
"apikey": apikey,
},
)
return {
"content": response.text,
"status_code": response.status_code,
"request_url": url,
}
pool = ThreadPool(concurrency)
results = pool.map(scrape_with_zenrows, urls)
pool.close()
pool.join()
[print(result) for result in results]
```
### ZenRows SDK for JavaScript
When working with JavaScript for web scraping, managing concurrency and handling retries can be challenging.
The ZenRows JavaScript SDK simplifies these tasks by providing built-in concurrency and retry options. This is particularly useful for developers who need to scrape multiple URLs efficiently while avoiding rate limits.
To get started, install the ZenRows SDK using npm:
```bash theme={null}
npm i zenrows
```
ZenRows allows you to control the concurrency level by passing a number in the constructor. It's important to set this according to your subscription plan's limits to prevent 429 (Too Many Requests) errors. Remember, each client instance has its own concurrency limit, so running multiple scripts won't share this limit.
```javascript theme={null}
const { ZenRows } = require('zenrows');
const apiKey = 'YOUR_ZENROWS_API_KEY';
(async () => {
const client = new ZenRows(apiKey, { concurrency: 5, retries: 1 });
const urls = [
// ...
];
const promises = urls.map(url => client.get(url));
const results = await Promise.allSettled(promises);
console.log(results);
/*
[
{
status: 'fulfilled',
value: {
status: 200,
statusText: 'OK',
data: ...
...
*/
// separate results list into rejected and fulfilled for later processing
const rejected = results.filter(({ status }) => status === 'rejected');
const fulfilled = results.filter(({ status }) => status === 'fulfilled');
})();
```
In this example, we use Promise.allSettled() to handle multiple asynchronous requests. This method is available in Node.js 12.9 and later. It waits for all the promises to settle, meaning it doesn't stop if some requests fail. Instead, it returns an array of objects, each with a status of either fulfilled or rejected.
This approach makes your scraping more robust, as it ensures that all URLs in your list are processed, even if some requests encounter issues. You can then handle the `fulfilled` and `rejected` responses separately, allowing you to log errors or retry failed requests as needed.
## Frequently Asked Questions (FAQ)
Concurrency directly influences how many tasks can be handled at the same time, meaning higher concurrency results in faster scraping as multiple requests can be processed simultaneously.
If you exceed your concurrency limit, you will receive a `429 Too Many Requests` error. The system won't accept additional requests until current tasks complete and free up slots.
Use the `Concurrency-Remaining` header in your API responses to check how many slots are still available for sending new requests.
Concurrency refers to the number of tasks handled at once, while rate limiting controls the total number of requests allowed in a set time period. Both can impact the efficiency of your scraping tasks.
To improve efficiency, consider breaking down larger tasks into smaller chunks or optimizing the time each request takes to complete. Faster requests will free up slots more quickly.
No, when you cancel a request, it can take up to 3 minutes for the associated concurrency slot to be freed. If you cancel multiple requests at once, you will need to wait a few minutes before you can fully utilize those freed slots again.
# Headers
Source: https://docs.zenrows.com/universal-scraper-api/features/headers
Custom headers let you tailor your requests by including specific HTTP fields, such as `Accept`, `Cookie`, or `Referer`. These can be useful for:
* Controlling the expected content type (e.g., application/json)
* Maintaining session continuity with cookies
* Mimicking user behavior through referrer URLs
For example, setting the Referer header to `https://www.google.com` can help simulate a user arriving from a Google search, which some websites use as a trust signal to serve less restricted or personalized content.
## ZenRows Header Management
ZenRows automatically manages certain browser-related headers to ensure consistency, high success rates, and protection against anti-bot systems. These include headers such as:
* `User-Agent`
* `Accept-Encoding`
* `Sec-Ch-Ua` (Client Hints)
* `Sec-Fetch-Mode`
* `Sec-Fetch-Site`
* `Sec-Fetch-User`
These headers are tightly coupled with browser behavior and are not customizable. Attempts to override them will be ignored by default.
## Enabling Custom Headers
To include your own headers, set the `custom_headers` parameter to true in your API request. This enables your custom headers while ZenRows continues to manage sensitive browser-specific ones.
### Example Use Case: Using `Referer`
Some websites change their content based on the `Referer` header. For instance, if you're scraping a product page and want it to appear as if a user clicked on a Google search result, you might set:
```python Python theme={null}
# pip install requests
import requests
url = 'https://httpbin.io/anything'
apikey = 'YOUR_ZENROWS_API_KEY'
params = {
'url': url,
'apikey': apikey,
'custom_headers': 'true',
}
headers = {
'Referer': 'https://google.com',
}
response = requests.get('https://api.zenrows.com/v1/', params=params, headers=headers)
print(response.text)
```
```javascript Node.js theme={null}
// npm install axios
const axios = require('axios');
const url = 'https://httpbin.io/anything';
const apikey = 'YOUR_ZENROWS_API_KEY';
axios({
url: 'https://api.zenrows.com/v1/',
method: 'GET',
headers: {
'Referer': 'https://google.com',
},
params: {
'url': url,
'apikey': apikey,
'custom_headers': 'true',
},
})
.then(response => console.log(response.data))
.catch(error => console.log(error));
```
```java Java theme={null}
import org.apache.hc.client5.http.fluent.Request;
public class APIRequest {
public static void main(final String... args) throws Exception {
String apiUrl = "https://api.zenrows.com/v1/?apikey=YOUR_ZENROWS_API_KEY&url=https%3A%2F%2Fhttpbin.io%2Fanything&custom_headers=true";
String response = Request.get(apiUrl)
.addHeader("Referer", "https://google.com")
.execute().returnContent().asString();
System.out.println(response);
}
}
```
```php PHP theme={null}
```
```go Go theme={null}
package main
import (
"io"
"log"
"net/http"
)
func main() {
client := &http.Client{}
req, err := http.NewRequest("GET", "https://api.zenrows.com/v1/?apikey=YOUR_ZENROWS_API_KEY&url=https%3A%2F%2Fhttpbin.io%2Fanything&custom_headers=true", nil)
req.Header.Add("Referer", "https://google.com")
resp, err := client.Do(req)
if err != nil {
log.Fatalln(err)
}
defer resp.Body.Close()
body, err := io.ReadAll(resp.Body)
if err != nil {
log.Fatalln(err)
}
log.Println(string(body))
}
```
```ruby Ruby theme={null}
# gem install faraday
require 'faraday'
url = URI.parse('https://api.zenrows.com/v1/?apikey=YOUR_ZENROWS_API_KEY&url=https%3A%2F%2Fhttpbin.io%2Fanything&custom_headers=true')
headers = {
"Referer": "https://google.com",
}
conn = Faraday.new()
conn.options.timeout = 180
res = conn.get(url, nil, headers)
print(res.body)
```
```bash cURL theme={null}
curl -H "Referer: https://google.com" "https://api.zenrows.com/v1/?apikey=YOUR_ZENROWS_API_KEY&url=https%3A%2F%2Fhttpbin.io%2Fanything&custom_headers=true"
```
**This can help bypass redirects, bot checks, or locked content that only appears for certain traffic sources.**
If you need to use custom headers and are unsure which ones are allowed or are facing challenges with the headers you're trying to set, please contact us for guidance.
## Frequently Asked Questions (FAQ)
Custom headers allow you to modify the HTTP headers in your requests, such as `Referer`, `Accept`, or `Cookie`, to control how the request is perceived by the target server. This can be useful for handling sessions, mimicking specific browser behaviors, or requesting specific content types.
ZenRows manages certain headers related to browser environment and request consistency, such as `User-Agent`, `Accept-Encoding`, `Sec-Fetch-*`, and `Client-Hints`. This helps ensure success and reliability when scraping protected or complex websites.
Headers such as `Sec-Ch-Ua` and `Accept-Encoding` are tightly coupled with browser behavior and could trigger anti-scraping mechanisms if set improperly. ZenRows prevents manual customization of these headers to ensure optimal success rates and avoid unnecessary blocks.
If you attempt to set a forbidden header, it will be ignored by ZenRows, and the request will proceed with the default browser headers managed by the system. This prevents potential issues that could arise from incorrect configurations.
No, you cannot manually set or override headers like `Sec-Ch-Ua`, `Accept-Encoding`, and `Sec-Fetch-*`. These are managed by ZenRows to optimize performance and prevent blocks during web scraping.
# JavaScript Instructions
Source: https://docs.zenrows.com/universal-scraper-api/features/js-instructions
JavaScript Instructions enable you to interact with web pages dynamically by automating user actions like clicking buttons, filling forms, waiting for content to load, and executing custom JavaScript code. This powerful feature allows you to scrape content that requires user interaction or appears after specific actions are performed.
These instructions are essential for modern web scraping because many websites load content dynamically, hide information behind user interactions, or require form submissions to access data. With JavaScript Instructions, you can automate these interactions to extract the complete content you need.
JavaScript Instructions require `js_render=true` to function, as they operate within the browser environment during page rendering.
## How JavaScript Instructions work
JavaScript Instructions execute sequentially within a real browser environment, simulating genuine user interactions. Each instruction waits for the previous one to complete before executing, ensuring reliable automation of complex user workflows.
The process works as follows:
1. **Page loads** - The browser renders the initial page content
2. **Wait/Wait\_for parameters execute** - Global wait conditions are processed first
3. **JavaScript Instructions execute** - Each instruction runs in order, waiting for completion
4. **DOM updates** - The page responds to interactions, potentially loading new content
5. **Final capture** - The complete rendered page is captured after all instructions finish
This sequential execution ensures that dynamic content has time to load and that user interactions trigger the expected page changes.
JavaScript Instructions have a **40-second timeout limit**. If your instruction sequence takes longer than 40 seconds to complete (due to many interactions, slow page responses, or redirects), the execution will stop and return whatever content is currently visible on the page. For complex workflows that may exceed this limit, consider using our [Scraping Browser](/scraping-browser) which provides up to 15 minutes of execution time and more advanced automation capabilities.
## Basic usage
JavaScript Instructions are provided as a JSON array where each instruction is an object specifying the action and its parameters:
```python Python theme={null}
# pip install requests
import requests
url = 'https://www.example.com'
apikey = 'YOUR_ZENROWS_API_KEY'
params = {
'url': url,
'apikey': apikey,
'js_render': 'true',
'js_instructions': """[{"click":".button-selector"},{"wait":500}]""",
}
response = requests.get('https://api.zenrows.com/v1/', params=params)
print(response.text)
```
```javascript Node.js theme={null}
// npm install axios
const axios = require('axios');
const url = 'https://www.example.com';
const apikey = 'YOUR_ZENROWS_API_KEY';
axios({
url: 'https://api.zenrows.com/v1/',
method: 'GET',
params: {
'url': url,
'apikey': apikey,
'js_render': 'true',
'js_instructions': `[{"click":".button-selector"},{"wait":500}]`,
},
})
.then(response => console.log(response.data))
.catch(error => console.log(error));
```
```java Java theme={null}
import org.apache.hc.client5.http.fluent.Request;
public class APIRequest {
public static void main(final String... args) throws Exception {
String apiUrl = "https://api.zenrows.com/v1/?apikey=YOUR_ZENROWS_API_KEY&url=https%3A%2F%2Fwww.example.com&js_render=true&js_instructions=%255B%257B%2522click%2522%253A%2522.button-selector%2522%257D%252C%257B%2522wait%2522%253A500%257D%255D";
String response = Request.get(apiUrl)
.execute().returnContent().asString();
System.out.println(response);
}
}
```
```php PHP theme={null}
```
```go Go theme={null}
package main
import (
"io"
"log"
"net/http"
)
func main() {
client := &http.Client{}
req, err := http.NewRequest("GET", "https://api.zenrows.com/v1/?apikey=YOUR_ZENROWS_API_KEY&url=https%3A%2F%2Fwww.example.com&js_render=true&js_instructions=%255B%257B%2522click%2522%253A%2522.button-selector%2522%257D%252C%257B%2522wait%2522%253A500%257D%255D", nil)
resp, err := client.Do(req)
if err != nil {
log.Fatalln(err)
}
defer resp.Body.Close()
body, err := io.ReadAll(resp.Body)
if err != nil {
log.Fatalln(err)
}
log.Println(string(body))
}
```
```ruby Ruby theme={null}
# gem install faraday
require 'faraday'
url = URI.parse('https://api.zenrows.com/v1/?apikey=YOUR_ZENROWS_API_KEY&url=https%3A%2F%2Fwww.example.com&js_render=true&js_instructions=%255B%257B%2522click%2522%253A%2522.button-selector%2522%257D%252C%257B%2522wait%2522%253A500%257D%255D')
conn = Faraday.new()
conn.options.timeout = 180
res = conn.get(url, nil, nil)
print(res.body)
```
```csharp C# theme={null}
using RestSharp;
namespace TestApplication {
class Test {
static void Main(string[] args) {
var client = new RestClient("https://api.zenrows.com/v1/?apikey=YOUR_ZENROWS_API_KEY&url=https%3A%2F%2Fwww.example.com&js_render=true&js_instructions=%255B%257B%2522click%2522%253A%2522.button-selector%2522%257D%252C%257B%2522wait%2522%253A500%257D%255D");
var request = new RestRequest();
var response = client.Get(request);
Console.WriteLine(response.Content);
}
}
}
```
```bash cURL theme={null}
curl "https://api.zenrows.com/v1/?apikey=YOUR_ZENROWS_API_KEY&url=https%3A%2F%2Fwww.example.com&js_render=true&js_instructions=%255B%257B%2522click%2522%253A%2522.button-selector%2522%257D%252C%257B%2522wait%2522%253A500%257D%255D"
```
Use the [ZenRows Builder](https://app.zenrows.com/builder) to create and test your JavaScript Instructions visually, or use an Online URL Encoder to properly encode your instructions for API requests.
## Available instructions
### Click interactions
Simulates clicking on page elements like buttons, links, or interactive areas. This is one of the most fundamental interactions for web automation, enabling you to trigger actions that reveal hidden content, navigate through interfaces, or activate dynamic functionality.
```json JSON theme={null}
[
{"click": ".read-more-button"},
{"click": "#submit-btn"},
{"click": "button[data-action='load-more']"}
]
```
**Common use cases**
* Expanding collapsed content sections to access full article text
* Navigating through pagination to scrape multiple pages of results
* Triggering modal dialogs or popups that contain additional information
* Activating dropdown menus to access navigation options
* Loading additional content dynamically (infinite scroll triggers)
* Accepting cookie consent banners or terms of service
**Best practices**
* Always wait for elements to be clickable before clicking
* Use specific selectors to avoid clicking wrong elements
* Combine with `wait_for` to handle dynamic content loading
```json JSON theme={null}
# Example: Click through pagination to scrape multiple pages
[
{"wait_for": ".product-list"}, # Wait for initial content
{"click": ".pagination .next-page"}, # Click next page
{"wait_for": ".product-list"}, # Wait for new content to load
{"click": ".pagination .next-page"}, # Click next page again
{"wait": 1000} # Final wait for stability
]
```
### Wait for selector
Pauses execution until a specific element appears in the DOM. This instruction is crucial for handling asynchronous content loading, which is common in modern web applications that use AJAX, React, Vue, or other dynamic frameworks.
```json JSON theme={null}
[
{"wait_for": ".dynamic-content"},
{"wait_for": "#ajax-loaded-section"},
{"wait_for": "[data-loaded='true']"}
]
```
**When to use**
* Content loads asynchronously via AJAX or fetch requests
* Elements appear after animations or CSS transitions
* Waiting for user-triggered content to become available
* Ensuring forms are fully rendered before interaction
* After clicking buttons that trigger content loading
* When dealing with single-page applications (SPAs)
If the selector doesn't appear within the timeout period (default: 10 seconds), the instruction will fail and execution will continue to the next instruction. This contributes to the overall 40-second timeout limit for all JavaScript Instructions.
### Wait for specific duration
Pauses execution for a fixed amount of time in milliseconds. While less precise than `wait_for`, this instruction is useful when you need to accommodate processes that don't have visible indicators or when you need to ensure stability after rapid interactions.
```json JSON theme={null}
[
{"wait": 1000}, # Wait 1 second
{"wait": 5000}, # Wait 5 seconds
{"wait": 500} # Wait 0.5 seconds
]
```
**Use cases**
* Allowing animations to complete before taking screenshots
* Giving time for slow-loading content when no loading indicator exists
* Preventing rate limiting by spacing requests appropriately
* Ensuring page stability after rapid-fire interactions
* Waiting for third-party widgets or ads to load
* Accommodating server processing time for form submissions
```json JSON theme={null}
# Example: Handle slow-loading content with strategic waits
[
{"click": ".load-data-button"}, # Trigger data loading
{"wait": 3000}, # Wait for server response
{"wait_for": ".data-table"}, # Wait for table to appear
{"wait": 1000} # Additional stability wait
]
```
The maximum allowed wait time for a single `wait` instruction is 10 seconds, and the total combined duration of all `wait` instructions cannot exceed 30 seconds. For example, you could use three `{"wait": 10000}` instructions (10 seconds each) but not four. This 30-second limit contributes to the overall 40-second timeout for the entire JavaScript Instructions sequence.
### Wait for browser events
Waits for specific browser events to occur, providing more sophisticated timing control based on actual browser state rather than arbitrary time delays. This is particularly useful for ensuring that all network activity has completed or that the page has reached a stable state.
```json JSON theme={null}
[
{"wait_event": "networkidle"}, # Wait until network is idle
{"wait_event": "networkalmostidle"}, # Wait until network is almost idle
{"wait_event": "load"}, # Wait for page load event
{"wait_event": "domcontentloaded"} # Wait for DOM to be ready
]
```
**Event descriptions**
* `networkidle` - No network requests for 500ms (ideal for SPAs with API calls)
* `networkalmostidle` - No more than 2 network requests for 500ms (less strict timing)
* `load` - Page load event fired (all resources including images loaded)
* `domcontentloaded` - DOM parsing completed (faster than load event)
**Use cases**
* Ensure all API calls and resource loading have completed
* Wait for specific browser lifecycle events
* Avoid unnecessary waiting by responding to actual browser state
* Use browser events as more accurate timing signals than fixed delays
### Fill input fields
Populates form fields with specified values, enabling automation of data entry tasks. This instruction is essential for logging into websites, submitting forms, or providing input data that triggers dynamic content loading.
```json JSON theme={null}
[
{"fill": ["#username", "john_doe"]},
{"fill": ["input[name='email']", "user@example.com"]},
{"fill": [".search-box", "search query"]}
]
```
**Supported input types**
* Text inputs (single-line text fields)
* Email fields (with built-in validation)
* Password fields (securely handled)
* Search boxes (often trigger autocomplete)
* Textarea elements (multi-line text)
* Number inputs (numeric data entry)
**Common applications**
* Login automation for accessing protected content
* Search form submission to find specific content
* Filter application to narrow down results
* Contact form completion for lead generation
* Registration form automation for account creation
* Configuration forms for customizing page content
```json JSON theme={null}
# Example: Complete a contact form
[
{"wait_for": "#contact-form"}, # Wait for form to load
{"fill": ["#name", "John Smith"]}, # Fill name field
{"fill": ["#email", "john@example.com"]}, # Fill email field
{"fill": ["#message", "Hello, I need help..."]}, # Fill message
{"click": "#submit-button"}, # Submit form
{"wait": 10000} # Wait 10 seconds
]
```
### Checkbox interactions
Check or uncheck checkbox and radio button elements, allowing you to select options, agree to terms, or configure settings. These interactions are crucial for forms that require user consent or option selection.
```json JSON theme={null}
[
{"check": "#agree-terms"}, # Check a checkbox
{"uncheck": "#newsletter-signup"}, # Uncheck a checkbox
{"check": "input[name='payment'][value='credit']"} # Select radio button
]
```
**Use cases**
* Accepting cookie consent or privacy policies
* Selecting payment methods or shipping options
* Configuring notification preferences
* Filtering product catalogs by features
* Agreeing to terms of service during registration
* Enabling optional services or add-ons
Using `check` on an already checked element will not uncheck it. Use `uncheck` specifically to deselect elements. This prevents accidental state changes in your automation.
### Select dropdown options
Choose options from dropdown menus by their value, enabling selection from predefined lists of options. This is essential for forms that use select elements for categories, locations, or other structured data.
```json JSON theme={null}
[
{"select_option": ["#country-select", "USA"]},
{"select_option": [".size-dropdown", "large"]},
{"select_option": ["select[name='category']", "electronics"]}
]
```
**Important notes**
* The second parameter must match the value attribute of the option, not the displayed text
* Use the actual value from the HTML, which may differ from what users see
* Works with both single and multiple select elements
* Triggers change events that may load additional content
**Common scenarios**
* Selecting countries for shipping calculations
* Choosing product categories for filtered browsing
* Setting language preferences for localized content
* Selecting time zones or date formats
* Choosing sorting options for search results
* Configuring display preferences (items per page, view type)
### Vertical scrolling
Scroll the page vertically by a specified number of pixels, essential for triggering content that loads based on scroll position or for ensuring elements are visible before interaction.
```json JSON theme={null}
[
{"scroll_y": 1000}, # Scroll down 1000 pixels
{"scroll_y": -500}, # Scroll up 500 pixels
{"scroll_y": 2000} # Scroll down 2000 pixels
]
```
**Common applications**
* Social media feeds with scroll loading
* E-commerce sites with lazy-loaded product images
* News sites with continuous article loading
* Search results that load more items on scroll
* Long-form content with progressive disclosure
* Image galleries with scroll-triggered loading
### Horizontal scrolling
Scroll the page horizontally by a specified number of pixels, useful for content that extends beyond the viewport width or for navigating horizontal carousels and galleries.
```json JSON theme={null}
[
{"scroll_x": 800}, # Scroll right 800 pixels
{"scroll_x": -400}, # Scroll left 400 pixels
{"scroll_x": 1200} # Scroll right 1200 pixels
]
```
**Use cases**
* Product image carousels on e-commerce sites
* Data tables with many columns
* Horizontal navigation menus
* Timeline or calendar interfaces
* Wide charts or graphs
* Panoramic image viewers
### Execute custom JavaScript (`evaluate`)
Run arbitrary JavaScript code within the page context, providing unlimited flexibility for complex interactions or page modifications that aren't covered by standard instructions.
```json JSON theme={null}
[
{"evaluate": "document.querySelector('.modal').style.display = 'none';"},
{"evaluate": "window.scrollTo(0, document.body.scrollHeight);"},
{"evaluate": "document.querySelector('.load-more').scrollIntoView();"}
]
```
**Common JavaScript patterns**
```javascript JavaScript theme={null}
// Scroll to specific element
"document.querySelector('.target-element').scrollIntoView();"
// Modify page styling
"document.body.style.backgroundColor = '#ffffff';"
// Trigger custom events
"document.querySelector('.button').dispatchEvent(new Event('click'));"
// Access page data
"window.dataLayer = window.dataLayer || [];"
// Remove overlays
"document.querySelectorAll('.overlay').forEach(el => el.remove());"
// Trigger infinite scroll
"window.scrollTo(0, document.body.scrollHeight);"
// Click multiple elements
"document.querySelectorAll('.expand-button').forEach(btn => btn.click());"
```
**Advanced use cases**
* Removing cookie banners or overlay advertisements
* Triggering complex JavaScript functions specific to the site
* Modifying page state to reveal hidden content
* Collecting data from JavaScript variables
* Simulating complex user interactions
* Bypassing client-side restrictions
### CAPTCHA solving
Automatically solve CAPTCHAs using integrated solving services, enabling automation of forms and processes that are protected by CAPTCHA challenges.
CAPTCHA solving requires a [2Captcha](https://www.zenrows.com/go/2captcha) API key configured in your [ZenRows Integration Settings](https://app.zenrows.com/account/integrations).
```json JSON theme={null}
[
{"solve_captcha": {"type": "recaptcha"}},
{"solve_captcha": {"type": "cloudflare_turnstile"}},
{"solve_captcha": {"type": "recaptcha", "options": {"solve_inactive": true}}}
]
```
**Supported CAPTCHA types**
* **reCAPTCHA v2** - Standard checkbox and image challenges
* **reCAPTCHA v3** - Invisible background verification
* **Cloudflare Turnstile** - Cloudflare's CAPTCHA system
To ensure the CAPTCHA is solved before proceeding, add `wait` instructions **before** and **after** the CAPTCHA-solving step, allowing time for the CAPTCHA to load and be resolved.
```javascript theme={null}
[
{"wait": 3000}, // Wait for 3 seconds to allow the page to load
{"solve_captcha": {"type": "recaptcha"}},
{"wait": 2000} // Wait 2 seconds to confirm CAPTCHA resolution
]
```
### Working with iframes
Standard instructions don't work inside iframe elements due to browser security restrictions. Iframes create isolated contexts that require special handling to access their content and interact with their elements.
#### Frame instructions
All frame instructions require specifying the iframe selector as the first parameter
```json JSON theme={null}
[
{"frame_click": ["#payment-iframe", ".submit-button"]},
{"frame_wait_for": ["#content-iframe", ".loaded-content"]},
{"frame_fill": ["#form-iframe", "#email", "user@example.com"]},
{"frame_check": ["#options-iframe", "#agree-checkbox"]},
{"frame_uncheck": ["#settings-iframe", "#notifications"]},
{"frame_select_option": ["#dropdown-iframe", "#country", "USA"]},
{"frame_evaluate": ["iframe-name", "document.body.style.color = 'red';"]}
]
```
#### Revealing iframe content
Extract content from iframes for processing:
```json JSON theme={null}
[
{"frame_reveal": "#payment-iframe"}
]
```
This creates a hidden div element with the iframe content encoded in base64:
```php HTML theme={null}
```
For security reasons, iframe content isn't included in the standard response. Use frame\_reveal to explicitly extract iframe content when needed.
### Using XPath selectors
In addition to CSS selectors, you can use XPath expressions for more precise element targeting:
```json JSON theme={null}
[
{"click": "//button[text()='Submit']"},
{"wait_for": "//div[@class='content' and @data-loaded='true']"},
{"fill": ["//input[@placeholder='Enter email']", "user@example.com"]}
]
```
**XPath advantages**
* **Text-based selection** - Select elements by their text content
* **Complex conditions** - Use logical operators and functions
* **Hierarchical navigation** - Navigate parent/child relationships easily
* **Attribute matching** - Complex attribute-based selection
## Debugging JavaScript Instructions
Enable detailed execution reporting by adding `json_response=true` to your request:
```python Python theme={null}
params = {
'js_render': 'true',
'js_instructions': """[{"click":".button-selector"},{"wait":500}]""",
'json_response': 'true' # Enable debugging information
}
```
### Understanding the debug report
The debug report provides comprehensive execution details:
```json JSON expandable theme={null}
{
"instructions_duration": 5041,
"instructions_executed": 4,
"instructions_succeeded": 3,
"instructions_failed": 1,
"instructions": [
{
"instruction": "wait_for",
"params": {"selector": ".content"},
"success": true,
"duration": 1200
},
{
"instruction": "click",
"params": {"selector": ".button"},
"success": true,
"duration": 150
},
{
"instruction": "wait_for",
"params": {"selector": ".missing-element"},
"success": false,
"duration": 30000
},
{
"instruction": "fill",
"params": {"selector": "#input", "value": "test"},
"success": true,
"duration": 80
}
]
}
```
## Common use cases and workflows
```python Python theme={null}
def automate_registration_form(signup_url, user_data):
"""
Complete multi-step registration process
"""
instructions = [
# Step 1: Basic information
{"wait_for": "#registration-form"},
{"fill": ["#first-name", user_data['first_name']]},
{"fill": ["#last-name", user_data['last_name']]},
{"fill": ["#email", user_data['email']]},
{"click": ".next-step"},
# Step 2: Account details
{"wait_for": "#account-details"},
{"fill": ["#username", user_data['username']]},
{"fill": ["#password", user_data['password']]},
{"fill": ["#confirm-password", user_data['password']]},
{"click": ".next-step"},
# Step 3: Preferences
{"wait_for": "#preferences"},
{"check": "#newsletter-signup"},
{"select_option": ["#country", user_data['country']]},
{"click": ".submit-registration"},
# Step 4: Confirmation
{"wait_for": ".registration-success"},
]
return requests.get('https://api.zenrows.com/v1/', params={
'url': signup_url,
'apikey': 'YOUR_ZENROWS_API_KEY',
'js_render': 'true',
'js_instructions': json.dumps(instructions),
})
```
```javascript Node.js theme={null}
async function automateRegistrationForm(signupUrl, userData) {
/**
* Complete multi-step registration process
*/
const instructions = [
// Step 1: Basic information
{"wait_for": "#registration-form"},
{"fill": ["#first-name", userData.firstName]},
{"fill": ["#last-name", userData.lastName]},
{"fill": ["#email", userData.email]},
{"click": ".next-step"},
// Step 2: Account details
{"wait_for": "#account-details"},
{"fill": ["#username", userData.username]},
{"fill": ["#password", userData.password]},
{"fill": ["#confirm-password", userData.password]},
{"click": ".next-step"},
// Step 3: Preferences
{"wait_for": "#preferences"},
{"check": "#newsletter-signup"},
{"select_option": ["#country", userData.country]},
{"click": ".submit-registration"},
// Step 4: Confirmation
{"wait_for": ".registration-success"},
];
try {
const response = await axios({
url: 'https://api.zenrows.com/v1/',
method: 'GET',
params: {
'url': signupUrl,
'apikey': 'YOUR_ZENROWS_API_KEY',
'js_render': 'true',
'js_instructions': JSON.stringify(instructions),
}
});
return response.data;
} catch (error) {
console.error('Error automating registration:', error);
throw error;
}
}
```
```python Python theme={null}
def scrape_search_results(search_url, query, max_pages=3):
"""
Search and navigate through multiple result pages
"""
instructions = [
# Perform search
{"wait_for": "#search-form"},
{"fill": ["#search-input", query]},
{"click": "#search-button"},
{"wait_for": ".search-results"},
]
# Navigate through pagination
for page in range(2, max_pages + 1):
instructions.extend([
{"click": f".pagination a[data-page='{page}']"},
{"wait_for": ".search-results"},
{"wait": 1000}, # Allow page to stabilize
])
return requests.get('https://api.zenrows.com/v1/', params={
'url': search_url,
'apikey': 'YOUR_ZENROWS_API_KEY',
'js_render': 'true',
'js_instructions': json.dumps(instructions),
})
```
```javascript Node.js theme={null}
async function scrapeSearchResults(searchUrl, query, maxPages = 3) {
/**
* Search and navigate through multiple result pages
*/
const instructions = [
// Perform search
{"wait_for": "#search-form"},
{"fill": ["#search-input", query]},
{"click": "#search-button"},
{"wait_for": ".search-results"},
];
// Navigate through pagination
for (let page = 2; page <= maxPages; page++) {
instructions.push(
{"click": `.pagination a[data-page='${page}']`},
{"wait_for": ".search-results"},
{"wait": 1000} // Allow page to stabilize
);
}
try {
const response = await axios({
url: 'https://api.zenrows.com/v1/',
method: 'GET',
params: {
'url': searchUrl,
'apikey': 'YOUR_ZENROWS_API_KEY',
'js_render': 'true',
'js_instructions': JSON.stringify(instructions),
}
});
return response.data;
} catch (error) {
console.error('Error scraping search results:', error);
throw error;
}
}
// Usage examples
async function runExamples() {
try {
// E-commerce example
const productData = await scrapeProductWithShipping('https://shop.example.com/product/123');
console.log('Product data scraped successfully');
// Social media example
const feedData = await scrapeSocialFeed('https://social.example.com/user/profile', 5);
console.log('Social feed data scraped successfully');
// Registration example
const userData = {
firstName: 'John',
lastName: 'Doe',
email: 'john.doe@example.com',
username: 'johndoe',
password: 'SecurePass123',
country: 'USA'
};
const registrationResult = await automateRegistrationForm('https://app.example.com/signup', userData);
console.log('Registration automated successfully');
// Search example
const searchResults = await scrapeSearchResults('https://marketplace.example.com', 'wireless headphones', 3);
console.log('Search results scraped successfully');
} catch (error) {
console.error('Example execution failed:', error);
}
}
// Run examples
runExamples();
```
```python Python theme={null}
def scrape_product_with_shipping(product_url):
"""
Scrape product page with shipping calculation by zip code
"""
instructions = [
{"wait_for": ".product-details"}, # Wait for product to load
{"click": ".size-option[data-size='large']"}, # Select size
{"wait": 500}, # Wait for price update
{"click": ".color-option[data-color='blue']"}, # Select color
{"wait": 500}, # Wait for price update
{"click": ".shipping-calculator"}, # Open shipping calculator
{"wait_for": "#zip-code-input"}, # Wait for shipping form
{"fill": ["#zip-code-input", "90210"]}, # Enter zip code
{"click": ".calculate-shipping"}, # Calculate shipping
{"wait_for": ".shipping-options"}, # Wait for shipping options
]
return requests.get('https://api.zenrows.com/v1/', params={
'url': product_url,
'apikey': 'YOUR_ZENROWS_API_KEY',
'js_render': 'true',
'js_instructions': json.dumps(instructions),
})
```
```javascript Node.js theme={null}
const axios = require('axios');
async function scrapeProductWithShipping(productUrl) {
/**
* Scrape product page with shipping calculation by zip code
*/
const instructions = [
{"wait_for": ".product-details"}, // Wait for product to load
{"click": ".size-option[data-size='large']"}, // Select size
{"wait": 500}, // Wait for price update
{"click": ".color-option[data-color='blue']"}, // Select color
{"wait": 500}, // Wait for price update
{"click": ".shipping-calculator"}, // Open shipping calculator
{"wait_for": "#zip-code-input"}, // Wait for shipping form
{"fill": ["#zip-code-input", "90210"]}, // Enter zip code
{"click": ".calculate-shipping"}, // Calculate shipping
{"wait_for": ".shipping-options"}, // Wait for shipping options
];
try {
const response = await axios({
url: 'https://api.zenrows.com/v1/',
method: 'GET',
params: {
'url': productUrl,
'apikey': 'YOUR_ZENROWS_API_KEY',
'js_render': 'true',
'js_instructions': JSON.stringify(instructions),
}
});
return response.data;
} catch (error) {
console.error('Error scraping product:', error);
throw error;
}
}
```
## Troubleshooting
### Common issues and solutions
| Issue | Cause | Solution |
| ---------------------- | ------------------------------------- | ---------------------------------------------- |
| Element not found | Selector doesn't match any elements | Verify selector in browser DevTools |
| Click not working | Element not clickable or covered | Use `wait_for` to ensure element is ready |
| Form submission fails | Missing required fields | Fill all required fields before submitting |
| Timeout errors | Content takes too long to load | Increase wait times or use `wait_for` |
| Instructions skip | Previous instruction failed | Check debug report for failed instructions |
| Iframe content missing | Using standard instructions on iframe | Use `frame_*` instructions for iframe elements |
### Debugging selector issues
When selectors aren't working as expected:
Open the target page in your browser and test the selector in DevTools console:
```javascript JavaScript theme={null}
// Test CSS selector
document.querySelector('.your-selector')
// Test XPath
document.evaluate('//your/xpath', document, null, XPathResult.FIRST_ORDERED_NODE_TYPE, null).singleNodeValue
```
Ensure the element exists when the instruction runs:
```json JSON theme={null}
[
{"wait_for": ".parent-container"}, // Wait for parent first
{"click": ".child-element"} // Then interact with child
]
```
Try different selector strategies:
```json JSON theme={null}
[
{"click": "#button-id"}, // Try ID first
{"click": "button[data-action='submit']"}, // Try attribute
{"click": "//button[text()='Submit']"} // Try XPath with text
]
```
Some elements are created dynamically:
```json JSON theme={null}
[
{"click": ".load-content"}, // Trigger content creation
{"wait_for": ".dynamic-element"}, // Wait for element to appear
{"click": ".dynamic-element"} // Then interact with it
]
```
## Pricing
The `js_instructions` parameter doesn't increase the request cost. You pay the JavaScript Render (5 times the standard price) regardless of the wait value you choose.
## Frequently Asked Questions (FAQ)
When an instruction fails, execution continues with the next instruction. Use `json_response=true` to get detailed failure information and adjust your instructions accordingly. Critical failures may require adding `wait_for` instructions to ensure elements are available.
No, JavaScript Instructions require `js_render=true` because they operate within a browser environment. Static HTML requests cannot execute dynamic interactions or JavaScript code.
Execution time varies based on the complexity of instructions and page responsiveness. Simple clicks take 50-200ms, while waiting for elements can take several seconds. Use the debug report to analyze timing and optimize your instruction sequences.
Standard instructions don't work with iframe content. Use frame-specific instructions like `frame_click`, `frame_fill`, and `frame_wait_for` to interact with elements inside iframes. You'll need to specify the iframe selector as the first parameter.
There's no hard limit on instruction count, but longer sequences increase execution time and potential failure points. For complex workflows, consider breaking them into smaller, focused instruction sets and making multiple requests if needed.
Use the `solve_captcha` instruction with a configured [2Captcha](https://www.zenrows.com/go/2captcha) API key. Add wait instructions before and after CAPTCHA solving to allow time for loading and verification. Different CAPTCHA types require specific configuration options.
Yes, use the `evaluate` instruction to run custom JavaScript code that can modify page content, styling, or behavior. This is useful for removing overlays, triggering custom events, or preparing the page for data extraction.
# JavaScript Rendering (Headless Browser)
Source: https://docs.zenrows.com/universal-scraper-api/features/js-rendering
JavaScript Rendering processes web pages through a headless browser - a browser without a graphical interface that can execute JavaScript and render dynamic content. Many modern websites load content dynamically after the initial page load, making this data invisible to standard HTTP requests that only capture the initial HTML.
When you enable JavaScript Rendering, ZenRows simulates a real browser environment, executing all JavaScript code and waiting for dynamic content to load before returning the fully rendered page. This browser simulation also helps bypass sophisticated anti-bot protections that analyze browser behavior, JavaScript execution patterns, and other browser-specific characteristics that Premium Proxy alone cannot address.
## How JavaScript Rendering Works
JavaScript Rendering launches a headless browser instance that navigates to your target URL just like a regular browser would. The browser executes all JavaScript code, processes CSS, loads additional resources, and waits for the page to fully render before extracting the HTML content.
This process captures content that appears after the initial page load, such as:
* AJAX-loaded product listings
* Single-page application (SPA) navigation
* Dynamic pricing information
* User-generated content loaded via JavaScript
Additionally, the browser simulation helps bypass advanced anti-bot measures that detect:
* Missing browser APIs and properties
* Unusual JavaScript execution patterns
* Absence of browser-specific behaviors
* Automated request signatures
## Basic usage
Enable JavaScript Rendering by adding the `js_render=true` parameter to your ZenRows request:
```python Python theme={null}
# pip install requests
import requests
url = 'https://httpbin.io/anything'
apikey = 'YOUR_ZENROWS_API_KEY'
params = {
'url': url,
'apikey': apikey,
'js_render': 'true',
}
response = requests.get('https://api.zenrows.com/v1/', params=params)
print(response.text)
```
```javascript Node.js theme={null}
// npm install axios
const axios = require('axios');
const url = 'https://httpbin.io/anything';
const apikey = 'YOUR_ZENROWS_API_KEY';
axios({
url: 'https://api.zenrows.com/v1/',
method: 'GET',
params: {
'url': url,
'apikey': apikey,
'js_render': 'true',
},
})
.then(response => console.log(response.data))
.catch(error => console.log(error));
```
```java Java theme={null}
import org.apache.hc.client5.http.fluent.Request;
public class APIRequest {
public static void main(final String... args) throws Exception {
String apiUrl = "https://api.zenrows.com/v1/?apikey=YOUR_ZENROWS_API_KEY&url=https%3A%2F%2Fhttpbin.io%2Fanything&js_render=true";
String response = Request.get(apiUrl)
.execute().returnContent().asString();
System.out.println(response);
}
}
```
```php PHP theme={null}
```
```go Go theme={null}
package main
import (
"io"
"log"
"net/http"
)
func main() {
client := &http.Client{}
req, err := http.NewRequest("GET", "https://api.zenrows.com/v1/?apikey=YOUR_ZENROWS_API_KEY&url=https%3A%2F%2Fhttpbin.io%2Fanything&js_render=true", nil)
resp, err := client.Do(req)
if err != nil {
log.Fatalln(err)
}
defer resp.Body.Close()
body, err := io.ReadAll(resp.Body)
if err != nil {
log.Fatalln(err)
}
log.Println(string(body))
}
```
```ruby Ruby theme={null}
# gem install faraday
require 'faraday'
url = URI.parse('https://api.zenrows.com/v1/?apikey=YOUR_ZENROWS_API_KEY&url=https%3A%2F%2Fhttpbin.io%2Fanything&js_render=true')
conn = Faraday.new()
conn.options.timeout = 180
res = conn.get(url, nil, nil)
print(res.body)
```
```bash cURL theme={null}
curl "https://api.zenrows.com/v1/?apikey=YOUR_ZENROWS_API_KEY&url=https%3A%2F%2Fhttpbin.io%2Fanything&js_render=true"
```
This example enables JavaScript Rendering for your request. ZenRows processes the page through a headless browser, executing all JavaScript and returning the fully rendered HTML content, rather than just the initial server response.
## When to use JavaScript Rendering
### Content-related needs:
* **Single-page applications (SPAs)** - React, Vue, Angular applications that load content dynamically
* **E-commerce sites** - Product listings, prices, and reviews loaded via JavaScript
* **Search results** - Dynamic search results and pagination
* **Infinite scroll content** - Content that loads as users scroll down
* **AJAX-heavy websites** - Sites that rely heavily on asynchronous data loading
* **Progressive web apps** - Modern web applications with dynamic content updates
### Protection bypass needs:
* **Advanced anti-bot systems** - Sites that analyze browser fingerprints and JavaScript execution
* **Behavioral detection** - Websites that monitor mouse movements, timing patterns, and user interactions
* **Browser API validation** - Sites that check for the presence of browser-specific APIs and properties
* **CloudFlare challenges** - Advanced protection that requires JavaScript execution to pass
* **Captcha systems** - Some captchas that rely on browser behavior analysis
For the highest success rate, especially on heavily protected websites, combine JavaScript Rendering with Premium Proxy. This combination provides both residential IP addresses and realistic browser behavior:
```python Python theme={null}
# Maximum protection: JS Rendering + Premium Proxy
params = {
'url': 'https://httpbin.io/anything',
'apikey': 'YOUR_ZENROWS_API_KEY',
'js_render': 'true', # Browser simulation
'premium_proxy': 'true', # Residential IP
}
response = requests.get('https://api.zenrows.com/v1/', params=params)
print(response.text)
```
This combination addresses multiple layers of protection:
* **Premium Proxy:** Provides residential IP addresses that are harder to detect and block
* **JavaScript Rendering:** Simulates genuine browser behavior and executes anti-bot detection scripts
## Identifying when you need JavaScript Rendering
You can determine if a website requires JavaScript Rendering by comparing the initial HTML with what you see in the browser:
```python Python theme={null}
import requests
# Test without JavaScript Rendering
url = 'https://httpbin.io/anything'
response_standard = requests.get('https://api.zenrows.com/v1/', params={
'url': url,
'apikey': 'YOUR_ZENROWS_API_KEY',
})
# Test with JavaScript Rendering
response_js = requests.get('https://api.zenrows.com/v1/', params={
'url': url,
'apikey': 'YOUR_ZENROWS_API_KEY',
'js_render': 'true',
})
# Compare content lengths
print(f"Standard HTML length: {len(response_standard.text)}")
print(f"JS-rendered HTML length: {len(response_js.text)}")
# If JS-rendered content is significantly longer, you need JavaScript Rendering
```
## Troubleshooting
### Common issues and solutions
| Issue | Cause | Solution |
| ----------------------------------- | --------------------------------- | ----------------------------------------------------- |
| Content still missing or incomplete | Page needs more time to load | Increase `wait` time or use `wait_for` parameter |
| Still getting blocked | Need residential IPs | Add `premium_proxy=true` |
| Slow response times | Browser processing overhead | Use JavaScript Rendering only when necessary |
| Higher costs than expected | Using both features unnecessarily | Implement progressive enhancement strategy |
| Advanced bot detection | Sophisticated fingerprinting | Combine JS Rendering + Premium Proxy + Custom Headers |
### Debugging protection bypassing
When you're still getting blocked despite using JavaScript Rendering:
```python Python theme={null}
params = {
'js_render': 'true',
'premium_proxy': 'true',
}
```
```python Python theme={null}
params = {
'js_render': 'true',
'premium_proxy': 'true',
'wait': '5000',
}
```
See more on the [Wait](/universal-scraper-api/features/wait) and [Wait\_for](/universal-scraper-api/features/wait-for) documentation pages
```python Python theme={null}
params = {
'js_render': 'true',
'premium_proxy': 'true',
'wait': '5000',
}
headers = {
'referer': 'https://www.google.com'
}
```
```python Python theme={null}
params = {
'js_render': 'true',
'original_status': 'true',
}
```
Returning the original status helps you identify what HTML status code the website is returning.
See more about the `original_status` parameter [here](/universal-scraper-api/features/other#original-http-code)
## Pricing
JavaScript Rendering costs 5 times the standard request rate due to the additional computational resources required for browser processing.
Monitor your usage through the ZenRows [analytics page](https://app.zenrows.com/analytics/scraper-api) to track costs and optimize your scraping strategy accordingly.
## Frequently Asked Questions (FAQ)
Several features rely on `js_render` being set to true. These include:
* [Wait:](/universal-scraper-api/features/wait) Introduces a delay before proceeding with the request. Useful for scenarios where you need to allow time for JavaScript to load content.
* [Wait For:](/universal-scraper-api/features/wait-for) Waits for a specific element to appear on the page before proceeding. When used with `js_render`, this parameter will cause the request to fail if the selector is not found.
* [JSON Response:](/universal-scraper-api/features/json-response) Retrieves the rendered page content in JSON format, including data loaded dynamically via JavaScript.
* [Block Resources:](/universal-scraper-api/features/block-resources) Block specific types of resources from being loaded.
* [JavaScript Instructions:](/universal-scraper-api/features/js-instructions) Allows you to execute custom JavaScript code on the page. This includes additional parameters.
* [Screenshot:](/universal-scraper-api/features/output#page-screenshot) Capture an above-the-fold screenshot of the target page by adding `screenshot=true` to the request.
Use JavaScript Rendering when the content you need is loaded dynamically via JavaScript, when dealing with single-page applications, or when facing advanced anti-bot protection that analyzes browser behavior. If the content is present in the initial HTML response and the site has no protection, standard requests are more cost-effective.
For the highest success rate on protected websites, yes. However, this combination costs 25x the standard rate. Start with individual features and combine them only when necessary. Use progressive enhancement to find the most cost-effective approach for each target.
JavaScript Rendering simulates a real browser environment, executing anti-bot detection scripts and providing browser-specific APIs that automated tools typically lack. This makes requests appear more like genuine user traffic, helping bypass sophisticated behavioral analysis systems.
If the combination of JavaScript Rendering and Premium Proxy doesn't work, the website likely uses very advanced protection. Try adding longer wait times, custom headers, or contact ZenRows support for assistance with particularly challenging targets.
Yes, you can specify proxy countries when using both features by adding the `proxy_country` parameter. This can help access geo-restricted content while maintaining the protection benefits of both features.
# JSON Response
Source: https://docs.zenrows.com/universal-scraper-api/features/json-response
The JSON Response feature transforms ZenRows' standard HTML output into a structured JSON object containing the page content, network requests, and optional execution reports. This format provides comprehensive insights into page behavior, making it ideal for debugging, monitoring network activity, and analyzing dynamic content loading patterns.
When you enable JSON Response with `json_response=true`, ZenRows captures not only the final HTML content but also all XHR, Fetch, and AJAX requests made during page rendering. This gives you complete visibility into how modern web applications load and update their content.
The JSON Response parameter requires `js_render=true` to function, as it monitors network activity and JavaScript execution within the browser environment.
## How JSON Response works
JSON Response intercepts and records most network activity during JavaScript rendering, creating a comprehensive report of the page's behavior. The browser monitors every HTTP request made by the page, including background API calls, resource loading, and dynamic content updates.
This process captures:
* All XHR and Fetch requests with full request/response details
* The final rendered HTML content
* Optional JavaScript instruction execution reports
* Optional screenshot data of the rendered page
* Complete request and response headers for network analysis
The data is structured in a JSON format making it easy to programmatically analyze page behavior and extract specific information from network requests.
## Basic usage
Enable JSON Response by adding the `json_response=true` parameter to your JavaScript rendering request:
```python Python theme={null}
# pip install requests
import requests
url = 'https://httpbin.io/anything'
apikey = 'YOUR_ZENROWS_API_KEY'
params = {
'url': url,
'apikey': apikey,
'js_render': 'true',
'json_response': 'true',
}
response = requests.get('https://api.zenrows.com/v1/', params=params)
print(response.text)
```
```javascript Node.js theme={null}
// npm install axios
const axios = require('axios');
const url = 'https://httpbin.io/anything';
const apikey = 'YOUR_ZENROWS_API_KEY';
axios({
url: 'https://api.zenrows.com/v1/',
method: 'GET',
params: {
'url': url,
'apikey': apikey,
'js_render': 'true',
'json_response': 'true',
},
})
.then(response => console.log(response.data))
.catch(error => console.log(error));
```
```java Java theme={null}
import org.apache.hc.client5.http.fluent.Request;
public class APIRequest {
public static void main(final String... args) throws Exception {
String apiUrl = "https://api.zenrows.com/v1/?apikey=YOUR_ZENROWS_API_KEY&url=https%3A%2F%2Fhttpbin.io%2Fanything&js_render=true&json_response=true";
String response = Request.get(apiUrl)
.execute().returnContent().asString();
System.out.println(response);
}
}
```
```php PHP theme={null}
```
```go Go theme={null}
package main
import (
"io"
"log"
"net/http"
)
func main() {
client := &http.Client{}
req, err := http.NewRequest("GET", "https://api.zenrows.com/v1/?apikey=YOUR_ZENROWS_API_KEY&url=https%3A%2F%2Fhttpbin.io%2Fanything&js_render=true&json_response=true", nil)
resp, err := client.Do(req)
if err != nil {
log.Fatalln(err)
}
defer resp.Body.Close()
body, err := io.ReadAll(resp.Body)
if err != nil {
log.Fatalln(err)
}
log.Println(string(body))
}
```
```ruby Ruby theme={null}
# gem install faraday
require 'faraday'
url = URI.parse('https://api.zenrows.com/v1/?apikey=YOUR_ZENROWS_API_KEY&url=https%3A%2F%2Fhttpbin.io%2Fanything&js_render=true&json_response=true')
conn = Faraday.new()
conn.options.timeout = 180
res = conn.get(url, nil, nil)
print(res.body)
```
```bash cURL theme={null}
curl "https://api.zenrows.com/v1/?apikey=YOUR_ZENROWS_API_KEY&url=https%3A%2F%2Fhttpbin.io%2Fanything&js_render=true&json_response=true"
```
This example returns a JSON object containing the HTML content and any network requests made during page rendering, instead of just the raw HTML string.
## JSON Response structure
The JSON Response contains several key fields that provide different types of information. Here's a complete example of what a typical JSON response looks like:
```json JSON expandable theme={null}
{
"html": "\n\n\n \n Product Page\n\n\n
\n
Wireless Headphones
\n
$99.99
\n
In Stock
\n
\n
Great sound quality!
\n
Comfortable to wear
\n
\n
\n\n",
"xhr": [
{
"url": "https://api.example.com/product/123/price",
"body": "{\"price\": 99.99, \"currency\": \"USD\", \"discount\": 0.15}",
"status_code": 200,
"method": "GET",
"headers": {
"content-type": "application/json",
"content-length": "54",
"cache-control": "no-cache"
},
"request_headers": {
"accept": "application/json",
"user-agent": "Mozilla/5.0 (compatible; ZenRows)"
}
},
{
"url": "https://api.example.com/product/123/inventory",
"body": "{\"in_stock\": true, \"quantity\": 25, \"warehouse\": \"US-EAST\"}",
"status_code": 200,
"method": "GET",
"headers": {
"content-type": "application/json",
"content-length": "67"
},
"request_headers": {
"accept": "application/json",
"authorization": "Bearer token123"
}
},
{
"url": "https://api.example.com/product/123/reviews",
"body": "{\"reviews\": [{\"rating\": 5, \"comment\": \"Great sound quality!\"}, {\"rating\": 4, \"comment\": \"Comfortable to wear\"}], \"average_rating\": 4.5}",
"status_code": 200,
"method": "GET",
"headers": {
"content-type": "application/json",
"content-length": "156"
},
"request_headers": {
"accept": "application/json"
}
}
],
"js_instructions_report": {
"instructions_duration": 1041,
"instructions_executed": 2,
"instructions_succeeded": 2,
"instructions_failed": 0,
"instructions": [
{
"instruction": "wait_for_selector",
"params": {
"selector": ".price-display"
},
"success": true,
"duration": 40
},
{
"instruction": "wait",
"params": {
"timeout": 1000
},
"success": true,
"duration": 1001
}
]
},
"screenshot": {
"data": "iVBORw0KGgoAAAANSUhEUgAAAAEAAAABCAYAAAAfFcSJAAAADUlEQVR42mP8/5+hHgAHggJ/PchI7wAAAABJRU5ErkJggg==",
"type": "image/png",
"width": 1920,
"height": 1080
}
}
```
### Response fields
* **`html`** - The complete rendered HTML content of the page as a string. This content is JSON-encoded and contains the final DOM state after all JavaScript execution and dynamic loading.
* **`xhr`** - An array containing all XHR, Fetch, and AJAX requests made during page rendering. Each request object includes:
* `url` - The complete URL of the request
* `body` - The response body content
* `status_code` - HTTP status code (200, 404, 500, etc.)
* `method` - HTTP method used (GET, POST, PUT, DELETE, etc.)
* `headers` - Response headers from the server
* `request_headers` - Headers sent with the original request
* **`js_instructions_report`** *(Optional - only present when using JavaScript Instructions)* - Detailed execution report including:
* `instructions_duration` - Total execution time in milliseconds
* `instructions_executed` - Number of instructions processed
* `instructions_succeeded` - Number of successful instructions
* `instructions_failed` - Number of failed instructions
* `instructions` - Array of individual instruction details with parameters, success status, and timing
* **`screenshot`** *(Optional - only present when using the Screenshot feature)* - Screenshot data containing:
* `data` - Base64-encoded image data
* `type` - Image format (typically "image/png")
* `width` - Screenshot width in pixels
* `height` - Screenshot height in pixels
## When to use JSON Response
JSON Response is essential for these scenarios:
### Dynamic content loading:
* **AJAX-loaded content** - When page content is loaded dynamically via XHR calls, JSON Response captures these API requests so you can access the raw data directly from the network calls rather than parsing it from the rendered HTML
* **API-dependent data** - Content that appears after external API calls
* **Progressive loading** - Pages that load content in stages
* **Conditional content** - Elements that appear based on user state or preferences
* **Real-time applications** - Capture live data feeds and WebSocket-like communications
* **Search platforms** - Monitor search API calls and result loading patterns
### Debugging and development:
* **Network troubleshooting** - Identify failed requests or slow API calls
* **Content loading analysis** - Understand how content loads in stages
* **Performance monitoring** - Track request timing and response sizes
* **Integration testing** - Verify that all expected API calls are made
* **Security analysis** - Monitor for unexpected network activity
* **JavaScript Instructions debugging** - When using JavaScript Instructions, JSON Response provides detailed execution reports to help debug instruction failures and timing issues
For comprehensive guidance on debugging JavaScript Instructions using JSON Response, see our [JavaScript Instructions Debugging documentation](/universal-scraper-api/features/js-instructions#debugging-javascript-instructions).
## Best practices
### Combine with appropriate parameters
Use JSON Response with other features such as `wait` or `wait_for` to guarantee the content will be loaded:
```python Python theme={null}
params = {
'url': url,
'apikey': 'YOUR_ZENROWS_API_KEY',
'js_render': 'true',
'json_response': 'true',
'premium_proxy': 'true', # For protected sites
'wait': '3000', # Allow time for API calls
'screenshot': 'true', # Include visual verification
}
```
### Filter and process network requests
Focus on relevant requests to avoid information overload
```python Python theme={null}
def filter_relevant_requests(xhr_requests, filters):
"""
Filter XHR requests based on specified criteria
"""
relevant_requests = []
for request in xhr_requests:
include_request = True
# Apply filters
if 'methods' in filters:
if request['method'] not in filters['methods']:
include_request = False
if 'status_codes' in filters:
if request['status_code'] not in filters['status_codes']:
include_request = False
if 'url_contains' in filters:
if not any(pattern in request['url'] for pattern in filters['url_contains']):
include_request = False
if 'exclude_extensions' in filters:
if any(request['url'].endswith(ext) for ext in filters['exclude_extensions']):
include_request = False
if include_request:
relevant_requests.append(request)
return relevant_requests
# Filter for API calls only
api_filters = {
'methods': ['GET', 'POST'],
'status_codes': [200, 201, 202],
'url_contains': ['/api/', '.json', '/v1/', '/v2/'],
'exclude_extensions': ['.css', '.js', '.png', '.jpg', '.gif', '.svg'],
}
api_requests = filter_relevant_requests(json_data['xhr'], api_filters)
print(f"Found {len(api_requests)} relevant API requests")
```
## Troubleshooting
### Common issues and solutions
| Issue | Cause | Solution |
| --------------------------------- | ------------------------------- | --------------------------------------------- |
| Empty XHR array | No network requests made | Verify the page actually makes AJAX calls |
| Missing expected requests | Requests happen after page load | Increase `wait` time or use `wait_for` |
| Large response size | Many network requests captured | Filter requests to focus on relevant ones |
| JSON parsing errors | Malformed response data | Add error handling for JSON parsing |
| Incomplete request data | Requests still in progress | Ensure adequate wait time for completion |
| Response size exceeds plan limits | Too much data captured | Upgrade plan or use Block Resources parameter |
### Handling oversized responses
When JSON responses become too large and exceed your plan's limits:
**Response size exceeded error**: If your response exceeds the maximum size allowed by your plan, you'll receive an error indicating the limit has been reached.
**Solutions**:
1. **Upgrade your plan** - Higher-tier plans support larger response sizes
2. **Use Block Resources parameter** - Remove unnecessary content like images, stylesheets, and scripts:
```python theme={null}
params = {
'json_response': 'true',
'block_resources': 'image,stylesheet,script,font', # Block heavy resources
}
```
3. **Filter XHR requests** - Focus on specific API endpoints rather than capturing all network activity
4. **Use shorter wait times** - Reduce the time window to capture fewer requests
The Block Resources parameter can significantly reduce response sizes by preventing the loading of images, CSS files, JavaScript files, and fonts that aren't essential for your scraping needs.
### Debugging missing network requests
When expected API calls don't appear in the XHR array:
```python Python theme={null}
# Check if any requests were captured
if not json_data.get('xhr'):
print("No network requests captured - verify page makes AJAX calls")
else:
print(f"Captured {len(json_data['xhr'])} requests")
```
```python Python theme={null}
params = {
'js_render': 'true',
'json_response': 'true',
'wait': '10000', # Wait 10 seconds for slow API calls
}
```
```python Python theme={null}
params = {
'js_render': 'true',
'json_response': 'true',
'wait_for': '.api-loaded-content', # Wait for specific content
}
```
## Pricing
The `json_response` parameter doesn't increase the request cost. You pay the JavaScript Render (5 times the standard price) regardless of the wait value you choose.
## Frequently Asked Questions (FAQ)
Yes, the `json_response` parameter requires `js_render=true` because it monitors network activity that occurs during JavaScript execution. Without JavaScript rendering, there would be no XHR/Fetch requests to capture.
JSON Response captures XHR, Fetch, and AJAX requests made during the page rendering process. It does not capture initial resource loading (like CSS, images, or the main HTML request), but focuses on dynamic API calls and background requests.
The size depends on the number of network requests and their response sizes. Pages with many API calls can generate large JSON responses. Consider filtering requests or processing data in chunks for very active pages.
No, the JSON Response always includes both HTML and XHR data. However, you can ignore the HTML field in your processing and focus only on the XHR array if that's all you need.
Failed requests are still captured in the XHR array with their actual status codes (e.g., 404, 500). This allows you to analyze both successful and failed network activity.
Yes, JSON Response works perfectly with Premium Proxy. Network monitoring occurs within the browser environment, regardless of the type of proxy used.
No, JSON Response only captures HTTP-based requests (XHR, Fetch, AJAX). WebSocket connections use a different protocol and are not captured in the XHR array.
Use JavaScript Instructions to simulate user interactions (such as clicks and scrolls) before capturing the page. This will trigger additional network requests that will be included in the JSON response.
# Other Features
Source: https://docs.zenrows.com/universal-scraper-api/features/other
## Session ID
The Session ID feature allows you to use the same IP address across multiple API requests. By setting the `session_id=12345` parameter in your requests, ZenRows® will ensure that all requests made with the same Session ID are routed through the same IP address for 10 minutes.
This feature is useful for web scraping sites that track sessions or limit IP rotation. It helps simulate a persistent session and avoids triggering anti-bot systems that flag frequent IP changes.
```python Python theme={null}
# pip install requests
import requests
url = 'https://httpbin.io/anything'
apikey = 'YOUR_ZENROWS_API_KEY'
params = {
'url': url,
'apikey': apikey,
'session_id': '12345',
}
response = requests.get('https://api.zenrows.com/v1/', params=params)
print(response.text)
```
```javascript Node.js theme={null}
// npm install axios
const axios = require('axios');
const url = 'https://httpbin.io/anything';
const apikey = 'YOUR_ZENROWS_API_KEY';
axios({
url: 'https://api.zenrows.com/v1/',
method: 'GET',
params: {
'url': url,
'apikey': apikey,
'session_id': '12345',
},
})
.then(response => console.log(response.data))
.catch(error => console.log(error));
```
```java Java theme={null}
import org.apache.hc.client5.http.fluent.Request;
public class APIRequest {
public static void main(final String... args) throws Exception {
String apiUrl = "https://api.zenrows.com/v1/?apikey=YOUR_ZENROWS_API_KEY&url=https%3A%2F%2Fhttpbin.io%2Fanything&session_id=12345";
String response = Request.get(apiUrl)
.execute().returnContent().asString();
System.out.println(response);
}
}
```
```php PHP theme={null}
```
```go Go theme={null}
package main
import (
"io"
"log"
"net/http"
)
func main() {
client := &http.Client{}
req, err := http.NewRequest("GET", "https://api.zenrows.com/v1/?apikey=YOUR_ZENROWS_API_KEY&url=https%3A%2F%2Fhttpbin.io%2Fanything&session_id=12345", nil)
resp, err := client.Do(req)
if err != nil {
log.Fatalln(err)
}
defer resp.Body.Close()
body, err := io.ReadAll(resp.Body)
if err != nil {
log.Fatalln(err)
}
log.Println(string(body))
}
```
```ruby Ruby theme={null}
# gem install faraday
require 'faraday'
url = URI.parse('https://api.zenrows.com/v1/?apikey=YOUR_ZENROWS_API_KEY&url=https%3A%2F%2Fhttpbin.io%2Fanything&session_id=12345')
conn = Faraday.new()
conn.options.timeout = 180
res = conn.get(url, nil, nil)
print(res.body)
```
```bash cURL theme={null}
curl "https://api.zenrows.com/v1/?apikey=YOUR_ZENROWS_API_KEY&url=https%3A%2F%2Fhttpbin.io%2Fanything&session_id=12345"
```
You can use any number from `1` to `99999` for `session_id`.
## Original HTTP Code
By default, the ZenRows API returns standard HTTP codes based on the success or failure of your request. However, websites may provide their own status codes, which can give you valuable information about how the site handled the request (e.g., `403 Forbidden` or `500 Internal Server Error`).
If you need to retrieve the original HTTP status code returned by the target website, simply enable the `original_status=true` parameter. This is particularly useful for debugging, understanding site-specific responses, or adapting scraping strategies based on the target site's behavior.
```python Python theme={null}
# pip install requests
import requests
url = 'https://httpbin.io/anything'
apikey = 'YOUR_ZENROWS_API_KEY'
params = {
'url': url,
'apikey': apikey,
'original_status': 'true',
}
response = requests.get('https://api.zenrows.com/v1/', params=params)
print(response.text)
```
```javascript Node.js theme={null}
// npm install axios
const axios = require('axios');
const url = 'https://httpbin.io/anything';
const apikey = 'YOUR_ZENROWS_API_KEY';
axios({
url: 'https://api.zenrows.com/v1/',
method: 'GET',
params: {
'url': url,
'apikey': apikey,
'original_status': 'true',
},
})
.then(response => console.log(response.data))
.catch(error => console.log(error));
```
```java Java theme={null}
import org.apache.hc.client5.http.fluent.Request;
public class APIRequest {
public static void main(final String... args) throws Exception {
String apiUrl = "https://api.zenrows.com/v1/?apikey=YOUR_ZENROWS_API_KEY&url=https%3A%2F%2Fhttpbin.io%2Fanything&original_status=true";
String response = Request.get(apiUrl)
.execute().returnContent().asString();
System.out.println(response);
}
}
```
```php PHP theme={null}
```
```go Go theme={null}
package main
import (
"io"
"log"
"net/http"
)
func main() {
client := &http.Client{}
req, err := http.NewRequest("GET", "https://api.zenrows.com/v1/?apikey=YOUR_ZENROWS_API_KEY&url=https%3A%2F%2Fhttpbin.io%2Fanything&original_status=true", nil)
resp, err := client.Do(req)
if err != nil {
log.Fatalln(err)
}
defer resp.Body.Close()
body, err := io.ReadAll(resp.Body)
if err != nil {
log.Fatalln(err)
}
log.Println(string(body))
}
```
```ruby Ruby theme={null}
# gem install faraday
require 'faraday'
url = URI.parse('https://api.zenrows.com/v1/?apikey=YOUR_ZENROWS_API_KEY&url=https%3A%2F%2Fhttpbin.io%2Fanything&original_status=true')
conn = Faraday.new()
conn.options.timeout = 180
res = conn.get(url, nil, nil)
print(res.body)
```
```bash cURL theme={null}
curl "https://api.zenrows.com/v1/?apikey=YOUR_ZENROWS_API_KEY&url=https%3A%2F%2Fhttpbin.io%2Fanything&original_status=true"
```
## Return content on error
When working with web scraping, you may encounter errors such as `404 Not Found`, `500 Internal Server Error`, or `503 Service Unavailable`. Even in these cases, the response might contain valuable information, such as error messages or partial content that can aid in debugging.
To access this content despite the error status, you can use the `allowed_status_codes` parameter. This feature enhances the API's debugging capabilities by allowing you to retrieve the content associated with specified error codes.
You can specify multiple status codes in a single request by separating them with commas.
Requests using the param `allowed_status_codes` will incur charges!
```python Python theme={null}
# pip install requests
import requests
url = 'https://httpbin.io/anything'
apikey = 'YOUR_ZENROWS_API_KEY'
params = {
'url': url,
'apikey': apikey,
'allowed_status_codes': '404,500,503',
}
response = requests.get('https://api.zenrows.com/v1/', params=params)
print(response.text)
```
```javascript Node.js theme={null}
// npm install axios
const axios = require('axios');
const url = 'https://httpbin.io/anything';
const apikey = 'YOUR_ZENROWS_API_KEY';
axios({
url: 'https://api.zenrows.com/v1/',
method: 'GET',
params: {
'url': url,
'apikey': apikey,
'allowed_status_codes': '404,500,503',
},
})
.then(response => console.log(response.data))
.catch(error => console.log(error));
```
```java Java theme={null}
import org.apache.hc.client5.http.fluent.Request;
public class APIRequest {
public static void main(final String... args) throws Exception {
String apiUrl = "https://api.zenrows.com/v1/?apikey=YOUR_ZENROWS_API_KEY&url=https%3A%2F%2Fhttpbin.io%2Fanything&allowed_status_codes=404,500,503";
String response = Request.get(apiUrl)
.execute().returnContent().asString();
System.out.println(response);
}
}
```
```php PHP theme={null}
```
```go Go theme={null}
package main
import (
"io"
"log"
"net/http"
)
func main() {
client := &http.Client{}
req, err := http.NewRequest("GET", "https://api.zenrows.com/v1/?apikey=YOUR_ZENROWS_API_KEY&url=https%3A%2F%2Fhttpbin.io%2Fanything&allowed_status_codes=404,500,503", nil)
resp, err := client.Do(req)
if err != nil {
log.Fatalln(err)
}
defer resp.Body.Close()
body, err := io.ReadAll(resp.Body)
if err != nil {
log.Fatalln(err)
}
log.Println(string(body))
}
```
```ruby Ruby theme={null}
# gem install faraday
require 'faraday'
url = URI.parse('https://api.zenrows.com/v1/?apikey=YOUR_ZENROWS_API_KEY&url=https%3A%2F%2Fhttpbin.io%2Fanything&allowed_status_codes=404,500,503')
conn = Faraday.new()
conn.options.timeout = 180
res = conn.get(url, nil, nil)
print(res.body)
```
```bash cURL theme={null}
curl "https://api.zenrows.com/v1/?apikey=YOUR_ZENROWS_API_KEY&url=https%3A%2F%2Fhttpbin.io%2Fanything&allowed_status_codes=404,500,503"
```
## POST / PUT Requests
You can send POST and PUT requests using your preferred programming language, and ZenRows® will handle the data forwarding to the target site seamlessly. This allows you to interact with APIs or web forms that require data submission without worrying about the underlying mechanics of HTTP requests.
The response you receive will contain the original content from the target site, including any headers and cookies. This can be particularly useful for maintaining sessions or tracking state during your interactions with web applications.
Accessing headers and cookies will vary based on the method you use to make the request, so refer to the relevant documentation for your programming language or library to handle these elements appropriately.
```python Python theme={null}
# pip install requests
import requests
url = 'https://httpbin.io/anything'
apikey = 'YOUR_ZENROWS_API_KEY'
params = {
'url': url,
'apikey': apikey,
}
data = {
'key1': 'value1',
'key2': 'value2',
}
response = requests.post('https://api.zenrows.com/v1/', params=params, data=data)
print(response.text)
```
```javascript Node.js theme={null}
// npm install axios
const axios = require('axios');
const url = 'https://httpbin.io/anything';
const apikey = 'YOUR_ZENROWS_API_KEY';
axios({
url: 'https://api.zenrows.com/v1/',
method: 'POST',
data: 'key1=value1&key2=value2',
params: {
'url': url,
'apikey': apikey,
},
})
.then(response => console.log(response.data))
.catch(error => console.log(error));
```
```java Java theme={null}
import org.apache.hc.client5.http.fluent.Request;
import org.apache.hc.client5.http.fluent.Form;
public class APIRequest {
public static void main(final String... args) throws Exception {
String apiUrl = "https://api.zenrows.com/v1/?apikey=YOUR_ZENROWS_API_KEY&url=https%3A%2F%2Fhttpbin.io%2Fanything";
String response = Request.post(apiUrl)
.bodyForm(Form.form()
.add("key1", "value1")
.add("key2", "value2")
.build())
.execute().returnContent().asString();
System.out.println(response);
}
}
```
```php PHP theme={null}
'value1',
'key2' => 'value2',
];
curl_setopt($ch, CURLOPT_POSTFIELDS, http_build_query($postBody));
$response = curl_exec($ch);
echo $response . PHP_EOL;
curl_close($ch);
?>
```
```go Go theme={null}
package main
import (
"io"
"log"
"net/http"
"net/url"
"strings"
)
func main() {
form := url.Values{}
form.Set("key1", "value1")
form.Set("key2", "value2")
client := &http.Client{}
req, err := http.NewRequest("POST", "https://api.zenrows.com/v1/?apikey=YOUR_ZENROWS_API_KEY&url=https%3A%2F%2Fhttpbin.io%2Fanything", strings.NewReader(form.Encode()))
req.Header.Add("Content-Type", "application/x-www-form-urlencoded")
resp, err := client.Do(req)
if err != nil {
log.Fatalln(err)
}
defer resp.Body.Close()
body, err := io.ReadAll(resp.Body)
if err != nil {
log.Fatalln(err)
}
log.Println(string(body))
}
```
```ruby Ruby theme={null}
# gem install faraday
require 'faraday'
url = URI.parse('https://api.zenrows.com/v1/?apikey=YOUR_ZENROWS_API_KEY&url=https%3A%2F%2Fhttpbin.io%2Fanything')
data = {
"key1" => "value1",
"key2" => "value2",
}
conn = Faraday.new()
conn.options.timeout = 180
res = conn.post(url, URI.encode_www_form(data), nil)
print(res.body)
```
```bash cURL theme={null}
curl "https://api.zenrows.com/v1/?apikey=YOUR_ZENROWS_API_KEY&url=https%3A%2F%2Fhttpbin.io%2Fanything" -X "POST" --data "key1=value1&key2=value2"
```
## Plan Usage
To monitor your subscription plan's usage programmatically, you can call the endpoint `/v1/subscriptions/self/details`. This allows you to track your API usage in real time, enabling better management of your resources and ensuring you stay within your plan's limits.
Calls made to this endpoint do not count against your concurrency limits, making it an efficient way to gather usage statistics without impacting your scraping activities.
To use this feature, include your API Key in the request header using `X-API-Key`. This is necessary for authentication and to ensure that the usage data corresponds to your account.
The previous endpoint `/usage` is deprecated, so please use the updated endpoint for all future requests to avoid disruptions.
```python Python theme={null}
# pip install requests
import requests
headers = {
'X-API-Key': 'YOUR_ZENROWS_API_KEY',
}
response = requests.get('https://api.zenrows.com/v1/subscriptions/self/details', headers=headers)
print(response.text)
```
```javascript Node.js theme={null}
// npm install axios
const axios = require('axios');
axios({
url: 'https://api.zenrows.com/v1/subscriptions/self/details',
method: 'GET',
headers: {
'X-API-Key': 'YOUR_ZENROWS_API_KEY',
},
})
.then(response => console.log(response.data))
.catch(error => console.log(error));
```
```java Java theme={null}
import org.apache.hc.client5.http.fluent.Request;
public class APIRequest {
public static void main(final String... args) throws Exception {
String apiUrl = "https://api.zenrows.com/v1/subscriptions/self/details";
String response = Request.get(apiUrl)
.addHeader("X-API-Key", "YOUR_ZENROWS_API_KEY")
.execute().returnContent().asString();
System.out.println(response);
}
}
```
```php PHP theme={null}
```
```go Go theme={null}
package main
import (
"io"
"log"
"net/http"
)
func main() {
client := &http.Client{}
req, err := http.NewRequest("GET", "https://api.zenrows.com/v1/subscriptions/self/details", nil)
req.Header.Add("X-API-Key", "YOUR_ZENROWS_API_KEY")
resp, err := client.Do(req)
if err != nil {
log.Fatalln(err)
}
defer resp.Body.Close()
body, err := io.ReadAll(resp.Body)
if err != nil {
log.Fatalln(err)
}
log.Println(string(body))
}
```
```ruby Ruby theme={null}
# gem install faraday
require 'faraday'
url = URI.parse('https://api.zenrows.com/v1/subscriptions/self/details')
headers = {
"X-API-Key": "YOUR_ZENROWS_API_KEY",
}
conn = Faraday.new()
conn.options.timeout = 180
res = conn.get(url, nil, headers)
print(res.body)
```
```bash cURL theme={null}
curl -H "X-API-Key: YOUR_ZENROWS_API_KEY" "https://api.zenrows.com/v1/subscriptions/self/details"
```
The output will be something similar to this:
```json theme={null}
{
"status": "ACTIVE",
"period_starts_at": "202X-09-02T00:00:00Z",
"period_ends_at": "202X-10-02T00:00:00Z",
"usage": 103.815320296,
"usage_percent": 34,
"plan": {
"name": "Business",
"price": 299.99,
"recurrence": "MONTHLY",
"products": {
"api": {
"concurrency": {
"limit": 100,
"usage": 1
},
"name": "WebScraping API",
"usage": 103.7470762335
},
"proxy_residential": {
"name": "Residential Proxies",
"usage": 0.033588062450952
},
"scraping_browser": {
"name": "Scraping Browser",
"usage": 0.034656
}
}
},
"top_ups": []
}
```
## Frequently Asked Questions (FAQ)
The Session ID feature allows you to maintain the same IP address across multiple API requests. By using the `session_id` parameter (ranging from 1 to 99999), ZenRows® ensures that all requests with the same Session ID are routed through the same IP for up to 10 minutes. This helps avoid triggering anti-bot mechanisms on websites that track sessions, making it particularly useful for web scraping tasks where consistency is important.
If you encounter errors, use the `allowed_status_codes` parameter to access content even when error responses (like 404 or 500) are returned. This can provide valuable data for debugging and understanding the response from the server.
To check your plan usage, call the endpoint `/v1/subscriptions/self/details`. This will return real-time usage data without counting against your concurrency limits. Include your API Key in the `X-API-Key` header for authentication.
# Outputs
Source: https://docs.zenrows.com/universal-scraper-api/features/output
## CSS Selectors
You can use CSS Selectors for data extraction. In the table below, you will find a list of examples of how to use it.
You only need to add `&css_extractor={"links":"a @href"}` to the request to use this feature.
**Here are some examples**
| extraction rules | sample html | value | json output |
| ----------------------------------------- | ------------------------------------------------------------------------------------------------ | -------------------------------------------------- | -------------------------------------------------------- |
| \{"divs":"div"} | \
text0\
| text | \{"divs": "text0"} |
| \{"divs":"div"} | \
| Content from element with *id* | \{"id": "Content here"} |
| \{"links":"a\[id='register-link'] @href"} | \Sign up\ | *href* attribute of element with specific *id* | \{"links": "#signup"} |
| \{"xpath":"//h1"} | \
Welcome\
| Extract text using XPath | \{"xpath": "Welcome"} |
| \{"xpath":"//img @src"} | \ | Extract *src* attribute using XPath | \{"xpath": "image.png"} |
If you are interested in learning more, you can find a complete reference of CSS Selectors here.
```python Python theme={null}
# pip install requests
import requests
url = 'https://www.scrapingcourse.com/ecommerce/'
apikey = 'YOUR_ZENROWS_API_KEY'
params = {
'url': url,
'apikey': apikey,
'css_extractor': """{"links":"a @href","images":"img @src"}""",
}
response = requests.get('https://api.zenrows.com/v1/', params=params)
print(response.text)
```
```javascript Node.js theme={null}
// npm install axios
const axios = require('axios');
const url = 'https://www.scrapingcourse.com/ecommerce/';
const apikey = 'YOUR_ZENROWS_API_KEY';
axios({
url: 'https://api.zenrows.com/v1/',
method: 'GET',
params: {
'url': url,
'apikey': apikey,
'css_extractor': `{"links":"a @href","images":"img @src"}`,
},
})
.then(response => {
console.log(response.data.tables[0]); // Access the first table directly
})
.catch(error => console.log(error));
```
```java Java theme={null}
import org.apache.hc.client5.http.fluent.Request;
public class APIRequest {
public static void main(final String... args) throws Exception {
String apiUrl = "https://api.zenrows.com/v1/?apikey=YOUR_ZENROWS_API_KEY&url=https%3A%2F%2Fwww.scrapingcourse.com%2Fecommerce%2F&css_extractor=%7B%22links%22%3A%22a%20%40href%22%2C%20%22images%22%3A%22img%20%40src%22%7D";
String response = Request.get(apiUrl)
.execute().returnContent().asString();
System.out.println(response);
}
}
```
```php PHP theme={null}
```
```go Go theme={null}
package main
import (
"io"
"log"
"net/http"
)
func main() {
client := &http.Client{}
req, err := http.NewRequest("GET", "https://api.zenrows.com/v1/?apikey=YOUR_ZENROWS_API_KEY&url=https%3A%2F%2Fwww.scrapingcourse.com%2Fecommerce%2F&css_extractor=%7B%22links%22%3A%22a%20%40href%22%2C%20%22images%22%3A%22img%20%40src%22%7D", nil)
resp, err := client.Do(req)
if err != nil {
log.Fatalln(err)
}
defer resp.Body.Close()
body, err := io.ReadAll(resp.Body)
if err != nil {
log.Fatalln(err)
}
log.Println(string(body))
}
```
```ruby Ruby theme={null}
# gem install faraday
require 'faraday'
url = URI.parse('https://api.zenrows.com/v1/?apikey=YOUR_ZENROWS_API_KEY&url=https%3A%2F%2Fwww.scrapingcourse.com%2Fecommerce%2F&css_extractor=%7B%22links%22%3A%22a%20%40href%22%2C%20%22images%22%3A%22img%20%40src%22%7D')
conn = Faraday.new()
conn.options.timeout = 180
res = conn.get(url, nil, nil)
print(res.body)
```
```bash cURL theme={null}
curl "https://api.zenrows.com/v1/?apikey=YOUR_ZENROWS_API_KEY&url=https%3A%2F%2Fwww.scrapingcourse.com%2Fecommerce%2F&css_extractor=%7B%22links%22%3A%22a%20%40href%22%2C%20%22images%22%3A%22img%20%40src%22%7D"
```
## Auto Parsing
ZenRows® API will return the HTML of the URL by default. Enabling Autoparse uses our extraction algorithms to parse data in JSON format automatically.
Understand more about the `autoparse` feature on: [What Is Autoparse?](/universal-scraper-api/faq#what-is-autoparse)
Add `&autoparse=true` to the request for this feature.
```python Python theme={null}
# pip install requests
import requests
url = 'https://www.amazon.com/dp/B01LD5GO7I/'
apikey = 'YOUR_ZENROWS_API_KEY'
params = {
'url': url,
'apikey': apikey,
'autoparse': 'true',
}
response = requests.get('https://api.zenrows.com/v1/', params=params)
print(response.text)
```
```javascript Node.js theme={null}
// npm install axios
const axios = require('axios');
const url = 'https://www.amazon.com/dp/B01LD5GO7I/';
const apikey = 'YOUR_ZENROWS_API_KEY';
axios({
url: 'https://api.zenrows.com/v1/',
method: 'GET',
params: {
'url': url,
'apikey': apikey,
'autoparse': 'true',
},
})
.then(response => console.log(response.data))
.catch(error => console.log(error));
```
```java Java theme={null}
import org.apache.hc.client5.http.fluent.Request;
public class APIRequest {
public static void main(final String... args) throws Exception {
String apiUrl = "https://api.zenrows.com/v1/?apikey=YOUR_ZENROWS_API_KEY&url=https%3A%2F%2Fwww.amazon.com%2Fdp%2FB01LD5GO7I%2F&autoparse=true";
String response = Request.get(apiUrl)
.execute().returnContent().asString();
System.out.println(response);
}
}
```
```php PHP theme={null}
```
```go Go theme={null}
package main
import (
"io"
"log"
"net/http"
)
func main() {
client := &http.Client{}
req, err := http.NewRequest("GET", "https://api.zenrows.com/v1/?apikey=YOUR_ZENROWS_API_KEY&url=https%3A%2F%2Fwww.amazon.com%2Fdp%2FB01LD5GO7I%2F&autoparse=true", nil)
resp, err := client.Do(req)
if err != nil {
log.Fatalln(err)
}
defer resp.Body.Close()
body, err := io.ReadAll(resp.Body)
if err != nil {
log.Fatalln(err)
}
log.Println(string(body))
}
```
```ruby Ruby theme={null}
# gem install faraday
require 'faraday'
url = URI.parse('https://api.zenrows.com/v1/?apikey=YOUR_ZENROWS_API_KEY&url=https%3A%2F%2Fwww.amazon.com%2Fdp%2FB01LD5GO7I%2F&autoparse=true')
conn = Faraday.new()
conn.options.timeout = 180
res = conn.get(url, nil, nil)
print(res.body)
```
```bash cURL theme={null}
curl "https://api.zenrows.com/v1/?apikey=YOUR_ZENROWS_API_KEY&url=https%3A%2F%2Fwww.amazon.com%2Fdp%2FB01LD5GO7I%2F&autoparse=true"
```
## Output Filters
The `outputs` parameter lets you specify which data types to extract from the scraped HTML. This allows you to efficiently retrieve only the data types you're interested in, reducing processing time and focusing on the most relevant information.
The parameter accepts a comma-separated list of filter names and returns the results in a structured JSON format.
Use `outputs=*` to retrieve all available data types.
Here's an example of how to use the `outputs` parameter:
```python Python theme={null}
# pip install requests
import requests
url = 'https://www.scrapingcourse.com/ecommerce/'
apikey = 'YOUR_ZENROWS_API_KEY'
params = {
'url': url,
'apikey': apikey,
'outputs': 'emails,headings,menus',
}
response = requests.get('https://api.zenrows.com/v1/', params=params)
print(response.text)
```
```javascript Node.js theme={null}
// npm install axios
const axios = require('axios');
const url = 'https://www.scrapingcourse.com/ecommerce/';
const apikey = 'YOUR_ZENROWS_API_KEY';
axios({
url: 'https://api.zenrows.com/v1/',
method: 'GET',
params: {
'url': url,
'apikey': apikey,
'outputs': 'emails,headings,menus',
},
})
.then(response => console.log(response.data))
.catch(error => console.log(error));
```
```java Java theme={null}
import org.apache.hc.client5.http.fluent.Request;
public class APIRequest {
public static void main(final String... args) throws Exception {
String apiUrl = "https://api.zenrows.com/v1/?apikey=YOUR_ZENROWS_API_KEY&url=https%3A%2F%2Fwww.scrapingcourse.com%2Fecommerce%2F&outputs=emails,headings,menus";
String response = Request.get(apiUrl)
.execute().returnContent().asString();
System.out.println(response);
}
}
```
```php PHP theme={null}
```
```go Go theme={null}
package main
import (
"io"
"log"
"net/http"
)
func main() {
client := &http.Client{}
req, err := http.NewRequest("GET", "https://api.zenrows.com/v1/?apikey=YOUR_ZENROWS_API_KEY&url=https%3A%2F%2Fwww.scrapingcourse.com%2Fecommerce%2F&outputs=emails,headings,menus", nil)
resp, err := client.Do(req)
if err != nil {
log.Fatalln(err)
}
defer resp.Body.Close()
body, err := io.ReadAll(resp.Body)
if err != nil {
log.Fatalln(err)
}
log.Println(string(body))
}
```
```ruby Ruby theme={null}
# gem install faraday
require 'faraday'
url = URI.parse('https://api.zenrows.com/v1/?apikey=YOUR_ZENROWS_API_KEY&url=https%3A%2F%2Fwww.scrapingcourse.com%2Fecommerce%2F&outputs=emails,headings,menus')
conn = Faraday.new()
conn.options.timeout = 180
res = conn.get(url, nil, nil)
print(res.body)
```
```bash cURL theme={null}
curl "https://api.zenrows.com/v1/?apikey=YOUR_ZENROWS_API_KEY&url=https%3A%2F%2Fwww.scrapingcourse.com%2Fecommerce%2F&outputs=emails,headings,menus"
```
Supported Filters and Examples:
### Emails
Extracts email addresses using CSS selectors and regular expressions. This includes standard email formats like `example@example.com` and obfuscated versions like `example[at]example.com`.
Example: `outputs=emails`
```json output theme={null}
{
"emails": [
"example@example.com",
"info@website.com",
"contact[at]domain.com",
"support at support dot com"
]
}
```
### Phone Numbers
Extracts phone numbers using CSS selectors and regular expressions, focusing on links with `tel:` protocol.
Example: `outputs=phone_numbers`
```json output theme={null}
{
"phone_numbers": [
"+1-800-555-5555",
"(123) 456-7890",
"+44 20 7946 0958"
]
}
```
### Headings
Extracts heading text from HTML elements `h1` through `h6`.
Example: `outputs=headings`
```json output theme={null}
{
"headings": [
"Welcome to Our Website",
"Our Services",
"Contact Us",
"FAQ"
]
}
```
### Images
Extracts image sources from `img` tags. Only the `src` attribute is returned.
Example: `outputs=images`
```json output theme={null}
{
"images": [
"https://example.com/image1.jpg",
"https://example.com/image2.png"
]
}
```
### Audios
Extracts audio sources from `source` elements inside audio tags. Only the `src` attribute is returned.
Example: `outputs=audios`
```json output theme={null}
{
"audios": [
"https://example.com/audio1.mp3",
"https://example.com/audio2.wav"
]
}
```
### Videos
Extracts video sources from `source` elements inside video tags. Only the `src` attribute is returned.
Example: `outputs=videos`
```json output theme={null}
{
"videos": [
"https://example.com/video1.mp4",
"https://example.com/video2.webm"
]
}
```
### Links
Extracts URLs from `a` tags. Only the `href` attribute is returned.
Example: `outputs=links`
```json output theme={null}
{
"links": [
"https://example.com/page1",
"https://example.com/page2"
]
}
```
### Menus
Extracts menu items from `li` elements inside `menu` tags.
Example: `outputs=menus`
```json output theme={null}
{
"menus": [
"Home",
"About Us",
"Services",
"Contact"
]
}
```
### Hashtags
Extracts hashtags using regular expressions, matching typical hashtag formats like `#example`.
Example: `outputs=hashtags`
```json output theme={null}
{
"hashtags": [
"#vacation",
"#summer2024",
"#travel"
]
}
```
### Metadata
Extracts meta-information from `meta` tags inside the `head` section. Returns `name` and `content` attributes in the format `name: content`.
Example: `outputs=metadata`
```json output theme={null}
{
"metadata": [
"description: This is an example webpage.",
"keywords: example, demo, website",
"author: John Doe"
]
}
```
### Tables
Extracts data from `table` elements and returns the table data in JSON format, including dimensions, headings, and content.
Example: `outputs=tables`
```json output theme={null}
{
"dimensions": {
"rows": 4,
"columns": 4,
"heading": true
},
"heading": ["A", "B", "C", "D"],
"content": [
{"A": "1", "B": "1", "C": "1", "D": "1"},
{"A": "2", "B": "2", "C": "2", "D": "2"},
{"A": "3", "B": "3", "C": "3", "D": "3"},
{"A": "4", "B": "4", "C": "4", "D": "4"}
]
}
```
### Favicon
Extracts the favicon URL from the `link` element in the `head` section of the HTML.
Example: `outputs=favicon`
```json output theme={null}
{
"favicon": "https://example.com/favicon.ico"
}
```
## Markdown Response
By adding `response_type=markdown` to the request parameters, the ZenRows API will return the content in a Markdown format, making it easier to read and work with, especially if you are more comfortable with Markdown than HTML.
It can be beneficial if you prefer working with Markdown for its simplicity and readability.
You can't use the Markdown Response in conjunction with other outputs
Add `response_type=markdown` to the request:
```python Python theme={null}
# pip install requests
import requests
url = 'https://www.scrapingcourse.com/ecommerce/'
apikey = 'YOUR_ZENROWS_API_KEY'
params = {
'url': url,
'apikey': apikey,
'response_type': 'markdown',
}
response = requests.get('https://api.zenrows.com/v1/', params=params)
print(response.text)
```
```javascript Node.js theme={null}
// npm install axios
const axios = require('axios');
const url = 'https://www.scrapingcourse.com/ecommerce/';
const apikey = 'YOUR_ZENROWS_API_KEY';
axios({
url: 'https://api.zenrows.com/v1/',
method: 'GET',
params: {
'url': url,
'apikey': apikey,
'response_type': 'markdown',
},
})
.then(response => console.log(response.data))
.catch(error => console.log(error));
```
```java Java theme={null}
import org.apache.hc.client5.http.fluent.Request;
public class APIRequest {
public static void main(final String... args) throws Exception {
String apiUrl = "https://api.zenrows.com/v1/?apikey=YOUR_ZENROWS_API_KEY&url=https%3A%2F%2Fwww.scrapingcourse.com%2Fecommerce%2F&response_type=markdown";
String response = Request.get(apiUrl)
.execute().returnContent().asString();
System.out.println(response);
}
}
```
```php PHP theme={null}
```
```go Go theme={null}
package main
import (
"io"
"log"
"net/http"
)
func main() {
client := &http.Client{}
req, err := http.NewRequest("GET", "https://api.zenrows.com/v1/?apikey=YOUR_ZENROWS_API_KEY&url=https%3A%2F%2Fwww.scrapingcourse.com%2Fecommerce%2F&response_type=markdown", nil)
resp, err := client.Do(req)
if err != nil {
log.Fatalln(err)
}
defer resp.Body.Close()
body, err := io.ReadAll(resp.Body)
if err != nil {
log.Fatalln(err)
}
log.Println(string(body))
}
```
```ruby Ruby theme={null}
# gem install faraday
require 'faraday'
url = URI.parse('https://api.zenrows.com/v1/?apikey=YOUR_ZENROWS_API_KEY&url=https%3A%2F%2Fwww.scrapingcourse.com%2Fecommerce%2F&response_type=markdown')
conn = Faraday.new()
conn.options.timeout = 180
res = conn.get(url, nil, nil)
print(res.body)
```
```bash cURL theme={null}
curl "https://api.zenrows.com/v1/?apikey=YOUR_ZENROWS_API_KEY&url=https%3A%2F%2Fwww.scrapingcourse.com%2Fecommerce%2F&response_type=markdown"
```
Let's say the HTML content of the ScrapingCourse product page includes a product title, a description, and a list of features. In HTML, it might look something like this:
```bash theme={null}
Product Title
This is a great product that does many things.
Feature 1
Feature 2
Feature 3
```
When you enable the Markdown response feature, ZenRows Universal Scraper API will convert this HTML content into Markdown like this:
```bash theme={null}
# Product Title
This is a great product that does many things.
- Feature 1
- Feature 2
- Feature 3
```
## Plain Text Response
The `plaintext` feature is an output option that returns the scraped content as plain text instead of HTML or Markdown.
This feature can be helpful when you want a clean, unformatted version of the content without any HTML tags or Markdown formatting. It simplifies the content extraction process and makes processing or analyzing the text easier.
You can't use the Plain Text Response in conjunction with other outputs
Add `response_type=plaintext` to the request:
```python Python theme={null}
# pip install requests
import requests
url = 'https://www.scrapingcourse.com/ecommerce/'
apikey = 'YOUR_ZENROWS_API_KEY'
params = {
'url': url,
'apikey': apikey,
'response_type': 'plaintext',
}
response = requests.get('https://api.zenrows.com/v1/', params=params)
print(response.text)
```
```javascript Node.js theme={null}
// npm install axios
const axios = require('axios');
const url = 'https://www.scrapingcourse.com/ecommerce/';
const apikey = 'YOUR_ZENROWS_API_KEY';
axios({
url: 'https://api.zenrows.com/v1/',
method: 'GET',
params: {
'url': url,
'apikey': apikey,
'response_type': 'plaintext',
},
})
.then(response => console.log(response.data))
.catch(error => console.log(error));
```
```java Java theme={null}
import org.apache.hc.client5.http.fluent.Request;
public class APIRequest {
public static void main(final String... args) throws Exception {
String apiUrl = "https://api.zenrows.com/v1/?apikey=YOUR_ZENROWS_API_KEY&url=https%3A%2F%2Fwww.scrapingcourse.com%2Fecommerce%2F&response_type=plaintext";
String response = Request.get(apiUrl)
.execute().returnContent().asString();
System.out.println(response);
}
}
```
```php PHP theme={null}
```
```go Go theme={null}
package main
import (
"io"
"log"
"net/http"
)
func main() {
client := &http.Client{}
req, err := http.NewRequest("GET", "https://api.zenrows.com/v1/?apikey=YOUR_ZENROWS_API_KEY&url=https%3A%2F%2Fwww.scrapingcourse.com%2Fecommerce%2F&response_type=plaintext", nil)
resp, err := client.Do(req)
if err != nil {
log.Fatalln(err)
}
defer resp.Body.Close()
body, err := io.ReadAll(resp.Body)
if err != nil {
log.Fatalln(err)
}
log.Println(string(body))
}
```
```ruby Ruby theme={null}
# gem install faraday
require 'faraday'
url = URI.parse('https://api.zenrows.com/v1/?apikey=YOUR_ZENROWS_API_KEY&url=https%3A%2F%2Fwww.scrapingcourse.com%2Fecommerce%2F&response_type=plaintext')
conn = Faraday.new()
conn.options.timeout = 180
res = conn.get(url, nil, nil)
print(res.body)
```
```bash cURL theme={null}
curl "https://api.zenrows.com/v1/?apikey=YOUR_ZENROWS_API_KEY&url=https%3A%2F%2Fwww.scrapingcourse.com%2Fecommerce%2F&response_type=plaintext"
```
Let's say the HTML content of the ScrapingCourse product page includes a product title, a description, and a list of features. In HTML, it might look something like this:
```bash theme={null}
Product Title
This is a great product that does many things.
Feature 1
Feature 2
Feature 3
```
When you enable the `plaintext_response` feature, ZenRows Universal Scraper API will convert this HTML content into plain text like this:
```bash theme={null}
Product Title
This is a great product that does many things.
Feature 1
Feature 2
Feature 3
```
## PDF Response
In today's data-driven world, the ability to generate and save web scraping results in various formats can significantly enhance data utilization and sharing.
To use the PDF response feature, you must include the `js_render=true` parameter alongside with the `response_type` with the value `pdf` in your request. This instructs the API to generate a PDF file from the scraped content.
Check our documentation about the [JS Rendering](/universal-scraper-api/features/js-rendering)You can't use the PDF Response in conjunction with other outputs.
The resulting PDF file will contain the same information as the web page you scraped.
```python Python theme={null}
# pip install requests
import requests
url = 'https://www.scrapingcourse.com/ecommerce/'
apikey = 'YOUR_ZENROWS_API_KEY'
params = {
'url': url,
'apikey': apikey,
'js_render': 'true',
'response_type': 'pdf',
}
response = requests.get('https://api.zenrows.com/v1/', params=params)
print(response.text)
```
```javascript Node.js theme={null}
// npm install axios
const axios = require('axios');
const url = 'https://www.scrapingcourse.com/ecommerce/';
const apikey = 'YOUR_ZENROWS_API_KEY';
axios({
url: 'https://api.zenrows.com/v1/',
method: 'GET',
params: {
'url': url,
'apikey': apikey,
'js_render': 'true',
'response_type': 'pdf',
},
})
.then(response => console.log(response.data))
.catch(error => console.log(error));
```
```java Java theme={null}
import org.apache.hc.client5.http.fluent.Request;
public class APIRequest {
public static void main(final String... args) throws Exception {
String apiUrl = "https://api.zenrows.com/v1/?apikey=YOUR_ZENROWS_API_KEY&url=https%3A%2F%2Fwww.scrapingcourse.com%2Fecommerce%2F&js_render=true&response_type=pdf";
String response = Request.get(apiUrl)
.execute().returnContent().asString();
System.out.println(response);
}
}
```
```php PHP theme={null}
```
```go Go theme={null}
package main
import (
"io"
"log"
"net/http"
)
func main() {
client := &http.Client{}
req, err := http.NewRequest("GET", "https://api.zenrows.com/v1/?apikey=YOUR_ZENROWS_API_KEY&url=https%3A%2F%2Fwww.scrapingcourse.com%2Fecommerce%2F&js_render=true&response_type=pdf", nil)
resp, err := client.Do(req)
if err != nil {
log.Fatalln(err)
}
defer resp.Body.Close()
body, err := io.ReadAll(resp.Body)
if err != nil {
log.Fatalln(err)
}
log.Println(string(body))
}
```
```ruby Ruby theme={null}
# gem install faraday
require 'faraday'
url = URI.parse('https://api.zenrows.com/v1/?apikey=YOUR_ZENROWS_API_KEY&url=https%3A%2F%2Fwww.scrapingcourse.com%2Fecommerce%2F&js_render=true&response_type=pdf')
conn = Faraday.new()
conn.options.timeout = 180
res = conn.get(url, nil, nil)
print(res.body)
```
```bash cURL theme={null}
curl "https://api.zenrows.com/v1/?apikey=YOUR_ZENROWS_API_KEY&url=https%3A%2F%2Fwww.scrapingcourse.com%2Fecommerce%2F&js_render=true&response_type=pdf"
```
After getting the response in `.pdf` you can save it using the following example in Python:
```python scraper.py theme={null}
# Save the response as a binary file
with open('output.pdf', 'wb') as file:
file.write(response.content)
print("Response saved into output.pdf")
```
## Page Screenshot
Capture an above-the-fold screenshot of the target page by adding `screenshot=true` to the request. By default, the image will be in PNG format.
### Additional Options
`screenshot_fullpage=true` takes a full-page screenshot.
`screenshot_selector=` takes a screenshot of the element given in the CSS Selector.
Due to the nature of the params, `screenshot_selector` and `screenshot_fullpage` are mutually exclusive. Additionally, JavaScript rendering (`js_render=true`) is required.
These screenshot features can be combined with other options like `wait`, `wait_for`, or `js_instructions` to ensure that the page or elements are fully loaded before capturing the image. When using `json_response`, the result will include a JSON object with the screenshot data encoded in base64, allowing for easy integration into your workflows.
### Image Format and Quality
In addition to the basic screenshot functionality, ZenRows offers customization options to optimize the output. These features are particularly useful for reducing file size, especially when taking full-page screenshots where the image might exceed 10MB, causing errors.
`screenshot_format`: Choose between `png` and `jpeg` formats, with PNG being the default. PNG is great for high-quality images and transparency, while JPEG offers efficient compression.
`screenshot_quality`: Applicable when using JPEG, this parameter allows you to set the quality from `1` to `100`. Useful for balancing image clarity and file size, especially in scenarios where storage or bandwidth is limited.
```python Python theme={null}
# pip install requests
import requests
url = 'https://www.scrapingcourse.com/ecommerce/'
apikey = 'YOUR_ZENROWS_API_KEY'
params = {
'url': url,
'apikey': apikey,
'js_render': 'true',
'screenshot_fullpage': 'true',
}
response = requests.get('https://api.zenrows.com/v1/', params=params)
print(response.text)
```
```javascript Node.js theme={null}
// npm install axios
const axios = require('axios');
const fs = require('fs');
const url = 'https://www.scrapingcourse.com/ecommerce/';
const apikey = 'YOUR_ZENROWS_API_KEY';
axios({
url: 'https://api.zenrows.com/v1/',
method: 'GET',
params: {
'url': url,
'apikey': apikey,
'js_render': 'true',
'screenshot': 'true',
'screenshot_fullpage': 'true',
},
responseType: 'stream',
})
.then(response => {
const file = fs.createWriteStream('screenshot.png');
response.data.pipe(file);
})
.catch(error => console.log(error));
```
```java Java theme={null}
import java.io.File;
import org.apache.hc.client5.http.fluent.Request;
public class APIRequest {
public static void main(final String... args) throws Exception {
File file = new File("screenshot.png");
String apiUrl = "https://api.zenrows.com/v1/?apikey=YOUR_ZENROWS_API_KEY&url=https%3A%2F%2Fwww.scrapingcourse.com%2Fecommerce%2F&js_render=true&screenshot=true&screenshot_fullpage=true";
Request.get(apiUrl).execute().saveContent(file);
}
}
```
```php PHP theme={null}
```
```go Go theme={null}
package main
import (
"io"
"log"
"net/http"
"os"
)
func main() {
client := &http.Client{}
req, err := http.NewRequest("GET", "https://api.zenrows.com/v1/?apikey=YOUR_ZENROWS_API_KEY&url=https%3A%2F%2Fwww.scrapingcourse.com%2Fecommerce%2F&js_render=true&screenshot=true&screenshot_fullpage=true", nil)
resp, err := client.Do(req)
if err != nil {
log.Fatalln(err)
}
defer resp.Body.Close()
img, _ := os.Create("screenshot.png")
defer img.Close()
io.Copy(img, resp.Body)
}
```
```ruby Ruby theme={null}
# gem install faraday
require 'faraday'
url = URI.parse('https://api.zenrows.com/v1/?apikey=YOUR_ZENROWS_API_KEY&url=https%3A%2F%2Fwww.scrapingcourse.com%2Fecommerce%2F&js_render=true&screenshot=true&screenshot_fullpage=true')
conn = Faraday.new()
conn.options.timeout = 180
res = conn.get(url, nil, nil)
File.open('screenshot.png', 'wb') { |file| file.write(res.body) }
```
```bash cURL theme={null}
curl "https://api.zenrows.com/v1/?apikey=YOUR_ZENROWS_API_KEY&url=https%3A%2F%2Fwww.scrapingcourse.com%2Fecommerce%2F&js_render=true&screenshot=true&screenshot_fullpage=true" > screenshot.png
```
## Download Files and Pictures
ZenRows® lets you download images, PDFs, and other files directly from web pages. This feature is handy when extracting non-text content, like product images, manuals, or downloadable reports, as part of your web scraping workflow.
**Example:**
```python Python theme={null}
# pip install requests
import requests
url = 'https://www.w3.org/WAI/ER/tests/xhtml/testfiles/resources/pdf/dummy.pdf'
apikey = 'YOUR_ZENROWS_API_KEY'
params = {
'url': url,
'apikey': apikey,
}
response = requests.get('https://api.zenrows.com/v1/', params=params)
# Save the PDF file as .pdf if the request is successful
if response.status_code == 200:
with open('output.pdf', 'wb') as f:
f.write(response.content)
print("File downloaded and saved successfully!")
else:
print(f"Failed to download the file. Status code: {response.text}")
```
```javascript Node.js theme={null}
const fs = require('fs');
const fetch = require('node-fetch');
const apiKey = 'YOUR_ZENROWS_API_KEY';
const targetUrl = 'https://www.w3.org/WAI/ER/tests/xhtml/testfiles/resources/pdf/dummy.pdf';
const url = `https://api.zenrows.com/v1/?apikey=${apiKey}&url=${encodeURIComponent(targetUrl)}`;
fetch(url)
.then(res => {
if (!res.ok) throw new Error(`Failed to download. Status: ${res.status}`);
return res.buffer();
})
.then(data => {
fs.writeFileSync('output.pdf', data);
console.log('File downloaded and saved successfully!');
})
.catch(err => console.error('Error:', err.message));
```
```java Java theme={null}
// Using HttpURLConnection
import java.io.*;
import java.net.*;
public class DownloadFile {
public static void main(String[] args) throws IOException {
String targetUrl = "https://www.w3.org/WAI/ER/tests/xhtml/testfiles/resources/pdf/dummy.pdf";
String apiKey = "YOUR_ZENROWS_API_KEY";
String requestUrl = "https://api.zenrows.com/v1/?apikey=" + apiKey + "&url=" + URLEncoder.encode(targetUrl, "UTF-8");
URL url = new URL(requestUrl);
HttpURLConnection connection = (HttpURLConnection) url.openConnection();
if (connection.getResponseCode() == 200) {
InputStream in = connection.getInputStream();
FileOutputStream out = new FileOutputStream("output.pdf");
byte[] buffer = new byte[4096];
int n;
while ((n = in.read(buffer)) != -1) {
out.write(buffer, 0, n);
}
out.close();
in.close();
System.out.println("File downloaded and saved successfully!");
} else {
System.out.println("Failed to download. Status code: " + connection.getResponseCode());
}
connection.disconnect();
}
}
```
```php PHP theme={null}
```
```go Go theme={null}
package main
import (
"fmt"
"io"
"net/http"
"net/url"
"os"
)
func main() {
apiKey := "YOUR_ZENROWS_API_KEY"
targetUrl := "https://www.w3.org/WAI/ER/tests/xhtml/testfiles/resources/pdf/dummy.pdf"
requestUrl := fmt.Sprintf("https://api.zenrows.com/v1/?apikey=%s&url=%s", apiKey, url.QueryEscape(targetUrl))
resp, err := http.Get(requestUrl)
if err != nil {
fmt.Println("Error:", err)
return
}
defer resp.Body.Close()
if resp.StatusCode == 200 {
out, err := os.Create("output.pdf")
if err != nil {
fmt.Println("Error creating file:", err)
return
}
defer out.Close()
_, err = io.Copy(out, resp.Body)
if err != nil {
fmt.Println("Error saving file:", err)
return
}
fmt.Println("File downloaded and saved successfully!")
} else {
fmt.Println("Failed to download. Status code:", resp.Status)
}
}
```
```ruby Ruby theme={null}
require 'net/http'
require 'uri'
api_key = 'YOUR_ZENROWS_API_KEY'
target_url = 'https://www.w3.org/WAI/ER/tests/xhtml/testfiles/resources/pdf/dummy.pdf'
uri = URI("https://api.zenrows.com/v1/")
uri.query = URI.encode_www_form({ 'apikey' => api_key, 'url' => target_url })
response = Net::HTTP.get_response(uri)
if response.is_a?(Net::HTTPSuccess)
File.open('output.pdf', 'wb') { |file| file.write(response.body) }
puts "File downloaded and saved successfully!"
else
puts "Failed to download. Status code: #{response.code}"
end
```
```bash cURL theme={null}
curl "https://api.zenrows.com/v1/?apikey=YOUR_ZENROWS_API_KEY&url=https%3A%2F%2Fwww.w3.org%2FWAI%2FER%2Ftests%2Fxhtml%2Ftestfiles%2Fresources%2Fpdf%2Fdummy.pdf" -o output.pdf
```
Supported file download scenarios:
If the URL you request returns the file directly, such as an image or PDF link, ZenRows will fetch the file so you can save it in its original format. This is the most reliable method.
If a file download is started by a user action, such as clicking a button or link, you can use ZenRows' JS Instructions to simulate these actions. If the download begins automatically, without prompting for a directory or further user input, ZenRows can capture and return the file.
Downloads are only possible when the file is delivered directly in the HTTP response. If the website asks the user to choose a download location or requires more interaction, ZenRows cannot capture the file. In these cases, we recommend using our [Scraping Browser](/scraping-browser/introduction), which gives you more control over the browser session and supports more complex interactions.
### File Size Limits
ZenRows enforces a maximum file size per request to ensure stable performance. If you try downloading a file larger than your plan allows, you will receive a `413 Content Too Large` error.
You can find more details on the plan limits on our [Pricing Documentation](/first-steps/pricing#available-plans)
## Frequently Asked Questions (FAQ)
No, certain `response_type` formats like Markdown, Plain Text, and PDF cannot be used together.
For us to process the response as a `response_type` (Markdown, Plain Text, or PDF), we need to be able to parse the response as HTML. If we can't parse the response as HTML, we'll return the original response.
When can this happen? When the response type is not `text/html` or when the response is not rendered.
ZenRows supports customizing screenshots. You can choose between PNG (default) or JPEG formats using `screenshot_format`. For JPEGs, you can control the quality using `screenshot_quality`, with a value between `1` and `100`, to balance image clarity and file size.
To ensure dynamic pages are fully loaded before scraping, you can use JavaScript rendering (`js_render=true`) and pair it with parameters like `wait` or `wait_for`. This ensures that ZenRows waits until the necessary elements are present on the page before scraping.
# Premium Proxy (Residential IPs)
Source: https://docs.zenrows.com/universal-scraper-api/features/premium-proxy
Premium Proxy routes your requests through residential IP addresses instead of standard datacenter IPs. These residential IPs come from real Internet Service Provider (ISP) connections assigned to actual households, making them significantly harder for websites to detect and block.
When websites implement anti-scraping measures, they typically target datacenter IP ranges first. Premium Proxy addresses this challenge by utilizing IP addresses that appear as regular user traffic, thereby dramatically improving your scraping success rates on protected websites.
## How Premium Proxy works
Premium Proxy automatically selects residential IP addresses from ZenRows' global pool when the feature is enabled. Each request routes through a different residential connection, mimicking natural user behavior and avoiding the IP-based blocking that affects datacenter proxies.
The system handles IP rotation automatically, so you don't need to manage proxy lists or worry about IP exhaustion. ZenRows maintains thousands of residential IPs across multiple countries to ensure reliable access to your target websites.
## Basic usage
Enable Premium Proxy by adding the `premium_proxy=true` parameter to your ZenRows request:
```python Python theme={null}
# pip install requests
import requests
url = 'https://httpbin.io/anything'
apikey = 'YOUR_ZENROWS_API_KEY'
params = {
'url': url,
'apikey': apikey,
'premium_proxy': 'true',
}
response = requests.get('https://api.zenrows.com/v1/', params=params)
print(response.text)
```
```javascript Node.js theme={null}
// npm install axios
const axios = require('axios');
const url = 'https://httpbin.io/anything';
const apikey = 'YOUR_ZENROWS_API_KEY';
axios({
url: 'https://api.zenrows.com/v1/',
method: 'GET',
params: {
'url': url,
'apikey': apikey,
'premium_proxy': 'true',
},
})
.then(response => console.log(response.data))
.catch(error => console.log(error));
```
```java Java theme={null}
import org.apache.hc.client5.http.fluent.Request;
public class APIRequest {
public static void main(final String... args) throws Exception {
String apiUrl = "https://api.zenrows.com/v1/?apikey=YOUR_ZENROWS_API_KEY&url=https%3A%2F%2Fhttpbin.io%2Fanything&premium_proxy=true";
String response = Request.get(apiUrl)
.execute().returnContent().asString();
System.out.println(response);
}
}
```
```php PHP theme={null}
```
```go Go theme={null}
package main
import (
"io"
"log"
"net/http"
)
func main() {
client := &http.Client{}
req, err := http.NewRequest("GET", "https://api.zenrows.com/v1/?apikey=YOUR_ZENROWS_API_KEY&url=https%3A%2F%2Fhttpbin.io%2Fanything&premium_proxy=true", nil)
resp, err := client.Do(req)
if err != nil {
log.Fatalln(err)
}
defer resp.Body.Close()
body, err := io.ReadAll(resp.Body)
if err != nil {
log.Fatalln(err)
}
log.Println(string(body))
}
```
```ruby Ruby theme={null}
# gem install faraday
require 'faraday'
url = URI.parse('https://api.zenrows.com/v1/?apikey=YOUR_ZENROWS_API_KEY&url=https%3A%2F%2Fhttpbin.io%2Fanything&premium_proxy=true')
conn = Faraday.new()
conn.options.timeout = 180
res = conn.get(url, nil, nil)
print(res.body)
```
```bash cURL theme={null}
curl "https://api.zenrows.com/v1/?apikey=YOUR_ZENROWS_API_KEY&url=https%3A%2F%2Fhttpbin.io%2Fanything&premium_proxy=true"
```
This example enables Premium Proxy for your request. ZenRows automatically selects an available residential IP and routes your request through it, improving your chances of successful data extraction.
## When to use Premium Proxy
Premium Proxy is essential in these scenarios:
* **High-security websites** - Sites protected by CloudFlare, Akamai, or similar anti-bot systems
* **E-commerce platforms** - Online stores that actively block datacenter IPs
* **Social media sites** - Platforms with sophisticated bot detection
* **Financial websites** - Banking and trading sites with strict access controls
* **Streaming services** - Video platforms that block automated access
* **Government websites** - Official sites with enhanced security measures
## Best practices
### Combine with other features
Premium Proxy works best when combined with other ZenRows features:
```python Python theme={null}
params = {
'url': target_url,
'apikey': 'YOUR_ZENROWS_API_KEY',
'premium_proxy': 'true',
'js_render': 'true', # For JavaScript-heavy sites
'wait_for': '.content', # Wait for specific elements
}
```
### Monitor success rates
Track your scraping success to optimize your approach:
```python Python theme={null}
successful_requests = 0
total_requests = 0
for url in url_list:
total_requests += 1
response = requests.get('https://api.zenrows.com/v1/', params={
'url': url,
'apikey': 'YOUR_ZENROWS_API_KEY',
'premium_proxy': 'true',
})
if response.status_code == 200:
successful_requests += 1
success_rate = (successful_requests / total_requests) * 100
print(f"Success rate: {success_rate}%")
```
## Troubleshooting
### Common issues and solutions
| Issue | Cause | Solution |
| -------------------------- | --------------------------------------------------- | --------------------------------------------------------------------------------------------------------------------------------------------------------------------------------------- |
| Still getting blocked | Website uses advanced fingerprinting | Add `js_render=true` and custom headers |
| Inconsistent results | Different residential IPs may see different content | Use session management or sticky sessions ([session\_id](/universal-scraper-api/features/other#session-id)), or test using [Geolocation](/universal-scraper-api/features/proxy-country) |
| Higher costs than expected | Premium Proxy costs 10x base rate | Monitor usage and optimize request frequency |
### Debugging blocked requests
If you're still getting blocked with Premium Proxy enabled:
```python Python theme={null}
params = {
'premium_proxy': 'true',
'js_render': 'true',
}
```
See more about the `js_render` parameter [here](./js-rendering)
```python Python theme={null}
params = {
'premium_proxy': 'true',
'original_status': 'true',
}
```
See more about the `original_status` parameter [here](/universal-scraper-api/features/other#original-http-code)
```python Python theme={null}
params = {
'premium_proxy': 'true',
'js_render': 'true',
'custom_headers': 'true',
}
headers = {
'referer': 'https://www.google.com'
}
```
See more about the `custom_headers` parameter [here](/universal-scraper-api/features/headers#enabling-custom-headers)
```python Python theme={null}
params = {
'premium_proxy': 'true',
'js_render': 'true',
'wait': '3000',
}
```
## Pricing
Premium Proxy requests cost 10 times the standard rate. This pricing reflects the higher cost and limited availability of residential IP addresses compared to datacenter proxies.
Monitor your usage through the ZenRows [analytics page](https://app.zenrows.com/analytics/scraper-api) to track costs and optimize your scraping strategy accordingly.
## Frequently Asked Questions (FAQ)
Premium Proxy utilizes residential IP addresses from genuine ISP connections, whereas standard proxies employ data center IPs. Residential IPs are much harder for websites to detect and block, resulting in higher success rates for scraping protected websites.
No, ZenRows automatically selects residential IPs from its pool to ensure optimal performance and avoid IP exhaustion. Manual IP selection could lead to blocking and reduced success rates.
No, Premium Proxy is primarily needed for websites with anti-scraping measures. Simple websites without bot protection can often be scraped successfully using standard datacenter proxies.
Yes, Premium Proxy works with all other ZenRows features, including custom headers, JavaScript rendering, and wait parameters. Combining features often provides the best results.
# Proxy Country (Geolocation)
Source: https://docs.zenrows.com/universal-scraper-api/features/proxy-country
Proxy Country allows you to specify the geographic location from which your scraping requests originate. This feature enables access to geo-restricted content, region-specific pricing, and localized search results by routing your requests through residential IP addresses in your chosen country.
Many websites serve different content based on the visitor's location. Proxy Country addresses this challenge by allowing your requests to appear to originate from any of 190+ supported countries, thereby providing access to region-specific data that would otherwise be unavailable.
## How Proxy Country works
When you specify a country code with the `proxy_country` parameter, ZenRows routes your request through a residential IP address located in that country. The target website recognizes your request as coming from a real user in the specified location, enabling you to access geo-restricted content and view localized results.
Proxy Country requires Premium Proxy to be enabled, as only residential IP addresses can provide accurate geolocation. Datacenter proxies cannot reliably represent specific geographic locations.
## Basic usage
Enable Proxy Country by adding both `premium_proxy=true` and `proxy_country` parameters to your request:
```python Python theme={null}
# pip install requests
import requests
url = 'https://httpbin.io/anything'
apikey = 'YOUR_ZENROWS_API_KEY'
params = {
'url': url,
'apikey': apikey,
'premium_proxy': 'true',
'proxy_country': 'es',
}
response = requests.get('https://api.zenrows.com/v1/', params=params)
print(response.text)
```
```javascript Node.js theme={null}
// npm install axios
const axios = require('axios');
const url = 'https://httpbin.io/anything';
const apikey = 'YOUR_ZENROWS_API_KEY';
axios({
url: 'https://api.zenrows.com/v1/',
method: 'GET',
params: {
'url': url,
'apikey': apikey,
'premium_proxy': 'true',
'proxy_country': 'es',
},
})
.then(response => console.log(response.data))
.catch(error => console.log(error));
```
```java Java theme={null}
import org.apache.hc.client5.http.fluent.Request;
public class APIRequest {
public static void main(final String... args) throws Exception {
String apiUrl = "https://api.zenrows.com/v1/?apikey=YOUR_ZENROWS_API_KEY&url=https%3A%2F%2Fhttpbin.io%2Fanything&premium_proxy=true&proxy_country=es";
String response = Request.get(apiUrl)
.execute().returnContent().asString();
System.out.println(response);
}
}
```
```php PHP theme={null}
```
```go Go theme={null}
package main
import (
"io"
"log"
"net/http"
)
func main() {
client := &http.Client{}
req, err := http.NewRequest("GET", "https://api.zenrows.com/v1/?apikey=YOUR_ZENROWS_API_KEY&url=https%3A%2F%2Fhttpbin.io%2Fanything&premium_proxy=true&proxy_country=es", nil)
resp, err := client.Do(req)
if err != nil {
log.Fatalln(err)
}
defer resp.Body.Close()
body, err := io.ReadAll(resp.Body)
if err != nil {
log.Fatalln(err)
}
log.Println(string(body))
}
```
```ruby Ruby theme={null}
# gem install faraday
require 'faraday'
url = URI.parse('https://api.zenrows.com/v1/?apikey=YOUR_ZENROWS_API_KEY&url=https%3A%2F%2Fhttpbin.io%2Fanything&premium_proxy=true&proxy_country=es')
conn = Faraday.new()
conn.options.timeout = 180
res = conn.get(url, nil, nil)
print(res.body)
```
```bash cURL theme={null}
curl "https://api.zenrows.com/v1/?apikey=YOUR_ZENROWS_API_KEY&url=https%3A%2F%2Fhttpbin.io%2Fanything&premium_proxy=true&proxy_country=es"
```
## Common use cases
### E-commerce price monitoring
Monitor pricing across different regions:
```python Python theme={null}
countries = ['us', 'gb', 'de', 'fr', 'jp']
product_url = 'https://example-store.com/product/123'
for country in countries:
response = requests.get('https://api.zenrows.com/v1/', params={
'url': product_url,
'apikey': 'YOUR_ZENROWS_API_KEY',
'premium_proxy': 'true',
'proxy_country': country,
})
# Extract and compare prices for each region
print(f"Price in {country}: {extract_price(response.text)}")
```
### Search engine localization
Get search results as they appear in different countries:
```python Python theme={null}
search_query = 'best restaurants'
search_url = f'https://www.google.com/search?q={search_query}'
# Get US results
us_response = requests.get('https://api.zenrows.com/v1/', params={
'url': search_url,
'apikey': 'YOUR_ZENROWS_API_KEY',
'premium_proxy': 'true',
'proxy_country': 'us',
})
# Get ES results
uk_response = requests.get('https://api.zenrows.com/v1/', params={
'url': search_url,
'apikey': 'YOUR_ZENROWS_API_KEY',
'premium_proxy': 'true',
'proxy_country': 'es',
})
```
### Content availability testing
Check if content is accessible from different regions:
```python Python theme={null}
def test_content_availability(url, countries):
results = {}
for country in countries:
response = requests.get('https://api.zenrows.com/v1/', params={
'url': url,
'apikey': 'YOUR_ZENROWS_API_KEY',
'premium_proxy': 'true',
'proxy_country': country,
})
results[country] = {
'accessible': response.status_code == 200,
'status_code': response.status_code,
}
return results
# Test video availability across regions
video_url = 'https://streaming-service.com/video/123'
availability = test_content_availability(video_url, ['us', 'ca', 'gb', 'au'])
```
## Best practices
### Choose appropriate countries
Select countries based on your specific needs:
* US (`us`) - For American content
* GB (`gb`) - For UK-specific results
* DE (`de`) - For German/EU content
* JP (`jp`) - For Japanese content data
* CA (`ca`) - For Canadian content
See our complete list of countries [here](/first-steps/faq#what-is-geolocation-and-what-are-all-the-premium-proxy-countries)!
### Handle region-specific layouts
Some websites serve different HTML structures by region:
```python Python theme={null}
def extract_data_by_region(html_content, country):
if country in ['us', 'ca']:
# North American layout
return extract_with_us_selectors(html_content)
elif country in ['gb', 'de', 'fr']:
# European layout
return extract_with_eu_selectors(html_content)
else:
# Default extraction
return extract_with_default_selectors(html_content)
```
### Implement country fallbacks
If a specific country doesn't work, try alternatives:
```python Python theme={null}
def scrape_with_fallback(url, preferred_countries):
for country in preferred_countries:
try:
response = requests.get('https://api.zenrows.com/v1/', params={
'url': url,
'apikey': 'YOUR_ZENROWS_API_KEY',
'premium_proxy': 'true',
'proxy_country': country,
})
if response.status_code == 200:
return response, country
except Exception as e:
print(f"Failed with {country}: {e}")
continue
return None, None
# Try US first, then Canada, then UK
response, used_country = scrape_with_fallback(
'https://example.com',
['us', 'ca', 'gb']
)
```
## Troubleshooting
### Common issues and solutions
| Issue | Cause | Solution |
| ------------------------------ | -------------------------------- | ------------------------------------------------- |
| Content still geo-blocked | Website blocks entire regions | Try neighboring countries or different continents |
| Different layout than expected | Region-specific website versions | Update CSS selectors for each region |
| Slower response times | Distance from target servers | Choose countries closer to the website's servers |
| Inconsistent results | Regional content variations | Implement region-specific data extraction logic |
### Debugging geo-restrictions
When content remains blocked despite using Proxy Country:
```python Python theme={null}
eu_countries = ['de', 'fr', 'it', 'es', 'nl']
for country in eu_countries:
# Test each country
```
```python Python theme={null}
test_countries = ['us', 'gb', 'de', 'jp', 'au', 'br']
# Test diverse geographic locations
```
* [js\_render](/universal-scraper-api/features/js-rendering): Makes the request act like a headles browser
* [wait\_for](/universal-scraper-api/features/wait-for): Waits for a specific CSS element on the target url
* [custom\_headers](/universal-scraper-api/features/headers): Enable using custom headers on the request
```python Python theme={null}
params = {
'premium_proxy': 'true',
'proxy_country': 'us',
'js_render': 'true', # For JavaScript-heavy sites
'wait_for': '.content', # Wait for specific elements
'custom_headers': 'true', # Enable using custom headers on the request
}
headers = {
'referer': 'https://www.google.com'
}
```
## Pricing
Proxy Country doesn't increase the request cost. You pay the Premium Proxy (10 times the standard price) regardless of the country you choose.
## Frequently Asked Questions (FAQ)
No, Proxy Country requires Premium Proxy to be enabled. Only residential IP addresses can provide accurate geolocation, and Premium Proxy is necessary to access residential IPs.
ZenRows utilizes genuine residential IP addresses from ISPs in each country, ensuring highly accurate geolocation that websites recognize as legitimate traffic from those specific regions.
Currently, ZenRows supports country-level geolocation only. You cannot specify specific cities or states within a country.
If no residential IPs are available for your specified country, the request will fail. Implement fallback logic to try alternative countries in such cases.
Yes, success rates can vary by country depending on the target website's blocking policies and the quality of residential IP pools in each region. Monitor your success rates and adjust accordingly.
Yes, you can use the same country consistently. However, some websites may still detect patterns, so consider rotating between countries in the same region if needed.
# Wait Parameter
Source: https://docs.zenrows.com/universal-scraper-api/features/wait
The Wait parameter introduces a fixed delay during JavaScript rendering, allowing web pages additional time to load dynamic content before ZenRows fully captures the HTML. Many websites load content progressively through JavaScript, AJAX calls, or other asynchronous processes that occur after the initial page has been rendered.
When you add the `wait` parameter to your request, ZenRows pauses for the specified duration (in milliseconds) after the page initially loads, ensuring that slow-loading elements, animations, and dynamically generated content have time to appear before the HTML is extracted. The maximum `wait` value acceptable is 30 seconds (30,000 milliseconds).
The Wait parameter requires `js_render=true` to function, as it operates within the browser environment during JavaScript rendering.
## How the Wait parameter works
The Wait parameter creates a pause in the scraping process after the initial page load completes. During this waiting period, the headless browser remains active, allowing JavaScript to continue executing, AJAX requests to complete, and dynamic content to render.
This process ensures you capture:
* Content loaded through delayed AJAX calls
* Elements that appear after animations complete
* Data populated by slow third-party APIs
* Progressive loading sequences
* Time-sensitive dynamic updates
The wait occurs after the initial DOM load but before the final HTML extraction, giving websites the necessary time to complete their loading processes.
## Basic usage
Add the `wait` parameter with a value in milliseconds to your JavaScript rendering request:
```python Python theme={null}
# pip install requests
import requests
url = 'https://httpbin.io/anything'
apikey = 'YOUR_ZENROWS_API_KEY'
params = {
'url': url,
'apikey': apikey,
'js_render': 'true',
'wait': '5000',
}
response = requests.get('https://api.zenrows.com/v1/', params=params)
print(response.text)
```
```javascript Node.js theme={null}
// npm install axios
const axios = require('axios');
const url = 'https://httpbin.io/anything';
const apikey = 'YOUR_ZENROWS_API_KEY';
axios({
url: 'https://api.zenrows.com/v1/',
method: 'GET',
params: {
'url': url,
'apikey': apikey,
'js_render': 'true',
'wait': '5000',
},
})
.then(response => console.log(response.data))
.catch(error => console.log(error));
```
```java Java theme={null}
import org.apache.hc.client5.http.fluent.Request;
public class APIRequest {
public static void main(final String... args) throws Exception {
String apiUrl = "https://api.zenrows.com/v1/?apikey=YOUR_ZENROWS_API_KEY&url=https%3A%2F%2Fhttpbin.io%2Fanything&js_render=true&wait=5000";
String response = Request.get(apiUrl)
.execute().returnContent().asString();
System.out.println(response);
}
}
```
```php PHP theme={null}
```
```go Go theme={null}
package main
import (
"io"
"log"
"net/http"
)
func main() {
client := &http.Client{}
req, err := http.NewRequest("GET", "https://api.zenrows.com/v1/?apikey=YOUR_ZENROWS_API_KEY&url=https%3A%2F%2Fhttpbin.io%2Fanything&js_render=true&wait=5000", nil)
resp, err := client.Do(req)
if err != nil {
log.Fatalln(err)
}
defer resp.Body.Close()
body, err := io.ReadAll(resp.Body)
if err != nil {
log.Fatalln(err)
}
log.Println(string(body))
}
```
```ruby Ruby theme={null}
# gem install faraday
require 'faraday'
url = URI.parse('https://api.zenrows.com/v1/?apikey=YOUR_ZENROWS_API_KEY&url=https%3A%2F%2Fhttpbin.io%2Fanything&js_render=true&wait=5000')
conn = Faraday.new()
conn.options.timeout = 180
res = conn.get(url, nil, nil)
print(res.body)
```
```bash cURL theme={null}
curl "https://api.zenrows.com/v1/?apikey=YOUR_ZENROWS_API_KEY&url=https%3A%2F%2Fhttpbin.io%2Fanything&js_render=true&wait=5000"
```
This example waits 5 seconds (5000 milliseconds) after the page loads before capturing the HTML content. During this time, any JavaScript-driven content loading processes can complete.
## When to use the Wait parameter
The Wait parameter is essential in these scenarios:
### Content loading delays:
* **Slow API responses** - Pages that fetch data from slow external APIs
* **Progressive content loading** - Sites that load content in multiple stages
* **Heavy JavaScript processing** - Pages with complex calculations or data processing
* **Third-party widgets** - External content like maps, charts, or embedded media
* **Animation sequences** - Content that appears after CSS or JavaScript animations
### Timing-dependent content:
* **Real-time data** - Stock prices, live scores, or updating counters
* **Lazy loading** - Images or content that loads as needed
* **Scroll preparation** - Initial content that loads before scroll triggers
* **Form validation** - Dynamic form elements that appear based on user input simulation
## Best practices
### Start with reasonable defaults
Begin with moderate wait times and adjust based on results:
```python Python theme={null}
def smart_wait_scraping(url, target_indicators):
"""
Use progressive wait times to find the minimum necessary delay
"""
wait_times = [2000, 4000, 6000, 8000] # Progressive wait times
for wait_time in wait_times:
response = requests.get('https://api.zenrows.com/v1/', params={
'url': url,
'apikey': 'YOUR_ZENROWS_API_KEY',
'js_render': 'true',
'wait': str(wait_time),
})
# Check if all target content is present
content_found = all(indicator in response.text for indicator in target_indicators)
if content_found:
print(f"Optimal wait time found: {wait_time}ms")
return response, wait_time
print("Content not found even with maximum wait time")
return None, None
# Usage
indicators = ['product-price', 'customer-reviews', 'stock-status']
result, optimal_wait = smart_wait_scraping('https://httpbin.io/anything', indicators)
```
### Combine with other parameters for maximum effectiveness
Use Wait with Premium Proxy for protected sites:
```python Python theme={null}
params = {
'url': 'https://httpbin.io/anything',
'apikey': 'YOUR_ZENROWS_API_KEY',
'js_render': 'true',
'premium_proxy': 'true',
'wait': '6000',
}
```
## Troubleshooting
### Common issues and solutions
| Issue | Cause | Solution |
| --------------------- | ----------------------------------------------------------------------- | -------------------------------------------------------------- |
| Content still missing | Wait time too short | Increase wait duration incrementally |
| Inconsistent results | Variable loading times | Use longer wait time, use `wait_for`, or implement retry logic |
| REQS004 | Invalid value provided for `wait` parameter; value is too big (REQS004) | Keep wait under 30 seconds total or use `wait_for` |
| Unnecessary delays | Fixed wait for fast-loading content | Use `wait_for` parameter for dynamic waiting |
### Debugging missing content with Wait
When content is still missing despite using the Wait parameter:
* Compare with manual browser testing
* Open the page in a browser and time how long content takes to appear
* Use that timing as your baseline wait duration
```python Python theme={null}
# Try progressively longer wait times
for wait_time in [3000, 6000, 9000, 12000]:
response = requests.get('https://api.zenrows.com/v1/', params={
'url': url,
'apikey': 'YOUR_ZENROWS_API_KEY',
'js_render': 'true',
'wait': str(wait_time),
})
if 'expected-content' in response.text:
print(f"Content found with {wait_time}ms wait")
break
```
```python Python theme={null}
params = {
'js_render': 'true',
'wait_for': '.content', # Wait for specific element
}
```
See more on [Wait\_for](/universal-scraper-api/features/wait-for) documentation page
## Understanding wait time limits
ZenRows has built-in limits for wait times to ensure service stability:
* **Maximum total wait time**: 30 seconds (30,000 milliseconds)
* **Recommended range**: 2,000 - 10,000 milliseconds (2-10 seconds)
* **Minimum practical wait**: 1,000 milliseconds (1 second). Values below that are acceptable but impractical
## Pricing
The `wait` parameter doesn't increase the request cost. You pay the JavaScript Render (5 times the standard price) regardless of the wait value you choose.
## Frequently Asked Questions (FAQ)
The `wait` parameter introduces a fixed delay in milliseconds, while `wait_for` waits for a specific element to appear on the page. Use `wait` when you know content takes a particular amount of time to load, and `wait_for` when you want to wait for specific elements to appear.
No, the `wait` parameter only works with JavaScript rendering enabled. Without `js_render=true`, the wait parameter will be ignored since there's no browser environment to pause within.
Test different wait times and monitor content length, as well as the presence of target elements. If content is missing, increase the wait time. If you're getting complete content with shorter waits, you can reduce the time to improve efficiency.
Not necessarily. Different pages may have different loading characteristics. Product pages may require longer wait times than category pages. Consider implementing adaptive wait times based on page type or previous successful timings.
Yes, the `wait` parameter works perfectly with any other feature.
When using both `wait` and `wait_for`, the `wait_for` parameter takes precedence and overrides the `wait` parameter.
# Wait For Parameter
Source: https://docs.zenrows.com/universal-scraper-api/features/wait-for
The Wait For parameter instructs ZenRows to pause JavaScript rendering until a specific element appears on the page, identified by a CSS selector. Unlike fixed delays, Wait For provides dynamic waiting that adapts to actual page loading conditions, making your scraping more reliable and efficient.
When you specify a CSS selector with the `wait_for` parameter, ZenRows continuously monitors the page during JavaScript rendering until the target element becomes visible in the DOM. This ensures that critical content has loaded before capturing the HTML, regardless of the duration of the loading process.
The Wait For parameter requires `js_render=true` to function, as it operates within the browser environment during JavaScript rendering.
## How the Wait For parameter works
The Wait For parameter actively monitors the page's DOM structure during JavaScript rendering, checking repeatedly for the presence of your specified CSS selector. Once the target element appears and becomes visible, ZenRows immediately captures the HTML content.
This process ensures you capture:
* Elements that load at unpredictable times
* Content dependent on API response timing
* Elements that appear after user interactions
* Dynamically generated content with variable loading speeds
* Critical page components that indicate full loading completion
The monitoring continues until either the element appears or the maximum timeout of 3 minutes is reached. If the selector is not found within this timeframe, ZenRows returns a 422 error indicating that the element could not be located.
## Basic usage
Add the `wait_for` parameter with a CSS selector to your JavaScript rendering request:
```python Python theme={null}
# pip install requests
import requests
url = 'https://www.scrapingcourse.com/ecommerce/'
apikey = 'YOUR_ZENROWS_API_KEY'
params = {
'url': url,
'apikey': apikey,
'js_render': 'true',
'wait_for': '.price',
}
response = requests.get('https://api.zenrows.com/v1/', params=params)
print(response.text)
```
```javascript Node.js theme={null}
// npm install axios
const axios = require('axios');
const url = 'https://www.scrapingcourse.com/ecommerce/';
const apikey = 'YOUR_ZENROWS_API_KEY';
axios({
url: 'https://api.zenrows.com/v1/',
method: 'GET',
params: {
'url': url,
'apikey': apikey,
'js_render': 'true',
'wait_for': '.price',
},
})
.then(response => console.log(response.data))
.catch(error => console.log(error));
```
```java Java theme={null}
import org.apache.hc.client5.http.fluent.Request;
public class APIRequest {
public static void main(final String... args) throws Exception {
String apiUrl = "https://api.zenrows.com/v1/?apikey=YOUR_ZENROWS_API_KEY&url=https%3A%2F%2Fwww.scrapingcourse.com%2Fecommerce%2F&js_render=true&wait_for=.price";
String response = Request.get(apiUrl)
.execute().returnContent().asString();
System.out.println(response);
}
}
```
```php PHP theme={null}
```
```go Go theme={null}
package main
import (
"io"
"log"
"net/http"
)
func main() {
client := &http.Client{}
req, err := http.NewRequest("GET", "https://api.zenrows.com/v1/?apikey=YOUR_ZENROWS_API_KEY&url=https%3A%2F%2Fwww.scrapingcourse.com%2Fecommerce%2F&js_render=true&wait_for=.price", nil)
resp, err := client.Do(req)
if err != nil {
log.Fatalln(err)
}
defer resp.Body.Close()
body, err := io.ReadAll(resp.Body)
if err != nil {
log.Fatalln(err)
}
log.Println(string(body))
}
```
```ruby Ruby theme={null}
# gem install faraday
require 'faraday'
url = URI.parse('https://api.zenrows.com/v1/?apikey=YOUR_ZENROWS_API_KEY&url=https%3A%2F%2Fwww.scrapingcourse.com%2Fecommerce%2F&js_render=true&wait_for=.price')
conn = Faraday.new()
conn.options.timeout = 180
res = conn.get(url, nil, nil)
print(res.body)
```
```bash cURL theme={null}
curl "https://api.zenrows.com/v1/?apikey=YOUR_ZENROWS_API_KEY&url=https%3A%2F%2Fwww.scrapingcourse.com%2Fecommerce%2F&js_render=true&wait_for=.price"
```
This example waits until an element with the class `price` appears on the page before capturing the HTML content. The waiting time adapts automatically to the actual loading speed. The waiting time automatically adapts to the actual loading speed, up to a maximum of 3 minutes.
## CSS selector examples
Use various CSS selectors to target different types of elements:
```python Python theme={null}
# Wait for specific classes
params = {'wait_for': '.content-loaded'}
# Wait for IDs
params = {'wait_for': '#main-content'}
# Wait for specific attributes
params = {'wait_for': '[data-loaded="true"]'}
# Wait for nested elements
params = {'wait_for': '.product-container .price-display'}
# Wait for elements with specific text content
params = {'wait_for': '.status:contains("Available")'}
# Wait for form elements
params = {'wait_for': 'input[name="search"]'}
# Wait for multiple class combinations
params = {'wait_for': '.product.loaded.visible'}
```
## When to use the Wait For parameter
The Wait For parameter is essential in these scenarios:
### Dynamic content loading:
* **AJAX-loaded content** - Elements populated by asynchronous requests
* **API-dependent data** - Content that appears after external API calls
* **Progressive loading** - Pages that load content in stages
* **Conditional content** - Elements that appear based on user state or preferences
* **Real-time updates** - Content that updates based on live data feeds
### User interface elements:
* **Interactive components** - Buttons, forms, and controls that load dynamically
* **Navigation elements** - Menus and links that appear after initialization
* **Modal dialogs** - Pop-ups and overlays that appear programmatically
* **Data visualizations** - Charts, graphs, and tables that render after data loading
* **Search results** - Results that appear after query processing
## Troubleshooting
If ZenRows cannot find a matching element for the CSS selector, it will retry internally several times. If it still doesn't match after the 3-minute timeout, the request will return a 422 error. This means your selector likely does not exist in the final HTML, or is too fragile to be reliable.
### Common reasons for the 422 error when using wait\_for
### Selector Not Present in Final HTML
1. Open the page
2. Right-click the target content and choose “Inspect”
3. Check if your selector exists after the page fully loads
1. Run `document.querySelectorAll('your_selector')` in the browser console
2. If it returns no elements, your selector is incorrect
1. Use simple selectors like `.class` or `#id`
2. Prefer stable attributes like `[data-testid="item"]`
3. Avoid overly specific or deep descendant selectors
### Dynamic or Fragile Selectors
Some websites use auto-generated class names that change frequently. These are considered **dynamic** and unreliable.
* Re-check the page in DevTools if a previously working selector fails.
* Look for stable attributes like `data-*`.
* Use attribute-based selectors, which are more stable.
Instead of this:
```python Python theme={null}
params = {'wait_for': '.xY7zD1'} # e.g., Google Search
params = {'wait_for': '.product_list__V9tjod'} # A mix of readable and random
```
Use stable alternatives:
```python Python theme={null}
params = {'wait_for': '[data-testid="product-list"]'}
params = {'wait_for': 'img[src$=".jpg"]'}
params = {'wait_for': '[data-products="item"]'}
```
You can also combine multiple fallback selectors:
```python Python theme={null}
params = {'wait_for': '.product, .listing, [data-products="item"]'}
```
Track your CSS selectors over time. When the target website changes its structure, you'll likely need to update your selectors.
### Content Is Conditional or Missing
When scraping at scale, it's common to encounter pages where the expected content is missing or appears under certain conditions.
#### Common Scenarios Where Selectors Might Fail
* **Out-of-stock products**: The product is valid, but some elements like the price or “Add to cart” button are missing.
* **Deleted or unavailable pages**: You may be accessing product URLs directly, but the product has been removed. The site may return a 404 error or a custom error page without updating the URL.
* **Failed pages**: The page might fail to load properly causing your selector to not match any on the HTML.
* **Conditional rendering**: Some content is only rendered based on user location, browser behavior, or scrolling. Especially on JavaScript-heavy websites.
#### How to Handle It
Use the following ZenRows parameters to help identify these cases:
1. `original_status=true` Returns the original HTTP status from the target site. Helps distinguish between a bad selector and a broken page.
```python Python theme={null}
params = {
'original_status': 'true'
}
```
For more details check the [Original Status Documentation](/universal-scraper-api/features/other#original-http-code)
2. `allowed_status_codes=404,500` Lets you capture and analyze error pages instead of discarding them.
```python Python theme={null}
params = {
'allowed_status_codes': '404,500,503'
}
```
For more details check the [Allowed Status Codes Documentation](/universal-scraper-api/features/other#return-content-on-error)
3. **Best practices:**
* Anticipate that some selectors may not match if content is missing or the page structure changes.
* Consider checking for fallback selectors or error indicators (like a 404 message or error class).
* Monitor your scraping jobs for unexpected increases in 422 errors, which may indicate site changes, missing data, or blocking.
### The CSS Selector Exists but Still Fails
Sometimes, your CSS selector is correct but still triggers a 422 error. Here are possible causes:
* **CSS selector is present but hidden (`display: none`)** ZenRows considers it valid. If you need a visible element, consider using a child or wrapper that only appears when the content is shown.
You can find more information about advanced CSS selectors [here](/universal-scraper-api/troubleshooting/advanced-css-selectors).
* **CSS selector appears after user interaction** Use the [`js_instructions`](/universal-scraper-api/features/js-instructions) to simulate a click or scroll action first.
* **The page relies on external scripts (slow loading)** Try a different `wait_for` selector that appears earlier in the loading process. Alternatively, switch to our Scraping Browser, which offers longer session times and allows you to manipulate requests more deeply through Puppeteer or Playwright.
* **CSS selector Typos:** Double-check for spelling errors, missing dots (.) for classes, or missing hashes (#) for IDs.
### Alternative: Manual Wait
Instead of waiting for a selector, you can add a fixed delay using the `wait` parameter:
```python Python theme={null}
params = {'wait': 10000,} # Wait of 10 seconds
```
Useful when dynamic elements take time to appear but don't have consistent selectors. The maximum wait time is 30 seconds.
### Combine with Premium Proxy for Protected Sites
Use Wait For with Premium Proxy for maximum effectiveness:
```python Python theme={null}
params = {
'url': url,
'apikey': apikey,
'js_render': 'true',
'wait_for': '.price',
'premium_proxy': 'true',
}
```
## Real-World Case Example
Let's say you're targeting the product grid on `scrapingcourse.com/ecommerce/`, and your request fails with a 422 error while your `wait_for` CSS selector is:
```python Python theme={null}
params = {'wait_for': '.lists-product',}
```
This selector is syntactically valid, but it does **not match any element in the HTML** of the target page, so ZenRows cannot proceed and returns a 422 error.
Inspecting the product section reveals the correct selectors:
```php HTML theme={null}
```
**Valid alternatives:**
```python Python theme={null}
params = {'wait_for': '#product-list'} # Waits for the ID 'product-list'
params = {'wait_for': '.products .product'} # Waits for any product in the product list
params = {'wait_for': '[data-products="item"]'} # Waits for any product item using a data attribute
params = {'wait_for': 'h2.product-name'} # Waits for product names
params = {'wait_for': '[data-testid="product-list"]'} # Waits for the entire product list container
```
## CSS Selector Cheat Sheet
| Selector | Example | Use Case |
| --------------- | ---------------------- | ----------------------------------------------- |
| `.class` | `.price` | Wait for an elements with class “price” |
| `#id` | `#main-content` | Wait for an element with ID “main-content” |
| `[data-attr]` | `[data-loaded="true"]` | Wait for attribute presence |
| `[attr^="val"]` | `[id^="item-"]` | Attribute starts with “item-” |
| `[attr$="val"]` | `[src$=".png"]` | Attribute ends with “.png” |
| `A > B` | `.list > .item` | Direct child of a parent |
| `A B` | `.list .item` | Any descendant item inside a parent |
| `A, B` | `.price, .discount` | Match either `.price` or `.discount` |
| `:nth-child(n)` | `li:nth-child(2)` | Select the 2nd child (or any Nth) of its parent |
| `:first-child` | `div:first-child` | First child of a parent element |
| `:last-child` | `div:last-child` | Last child of a parent element |
## Pricing
The `wait_for` parameter doesn't increase the request cost. You pay the JavaScript Render (5 times the standard price) regardless of the wait value you choose.
## Frequently Asked Questions (FAQ)
Yes! Everything in this guide also applies to XPath. ZenRows fully supports XPath in the `wait_for` parameter. Please ensure that you provide a valid expression.
Here's an example based on the HTML below:
```php HTML theme={null}
```
**Working XPath Examples:**
```python Python theme={null}
params = {'wait_for': '//ul[@id="product-list"]/li'} # Waits for any
inside the product list.
params = {'wait_for': '//h2[contains(@class, "product-name")]'} # Waits for a heading with a class containing product-name.
params = {'wait_for': '//span[@class="price" and contains(text(), "69")]'} # Waits for price elements that include the number 69.
```
To test XPath in your browser, open DevTools and use the console command: `$x('//your/xpath')`.
Just as with CSS selectors, ensure that your XPath expressions are accurate and match the final rendered HTML. If not found, you'll still get a 422 error.
If the specified element doesn't appear within the 3-minute timeout limit, ZenRows will return a 422 error. This indicates that the selector could not be found in the rendered HTML. You should verify that your selector is correct and that the element exists on the page.
When both parameters are present, `wait_for` takes precedence and completely overrides the `wait` parameter. ZenRows will ignore the fixed timing and only wait for the specified element to appear.
ZenRows supports standard CSS selectors including classes, IDs, attributes, pseudo-classes, and complex combinations. However, some advanced CSS4 selectors or browser-specific extensions might not be supported.
Test your selector in the browser's DevTools console using `document.querySelector('your-selector')`. A good selector should reliably match the element you want without being so specific that minor page changes break it.
Yes, `wait_for` works perfectly with Premium Proxy. Element monitoring occurs within the browser environment, regardless of the proxy type used, although residential connections may take slightly longer to load content.
The `wait_for` parameter will wait up to 3 minutes (180 seconds) for the specified element to appear. This is the ultimate timeout limit for any ZenRows request when using the Universal Scraper API. If the element doesn't appear within this time, you'll receive a 422 error.
# Make Your First Request with ZenRows' Universal Scraper API
Source: https://docs.zenrows.com/universal-scraper-api/first-request
Learn how to extract data from any website using ZenRows' Universal Scraper API. This guide walks you through creating your first scraping request that can handle sites at any scale.
ZenRows' Universal Scraper API is designed to simplify web scraping. Whether you're dealing with static content or dynamic JavaScript-heavy sites, you can get started in minutes with any programming language that supports HTTP requests.
## 1. Set Up Your Project
### Set Up Your Development Environment
Before diving in, ensure you have the proper development environment and required HTTP client libraries for your preferred programming language. ZenRows works with any language that can make HTTP requests.
While previous versions may work, we recommend using the latest stable versions for optimal performance and security.
Python 3 is recommended, preferably the latest version.
Consider using an IDE like PyCharm or Visual Studio Code with the Python extension.
```bash theme={null}
# Install Python (if not already installed)
# Visit https://www.python.org/downloads/ or use package managers:
# macOS (using Homebrew)
brew install python
# Ubuntu/Debian
sudo apt update && sudo apt install python3 python3-pip
# Windows (using Chocolatey)
choco install python
# Install the requests library
pip install requests
```
If you need help setting up your environment, check out our detailed [Python web scraping setup guide](https://www.zenrows.com/blog/web-scraping-python#setup).
Node.js 18 or higher is recommended, preferably the latest LTS version.
Consider using an IDE like Visual Studio Code or IntelliJ IDEA to enhance your coding experience.
```bash theme={null}
# Install Node.js (if not already installed)
# Visit https://nodejs.org/ or use package managers:
# macOS (using Homebrew)
brew install node
# Ubuntu/Debian (using NodeSource)
curl -fsSL https://deb.nodesource.com/setup_lts.x | sudo -E bash -
sudo apt-get install -y nodejs
# Windows (using Chocolatey)
choco install nodejs
# Install the axios library
npm install axios
```
If you need help setting up your environment, check out our detailed [Node.js scraping guide](https://www.zenrows.com/blog/web-scraping-javascript-nodejs)
Java 8 or higher is recommended, preferably the latest LTS version, and a build tool like Maven or Gradle.
IDEs like IntelliJ IDEA or Eclipse provide excellent Java development support.
```bash theme={null}
# Install Java (if not already installed)
# Visit https://adoptium.net/ or use package managers:
# macOS (using Homebrew)
brew install openjdk
# Ubuntu/Debian
sudo apt update && sudo apt install openjdk-17-jdk
# Windows (using Chocolatey)
choco install openjdk
```
For Maven projects, add this dependency to your `pom.xml`:
```xml xml theme={null}
org.apache.httpcomponents.client5httpclient5-fluent5.2.1
```
PHP 7.4 or higher with cURL extension enabled is recommended, preferably the latest stable version.
Consider editors like PhpStorm or Visual Studio Code with PHP extensions.
```bash theme={null}
# Install PHP (if not already installed)
# Visit https://www.php.net/downloads or use package managers:
# macOS (using Homebrew)
brew install php
# Ubuntu/Debian
sudo apt update && sudo apt install php php-curl
# Windows (using Chocolatey)
choco install php
```
PHP comes with cURL built-in, so no additional packages are needed for basic HTTP requests.
Go 1.16 or higher is recommended, preferably the latest stable version.
Visual Studio Code with the Go extension or GoLand provide excellent Go development environments.
```bash theme={null}
# Install Go (if not already installed)
# Visit https://golang.org/dl/ or use package managers:
# macOS (using Homebrew)
brew install go
# Ubuntu/Debian
sudo apt update && sudo apt install golang-go
# Windows (using Chocolatey)
choco install golang
```
Go's standard library includes the `net/http` package, so no additional dependencies are needed for HTTP requests.
Ruby 2.7 or higher is recommended, preferably the latest stable version.
Consider editors like RubyMine or Visual Studio Code with Ruby extensions.
```bash theme={null}
# Install Ruby (if not already installed)
# Visit https://www.ruby-lang.org/en/downloads/ or use package managers:
# macOS (using Homebrew)
brew install ruby
# Ubuntu/Debian
sudo apt update && sudo apt install ruby-full
# Windows (using Chocolatey)
choco install ruby
# Install the faraday gem
gem install faraday
```
Typically pre-installed on most systems. If not available, install using your system's package manager.
```bash theme={null}
# cURL is typically pre-installed on most systems. If not, install it:
# macOS (using Homebrew)
brew install curl
# Ubuntu/Debian
sudo apt update && sudo apt install curl
# Windows (using Chocolatey)
choco install curl
```
No additional packages needed - cURL works directly from the command line.
### Get Your API Key
[Sign up](https://app.zenrows.com/register?prod=universal_scraper) for a free ZenRows account and get your API key from the [Builder dashboard](https://app.zenrows.com/builder). You'll need this key to authenticate your requests.
## 2. Make Your First Request
Start with a simple request to understand how ZenRows works. We'll use the HTTPBin.io/get endpoint to demonstrate how ZenRows processes requests and returns data.
```python Python theme={null}
# pip install requests
import requests
url = 'https://httpbin.io/get'
apikey = 'YOUR_ZENROWS_API_KEY'
params = {
'url': url,
'apikey': apikey,
}
response = requests.get('https://api.zenrows.com/v1/', params=params)
print(response.text)
```
```javascript Node.js theme={null}
// npm install axios
const axios = require('axios');
const url = 'https://httpbin.io/get';
const apikey = 'YOUR_ZENROWS_API_KEY';
axios({
url: 'https://api.zenrows.com/v1/',
method: 'GET',
params: {
'url': url,
'apikey': apikey,
},
})
.then(response => console.log(response.data))
.catch(error => console.log(error));
```
```java Java theme={null}
import org.apache.hc.client5.http.fluent.Request;
public class APIRequest {
public static void main(final String... args) throws Exception {
String apiUrl = "https://api.zenrows.com/v1/?apikey=YOUR_ZENROWS_API_KEY&url=https%3A%2F%2Fhttpbin.io%2Fget";
String response = Request.get(apiUrl)
.execute().returnContent().asString();
System.out.println(response);
}
}
```
```php PHP theme={null}
```
```go Go theme={null}
package main
import (
"io"
"log"
"net/http"
)
func main() {
client := &http.Client{}
req, err := http.NewRequest("GET", "https://api.zenrows.com/v1/?apikey=YOUR_ZENROWS_API_KEY&url=https%3A%2F%2Fhttpbin.io%2Fget", nil)
resp, err := client.Do(req)
if err != nil {
log.Fatalln(err)
}
defer resp.Body.Close()
body, err := io.ReadAll(resp.Body)
if err != nil {
log.Fatalln(err)
}
log.Println(string(body))
}
```
```ruby Ruby theme={null}
# gem install faraday
require 'faraday'
url = URI.parse('https://api.zenrows.com/v1/?apikey=YOUR_ZENROWS_API_KEY&url=https%3A%2F%2Fhttpbin.io%2Fget')
conn = Faraday.new()
conn.options.timeout = 180
res = conn.get(url, nil, nil)
print(res.body)
```
```bash cURL theme={null}
curl "https://api.zenrows.com/v1/?apikey=YOUR_ZENROWS_API_KEY&url=https%3A%2F%2Fhttpbin.io%2Fget"
```
Replace `YOUR_ZENROWS_API_KEY` with your actual API key and run the script:
```bash Python theme={null}
python your_script.py
```
```bash Node.js theme={null}
node your_script.js
```
```bash Java theme={null}
javac YourScript.java && java YourScript
```
```bash PHP theme={null}
php your_script.php
```
```bash Go theme={null}
go run your_script.go
```
```bash Ruby theme={null}
ruby your_script.rb
```
```bash cURL theme={null}
# The cURL command runs directly in terminal
```
### Expected Output
The script will print the contents of the website, for `HTTPBin.io/get` it's something similar to this:
```json Response theme={null}
{
"args": {},
"headers": {
"User-Agent": "Mozilla/5.0 (Windows NT 10.0; Win64; x64) AppleWebKit/537.36 (KHTML, like Gecko) Chrome/137.0.0.0 Safari/537.36",
// additional headers omitted for brevity...
},
"origin": "38.154.5.224:6693",
"url": "http://httpbin.io/get"
}
```
Perfect! You've just made your first web scraping request with ZenRows.
## 3. Scrape More Complex Websites
Modern websites often use JavaScript to load content dynamically and employ sophisticated anti-bot protection. ZenRows provides powerful features to handle these challenges automatically.
Use the [Request Builder](https://app.zenrows.com/builder) in your ZenRows dashboard to easily configure and test different parameters. Enter the target URL (for this demonstration, the Anti-bot Challenge page) in the **URL to Scrape** field to get started.
### Use Premium Proxies
[Premium Proxies](/universal-scraper-api/features/premium-proxy) provide access to over 55 million residential IP addresses from 190+ countries with 99.9% uptime, ensuring the ability to bypass sophisticated anti-bot protection.
### Enable JavaScript Rendering
[JavaScript Rendering](/universal-scraper-api/features/js-rendering) uses a real browser to execute JavaScript and capture the fully rendered page. This is essential for modern web applications, single-page applications (SPAs), and sites that load content dynamically.
### Combine Features for Maximum Success
For the most protected sites, enable both **JavaScript Rendering** and **Premium Proxies**. This provides the highest success rate for challenging targets.
```python Python theme={null}
import requests
url = 'https://www.scrapingcourse.com/antibot-challenge'
apikey = 'YOUR_ZENROWS_API_KEY'
params = {
'url': url,
'apikey': apikey,
'js_render': 'true',
'premium_proxy': 'true',
}
response = requests.get('https://api.zenrows.com/v1/', params=params)
print(response.text)
```
```javascript Node.js theme={null}
const axios = require('axios');
const url = 'https://www.scrapingcourse.com/antibot-challenge';
const apikey = 'YOUR_ZENROWS_API_KEY';
axios({
url: 'https://api.zenrows.com/v1/',
method: 'GET',
params: {
'url': url,
'apikey': apikey,
'js_render': 'true',
'premium_proxy': 'true',
},
})
.then(response => console.log(response.data))
.catch(error => console.log(error));
```
```java Java theme={null}
import org.apache.hc.client5.http.fluent.Request;
public class APIRequest {
public static void main(final String... args) throws Exception {
String apiUrl = "https://api.zenrows.com/v1/?apikey=YOUR_ZENROWS_API_KEY&url=https%3A%2F%2Fwww.scrapingcourse.com%2Fantibot-challenge&js_render=true&premium_proxy=true";
String response = Request.get(apiUrl)
.execute().returnContent().asString();
System.out.println(response);
}
}
```
```php PHP theme={null}
```
```go Go theme={null}
package main
import (
"io"
"log"
"net/http"
)
func main() {
client := &http.Client{}
req, err := http.NewRequest("GET", "https://api.zenrows.com/v1/?apikey=YOUR_ZENROWS_API_KEY&url=https%3A%2F%2Fwww.scrapingcourse.com%2Fantibot-challenge&js_render=true&premium_proxy=true", nil)
resp, err := client.Do(req)
if err != nil {
log.Fatalln(err)
}
defer resp.Body.Close()
body, err := io.ReadAll(resp.Body)
if err != nil {
log.Fatalln(err)
}
log.Println(string(body))
}
```
```ruby Ruby theme={null}
# gem install faraday
require 'faraday'
url = URI.parse('https://api.zenrows.com/v1/?apikey=YOUR_ZENROWS_API_KEY&url=https%3A%2F%2Fwww.scrapingcourse.com%2Fantibot-challenge&js_render=true&premium_proxy=true')
conn = Faraday.new()
conn.options.timeout = 180
res = conn.get(url, nil, nil)
print(res.body)
```
```bash cURL theme={null}
curl "https://api.zenrows.com/v1/?apikey=YOUR_ZENROWS_API_KEY&url=https%3A%2F%2Fwww.scrapingcourse.com%2Fantibot-challenge&js_render=true&premium_proxy=true"
```
This code sends a GET request to the ZenRows API endpoint with your target URL and authentication. The `js_render` parameter enables JavaScript processing, while `premium_proxy` routes your request through residential IP addresses.
#### Use-case recipes
Here are a few quick recipes you can adapt:
* **Form submission** → Use `js_render` + `js_instructions`.
* **Keep session across requests** → Add `session_id` to maintain session state and IP consistency.
* **Extract structured fields only** → Use `css_extractor` to return just the fields you need.
See the full [Common Use Cases & Recipes](/universal-scraper-api/common-use-cases) guide.
### Run Your Application
Execute your script to test the scraping functionality and verify that your setup works correctly.
```bash Python theme={null}
python your_script.py
```
```bash Node.js theme={null}
node your_script.js
```
```bash Java theme={null}
javac YourScript.java && java YourScript
```
```bash PHP theme={null}
php your_script.php
```
```bash Go theme={null}
go run your_script.go
```
```bash Ruby theme={null}
ruby your_script.rb
```
```bash cURL theme={null}
# The cURL command runs directly in terminal
```
### Example Output
Run the script, and ZenRows will handle the heavy lifting by rendering the page's JavaScript and routing your request through premium residential proxies. The response will contain the entire HTML content of the page:
```html HTML theme={null}
Antibot Challenge - ScrapingCourse.com
You bypassed the Antibot challenge! :D
```
Congratulations! You now have a ZenRows integration that can scrape websites at any scale while bypassing anti-bot protection. You're ready to tackle more advanced scenarios and [customize the API](/universal-scraper-api/api-reference#parameter-overview) to fit your scraping needs.
## Troubleshooting
Request failures can happen for various reasons. While some issues can be resolved by adjusting ZenRows parameters, others are beyond your control, such as the target server being temporarily down.
Below are some quick troubleshooting steps you can take:
When faced with an error, it's essential first to check the error code and message for indications of the error. The most common error codes are:
* **401 Unauthorized** Your API key is missing, incorrect, or improperly formatted. Double-check that you are sending the correct API key in your request headers.
* **429 Too Many Requests** You have exceeded your concurrency limit. Wait for ongoing requests to finish before sending new ones, or consider upgrading your plan for higher limits.
* **413 Content Too Large** The response size exceeds your plan's limit. Use CSS selectors to extract only the needed data, reducing the response size.
* **422 Unprocessable Entity** Your request contains invalid parameter values, or anti-bot protection is blocking access. Review the API documentation to ensure all parameters are correct and supported.
Get more information on the [API Error Codes page](/api-error-codes).
Some websites may require a session, so verifying if the site can be accessed without logging in is a good idea. Open the target page in an incognito browser to check this.
You must handle session management in your requests if authentication credentials are required. You can learn how to scrape a website that requires authentication in our guide: [Web scraping with Python](https://www.zenrows.com/blog/web-scraping-login-python).
Sometimes, the target site may be region-restricted and only accessible to specific locations. ZenRows automatically selects the best proxy, but if the site is only available in concrete regions, specify a geolocation using `proxy_country`.
Here's how to choose a proxy in the US:
```python Python theme={null}
params = {
'premium_proxy': 'true',
'proxy_country': 'us' # <- choose a premium proxy in the US
# other configs...
}
response = requests.get('https://api.zenrows.com/v1/', params=params)
```
```javascript Node.js theme={null}
params: {
'premium_proxy': 'true',
'proxy_country': 'us' // <- choose a premium proxy in the US
// other configs...
},
```
If the target site requires access from a specific region, adding the `proxy_country` parameter will help.
Check out more about it on our [Geolocation Documentation Page](/universal-scraper-api/features/proxy-country).
You can also enhance your request by adding options like `wait` or `wait_for` to ensure the page fully loads before extracting data, improving accuracy.
```python Python theme={null}
# Use a wait parameter or a wait_for parameter
params = {
'wait': '3000', # <- Adds a delay of 3 seconds
# other configs...
}
response = requests.get('https://api.zenrows.com/v1/', params=params)
```
```javascript Node.js theme={null}
params: {
'wait': '3000', // <- Adds a delay of 3 seconds
// other configs...
},
```
Find more details on our [Wait Documentation](/universal-scraper-api/features/wait) on [Wait For Selector Documentation](/universal-scraper-api/features/wait-for).
Network issues or temporary failures can cause your request to fail. Implementing retry logic can solve this by automatically repeating the request.
```python Python theme={null}
import requests
from requests.adapters import HTTPAdapter
from urllib3.util.retry import Retry
# Define the retry strategy
retry_strategy = Retry(
total=4, # Maximum number of retries
status_forcelist=[429, 500, 502, 503, 504], # HTTP status codes to retry on
)
# Create an HTTP adapter with the retry strategy and mount it to session
adapter = HTTPAdapter(max_retries=retry_strategy)
# Create a new session object
session = requests.Session()
session.mount('http://', adapter)
session.mount('https://', adapter)
# Make a request using the session object
response = session.get('https://scrapingcourse.com/ecommerce/')
if response.status_code == 200:
print(f'SUCCESS: {response.text}')
else:
print("FAILED")
```
```javascript Node.js theme={null}
// npm install axios-retry
import axiosRetry from 'axios-retry';
import axios from 'axios';
// Pass the axios instance to the retry function and call it
axiosRetry(axios, {
retries: 3, // Number of retries (Defaults to 3)
});
// Make Axios requests below
axios.get('https://scrapingcourse.com/ecommerce/') // The request is retried if it fails
.then((response) => {
console.log('Data: ', response.data);
}).catch((error) => {
console.log('Error: ', error);
});
```
You can learn more on our [Python requests retry guide](https://www.zenrows.com/blog/python-requests-retry) and [Node.js Axios retry guide](https://www.zenrows.com/blog/axios-retry).
Our support team can assist you if the issue persists despite following these tips. Use the [Builder page](https://app.zenrows.com/builder) or contact us via email to get personalized help from ZenRows experts.
For more solutions and detailed troubleshooting steps, see our [Troubleshooting Guides](/universal-scraper-api/troubleshooting/troubleshooting-guide).
## Next Steps
You now have a solid foundation for web scraping with ZenRows. Here are some recommended next steps to take your scraping to the next level:
* **[Complete API Reference](/universal-scraper-api/api-reference)**: Explore all available parameters and advanced configuration options to customize ZenRows for your specific use cases.
* **[JavaScript Instructions Guide](/universal-scraper-api/features/js-instructions)**: Learn how to perform complex page interactions like form submissions, infinite scrolling, and multi-step workflows.
* **[Output Formats and Data Extraction](/universal-scraper-api/features/output)**: Learn advanced data extraction with CSS selectors, output formats including Markdown and PDF conversion, and screenshot configurations.
* **[Pricing and Plans](/first-steps/pricing)**: Understand how request costs are calculated and choose the plan that best fits your scraping volume and requirements.
## Frequently Asked Questions (FAQ)
To successfully bypass CloudFlare or similar security mechanisms, you'll need to enable both `js_render` and `premium_proxy` in your requests. These features simulate a full browser environment and use high-quality residential proxies to avoid detection.
You can also enhance your request by adding options like `wait` or `wait_for` to ensure the page fully loads before extracting data, improving accuracy.
Check out our documentation about the [wait](/universal-scraper-api/features/wait) and [wait\_for](/universal-scraper-api/features/wait-for) params.
You can configure retry logic to handle failed HTTP requests. Learn more in our [guide on retrying requests](/zenrows-academy/retry-failed-requests).
You can use the `css_extractor` parameter to directly extract content from a page using CSS selectors. Find out more in our [tutorial on data parsing](/zenrows-academy/how-to-extract-data).
Yes! You can use ZenRows alongside Python Requests and BeautifulSoup for HTML parsing. Learn how in our guide on [Python Requests and BeautifulSoup integration](/zenrows-academy/how-to-extract-data#python-with-beautifulsoup).
Yes! You can integrate ZenRows with Node.js and Cheerio for efficient HTML parsing and web scraping. Check out our guide to learn how to combine these tools: [Node.js and Cheerio integration](/zenrows-academy/how-to-extract-data#javascript-with-cheerio).
Use the `js_render` and `js_instructions` features to simulate actions such as clicking buttons or filling out forms. Discover more about interacting with web pages in our [JavaScript instructions guide](/universal-scraper-api/features/js-instructions).
You can scrape multiple URLs simultaneously by making concurrent API calls. Check out our guide on [using concurrency](/universal-scraper-api/features/concurrency#using-concurrency) to boost your scraping speed.
# JavaScript, NodeJS and Cheerio Integration
Source: https://docs.zenrows.com/universal-scraper-api/help/javascript-nodejs-and-cheerio-integration
Learn how to integrate ZenRows API with Axios and Cheerio to scrape any website. From the most basic calls to advanced features such as concurrency and auto-retry. From installation to the final code, we will go step-by-step, explaining everything we code.
To just grab the code, go to the final snippet and copy it. It is commented with the parts that must the filled and helpful remarks for the complicated details.
For the code to work, you will need Node (or nvm) and npm installed. Some systems have it pre-installed. After that, install all the necessary libraries by running `npm install`.
```bash theme={null}
npm install axios axios-retry cheerio
```
You will also need to [register to get your API Key](https://app.zenrows.com/register?p=free).
## Using Axios to Get a Page
The first library we will see is Axios, a "promise based HTTP client for the browser and node.js". It exposes a get method that will call a URL and return a response with the HTML. For the moment, we won't be using any parameters, just as a demo to see how it works.
**Careful! This script will run without any proxy, and the server will see your real IP.** You don't need to execute this snippet.
```javascript theme={null}
const axios = require("axios");
const url = ""; // ... your URL here
axios.get(url).then((response) => {
console.log(response.data); // pages's HTML
});
```
## Calling ZenRows API with Axios
Connecting Axios to ZenRows API is straightforward. `axios.get`'s target will be the API base, and a second parameter is an object with `params`: `apikey` for authentication and `url`. URLs must be [encoded](/universal-scraper-api/faq#how-to-encode-urls), but Axios will handle that when using params.
With this simple change, we will handle all the hassles of scraping, such as proxies rotation, bypassing CAPTCHAs and anti-bot solutions, setting correct headers, and many more. However, there are still some challenges that we will address now. Continue reading.
```javascript theme={null}
const axios = require("axios");
const url = ""; // ... your URL here
const apikey = "YOUR_ZENROWS_API_KEY"; // paste your API Key here
const zenrowsApiBase = "https://api.zenrows.com/v1/";
axios
.get(zenrowsApiBase, {
params: { apikey, url },
})
.then((response) => {
console.log(response.data); // pages's HTML
});
```
## Extracting Basic Data with Cheerio
We will now parse the page's HTML with Cheerio and extract some data. We'll create a simple function `extractContent` to return URL, title, and h1 content. Your custom extracting logic goes there.
Cheerio offers a "jQuery-like" syntax, and it is designed to work on the server. Its `load` method receives a plain HTML and creates a querying function that will allow us to find elements. Then you can query with CSS Selectors and navigate, manipulate, or extract content as a browser would. The resulting selector exposes `text`, which will give us the content in plain text, without tags. Check the docs for more advanced features.
```javascript theme={null}
const axios = require("axios");
const cheerio = require("cheerio");
const url = ""; // ... your URL here
const apikey = "YOUR_ZENROWS_API_KEY"; // paste your API Key here
const zenrowsApiBase = "https://api.zenrows.com/v1/";
const extractContent = (url, $) => ({
// extracting logic goes here
url,
title: $("title").text(),
h1: $("h1").text(),
});
axios
.get(zenrowsApiBase, {
params: { apikey, url },
})
.then((response) => {
const $ = cheerio.load(response.data);
const content = extractContent(url, $);
console.log(content); // custom scraped content
});
```
## List of URLs with Concurrency
We've seen how to scrape a single URL. Instead, we will now introduce a list of URLs closer to an actual use case. We'll also set up concurrency so we don't have to wait for the sequential process to finish. It will allow the script to process several URLs simultaneously, always with a maximum. That number depends on the plan you are in.
ZenRows JavaScript SDK provides full concurrency support, as JavaScript's support is limited.
```bash theme={null}
npm i zenrows
```
It will enqueue and execute all our requests. And it will do so by handling the parallelism for us and the maximum number of requests going on simultaneously, but never over the limit (10 in the example). Once all the requests finish, we will print the results. In a real case, for example, store them in a database.
```javascript theme={null}
const { ZenRows } = require("zenrows");
const cheerio = require("cheerio");
const apikey = "YOUR_ZENROWS_API_KEY"; // paste your API Key here
const urls = [
// ... your URLs here
];
(async () => {
const client = new ZenRows(apiKey, { concurrency: 10 });
const extractContent = (url, $) => ({
// extracting logic goes here
url,
title: $("title").text(),
h1: $("h1").text(),
});
const scrapeUrl = async (url) => {
try {
const response = await client.get(url);
const $ = cheerio.load(response.data);
return extractContent(url, $);
} catch (error) {
return { url, error: error.message };
}
};
const promises = urls.map((url) => scrapeUrl(url));
const results = await Promise.allSettled(promises);
console.log(results);
/*
[
{
status: "fulfilled",
value: {
url: "YOUR_FIRST_URL",
title: "First Title",
h1: "Some Important H1"
}
},
...
]
*/
})();
```
## Auto-Retry Failed Requests
The last step to having a robust scraper is to retry failed requests. We could use axios-retry, but the [SDK already does that](/universal-scraper-api/features/concurrency#zenrows-sdk-for-javascript).
The basic idea goes like this:
1. Identify the failed requests based on the return status code.
2. Wait an arbitrary amount of time. Using the library's `exponentialDelay` will increment exponentially plus a random margin between attempts.
3. Retry the request until it succeeds or reaches a maximum amount of retries.
Keep in mind that all the retries will take place on the same concurrency thread, effectively blocking it. Some errors are temporary, so retrying might not solve the issue. For those cases, a better strategy would be to store the URL as failed and enqueue it again after some minutes.
Passing a integer value on the SDK constructor is enough to set the number of retries you want. Visit the article on [Retry Failed Requests](/zenrows-academy/retry-failed-requests) for more info.
```javascript theme={null}
const { ZenRows } = require("zenrows");
// same snippet as above
const apikey = "YOUR_ZENROWS_API_KEY"; // paste your API Key here
const client = new ZenRows(apiKey, { concurrency: 10, retries: 3 });
```
If the implementation does not work for your use case or you have any problem, contact us and we'll gladly help you.
# Python Requests and BeautifulSoup Integration
Source: https://docs.zenrows.com/universal-scraper-api/help/python-requests-and-beautifulsoup-integration
Learn how to integrate ZenRows API with Python Requests and BeautifulSoup to extract the data you want. From basic calls to advanced features such as auto-retry and concurrency. We will walk over each stage of the process, from installation to final code, explaining everything we code.
For a short version, go to the final code and copy it. It is commented with the parts that must be completed and helpful suggestions for the more challenging details.
For the code to work, you will need python3 installed. Some systems have it pre-installed. After that, install all the necessary libraries by running `pip install`.
```bash theme={null}
pip install requests beautifulsoup4
```
You will also need to [register to get your API Key](https://app.zenrows.com/register?p=free).
## Using Requests to Get a Page
The first library we will see is `requests`, an HTTP library for Python. It exposes a `get` method that will call a URL and return its HTML. For the time being, we won't be utilizing any parameters; this is simply a demo to see how it works.
**Careful! This script will execute without any proxy so that the server will see your actual IP.** You don't need to run this snippet.
```python theme={null}
import requests
url = "" # ... your URL here
response = requests.get(url)
print(response.text) # pages's HTML
```
## Calling ZenRows API with Requests
Connecting requests to ZenRows API is straightforward. `get`'s target will be the API base and then two params: `apikey` for authentication and `url`. URLs must be [encoded](/universal-scraper-api/faq#how-to-encode-urls); however, `requests` will handle that when using `params`.
With this simple update, we will manage most scraping problems, such as proxy rotation, setting correct headers, avoiding CAPTCHAs and anti-bot solutions, and many more. But there are a few issues that we will address now. Keep on reading.
```python theme={null}
import requests
url = "" # ... your URL here
apikey = "YOUR_ZENROWS_API_KEY" # paste your API Key here
zenrows_api_base = "https://api.zenrows.com/v1/"
response = requests.get(zenrows_api_base, params={
"apikey": apikey,
"url": url,
})
print(response.text) # pages's HTML
```
## Extracting Basic Data with BeautifulSoup
We'll now use BeautifulSoup to parse the HTML on the page and extract some data. We will write a simple function called `extract_content` that returns URL, title, and h1 content. There is where you can put your custom extracting logic.
```python theme={null}
import requests
from bs4 import BeautifulSoup
url = "" # ... your URL here
apikey = "YOUR_ZENROWS_API_KEY" # paste your API Key here
zenrows_api_base = "https://api.zenrows.com/v1/"
def extract_content(url, soup):
# extracting logic goes here
return {
"url": url,
"title": soup.title.string,
"h1": soup.find("h1").text,
}
response = requests.get(zenrows_api_base, params={
"apikey": apikey,
"url": url,
})
soup = BeautifulSoup(response.text, "html.parser")
content = extract_content(url, soup)
print(content) # custom scraped content
```
## List of URLs with Concurrency
Up until now, we were scraping a single URL. Instead, we will now introduce a list of URLs more relevant to a real-world use case. In addition, we will set up concurrency, so we don't have to wait for the sequential process to complete. It will allow the script to process multiple URLs simultaneously, always with a maximum. That number is determined by the plan you are in.
In short, `multiprocessing` package implements a `ThreadPool` that will queue and execute all our requests. And it will do so by handling the parallelism for us and the maximum number of requests going on simultaneously, but never over the limit (10 in the example). Once all the requests finish, it will group all the results in a single variable, and we will print them. In a real case, for example, store them in a database.
Note that this is not a queue; we can add no new URLs once the process initiates. If that is your use case, check out our guide on how to [Scrape and Crawl from a Seed URL](/zenrows-academy/scrape-and-crawl-from-a-seed-url).
```python theme={null}
import requests
from bs4 import BeautifulSoup
from multiprocessing.pool import ThreadPool
apikey = "YOUR_ZENROWS_API_KEY" # paste your API Key here
zenrows_api_base = "https://api.zenrows.com/v1/"
concurrency = 10
urls = [
# ... your URLs here
]
def extract_content(url, soup):
# extracting logic goes here
return {
"url": url,
"title": soup.title.string,
"h1": soup.find("h1").text,
}
def scrape_with_zenrows(url):
response = requests.get(zenrows_api_base, params={
"apikey": apikey,
"url": url,
})
soup = BeautifulSoup(response.text, "html.parser")
return extract_content(url, soup)
pool = ThreadPool(concurrency)
results = pool.map(scrape_with_zenrows, urls)
pool.close()
pool.join()
[print(result) for result in results] # custom scraped content
```
## Auto-Retry Failed Requests
The final step in creating a robust scraper is to retry on failed requests. We will be using `Retry` from urllib3 and `HTTPAdapter` from requests.
The basic idea is as follows:
1. Using the return status code, identify the failed requests.
2. Wait an arbitrary amount of time. In our example, it will grow exponentially between tries.
3. Retry the request until it succeeds or reaches a maximum number of retries.
Fortunately, we can use these two libraries to implement that behavior. We must first configure `Retry` and then mount the `HTTPAdapter` for a requests session. Unlike the previous ones, we won't be calling `requests.get` directly but `requests_session.get`. Once created the session, it will use the same adapter for all subsequent calls.
For more information, visit the article on [Retry Failed Requests](/zenrows-academy/retry-failed-requests).
```python theme={null}
import requests
from bs4 import BeautifulSoup
from multiprocessing.pool import ThreadPool
from requests.adapters import HTTPAdapter
from urllib3.util.retry import Retry
apikey = "YOUR_ZENROWS_API_KEY" # paste your API Key here
zenrows_api_base = "https://api.zenrows.com/v1/"
urls = [
# ... your URLs here
]
concurrency = 10 # maximum concurrent requests, depends on the plan
requests_session = requests.Session()
retries = Retry(
total=3, # number of retries
backoff_factor=1, # exponential time factor between attempts
status_forcelist=[429, 500, 502, 503, 504] # status codes that will retry
)
requests_session.mount("http://", HTTPAdapter(max_retries=retries))
requests_session.mount("https://", HTTPAdapter(max_retries=retries))
def extract_content(url, soup):
# extracting logic goes here
return {
"url": url,
"title": soup.title.string,
"h1": soup.find("h1").text,
}
def scrape_with_zenrows(url):
try:
response = requests_session.get(zenrows_api_base, params={
"apikey": apikey,
"url": url,
})
soup = BeautifulSoup(response.text, "html.parser")
return extract_content(url, soup)
except Exception as e:
print(e) # will print "Max retries exceeded"
pool = ThreadPool(concurrency)
results = pool.map(scrape_with_zenrows, urls)
pool.close()
pool.join()
[print(result) for result in results if result] # custom scraped content
```
If you have any problem with the implementation or it does not work for your use case, contact us and we'll help you.
# Get Started with ZenRows® Universal Scraper API in Node.js
Source: https://docs.zenrows.com/universal-scraper-api/nodejs
This guide will walk you through the steps to get started with ZenRows in Node.js, from installing the necessary packages to performing your first API request. ZenRows simplifies web scraping by handling anti-bot measures and rendering JavaScript-heavy sites, allowing you to focus on data extraction without worrying about site protection mechanisms. Let's dive in!
## How to Use ZenRows with Node.js
Before starting, ensure you have Node.js 18+ installed on your machine. Using an IDE like Visual Studio Code or IntelliJ IDEA will also enhance your coding experience.
We'll create a Node.js script named `scraper.js` inside a `/scraper` directory. If you need help setting up your environment, check out our [Node.js scraping guide](https://www.zenrows.com/blog/web-scraping-javascript-nodejs) for detailed instructions on preparing everything.
### Install Node.js's Axios Library
To interact with the ZenRows API in a Node.js environment, you can use the popular HTTP client library, Axios. Axios simplifies making HTTP requests and handling responses, making it an ideal choice for integrating with web services such as ZenRows.
To install `axios` in your Node.js project, run the following command in your terminal:
```bash theme={null}
npm install axios
```
This command will install the Axios library, which allows you to easily send HTTP requests from your Node.js applications. Once installed, you can start making API calls to ZenRows, retrieving data efficiently while managing different aspects of the request and response cycle.
### Perform Your First API Request
In this step, you will send your first request to ZenRows using the Axios library to scrape content from a simple URL. We will use the HTTPBin.io/get endpoint to demonstrate how ZenRows processes the request and returns the data.
Here's an example:
```javascript scraper.js theme={null}
// npm install axios
const axios = require('axios');
const url = 'https://httpbin.io/get';
const apikey = 'YOUR_ZENROWS_API_KEY';
axios({
url: 'https://api.zenrows.com/v1/',
method: 'GET',
params: {
'url': url,
'apikey': apikey,
},
})
.then(response => console.log(response.data))
.catch(error => console.log(error));
```
Replace `YOUR_ZENROWS_API_KEY` with your actual API key and run the script:
```bash theme={null}
node scraper.js
```
The script will print something similar to this:
```json theme={null}
{
"args": {},
"headers": {
"User-Agent": "Mozilla/5.0 (Windows NT 10.0; Win64; x64) AppleWebKit/537.36 (KHTML, like Gecko) Chrome/137.0.0.0 Safari/537.36",
// additional headers omitted for brevity...
},
"origin": "38.154.5.224:6693",
"url": "http://httpbin.io/get"
}
```
The response includes useful information such as the origin, which shows the IP address from which the request was made. ZenRows automatically rotates your IP address and adjusts the User-Agent for each request, ensuring anonymity and preventing blocks.
Congratulations! You've just made your first web scraping request with Node.js and Axios.
### Scrape More Complex Web Pages
While scraping simple sites like HTTPBin is straightforward, many websites, especially those with dynamic content or strict anti-scraping measures, require additional features. ZenRows allows you to bypass these defenses by enabling [JavaScript Rendering](/universal-scraper-api/features/js-rendering) and using [Premium Proxies](/universal-scraper-api/features/premium-proxy).
For example, if you try to scrape a page like G2's Jira reviews without any extra configurations, you'll encounter an error:
```json theme={null}
{
"code":"REQS002",
"detail":"The requested URL domain needs JavaScript rendering and/or Premium Proxies due to its high-level security defenses. Please retry by adding 'js_render' and/or 'premium_proxy' parameters to your request.",
"instance":"/v1",
"status":400,
"title":"Www.g2.com requires javascript rendering and premium proxies enabled (REQS002)",
"type":"https://docs.zenrows.com/api-error-codes#REQS002"
}
```
This error happens because G2 employs advanced security measures that block basic scraping attempts.
Here's how you can modify the request to enable both:
```javascript scraper.js theme={null}
// npm install axios
const axios = require('axios');
const url = 'https://www.g2.com/products/jira/reviews';
const apikey = 'YOUR_ZENROWS_API_KEY';
axios({
url: 'https://api.zenrows.com/v1/',
method: 'GET',
params: {
'url': url,
'apikey': apikey,
'js_render': 'true',
'premium_proxy': 'true',
},
})
.then(response => console.log(response.data))
.catch(error => console.log(error));
```
Run the script, and this time, ZenRows will handle the heavy lifting by rendering the page's JavaScript and routing your request through premium residential proxies. The response will contain the entire HTML content of the page:
```html theme={null}
Jira Reviews 2024: Details, Pricing, & Features | G2
 | Extract *src* attribute using XPath | \{"xpath": "image.png"} |
If you are interested in learning more, you can find a complete reference of CSS Selectors here.
| Extract *src* attribute using XPath | \{"xpath": "image.png"} |
If you are interested in learning more, you can find a complete reference of CSS Selectors here.
