Integrating 2Captcha with ZenRows gives you an extra layer of protection to handle interactive CAPTCHAs that appear on web pages. This guide shows you how to set up 2Captcha with both the ZenRows Universal Scraper API and the ZenRows Scraping Browser.

What Is 2Captcha

2Captcha is a CAPTCHA-solving service that employs humans to solve various types of CAPTCHA challenges. Here’s how 2Captcha works:

  1. The scraper submits the CAPTCHA challenge as a unique key (e.g., sitekey for reCAPTCHA) via 2Captcha’s API.
  2. A human solver receives and solves the CAPTCHA challenge manually.
  3. The human worker returns the CAPTCHA solution as a hashed token.
  4. The scraper supplies the solution token to the site and solves the challenge.

The service is particularly useful for solving in-page CAPTCHAs, ensuring complete CAPTCHA evasion. These include CAPTCHAs attached to form fields or those that appear when you interact with page elements.

You’ll learn to integrate 2Captcha with ZenRows in the next sections of this guide. To demonstrate the solution, we’ll use the reCAPTCHA demo page as the target website.

Integrating 2Captcha With the Universal Scraper API

The Universal Scraper API automatically bypasses website protections, but you should combine it with 2Captcha for interactive or form-based CAPTCHAs. This approach requires minimal code changes and helps handle unexpected blocks.

Step 1: Set up 2Captcha on ZenRows

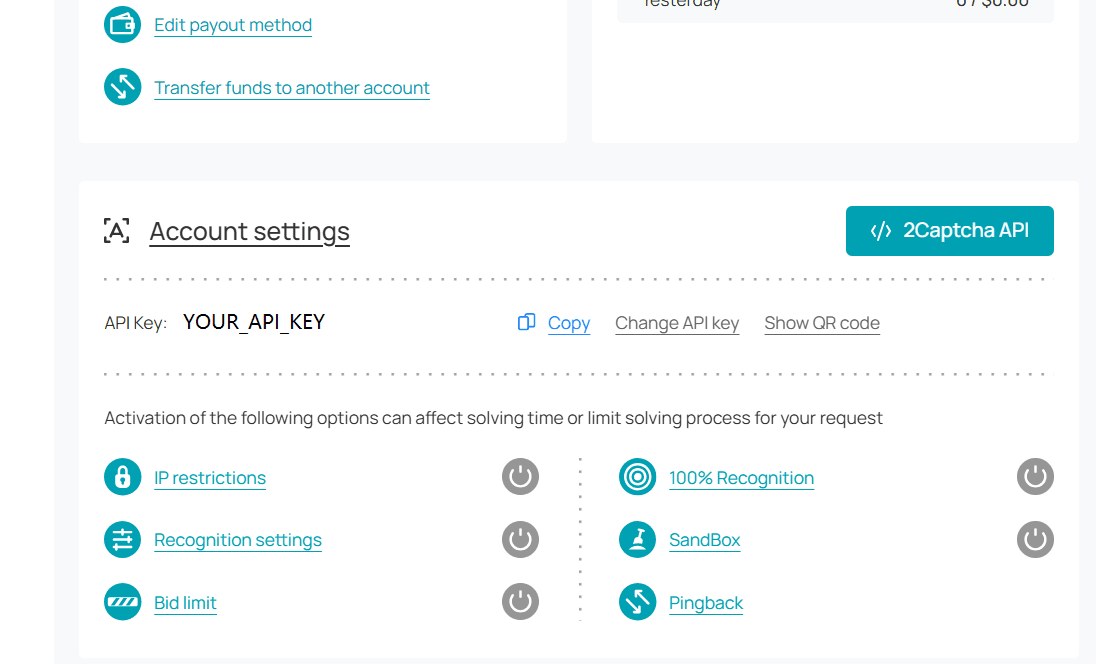
  1. Log in to your 2Captcha dashboard and copy your API key.
  2. Go to the Integrations Page in your ZenRows account and click on Integrations.
  3. Click Manage on the 2Captcha card.
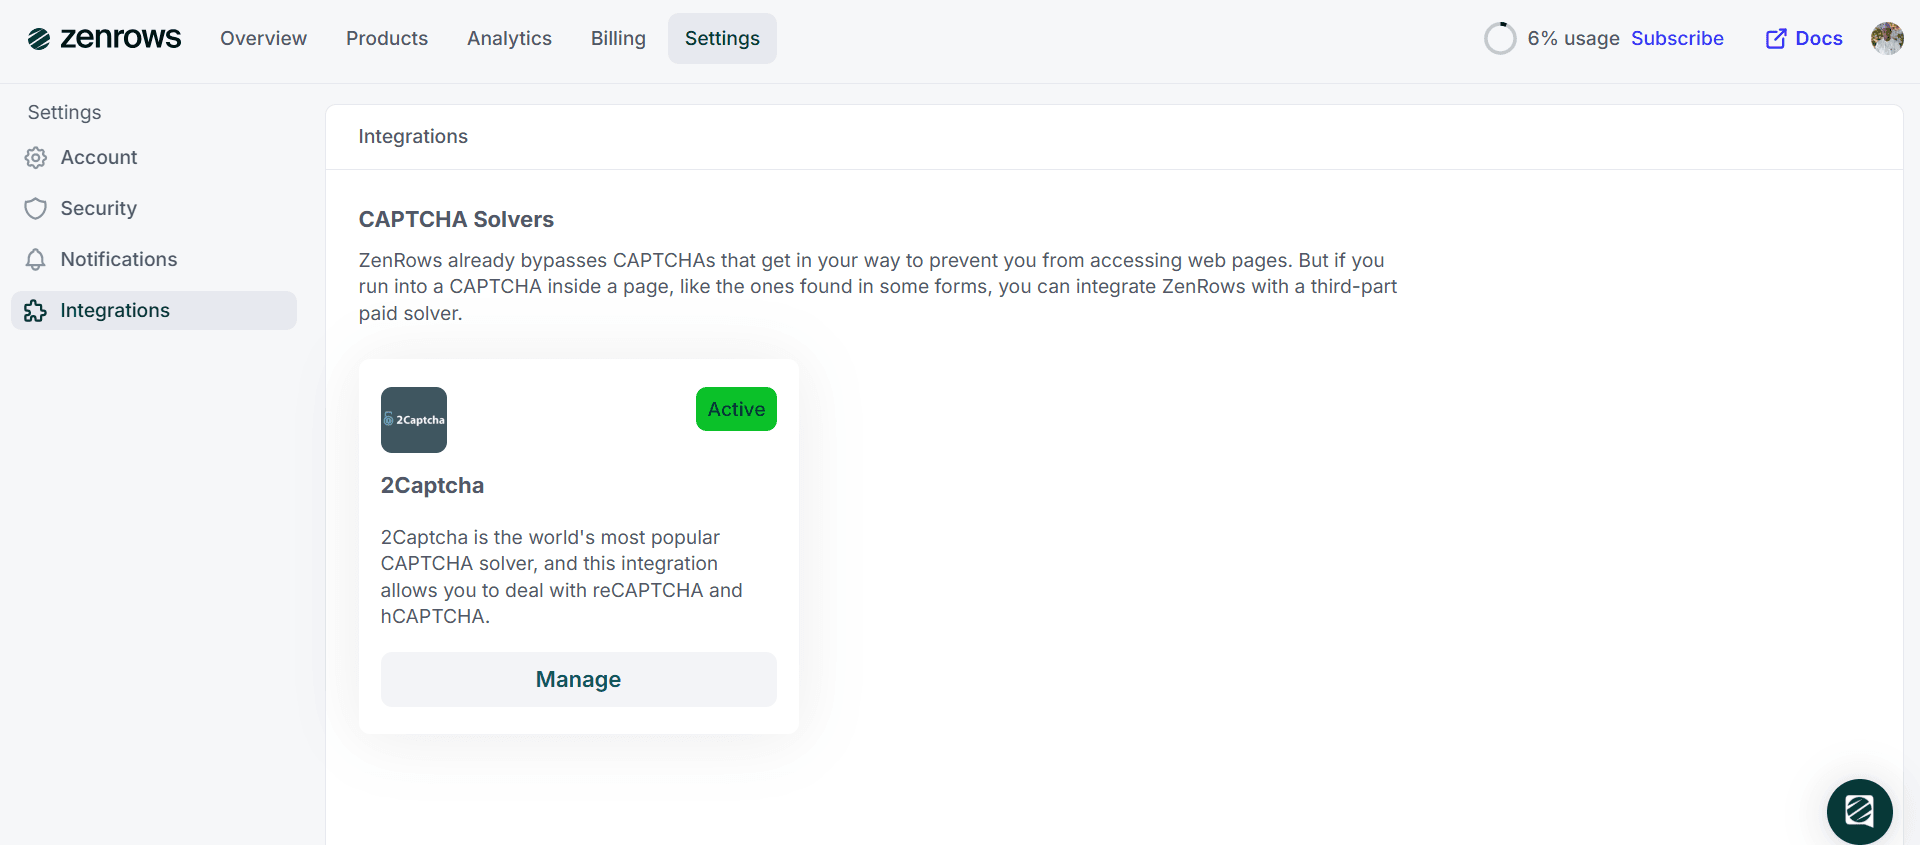
  4. Enter your 2Captcha API key and click Save.

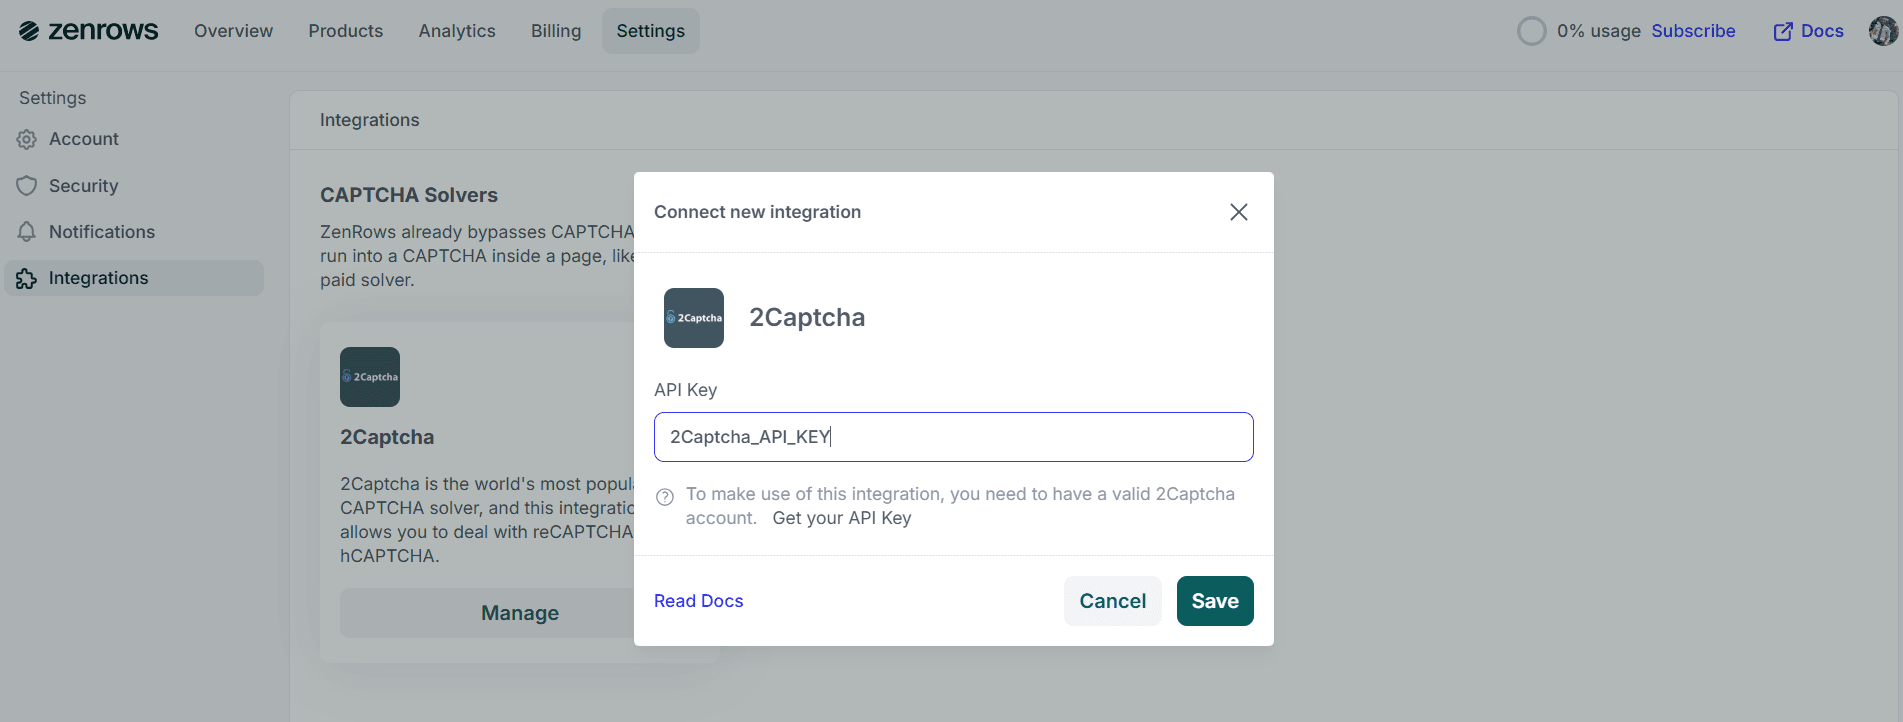
Step 2: Integrate 2Captcha in your scraping request

After adding the 2Captcha ZenRows integration, you need to specify its usage in your Universal Scraper API request via the js_instructions parameter. ZenRows handles all communication between your script and 2Captcha.

The js_instructions parameter accepts a solve_captcha option that specifies which CAPTCHA type you want to solve.

ZenRows’s Universal Scraper API supports these CAPTCHA types for 2Captcha integration:

  • recaptcha: Google reCAPTCHA series, including invisible CAPTCHAs that don’t require user interaction.
  • cloudflare_turnstile: Cloudflare Turnstile CAPTCHAs are typically found on forms and interactive elements.

Here are the supported CAPTCHA types with their configuration options:

[
    // Solve reCAPTCHA
    {"solve_captcha": {"type": "recaptcha"}},

    // Solve Cloudflare Turnstile
    {"solve_captcha": {"type": "cloudflare_turnstile"}},

    // Solve Invisible reCAPTCHA with inactive option
    {"solve_captcha": {"type": "recaptcha", "options": {"solve_inactive": true}}}
]
For more information on the available instructions, check the JavaScript Instructions Documentation page.

Now, let’s implement the js_instructions in your ZenRows request. In this example, the script waits for 3 seconds, solves the reCAPTCHA challenge using 2Captcha, waits 3 seconds for processing, clicks the submit button, and then waits for the success message to be present:

Python
# pip3 install requests
import requests

url = "https://2captcha.com/demo/recaptcha-v2"

def scraper(url):
    apikey = "YOUR_ZENROWS_API_KEY"
    params = {
        "url": url,
        "apikey": apikey,
        "js_render": "true",
        "premium_proxy": "true",
        "json_response": "true",
        "js_instructions": """[
            {"wait": 3000},
            {"solve_captcha":{"type":"recaptcha"}},
            {"wait": 3000},
            {"click": "button[type='submit']"},
            {"wait_for": "._successMessage_1ndnh_1"}
        ]""",
        "css_extractor": """{"success":"p._successMessage_1ndnh_1"}""",
    }
    response = requests.get("https://api.zenrows.com/v1/", params=params)
    return response.json()
The CSS selectors provided in this example (._successMessage_1ndnh_1, button[type='submit']) are specific to the page used in this guide. Selectors may vary across websites. For guidance on customizing selectors, refer to the CSS Extractor documentation. If you’re having trouble, the Advanced CSS Selectors Troubleshooting Guide can help resolve common issues.

Step 3: Confirm you solved the CAPTCHA

You can confirm that the CAPTCHA was successfully solved by checking the response from both the js_instructions and css_extractor:

# confirm if CAPTCHA is bypassed
html_content = scraper(url)
css_extractror_info = html_content.get("css_extractor")
js_instructions_info = html_content.get("js_instructions_report")

print(
    "CSS extractor info:",
    css_extractror_info,
    "\n",
    "JS instructions info:",
    js_instructions_info,
)

Complete Example

Here’s the full working code:

Python
# pip3 install requests
import requests

url = "https://2captcha.com/demo/recaptcha-v2"


def scraper(url):

    apikey = "YOUR_ZENROWS_API_KEY"
    params = {
        "url": url,
        "apikey": apikey,
        "js_render": "true",
        "premium_proxy": "true",
        "json_response": "true",
        "js_instructions": """[
            {"wait": 3000},
            {"solve_captcha":{"type":"recaptcha"}},
            {"wait": 3000},
            {"click": "button[type='submit']"},
            {"wait_for": "._successMessage_1ndnh_1"}
        ]""",
        "css_extractor": """{"success":"p._successMessage_1ndnh_1"}""",
    }
    response = requests.get("https://api.zenrows.com/v1/", params=params)
    return response.json()

### confirm if CAPTCHA is bypassed
html_content = scraper(url)
css_extractror_info = html_content.get("css_extractor")
js_instructions_info = html_content.get("js_instructions_report")

print(
    "CSS extractor info:",
    css_extractror_info,
    "\n",
    "JS instructions info:",
    js_instructions_info,
)

When successful, you’ll see a response like this, confirming the CAPTCHA was solved:

Response
CSS extractor info: {"data": {"success": "Captcha is passed successfully!"}}
JS instructions info: {
    "instructions": [
        # ...
        {
            "duration": 1456,
            "instruction": "solve_captcha",
            "params": {"options": None, "type": "recaptcha"},
            "result": [
                {
                    # ...
                    "response_element": True,
                    "solved": True,
                    # ...
                }
            ],
            "success": True,
        },
        # ...
    ],
    # ...
}

This response is equivalent to manually clicking the “Check” button on the reCAPTCHA demo page to verify the CAPTCHA was solved.

The json_response parameter is used here for debugging purposes. For production use, you can parse the response.text with a parser like BeautifulSoup since the request returns the HTML content that was previously locked behind the CAPTCHA.

Integrating 2Captcha With the ZenRows Scraping Browser

The ZenRows Scraping Browser doesn’t include direct 2Captcha integration, but you can achieve this using the 2Captcha SDK. Here’s how to set it up using Playwright with the Scraping Browser in Python.

Step 1: Install the 2Captcha SDK

First, install the 2Captcha SDK:

pip3 install 2captcha-python

Step 2: Connect to 2Captcha

Import the necessary libraries and create a connection to 2Captcha using your API key:

Python
# pip3 install 2captcha-python playwright
from playwright.async_api import async_playwright
from twocaptcha import TwoCaptcha

# connect to 2Captcha API
two_captcha_api_key = "2Captcha_API_KEY"
solver = TwoCaptcha(two_captcha_api_key)

The solver object handles all communication with the 2Captcha service.

Step 3: Connect to the Scraping Browser and obtain the CAPTCHA Token

Connect to the Scraping Browser, navigate to your target page, and extract the reCAPTCHA sitekey (a unique identifier for the CAPTCHA):

Python
# ...
    
    # scraping browser connection URL
    connection_url = (
        "wss://browser.zenrows.com?apikey=YOUR_ZENROWS_API_KEY"
    )

    async with async_playwright() as p:
        # connect to the browser over CDP (Chrome DevTools Protocol)
        browser = await p.chromium.connect_over_cdp(connection_url)

        # create a new page
        page = await browser.new_page()

        # navigate to the target URL
        await page.goto(url)

        # wait for the reCAPTCHA sitekey to load and extract it
        await page.wait_for_selector("#g-recaptcha")

        site_key = await page.evaluate(
            "document.querySelector('#g-recaptcha').getAttribute('data-sitekey')"
        )

        # solve CAPTCHA
        captcha_response = solver.recaptcha(sitekey=site_key, url=url)

        # extract the reCAPTCHA token from the response
        captcha_token = captcha_response["code"]

This code extracts the sitekey from the reCAPTCHA element and sends it to 2Captcha for solving.

Step 4: Solve the CAPTCHA

When a user solves a CAPTCHA, the solution token gets placed in a hidden input field. You need to simulate this process by injecting the token into the appropriate field:

Python
# ...
async def scraper(url):

    async with async_playwright() as p:
        # ...

        # enter the CAPTCHA token to pass the block
        await page.evaluate(
            """
            (captchaToken) => {
                const responseField = document.getElementById("g-recaptcha-response");
                responseField.style.display = 'block';
                responseField.value = captchaToken;
                responseField.dispatchEvent(new Event('change', { bubbles: true }));
            }
            """,
            captcha_token,
        )

This JavaScript code finds the hidden response field, makes it visible, sets the token value, and triggers a change event to notify the page that the CAPTCHA was solved.

Step 5: Confirm you solved the CAPTCHA

After applying the CAPTCHA solution, you can proceed with your scraping tasks. Let’s verify the solution worked by clicking the submit button and checking the response:

Python
# ...
import time

# ...
async def scraper(url):

    async with async_playwright() as p:
        # ...

        # confirm if the CAPTCHA is passed
        await page.get_by_role("button", name="Check").click()

        time.sleep(10)

        try:
            success_text = await page.text_content("p._successMessage_1ndnh_1")

            if success_text:
                print(success_text)
            else:
                error_text = await page.text_content("div._alertBody_bl73y_16")
                print(error_text)
        except Exception as e:
            print(e)

        # close the browser
        await browser.close()
The CSS selectors provided in this example (._successMessage_1ndnh_1, ._alertBody_bl73y_16) are specific to the page used in this guide. Selectors may vary across websites. For guidance on customizing selectors, refer to the CSS Extractor documentation. If you’re having trouble, the Advanced CSS Selectors Troubleshooting Guide can help resolve common issues.

Run the code using asyncio:

Python
# ...
import asyncio

# ...

url = "https://2captcha.com/demo/recaptcha-v2"
# run the scraper
asyncio.run(scraper(url))

Complete Example

Here’s the full working code:

Python
# pip3 install 2captcha-python playwright
from playwright.async_api import async_playwright
from twocaptcha import TwoCaptcha
import time
import asyncio

# connect to 2Captcha API
two_captcha_api_key = "2Captcha_API_KEY"

solver = TwoCaptcha(two_captcha_api_key)

# scraping browser connection URL
connection_url = "wss://browser.zenrows.com?apikey=YOUR_ZENROWS_API_KEY"


async def scraper(url):

    async with async_playwright() as p:
        # connect to the browser over CDP (Chrome DevTools Protocol)
        browser = await p.chromium.connect_over_cdp(connection_url)

        # create a new page
        page = await browser.new_page()

        # navigate to the target URL
        await page.goto(url)

        # wait for the reCAPTCHA sitekey to load and extract it
        await page.wait_for_selector("#g-recaptcha")

        site_key = await page.evaluate(
            "document.querySelector('#g-recaptcha').getAttribute('data-sitekey')"
        )

        # solve CAPTCHA
        captcha_response = solver.recaptcha(sitekey=site_key, url=url)

        # extract the reCAPTCHA token from the response
        captcha_token = captcha_response["code"]

        # enter the CAPTCHA token to pass the block
        await page.evaluate(
            """
            (captchaToken) => {
                const responseField = document.getElementById("g-recaptcha-response");
                responseField.style.display = 'block';
                responseField.value = captchaToken;
                responseField.dispatchEvent(new Event('change', { bubbles: true }));
            }
            """,
            captcha_token,  # Pass the CAPTCHA token as an argument to the JavaScript function
        )

        # confirm if the CAPTCHA is passed
        await page.get_by_role("button", name="Check").click()

        time.sleep(10)

        try:
            success_text = await page.text_content("p._successMessage_1ndnh_1")

            if success_text:
                print(success_text)
            else:
                error_text = await page.text_content("div._alertBody_bl73y_16")
                print(error_text)
        except Exception as e:
            print(e)

        # close the browser
        await browser.close()


url = "https://2captcha.com/demo/recaptcha-v2"
# run the scraper
asyncio.run(scraper(url))

The above code extracts the following success message from the page:

Captcha is passed successfully!

Congratulations! 🎉 You’ve just integrated 2Captcha with the ZenRows Universal Scraper API and the ZenRows Scraping Browser.

Conclusion

By integrating 2Captcha with ZenRows, you can reliably handle even the toughest CAPTCHAs and keep your scraping workflows running smoothly. Whether you use the Universal Scraper API or the Scraping Browser, this setup helps you automate CAPTCHA solving and reduce manual effort.

Frequently Asked Questions (FAQ)