Use ZenRows’ Proxies in Puppeteer to Avoid Blocks
ZenRows offers residential proxies in 190+ countries that auto-rotate the IP address for you and offer Geolocation and http/https protocols. Integrate them into Puppeteer to appear as a different user every time so that your chances of getting blocked are reduced exponentially. You have three ways to get a proxy with ZenRows, one is via Residential Proxies, where you get our proxy, and it’s charged by the bandwidth; the other way is via the Universal Scraper API’s Premium Proxy, which is our residential proxy for the API, and you are charged by the request, depending on the params you choose; and the third is by using the Scraping Browser where you can integrate into your code with just one line of code. After logging in, you’ll get redirected to the Request Playground page, then go to the Proxies Generator page and create your proxy: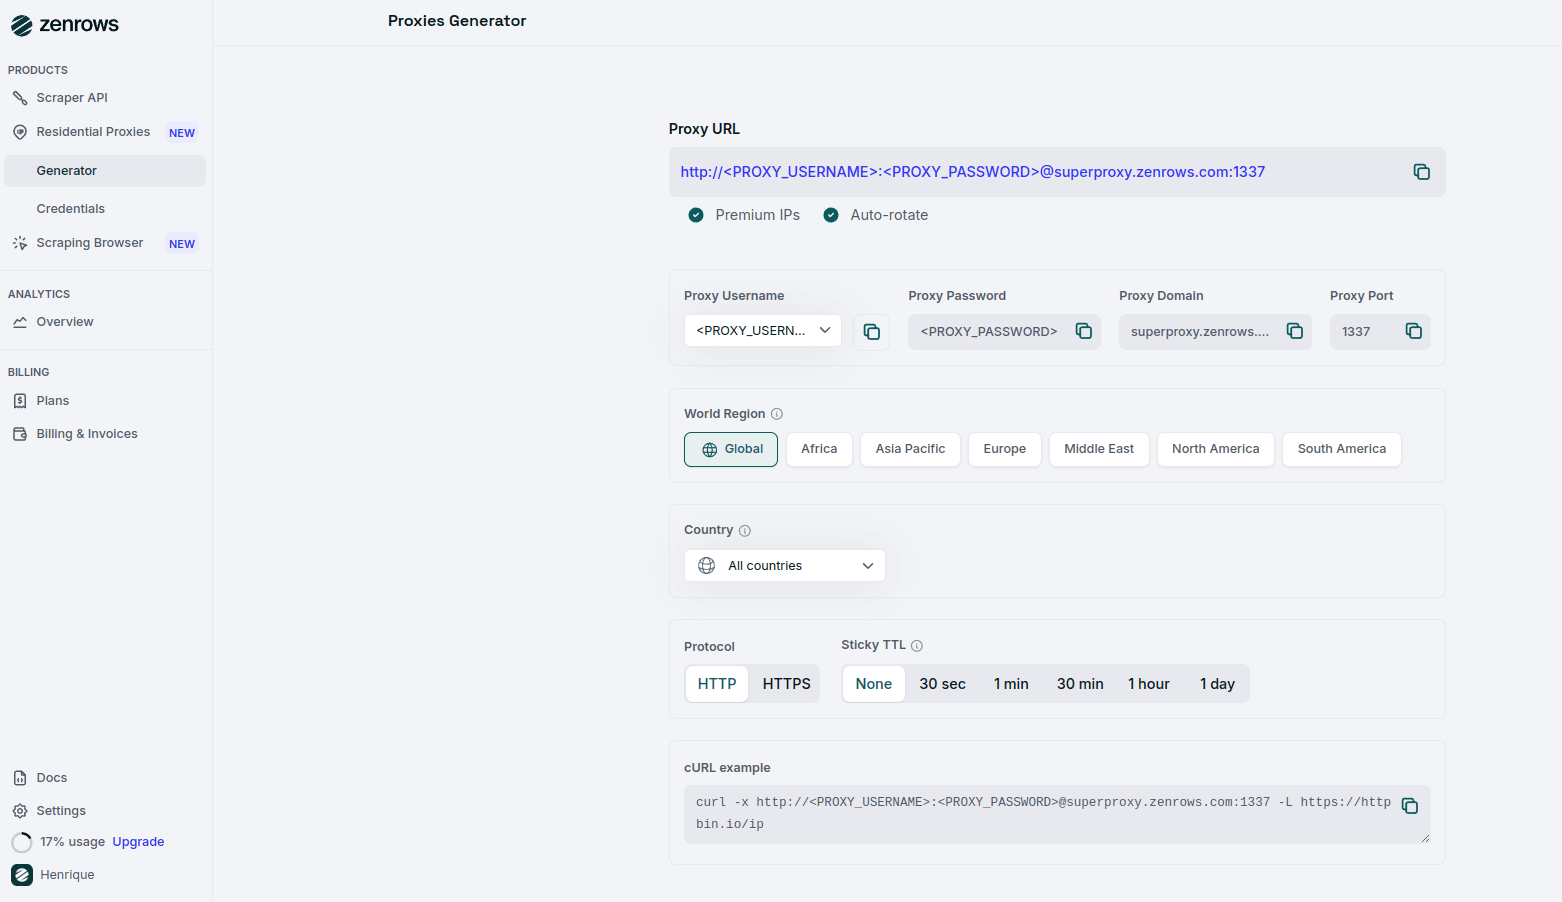
scraper.js
Configure your Residential Proxy in Puppeteer
To use authenticated residential proxies with Puppeteer, you’ll need to use Puppeteer’s--proxy-server flag and then page.authenticate with username and password.
1
Configure the Proxy
To use ZenRows’ premium proxy with Puppeteer, you need to anonymize the proxy URL provided by ZenRows. Replace
<YOUR_USERNAME> and <YOUR_PASSWORD> with your actual ZenRows proxy credentials.scraper.js
2
Launch Puppeteer with the Configured Proxy
Use the anonymized proxy URL to launch Puppeteer:
scraper.js
3
Run Your Script
Execute your script using Node.js:
Troubleshooting
Chrome Not Found Error
If you encounter the errorError: Could not find Chrome, it indicates that Puppeteer is unable to locate the Chrome or Chromium browser on your system. This issue often arises when the browser is installed in a non-standard location or if you’re using a custom installation of Chrome.
To resolve this issue, explicitly specify the path to the Chrome executable in your Puppeteer configuration. You can do this by setting the executablePath option to the correct path where Chrome is installed on your system.
scraper.js
/your/path/to/chrome-or-chromium with the actual path to the Chrome executable on your machine.
Invalid SSL Certificate
You might encounter anet::ERR_CERT_AUTHORITY_INVALID error due to SSL certificate issues. Configure Puppeteer to ignore SSL certificate errors by adding the following flag to the launch options to resolve this.
scraper.js
Stopped by Bot Detection with Puppeteer: CAPTCHAs, WAFs, and Beyond
Many websites employ advanced anti-bot measures like CAPTCHAs and Web Application Firewalls (WAFs) to prevent automated scraping. Simply using proxies may not be enough to bypass these protections. Instead of relying solely on Puppeteer, consider using ZenRows’ Universal Scraper API, which provides:- JavaScript Rendering and Interaction Simulation: Similar to Puppeteer but optimized with anti-bot bypass capabilities.
- Comprehensive Anti-Bot Toolkit: ZenRows offers advanced tools to overcome complex anti-scraping solutions.
Pricing
ZenRows operates on a bandwidth usage model on the Residential Proxies; it is pay-per-success on the Universal Scraper API (that means you only pay for requests that produce the desired result). To optimize your scraper’s success rate, fully replace Puppeteer with ZenRows. Different pages on the same site may have various levels of protection, but using the parameters recommended above will ensure that you are covered. ZenRows offers a range of plans, starting at just $69 monthly. For more detailed information, please refer to our pricing page.Frequently Asked Questions (FAQs)
Why do I need a proxy for Puppeteer?
Why do I need a proxy for Puppeteer?
Puppeteer is widely recognized by websites’ anti-bot systems, which can block your requests. Using residential proxies from ZenRows allows you to rotate IP addresses and appear as a legitimate user, helping to bypass these restrictions and reduce the chances of being blocked.
How do I know if my proxy is working?
How do I know if my proxy is working?
You can test the proxy connection by running the script provided in the tutorial and checking the output from
httpbin.io/ip. If the proxy is working, the response will display a different IP address than your local machine’s.What should I do if my requests are blocked?
What should I do if my requests are blocked?
Many websites employ advanced anti-bot measures, such as CAPTCHAs and Web Application Firewalls (WAFs), to prevent automated scraping. Simply using proxies may not be enough to bypass these protections.Instead of relying solely on proxies, consider using ZenRows’ Universal Scraper API, which provides:
- JavaScript Rendering and Interaction Simulation: Optimized with anti-bot bypass capabilities.
- Comprehensive Anti-Bot Toolkit: ZenRows offers advanced tools to overcome complex anti-scraping solutions.